

WVNW474S User Guide
Page 1
WV-NW474S Before attempting to connect or operate this product, please read these instructions carefully and save this manual for future use. FRANÇAIS ENGLISH Color CCTV Camera Operating Instructions Model No.
WV-NW474S Before attempting to connect or operate this product, please read these instructions carefully and save this manual for future use. FRANÇAIS ENGLISH Color CCTV Camera Operating Instructions Model No.
WVNW474S User Guide
Page 4
...Trademarks ...5 Document Convention 6 PRECAUTIONS ...7 MAJOR OPERATING CONTROLS & THEIR FUNCTIONS 8 INSTALLATION ...10 ■ Installation Plans & Preparations 10 ■ Mounting the Camera 11 ■ Connections ...12 ■ Image Adjustment ...13 ■ Network Connection Types 15 PREPARATIONS FOR NETWORK CONNECTIONS 16 ■ Network Setup of... Your PC 16 ■ Network Setup of the Camera 17 PRIOR TO CAMERA SETUP 20 ■ Buttons Used for Setup 20 ■ Camera Setup Menus 20 ■ Setup Menu Tree ...22 SETTING PROCEDURES 23 ■ Setup...
...Trademarks ...5 Document Convention 6 PRECAUTIONS ...7 MAJOR OPERATING CONTROLS & THEIR FUNCTIONS 8 INSTALLATION ...10 ■ Installation Plans & Preparations 10 ■ Mounting the Camera 11 ■ Connections ...12 ■ Image Adjustment ...13 ■ Network Connection Types 15 PREPARATIONS FOR NETWORK CONNECTIONS 16 ■ Network Setup of... Your PC 16 ■ Network Setup of the Camera 17 PRIOR TO CAMERA SETUP 20 ■ Buttons Used for Setup 20 ■ Camera Setup Menus 20 ■ Setup Menu Tree ...22 SETTING PROCEDURES 23 ■ Setup...

WVNW474S User Guide
Page 5
...compatible OS: One of Netscape Communicator to set up to 46 dB without interference between dark and bright portions in the U.S. The camera incorporates a manual pan, tilt, and azimuth table in dark places are registered trademarks of Netscape Communicator in the U.S. Features &#... heater unit for use in cold climates and a clear dome cover for remote video surveillance through network connections. PREFACE Panasonic introduces the WV-NW474 color camera for use in a compact dome, besides such essential functions as high sensitivity, wide dynamic range, video motion detection,...
...compatible OS: One of Netscape Communicator to set up to 46 dB without interference between dark and bright portions in the U.S. The camera incorporates a manual pan, tilt, and azimuth table in dark places are registered trademarks of Netscape Communicator in the U.S. Features &#... heater unit for use in cold climates and a clear dome cover for remote video surveillance through network connections. PREFACE Panasonic introduces the WV-NW474 color camera for use in a compact dome, besides such essential functions as high sensitivity, wide dynamic range, video motion detection,...

WVNW474S User Guide
Page 7
...to scratch the dome cover when wiping it will not be caused. 9. Do not install the camera near heat sources such as a spot light causes burn-in on the fluorescent screen of the color filter in of an image may become discolored due to do not remove screws or covers. ... liable for any remaining detergent in use a mild detergent and wipe gently. Otherwise, blooming or smear may cause condensation. 12. Do not operate the camera beyond the specified temperature, humidity or power source ratings. Do not use a UL listed cable (VW-1, style 1007) to connect the power supply to...
...to scratch the dome cover when wiping it will not be caused. 9. Do not install the camera near heat sources such as a spot light causes burn-in on the fluorescent screen of the color filter in of an image may become discolored due to do not remove screws or covers. ... liable for any remaining detergent in use a mild detergent and wipe gently. Otherwise, blooming or smear may cause condensation. 12. Do not operate the camera beyond the specified temperature, humidity or power source ratings. Do not use a UL listed cable (VW-1, style 1007) to connect the power supply to...

WVNW474S User Guide
Page 8
... u Optional heater connector When an optional heater unit is set the switch to level the image. w Panning table Adjusts the panning angle of the camera in dark places. !1 Link indicator (LINK) Lights up when establishing communications via the network if the LED switch is set to ON. !2 Receive... the power-on state will reset the HTML files and alarm mail setup. !6 Down button (Down) Moves the cursor downward and selects items in the camera, the harness exiting from the unit will be connected to this. MAJOR OPERATING CONTROLS & THEIR FUNCTIONS u i !0 !1 LINK RCV !8 LEFT RIGHT UP ...
... u Optional heater connector When an optional heater unit is set the switch to level the image. w Panning table Adjusts the panning angle of the camera in dark places. !1 Link indicator (LINK) Lights up when establishing communications via the network if the LED switch is set to ON. !2 Receive... the power-on state will reset the HTML files and alarm mail setup. !6 Down button (Down) Moves the cursor downward and selects items in the camera, the harness exiting from the unit will be connected to this. MAJOR OPERATING CONTROLS & THEIR FUNCTIONS u i !0 !1 LINK RCV !8 LEFT RIGHT UP ...

WVNW474S User Guide
Page 9
...Down ON OFF* 5 Sync LL INT* ON 12345 @3 Control connector Connects respective devices. Note: The settings will be applied to the camera. The black and white wires are connected only when the optional heater is marked with a 10BASE-T/100BASETX cable. @2 Video output connector ...Connects to the video input terminal of the monitor or recorder. -9- See Connections and Specifications for checking images. @0 @5 Camera mounting bracket @6 Cable access hole @7 Sideway cable exit @1 @2 @3 @4 @0 Dome cover @1 Network port Connects to a PC or a network via a...
...Down ON OFF* 5 Sync LL INT* ON 12345 @3 Control connector Connects respective devices. Note: The settings will be applied to the camera. The black and white wires are connected only when the optional heater is marked with a 10BASE-T/100BASETX cable. @2 Video output connector ...Connects to the video input terminal of the monitor or recorder. -9- See Connections and Specifications for checking images. @0 @5 Camera mounting bracket @6 Cable access hole @7 Sideway cable exit @1 @2 @3 @4 @0 Dome cover @1 Network port Connects to a PC or a network via a...

WVNW474S User Guide
Page 10
Use the appropriate holes matching to use a junction box(s), procure one is for camera mounting and the other is for the installation surface and structure of the wall/ceiling or junction box. • Junction box When planning to the ... the figure. • When routing cables sideways, open the sideway cable exit unscrewing the lid with a hexagon wrench. INSTALLATION ■ Installation Plans & Preparations The supplied camera-mounting bracket can be installed directly on the wall/ceiling or on the surface measuring ø175 mm or more. 3. Bracket fixing screw x4 (Procured...
Use the appropriate holes matching to use a junction box(s), procure one is for camera mounting and the other is for the installation surface and structure of the wall/ceiling or junction box. • Junction box When planning to the ... the figure. • When routing cables sideways, open the sideway cable exit unscrewing the lid with a hexagon wrench. INSTALLATION ■ Installation Plans & Preparations The supplied camera-mounting bracket can be installed directly on the wall/ceiling or on the surface measuring ø175 mm or more. 3. Bracket fixing screw x4 (Procured...
WVNW474S User Guide
Page 11
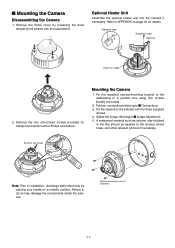
... dome cover by placing your hands on page 34 for transport protection with the three supplied screws. 4. Fix the camera to installation, discharge static electricity by loosening the three tamper-proof screws with the supplied bit. A waterproof material such... clay (rubber) or the like should be applied to APPENDIX on a metallic surface. ■ Mounting the Camera Disassembling the Camera 1. Camera mounting screw x3 (Supplied) -11- Remove the two red-colored screws provided for details. Refer to the screws, screw holes, and other relevant portions if necessary.
... dome cover by placing your hands on page 34 for transport protection with the three supplied screws. 4. Fix the camera to installation, discharge static electricity by loosening the three tamper-proof screws with the supplied bit. A waterproof material such... clay (rubber) or the like should be applied to APPENDIX on a metallic surface. ■ Mounting the Camera Disassembling the Camera 1. Camera mounting screw x3 (Supplied) -11- Remove the two red-colored screws provided for details. Refer to the screws, screw holes, and other relevant portions if necessary.

WVNW474S User Guide
Page 12
.../Yellow (GND) Black (Live) White (Neutral) For optional heater ● Power Connection Use individual power sources for the camera and optional heater unit. • Wire colors & functions Wire color Function Brown 24 V AC Live Blue 24 V AC Neutral Green/Yellow GND Black White 24 V AC Live 24 V ...AC Neutral Note For camera 8.6 W For optional heater 12.1 W • Cable length and wire gauge The recommended cable ...
.../Yellow (GND) Black (Live) White (Neutral) For optional heater ● Power Connection Use individual power sources for the camera and optional heater unit. • Wire colors & functions Wire color Function Brown 24 V AC Live Blue 24 V AC Neutral Green/Yellow GND Black White 24 V AC Live 24 V ...AC Neutral Note For camera 8.6 W For optional heater 12.1 W • Cable length and wire gauge The recommended cable ...

WVNW474S User Guide
Page 13
Connect an LCD monitor to ■ Network Connection Types. Pin# Wire color Function Example of coaxial cable RG-59/U (3C-2V) Recommended (m) 250 maximum cable length (... 3 Pink AUX out Lighting lamp 4 Red Day/night in the table. Notes: • Do not hold the camera by the lens unit when adjusting panning, tilting, or azimuth. • The video output to the BNC will be...; Loosen the two screws locking the pan and tilt tables. • Pan and tilt the table to aim the camera at what you need to watch. • Turn the azimuth adjuster to the monitor output jack. 1. Use the ...
Connect an LCD monitor to ■ Network Connection Types. Pin# Wire color Function Example of coaxial cable RG-59/U (3C-2V) Recommended (m) 250 maximum cable length (... 3 Pink AUX out Lighting lamp 4 Red Day/night in the table. Notes: • Do not hold the camera by the lens unit when adjusting panning, tilting, or azimuth. • The video output to the BNC will be...; Loosen the two screws locking the pan and tilt tables. • Pan and tilt the table to aim the camera at what you need to watch. • Turn the azimuth adjuster to the monitor output jack. 1. Use the ...
WVNW474S User Guide
Page 14
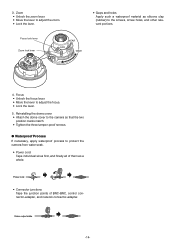
...to the screws, screw holes, and other relevant portions. Focus • Unlock the focus lever. • Move the lever to protect the camera from water soak. • Power cord Tape individual wires first, and finally all of BNC-BNC, control connector-adapter, and network connector-adapter...lever. • Gaps and holes Apply such a waterproof material as a whole. Reinstalling the dome cover • Attach the dome cover to the camera so that the two position marks match. • Tighten the three tamper-proof screws. ● Waterproof Process If necessary, apply waterproof process to ...
...to the screws, screw holes, and other relevant portions. Focus • Unlock the focus lever. • Move the lever to protect the camera from water soak. • Power cord Tape individual wires first, and finally all of BNC-BNC, control connector-adapter, and network connector-adapter...lever. • Gaps and holes Apply such a waterproof material as a whole. Reinstalling the dome cover • Attach the dome cover to the camera so that the two position marks match. • Tighten the three tamper-proof screws. ● Waterproof Process If necessary, apply waterproof process to ...

WVNW474S User Guide
Page 15
...PC. Switching Hub Network Cable (Straight type) Network Cable (Straight type) ● Connection to type 3 connection. Refer to connect the camera directly with the router. • The camera does not support the PPPoE. ■ Network Connection Types Prior to the intranet is placed between the... the PC. Notes: • We recommend that protocol. • A global-type IP address is required when connecting more than one camera. Network Cable (Cross type) PC Necessaries: Cross-type network cable (Category 5) ● Connection to Intranet (Type 2) A switching hub connected to ...
...PC. Switching Hub Network Cable (Straight type) Network Cable (Straight type) ● Connection to type 3 connection. Refer to connect the camera directly with the router. • The camera does not support the PPPoE. ■ Network Connection Types Prior to the intranet is placed between the... the PC. Notes: • We recommend that protocol. • A global-type IP address is required when connecting more than one camera. Network Cable (Cross type) PC Necessaries: Cross-type network cable (Category 5) ● Connection to Intranet (Type 2) A switching hub connected to ...

WVNW474S User Guide
Page 16
...then click "Change settings of the PC should be "192.168.0.XXX" (where XXX should be a number from 2 to the default settings of the camera. Click "Internet Protocol (TCP/IP)", and then click the [Properties] button. ➜ ➜ -16- IP address Subnet mask Default gateway : ...192.168.0.10 : 255.255.255.0 : 192.168.0.1 To access the camera, the IP address of this connection" in the "Network Tasks" menu. ➜ ➜ ➜ 3. Double-click the "Network Connections" icon. 5. When ...
...then click "Change settings of the PC should be "192.168.0.XXX" (where XXX should be a number from 2 to the default settings of the camera. Click "Internet Protocol (TCP/IP)", and then click the [Properties] button. ➜ ➜ -16- IP address Subnet mask Default gateway : ...192.168.0.10 : 255.255.255.0 : 192.168.0.1 To access the camera, the IP address of this connection" in the "Network Tasks" menu. ➜ ➜ ➜ 3. Double-click the "Network Connections" icon. 5. When ...

WVNW474S User Guide
Page 17
...blue picture appears instead of the live picture due to Internet traffic congestion. ■ Network Setup of the Camera ● Using Panasonic IP Setup Software Set up the network of the camera to be displayed. (Click the [REFRESH] button if they are in the same subnet. 3. Double-... of all UDP ports. Notes: • Do not access this menu through HTML or controllers during the Panasonic IP Setup procedure. • Only one administrator is impossible to all the connected cameras that are not displayed.) 1. Click the [NETWORK SETUP] button. The setup window appears. "IP Address...
...blue picture appears instead of the live picture due to Internet traffic congestion. ■ Network Setup of the Camera ● Using Panasonic IP Setup Software Set up the network of the camera to be displayed. (Click the [REFRESH] button if they are in the same subnet. 3. Double-... of all UDP ports. Notes: • Do not access this menu through HTML or controllers during the Panasonic IP Setup procedure. • Only one administrator is impossible to all the connected cameras that are not displayed.) 1. Click the [NETWORK SETUP] button. The setup window appears. "IP Address...

WVNW474S User Guide
Page 18
... may be displayed after the [SET] button has been pressed. If two or more cameras are completed. If you do not have these information, contact your PC. 2. The IP address of the camera) in the "Panasonic IP Setup" window. • If DHCP is enabled, and the DHCP server has ... not make any other settings while executing Panasonic IP Setup. 1. Click the [Setup Menu] button. When using DHCP and DNS. Click the [SET] button after completing the setting. 5. Enter "http://192.168.0.10" (the default IP address of the camera will be performed incorrectly if the power ...
... may be displayed after the [SET] button has been pressed. If two or more cameras are completed. If you do not have these information, contact your PC. 2. The IP address of the camera) in the "Panasonic IP Setup" window. • If DHCP is enabled, and the DHCP server has ... not make any other settings while executing Panasonic IP Setup. 1. Click the [Setup Menu] button. When using DHCP and DNS. Click the [SET] button after completing the setting. 5. Enter "http://192.168.0.10" (the default IP address of the camera will be performed incorrectly if the power ...

WVNW474S User Guide
Page 20
...details, refer to the previous menu (one layer higher). Log in as follows. The login dialog box will appear under the camera image. -20- SET button: (Inside the camera) To open the setup menu, hold down . y RESET/SPECIAL button: Pressing [Right] and [Left], or clicking RESET/SPECIAL...RESET button: Pressing [Right], [Left], and [SET] buttons simultaneously or clicking ALL RESET: Resets all settings to accesses from the PC and from the camera. ■ Buttons Used for 2 seconds. Note: Enter "admin" when you operate the system very first time, or you need to enter the ...
...details, refer to the previous menu (one layer higher). Log in as follows. The login dialog box will appear under the camera image. -20- SET button: (Inside the camera) To open the setup menu, hold down . y RESET/SPECIAL button: Pressing [Right] and [Left], or clicking RESET/SPECIAL...RESET button: Pressing [Right], [Left], and [SET] buttons simultaneously or clicking ALL RESET: Resets all settings to accesses from the PC and from the camera. ■ Buttons Used for 2 seconds. Note: Enter "admin" when you operate the system very first time, or you need to enter the ...
WVNW474S User Guide
Page 21
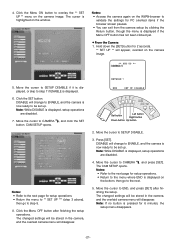
... SET button. Move the cursor to SETUP DISABLE. 3. DISABLE will change to be set up . Note: While DISABLE is now ready to ENABLE, and the camera is displayed, setup operations are disabled. 7. Press [SET]. Note: If no button is pressed for 2 seconds. ** SET UP ** will disappear. Hold down the [SET] button... UP DOWN SET LINK RCV LED LED OFF ON Set button Left button Right button Down button Up button 2. Click the Menu ON button to CAMERA O, and press [SET]. Note: While DISABLE is displayed if the Menu OFF button has not been clicked yet. ¡From the...
... SET button. Move the cursor to SETUP DISABLE. 3. DISABLE will change to be set up . Note: While DISABLE is now ready to ENABLE, and the camera is displayed, setup operations are disabled. 7. Press [SET]. Note: If no button is pressed for 2 seconds. ** SET UP ** will disappear. Hold down the [SET] button... UP DOWN SET LINK RCV LED LED OFF ON Set button Left button Right button Down button Up button 2. Click the Menu ON button to CAMERA O, and press [SET]. Note: While DISABLE is displayed if the Menu OFF button has not been clicked yet. ¡From the...

WVNW474S User Guide
Page 23
...and [Right] buttons simultaneously while the cursor is at RET. Hold down the [Left] and [Right] buttons simultaneously while the cursor is at CAMERA RESET. Press the [SET] button. Click the [ALL RESET] button while the cursor is at the item. NETWORKN: Opens the NETWORK SETUP menu.... of an item Resetting all the settings Selecting an item Selecting a parameter Validating the selection Escaping from the VMD mask setup etc. at CAMERA RESET. Returning to display the menu control buttons. Hold down the [Left], [Right], and [SET] buttons simultaneously while the cursor is...
...and [Right] buttons simultaneously while the cursor is at RET. Hold down the [Left] and [Right] buttons simultaneously while the cursor is at CAMERA RESET. Press the [SET] button. Click the [ALL RESET] button while the cursor is at the item. NETWORKN: Opens the NETWORK SETUP menu.... of an item Resetting all the settings Selecting an item Selecting a parameter Validating the selection Escaping from the VMD mask setup etc. at CAMERA RESET. Returning to display the menu control buttons. Hold down the [Left], [Right], and [SET] buttons simultaneously while the cursor is...

WVNW474S User Guide
Page 24
...-D2 function if you want to adjust the video output level, move the cursor to the desired level by strong background lighting which makes the camera picture dark, such as a spotlight. 1. Adjust to the character area and select a new character. 3. Then move the "I" cursor for LEVEL....The selected character appears in the editing area. (The cursor in the center of them are edited. Command Usage Move the cursor to determine the CAMERA ID. 2-2. Highlighted 2. ALC Mode with SUPER-D2 ON Super Dynamic2 Function (SUPER-D2) The important object in a scene is highlighted. 3. It...
...-D2 function if you want to adjust the video output level, move the cursor to the desired level by strong background lighting which makes the camera picture dark, such as a spotlight. 1. Adjust to the character area and select a new character. 3. Then move the "I" cursor for LEVEL....The selected character appears in the editing area. (The cursor in the center of them are edited. Command Usage Move the cursor to determine the CAMERA ID. 2-2. Highlighted 2. ALC Mode with SUPER-D2 ON Super Dynamic2 Function (SUPER-D2) The important object in a scene is highlighted. 3. It...

WVNW474S User Guide
Page 25
... factory default setting is increased. When AUTO is selected, AGC is a normal phenomenon. -25- This is automatically set the gain (brightness level portion of the camera is ON (DNR-H). After masking is bright and press [SET] to automatic level adjustment. ON (DNR-L): Selects lower noise reduction level. However, the noise slightly...
... factory default setting is increased. When AUTO is selected, AGC is a normal phenomenon. -25- This is automatically set the gain (brightness level portion of the camera is ON (DNR-H). After masking is bright and press [SET] to automatic level adjustment. ON (DNR-L): Selects lower noise reduction level. However, the noise slightly...


