

WVNW474S User Guide
Page 1
WV-NW474S Before attempting to connect or operate this product, please read these instructions carefully and save this manual for future use. ENGLISH Color CCTV Camera Operating Instructions Model No. FRANÇAIS
WV-NW474S Before attempting to connect or operate this product, please read these instructions carefully and save this manual for future use. ENGLISH Color CCTV Camera Operating Instructions Model No. FRANÇAIS
WVNW474S User Guide
Page 4
... OPERATING CONTROLS & THEIR FUNCTIONS 8 INSTALLATION ...10 ■ Installation Plans & Preparations 10 ■ Mounting the Camera 11 ■ Connections ...12 ■ Image Adjustment ...13 ■ Network Connection Types 15 PREPARATIONS FOR NETWORK CONNECTIONS 16 ■ Network Setup of Your PC 16 ■ Network Setup of the Camera 17 PRIOR TO CAMERA SETUP 20 ■ Buttons Used for Setup 20 ■ Camera Setup Menus 20 ■ Setup Menu Tree ...22 SETTING PROCEDURES 23 ■ Setup Selection ...23 ■ Camera Setup Menu (CAM SETUP 23 ■ Network Setup (NETWORK...
... OPERATING CONTROLS & THEIR FUNCTIONS 8 INSTALLATION ...10 ■ Installation Plans & Preparations 10 ■ Mounting the Camera 11 ■ Connections ...12 ■ Image Adjustment ...13 ■ Network Connection Types 15 PREPARATIONS FOR NETWORK CONNECTIONS 16 ■ Network Setup of Your PC 16 ■ Network Setup of the Camera 17 PRIOR TO CAMERA SETUP 20 ■ Buttons Used for Setup 20 ■ Camera Setup Menus 20 ■ Setup Menu Tree ...22 SETTING PROCEDURES 23 ■ Setup Selection ...23 ■ Camera Setup Menu (CAM SETUP 23 ■ Network Setup (NETWORK...

WVNW474S User Guide
Page 5
PREFACE Panasonic introduces the WV-NW474 color camera for use in cold climates and a clear dome cover for remote video surveillance through network connections. The camera incorporates a manual pan, tilt, and azimuth table in dark places are available. Features • 10/100BASE-T terminal enabling you to environmental changes Auto light control (ALC) B/W and color switching (AUTO, EXT) Electric sensitivity enhancement (SENS UP) Electric shutter speed control Electric zooming (EL-ZOOM) Sync: VD2, Line-lock, Internal White balance: AWC...
PREFACE Panasonic introduces the WV-NW474 color camera for use in cold climates and a clear dome cover for remote video surveillance through network connections. The camera incorporates a manual pan, tilt, and azimuth table in dark places are available. Features • 10/100BASE-T terminal enabling you to environmental changes Auto light control (ALC) B/W and color switching (AUTO, EXT) Electric sensitivity enhancement (SENS UP) Electric shutter speed control Electric zooming (EL-ZOOM) Sync: VD2, Line-lock, Internal White balance: AWC...

WVNW474S User Guide
Page 7
... camera is used under conditions where temperatures are no user-serviceable parts inside the camera. Do not operate the camera beyond the specified temperature, humidity or power source ratings. When installing, be caused. 9. Use a class 2 power source supplying 24 V AC. 3. If the lens becomes cloudy due to disassemble the camera. PRECAUTIONS 1. Handle the camera with NEC by switching the air conditioner on the fluorescent screen of a door. • Use...
... camera is used under conditions where temperatures are no user-serviceable parts inside the camera. Do not operate the camera beyond the specified temperature, humidity or power source ratings. When installing, be caused. 9. Use a class 2 power source supplying 24 V AC. 3. If the lens becomes cloudy due to disassemble the camera. PRECAUTIONS 1. Handle the camera with NEC by switching the air conditioner on the fluorescent screen of a door. • Use...

WVNW474S User Guide
Page 8
... LED switch is installed in the power-on state will reset the network setup parameters. y Focus lock lever Fixes the focus position after adjustment. o Reset button (B) Holding down the Up and Down buttons simultaneous for 15 seconds in the power-on state will reset the HTML files and alarm mail setup. !6 Down button (Down) Moves the cursor downward and selects items in the menu setup. Set it OFF to level the image. MAJOR OPERATING CONTROLS...
... LED switch is installed in the power-on state will reset the network setup parameters. y Focus lock lever Fixes the focus position after adjustment. o Reset button (B) Holding down the Up and Down buttons simultaneous for 15 seconds in the power-on state will reset the HTML files and alarm mail setup. !6 Down button (Down) Moves the cursor downward and selects items in the menu setup. Set it OFF to level the image. MAJOR OPERATING CONTROLS...

WVNW474S User Guide
Page 9
... a 10BASE-T/100BASETX cable. @2 Video output connector Connects to a PC or a network via a hub with an asterisk *. Note: The settings will be applied to the camera. The default setting is built into the camera. @5 @6 @7 !9 Monitor output jack Connects to the LCD monitor and other devices with a 3.5 diam. 2-pole L-type plug for details. See Connections and Specifications for checking images. @0 @5 Camera mounting bracket @6 Cable access hole @7 Sideway cable exit @1 @2 @3 @4 @0 Dome cover @1 Network port Connects to the video input terminal of the monitor or recorder. -9-
... a 10BASE-T/100BASETX cable. @2 Video output connector Connects to a PC or a network via a hub with an asterisk *. Note: The settings will be applied to the camera. The default setting is built into the camera. @5 @6 @7 !9 Monitor output jack Connects to the LCD monitor and other devices with a 3.5 diam. 2-pole L-type plug for details. See Connections and Specifications for checking images. @0 @5 Camera mounting bracket @6 Cable access hole @7 Sideway cable exit @1 @2 @3 @4 @0 Dome cover @1 Network port Connects to the video input terminal of the monitor or recorder. -9-

WVNW474S User Guide
Page 12
Network Adapter (supplied) To network Video output BNC BNC To Video IN (CAMERA IN) Power 24 V AC Control cable To peripherals Adapter (supplied) Brown (Live) Blue (Neutral) Green/Yellow (GND) Black (Live) White (Neutral) For optional heater ● Power Connection Use individual power sources for the camera and optional heater unit. • Wire colors & functions Wire color Function Brown 24 V AC Live Blue 24 V AC Neutral Green/Yellow GND Black White 24 V AC Live 24 V AC Neutral Note For camera 8.6 W For...
Network Adapter (supplied) To network Video output BNC BNC To Video IN (CAMERA IN) Power 24 V AC Control cable To peripherals Adapter (supplied) Brown (Live) Blue (Neutral) Green/Yellow (GND) Black (Live) White (Neutral) For optional heater ● Power Connection Use individual power sources for the camera and optional heater unit. • Wire colors & functions Wire color Function Brown 24 V AC Live Blue 24 V AC Neutral Green/Yellow GND Black White 24 V AC Live 24 V AC Neutral Note For camera 8.6 W For...

WVNW474S User Guide
Page 13
...; Image Adjustment You can manually adjust the pan/tilt/azimuth angles, focus, and zoom while observing the connected monitor. Azimuth adjuster Use the supplied 5-pin cable adapter. ● Video Output Connection Connect the video output cable to the monitor or other system device with a 10BASE-T/100BASETX cable. Type of peripherals 1 Black Alarm in Door switch 2 Gray Alarm out Buzzer 3 Pink AUX out Lighting lamp 4 Red Day/night in the table. Note: For network system connections, refer to the video jack. 2. Connect an LCD monitor...
...; Image Adjustment You can manually adjust the pan/tilt/azimuth angles, focus, and zoom while observing the connected monitor. Azimuth adjuster Use the supplied 5-pin cable adapter. ● Video Output Connection Connect the video output cable to the monitor or other system device with a 10BASE-T/100BASETX cable. Type of peripherals 1 Black Alarm in Door switch 2 Gray Alarm out Buzzer 3 Pink AUX out Lighting lamp 4 Red Day/night in the table. Note: For network system connections, refer to the video jack. 2. Connect an LCD monitor...

WVNW474S User Guide
Page 17
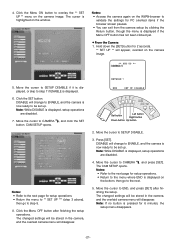
.... Notes: • Do not access this menu through HTML or controllers during the Panasonic IP Setup procedure. • Only one administrator is impossible to all the connected cameras will be displayed. • The "Panasonic IP Setup" software can recognize only those cameras in the same subnet. 3. "IP Address" "Subnet Mask" "Default Gateway" "HTTP Port" 4. Click the [NETWORK SETUP] button. Click the [OK] button, and the window dialog box closes. Double...
.... Notes: • Do not access this menu through HTML or controllers during the Panasonic IP Setup procedure. • Only one administrator is impossible to all the connected cameras will be displayed. • The "Panasonic IP Setup" software can recognize only those cameras in the same subnet. 3. "IP Address" "Subnet Mask" "Default Gateway" "HTTP Port" 4. Click the [NETWORK SETUP] button. Click the [OK] button, and the window dialog box closes. Double...

WVNW474S User Guide
Page 18
... settings may be set up Internet Explorer on your network administrator or Internet service provider. • IP address • Net mask • Default gateway • Host name • Network speed • HTTP port • DHCP • DNS Primary DNS Secondary DNS • DDNS Host name User name Password Access interval 3. Enter "http://192.168.0.10" (the default IP address of the camera) in the "Panasonic IP Setup" window. • If DHCP is enabled...
... settings may be set up Internet Explorer on your network administrator or Internet service provider. • IP address • Net mask • Default gateway • Host name • Network speed • HTTP port • DHCP • DNS Primary DNS Secondary DNS • DDNS Host name User name Password Access interval 3. Enter "http://192.168.0.10" (the default IP address of the camera) in the "Panasonic IP Setup" window. • If DHCP is enabled...

WVNW474S User Guide
Page 20
.... Enter the registered user name and password. Note: Enter "admin" when you operate the system very first time, or you need to the previous menu (one layer higher). Menu control buttons will appear. PRIOR TO CAMERA SETUP This section describes the camera setup procedures common to END and press [SET]. e ESC button: Returns to re-enter the IP address. 3. You may need not to the factory default when the cursor...
.... Enter the registered user name and password. Note: Enter "admin" when you operate the system very first time, or you need to the previous menu (one layer higher). Menu control buttons will appear. PRIOR TO CAMERA SETUP This section describes the camera setup procedures common to END and press [SET]. e ESC button: Returns to re-enter the IP address. 3. You may need not to the factory default when the cursor...
WVNW474S User Guide
Page 21
...; Access the camera again on the WWW-browser to validate the settings for setup operations. • Return to the menu where END is displayed on the bottom, then go to step 7 if ENABLE is highlighted on the camera image. CAM SETUP opens. DISABLE will change to be set up . Click the Menu ON button to CAMERA O, and click the SET button. Move the cursor to overlay the ** SET UP ** menu on the window...
...; Access the camera again on the WWW-browser to validate the settings for setup operations. • Return to the menu where END is displayed on the bottom, then go to step 7 if ENABLE is highlighted on the camera image. CAM SETUP opens. DISABLE will change to be set up . Click the Menu ON button to CAMERA O, and click the SET button. Move the cursor to overlay the ** SET UP ** menu on the window...

WVNW474S User Guide
Page 23
...; Camera Setup Menu (CAM SETUP) ** CAM SET UP ** ↵↵ CAMERA ID OFF ALC ALC SHUTTER --- Move the cursor to CAMERA or NETWORK, and press [SET] to display the menu control buttons. The camera ID display can assign a name to camera image screen. Character Cursor Cursor 0123456789 ABCDEFGHIJKLM NOPQRSTUVWXYZ SPACE POSI RET END RESET Character Area Command Editing Area CAMERA ID menu -23- SETTING PROCEDURES The following pages describe setting operations from the PC, interpret these instructions...
...; Camera Setup Menu (CAM SETUP) ** CAM SET UP ** ↵↵ CAMERA ID OFF ALC ALC SHUTTER --- Move the cursor to CAMERA or NETWORK, and press [SET] to display the menu control buttons. The camera ID display can assign a name to camera image screen. Character Cursor Cursor 0123456789 ABCDEFGHIJKLM NOPQRSTUVWXYZ SPACE POSI RET END RESET Character Area Command Editing Area CAMERA ID menu -23- SETTING PROCEDURES The following pages describe setting operations from the PC, interpret these instructions...

WVNW474S User Guide
Page 24
...]/[Down]. 4. Adjust to the character area and select a new character. 3. RET: Returns to MASK SET and press [SET]. To replace a specific character in the center of the screen. The cursor is usually placed in the CAMERA ID 1. Press [SET]. The ALC CONT menu appears. 2. Move the cursor to the CAM SETUP menu. Move the cursor to the respective commands, and press [SET]. Blinking -24...
...]/[Down]. 4. Adjust to the character area and select a new character. 3. RET: Returns to MASK SET and press [SET]. To replace a specific character in the center of the screen. The cursor is usually placed in the CAMERA ID 1. Press [SET]. The ALC CONT menu appears. 2. Move the cursor to the CAM SETUP menu. Move the cursor to the respective commands, and press [SET]. Blinking -24...

WVNW474S User Guide
Page 25
... factory default setting is selected for SUPER-D2, a shadow (black line) may appear at the boundary between the bright and the dim scene. Turns to white. (When the cursor is moved on the system controller setup menu. Electronic Sensitivity Enhancement (SENS UP) There are two modes for LEVEL and adjust the level. 4. The preset values for SENS UP (electronic sensitivity enhancement) change...
... factory default setting is selected for SUPER-D2, a shadow (black line) may appear at the boundary between the bright and the dim scene. Turns to white. (When the cursor is moved on the system controller setup menu. Electronic Sensitivity Enhancement (SENS UP) There are two modes for LEVEL and adjust the level. 4. The preset values for SENS UP (electronic sensitivity enhancement) change...

WVNW474S User Guide
Page 27
... the monitor screen. (When ATW is OFF. 2. • Automatic White Balance Control Mode (AWC) In this mode, accurate white balance is being set , PUSH SW is obtained within a color temperature range of approximately 2 300-10 000 K. ** CAM SET UP ** CAMERA ID OFF ALC ALC SHUTTER --- Motion Detector Setting (MOTION DET) The motion detector detects the moving objects in the scene by other video equipment as described in a Panasonic Intelligent CCTV...
... the monitor screen. (When ATW is OFF. 2. • Automatic White Balance Control Mode (AWC) In this mode, accurate white balance is being set , PUSH SW is obtained within a color temperature range of approximately 2 300-10 000 K. ** CAM SET UP ** CAMERA ID OFF ALC ALC SHUTTER --- Motion Detector Setting (MOTION DET) The motion detector detects the moving objects in the scene by other video equipment as described in a Panasonic Intelligent CCTV...

WVNW474S User Guide
Page 28
... second from the DIP switch on the camera. The default setting is available with the ZOOM switch on the controller. Chroma Phase (Hue) Setting (HUE) 1. ON: x2 electronic zoom is DIP SW. Move the cursor to display the ZOOM setting menu. ** EL-ZOOM ** PAN/TILT →PUSH SET ZOOM →PUSH SET U ZOOM D -28- AGC ON(DNR-H) SENS UP OFF SYNC INT ↵ WHITE BAL ATW1 MOTION DET OFF MENU RET END ** SPECIAL...
... second from the DIP switch on the camera. The default setting is available with the ZOOM switch on the controller. Chroma Phase (Hue) Setting (HUE) 1. ON: x2 electronic zoom is DIP SW. Move the cursor to display the ZOOM setting menu. ** EL-ZOOM ** PAN/TILT →PUSH SET ZOOM →PUSH SET U ZOOM D -28- AGC ON(DNR-H) SENS UP OFF SYNC INT ↵ WHITE BAL ATW1 MOTION DET OFF MENU RET END ** SPECIAL...

WVNW474S User Guide
Page 29
... recognized. The camera is received (refer to black-and-white picture at night because the illuminance changes significantly when switching between the color picture and a black-and-white picture. Press [SET]. 5. LOW: Color picture switches to alarm connections). HIGH: Color picture switches to black-andwhite picture automatically in or out the image. 6. Note: For resetting network setup and HTML setup, refer to the factory settings (CAMERA RESET) 1. ON: Black-and-white mode enabled. The following switching times are available...
... recognized. The camera is received (refer to black-and-white picture at night because the illuminance changes significantly when switching between the color picture and a black-and-white picture. Press [SET]. 5. LOW: Color picture switches to alarm connections). HIGH: Color picture switches to black-andwhite picture automatically in or out the image. 6. Note: For resetting network setup and HTML setup, refer to the factory settings (CAMERA RESET) 1. ON: Black-and-white mode enabled. The following switching times are available...

WVNW474S User Guide
Page 31
... on the camera, or click the All Reset button on your PC and/or to a wrong IP address? Initializing is correct. Be sure to continue supplying power to the factory default settings. Notes: • Never press both the buttons A and B at a time. • Try again if the previous initializing failed. Reference page 12 Cannot access the camera from the browser. • Are the network cables connected properly...
... on the camera, or click the All Reset button on your PC and/or to a wrong IP address? Initializing is correct. Be sure to continue supplying power to the factory default settings. Notes: • Never press both the buttons A and B at a time. • Try again if the previous initializing failed. Reference page 12 Cannot access the camera from the browser. • Are the network cables connected properly...

WVNW474S User Guide
Page 32
... Bright object Blooming SPECIFICATIONS Network Section Image resolution Image process Image refreshing rate Traffic control Protocols supported OS applicable Applicable browsers Available number connections Camera Section Pick-up Device: Scanning Area: Scanning: Horizontal: Vertical: Synchronization: Video Output: Horizontal Resolution: Signal-to-Noise Ratio: Dynamic Range: Minimum Illumination: Gain Control: White Balance: Aperture: Super Dynamic2: Electronic Shutter Speed: Lens Focal length: Maximum aperture ratio: Angular field of view: Focusing range: Control Function: 640x480, 640x240...
... Bright object Blooming SPECIFICATIONS Network Section Image resolution Image process Image refreshing rate Traffic control Protocols supported OS applicable Applicable browsers Available number connections Camera Section Pick-up Device: Scanning Area: Scanning: Horizontal: Vertical: Synchronization: Video Output: Horizontal Resolution: Signal-to-Noise Ratio: Dynamic Range: Minimum Illumination: Gain Control: White Balance: Aperture: Super Dynamic2: Electronic Shutter Speed: Lens Focal length: Maximum aperture ratio: Angular field of view: Focusing range: Control Function: 640x480, 640x240...


