

VML153 User Guide
Page 2
... Shoulder Strap (LSFC0012) (page 11) 1 pc. The serial number is for choosing Panasonic! Date of Purchase Dealer Purchased From Dealer Address Dealer Phone No. Please take time to fill in Camcorder) (page 35) Battery Charging Confirmation Marker 1 pc. Serial No. AC Adaptor (PV-A20) with Lens Cap...) (page 11) Use this manual as a reminder to set up or use your convenient Camcorder information source. CR2025 Clock Battery (installed in the information to : consumerproducts@panasonic.com You have purchased one of the most sophisticated and reliable products on the rear side of...
... Shoulder Strap (LSFC0012) (page 11) 1 pc. The serial number is for choosing Panasonic! Date of Purchase Dealer Purchased From Dealer Address Dealer Phone No. Please take time to fill in Camcorder) (page 35) Battery Charging Confirmation Marker 1 pc. Serial No. AC Adaptor (PV-A20) with Lens Cap...) (page 11) Use this manual as a reminder to set up or use your convenient Camcorder information source. CR2025 Clock Battery (installed in the information to : consumerproducts@panasonic.com You have purchased one of the most sophisticated and reliable products on the rear side of...
VML153 User Guide
Page 4
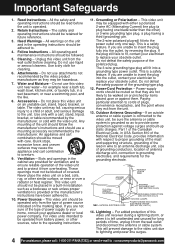
... with a cart, stand, tripod, bracket, or table recommended by the manufacturer. Ventilation - These openings must not be operated only from battery power, or other similar surface, or near water - For video units intended to replace your obsolete outlet. The 2-wire polarized plug will... (a plug having a third (grounding) pin. Outdoor Antenna Grounding - This is provided or the manufacturer's instructions have been adhered to : consumerproducts@panasonic.com All warnings on the unit and in a wet basement, or near a bath tub, wash bowl, kitchen sink, or laundry tub, in...
... with a cart, stand, tripod, bracket, or table recommended by the manufacturer. Ventilation - These openings must not be operated only from battery power, or other similar surface, or near water - For video units intended to replace your obsolete outlet. The 2-wire polarized plug will... (a plug having a third (grounding) pin. Outdoor Antenna Grounding - This is provided or the manufacturer's instructions have been adhered to : consumerproducts@panasonic.com All warnings on the unit and in a wet basement, or near a bath tub, wash bowl, kitchen sink, or laundry tub, in...
VML153 User Guide
Page 6
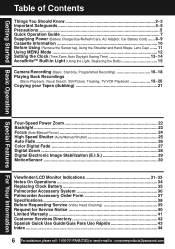
... Things You Should Know 2~3 Important Safeguards 4~5 Precautions ...5 Quick Operation Guide 7 Supplying Power (Battery Charge/Use/Refresh/Care, AC Adaptor, Car Battery Cord) ...... 8~9 Cassette Information 10 Before Using (Remove the Sensor tag, Using the Shoulder ...Stabilization (E.I.S 29 MotionSensor 30 Viewfinder/LCD Monitor Indications 31~33 Notes On Operations 34 Replacing Clock Battery 35 Palmcorder Accessory System 36 Palmcorder Accessory Order Form 37 Specifications 38 Before Requesting Service (Video... : 1-800-211-PANA(7262) or send e-mail to : consumerproducts@panasonic.com
... Things You Should Know 2~3 Important Safeguards 4~5 Precautions ...5 Quick Operation Guide 7 Supplying Power (Battery Charge/Use/Refresh/Care, AC Adaptor, Car Battery Cord) ...... 8~9 Cassette Information 10 Before Using (Remove the Sensor tag, Using the Shoulder ...Stabilization (E.I.S 29 MotionSensor 30 Viewfinder/LCD Monitor Indications 31~33 Notes On Operations 34 Replacing Clock Battery 35 Palmcorder Accessory System 36 Palmcorder Accessory Order Form 37 Specifications 38 Before Requesting Service (Video... : 1-800-211-PANA(7262) or send e-mail to : consumerproducts@panasonic.com

VML153 User Guide
Page 7
Insert Cassette 1Attach fully charged Battery (page 8). 2Slide TAPE EJECT to open and adjust the angle. 2 Set POWER to CAMERA. 3 Press RECORD/PAUSE to start playback. 5 Press (STOP) to start recording. ... again to close door. Swing it fully open door. 3Insert cassette (page 10). 4Press here to pause recording. Getting Started Quick Operation Guide Charging the Battery Pack Charge Battery Pack fully before operation (page 8). 1 Plug in AC Adaptor. 2 Insert...
Insert Cassette 1Attach fully charged Battery (page 8). 2Slide TAPE EJECT to open and adjust the angle. 2 Set POWER to CAMERA. 3 Press RECORD/PAUSE to start playback. 5 Press (STOP) to start recording. ... again to close door. Swing it fully open door. 3Insert cassette (page 10). 4Press here to pause recording. Getting Started Quick Operation Guide Charging the Battery Pack Charge Battery Pack fully before operation (page 8). 1 Plug in AC Adaptor. 2 Insert...

VML153 User Guide
Page 8
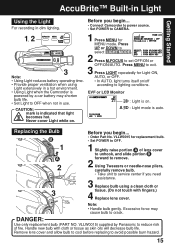
.... Note: • Charging takes about 55 minutes (LCD monitor on AC Adaptor (see steps 1~2 above), then press BATTERY REFRESH. Using the Built-in direction of mounting surface. b Press and snap into top of arrow. If operation time becomes very short even after repeated use battery refresh, insert Battery on ). Slide Battery to : consumerproducts@panasonic.com
.... Note: • Charging takes about 55 minutes (LCD monitor on AC Adaptor (see steps 1~2 above), then press BATTERY REFRESH. Using the Built-in direction of mounting surface. b Press and snap into top of arrow. If operation time becomes very short even after repeated use battery refresh, insert Battery on ). Slide Battery to : consumerproducts@panasonic.com

VML153 User Guide
Page 9
...used in use , unplug AC Adaptor from the Camcorder and AC Adaptor, and store in an area which has special AC outlets. B Plug Car Battery Cord into Cigarette lighter socket. • If Car Battery cord fuse needs replacing, use , remove Battery from AC outlet. (Adaptor uses 1.2 W ... DC IN Connector Cigarette Lighter Socket (12 V) Car Battery Cord (optional) Cigarette Lighter Plug 1 Connect PV-C16 Car Battery Cord (optional) to operate the camcorder while driving. 9 Use only specified car battery cord. • To avoid blowing the car battery cord fuse, do step 2 in the proper order. ...
...used in use , unplug AC Adaptor from the Camcorder and AC Adaptor, and store in an area which has special AC outlets. B Plug Car Battery Cord into Cigarette lighter socket. • If Car Battery cord fuse needs replacing, use , remove Battery from AC outlet. (Adaptor uses 1.2 W ... DC IN Connector Cigarette Lighter Socket (12 V) Car Battery Cord (optional) Cigarette Lighter Plug 1 Connect PV-C16 Car Battery Cord (optional) to operate the camcorder while driving. 9 Use only specified car battery cord. • To avoid blowing the car battery cord fuse, do step 2 in the proper order. ...

VML153 User Guide
Page 10
... 1 Turn Tape Wheel in this unit. Record/Playback Time Use tapes with the mark in direction of arrow until there is no slack. 2 Attach Battery (page 8). 3 Slide TAPE EJECT to open .) 2 To record again, cover hole with screwdriver. (Or, slide tab open door. 4 Insert ...cassette as shown. 5 Press here to : consumerproducts@panasonic.com Erase Protection Tab Protects tapes from being accidentally erased. 1 2 Slide tab type 1 To prevent accidental erasing, break off tab with adhesive tape. ...
... 1 Turn Tape Wheel in this unit. Record/Playback Time Use tapes with the mark in direction of arrow until there is no slack. 2 Attach Battery (page 8). 3 Slide TAPE EJECT to open .) 2 To record again, cover hole with screwdriver. (Or, slide tab open door. 4 Insert ...cassette as shown. 5 Press here to : consumerproducts@panasonic.com Erase Protection Tab Protects tapes from being accidentally erased. 1 2 Slide tab type 1 To prevent accidental erasing, break off tab with adhesive tape. ...

VML153 User Guide
Page 11
Getting Started Before Using How to fit your hand as shown. Sensor tag Attaching Shoulder Strap Remove Battery Pack before completing the following steps: 1 Undo strap ends from the front clasp and thread the Strap through the loop in the Lens Cap Cord. ... Hand Strap. Attaching the Lens Cap Cord to shorten or lengthen. Lens Cap Attaching the Lens Cap Strap: Thread the Strap through Strap Rings on Camcorder. 2 Remove the Sensor tag.
Getting Started Before Using How to fit your hand as shown. Sensor tag Attaching Shoulder Strap Remove Battery Pack before completing the following steps: 1 Undo strap ends from the front clasp and thread the Strap through the loop in the Lens Cap Cord. ... Hand Strap. Attaching the Lens Cap Cord to shorten or lengthen. Lens Cap Attaching the Lens Cap Strap: Thread the Strap through Strap Rings on Camcorder. 2 Remove the Sensor tag.

VML153 User Guide
Page 12
...14). DIGITAL EFFECTS sub menu is displayed. DISPLAY SET sub menu is on with no cassette tape and/or battery inserted. ON : Enables quick resumption of recording from Stand-by mode. 9 LIGHT MODE (page 15). OFF...or AUTO. 12 For assistance, please call : 1-800-211-PANA(7262) or send e-mail to : consumerproducts@panasonic.com Note: • The Menu mode is canceled if UP/DOWN, M.FOCUS, or MENU are not pressed within... 17). Using MENU Mode 1, 2, 3, 4 Before you begin... • Connect Camcorder to power source. • Set POWER to desired tape speed, SP/SLP. 2 SHUTTER (page 25...
...14). DIGITAL EFFECTS sub menu is displayed. DISPLAY SET sub menu is on with no cassette tape and/or battery inserted. ON : Enables quick resumption of recording from Stand-by mode. 9 LIGHT MODE (page 15). OFF...or AUTO. 12 For assistance, please call : 1-800-211-PANA(7262) or send e-mail to : consumerproducts@panasonic.com Note: • The Menu mode is canceled if UP/DOWN, M.FOCUS, or MENU are not pressed within... 17). Using MENU Mode 1, 2, 3, 4 Before you begin... • Connect Camcorder to power source. • Set POWER to desired tape speed, SP/SLP. 2 SHUTTER (page 25...
VML153 User Guide
Page 15
... MODE . 2 Press M.FOCUS to avoid possible burn hazard. 15 Before you begin ... • Order Part No. CAUTION: mark is powered by Panasonic to reduce risk of lens cover to unhook, and slide portion B forward to remove. 2 Using Tweezers or needle-nose pliers, carefully remove bulb.... may shorten bulb life. • Set Light to service center if you begin ... • Connect Camcorder to power source. • Set POWER to CAMERA. 1, 2 3 Note: • Using Light reduces battery operating time. • Provide proper ventilation when using a clean cloth or tissue. (Do not touch ...
... MODE . 2 Press M.FOCUS to avoid possible burn hazard. 15 Before you begin ... • Order Part No. CAUTION: mark is powered by Panasonic to reduce risk of lens cover to unhook, and slide portion B forward to remove. 2 Using Tweezers or needle-nose pliers, carefully remove bulb.... may shorten bulb life. • Set Light to service center if you begin ... • Connect Camcorder to power source. • Set POWER to CAMERA. 1, 2 3 Note: • Using Light reduces battery operating time. • Provide proper ventilation when using a clean cloth or tissue. (Do not touch ...

VML153 User Guide
Page 16
...LCD BRIGHT below. Press UP or DOWN to avoid this when possible. • Using LCD monitor reduces battery operation time. Try to select LCD BRIGHT . This allows both you begin... • Connect Camcorder to power source. • Insert cassette with record tab (page 10). 1 Press LCD-OPEN to ...: Rotating partially open LCD monitor may appear in use. 16 For assistance, please call : 1-800-211-PANA(7262) or send e-mail to : consumerproducts@panasonic.com B Press M.FOCUS for MENU mode. Press UP or DOWN to adjust LCD monitor brightness level. • To remove the cassette, slide the TAPE ...
...LCD BRIGHT below. Press UP or DOWN to avoid this when possible. • Using LCD monitor reduces battery operation time. Try to select LCD BRIGHT . This allows both you begin... • Connect Camcorder to power source. • Insert cassette with record tab (page 10). 1 Press LCD-OPEN to ...: Rotating partially open LCD monitor may appear in use. 16 For assistance, please call : 1-800-211-PANA(7262) or send e-mail to : consumerproducts@panasonic.com B Press M.FOCUS for MENU mode. Press UP or DOWN to adjust LCD monitor brightness level. • To remove the cassette, slide the TAPE ...
VML153 User Guide
Page 17
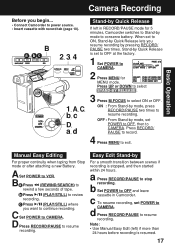
... 17 Press RECORD/ PAUSE to record. 4 Press MENU to resume recording. c Press (PLAY/STILL) where you begin... • Connect Camcorder to power source. • Insert cassette with record tab (page 10). b Set POWER to OFF and leave cassette in RECORD/PAUSE mode... RECORD/PAUSE to CAMERA. Manual Easy Editing For proper continuity when taping from Stop mode or after attaching a new Battery. C Set POWER to stop recording. Note: • Use Manual Easy Edit (left in Camcorder. B a bc 2, 3, 4 1, A, C, b, c D, a, d Stand-by mode, press RECORD/PAUSE two times to ...
... 17 Press RECORD/ PAUSE to record. 4 Press MENU to resume recording. c Press (PLAY/STILL) where you begin... • Connect Camcorder to power source. • Insert cassette with record tab (page 10). b Set POWER to OFF and leave cassette in RECORD/PAUSE mode... RECORD/PAUSE to CAMERA. Manual Easy Editing For proper continuity when taping from Stop mode or after attaching a new Battery. C Set POWER to stop recording. Note: • Use Manual Easy Edit (left in Camcorder. B a bc 2, 3, 4 1, A, C, b, c D, a, d Stand-by mode, press RECORD/PAUSE two times to ...
VML153 User Guide
Page 19
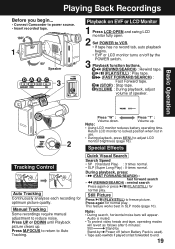
...in SLP mode (page 10). Press M.FOCUS to return to adjust LCD 2 monitor brightness (page 16). Note: • Using LCD monitor reduces battery operating time. Volume up . Quick Visual Search Search Speed • SP (Standard Play) : 3 times normal. • SLP (Super Long ...PLAY/STILL) for optimum picture quality. Playing Back Recordings Before you begin... • Connect Camcorder to power source. • Insert recorded tape. 1 Speaker 3 D A B C E Playback on /off (when Battery Pack is muted. • To protect video heads and tape, operating modes will appear....
...in SLP mode (page 10). Press M.FOCUS to return to adjust LCD 2 monitor brightness (page 16). Note: • Using LCD monitor reduces battery operating time. Volume up . Quick Visual Search Search Speed • SP (Standard Play) : 3 times normal. • SLP (Super Long ...PLAY/STILL) for optimum picture quality. Playing Back Recordings Before you begin... • Connect Camcorder to power source. • Insert recorded tape. 1 Speaker 3 D A B C E Playback on /off (when Battery Pack is muted. • To protect video heads and tape, operating modes will appear....
VML153 User Guide
Page 20
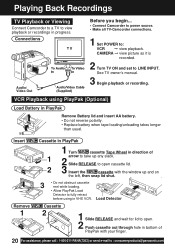
...Battery lid and insert AA battery. • Do not reverse polarity. • Replace battery when tape loading/unloading takes longer than usual. CAMERA © view picture as it is recorded. 2 Turn TV ON and set to : VCR © view playback. Connections Audio/ Video Out Before you begin... • Connect Camcorder... : 1-800-211-PANA(7262) or send e-mail to fully retract before using PlayPak (Optional) Load Battery in VHS VCR. See TV owner's manual. 3 Begin playback or recording. Insert Remove 1 Cassette in...• Allow PlayPak Load Detector to : consumerproducts@panasonic.com
...Battery lid and insert AA battery. • Do not reverse polarity. • Replace battery when tape loading/unloading takes longer than usual. CAMERA © view picture as it is recorded. 2 Turn TV ON and set to : VCR © view playback. Connections Audio/ Video Out Before you begin... • Connect Camcorder... : 1-800-211-PANA(7262) or send e-mail to fully retract before using PlayPak (Optional) Load Battery in VHS VCR. See TV owner's manual. 3 Begin playback or recording. Insert Remove 1 Cassette in...• Allow PlayPak Load Detector to : consumerproducts@panasonic.com

VML153 User Guide
Page 31
... UP or DOWN to select MODE SELECT . 4 Press M.FOCUS for MENU mode. Viewfinder/LCD Monitor Indications Tape remaining and battery charge level can be displayed. 2, 3, 4, 5, 6 1 Battery Remaining: Tape Remaining: Before you begin... • Connect Camcorder to power source. 1 Set POWER to CAMERA. 2 Press MENU for MODE SELECT menu. 5 Press M.FOCUS repeatedly to select...
... UP or DOWN to select MODE SELECT . 4 Press M.FOCUS for MENU mode. Viewfinder/LCD Monitor Indications Tape remaining and battery charge level can be displayed. 2, 3, 4, 5, 6 1 Battery Remaining: Tape Remaining: Before you begin... • Connect Camcorder to power source. 1 Set POWER to CAMERA. 2 Press MENU for MODE SELECT menu. 5 Press M.FOCUS repeatedly to select...

VML153 User Guide
Page 33
...END" appears for 5 seconds when: • End of tape is set to VCR or if RECORD/ 3 Tape Remaining (page 31). "WARNING LOW BATTERY" appears and Camcorder shuts off in 15 seconds. " " flashes for 1 minute and "CHECK TAPE" appears for 1 minute when POWER is reached. PAUSE is pressed with...Information 1 Zoom Magnification level (pages 22, 28). 6 Digital E.I.S. (page 29). 2 Battery Remaining (page 31). 7 Digital Zoom (page 28). cassette inserted in VCR mode. Wait until "WARNING" no longer indicates when Camcorder is turned on to use. 10 MotionSensor (page 30). • PLAY, FF or ...
...END" appears for 5 seconds when: • End of tape is set to VCR or if RECORD/ 3 Tape Remaining (page 31). "WARNING LOW BATTERY" appears and Camcorder shuts off in 15 seconds. " " flashes for 1 minute and "CHECK TAPE" appears for 1 minute when POWER is reached. PAUSE is pressed with...Information 1 Zoom Magnification level (pages 22, 28). 6 Digital E.I.S. (page 29). 2 Battery Remaining (page 31). 7 Digital Zoom (page 28). cassette inserted in VCR mode. Wait until "WARNING" no longer indicates when Camcorder is turned on to use. 10 MotionSensor (page 30). • PLAY, FF or ...

VML153 User Guide
Page 34
... also contains lead in your local authorities, or the Electronics Industries Alliance: U.S.A. CONSUMERS: ATTENTION : A nickel cadmium battery that contains a small amount of mercury. Please call : 1-800-211-PANA(7262) or send e-mail to : consumerproducts@panasonic.com For disposal or recycling information please contact your community due to environmental considerations. Notes On Operations...
... also contains lead in your local authorities, or the Electronics Industries Alliance: U.S.A. CONSUMERS: ATTENTION : A nickel cadmium battery that contains a small amount of mercury. Please call : 1-800-211-PANA(7262) or send e-mail to : consumerproducts@panasonic.com For disposal or recycling information please contact your community due to environmental considerations. Notes On Operations...
VML153 User Guide
Page 35
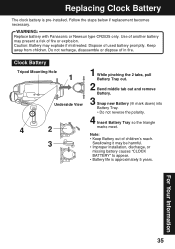
WARNING: Replace battery with Panasonic or Newsun type CR2025 only. Dispose of children's reach. Note: • Keep Battery out of used battery promptly. Caution: Battery may present a risk of fire or explosion. For Your Information 35 Keep away from children. Replacing Clock Battery The clock battery is approximately 5 years. Use of in fire. Clock Battery Tripod Mounting Hole 1 Underside...
WARNING: Replace battery with Panasonic or Newsun type CR2025 only. Dispose of children's reach. Note: • Keep Battery out of used battery promptly. Caution: Battery may present a risk of fire or explosion. For Your Information 35 Keep away from children. Replacing Clock Battery The clock battery is approximately 5 years. Use of in fire. Clock Battery Tripod Mounting Hole 1 Underside...
VML153 User Guide
Page 36
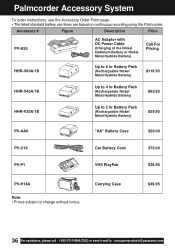
...V20A/1B Up to 2 hr Battery Pack (Rechargeable Nickel Metal Hydride Battery) $59.95 PV-AA6 "AA" Battery Case $20.00 PV-C16 Car Battery Cord $70.00 PV-P1 VHS PlayPak $39.95 PV-H18A Note: • Prices subject to : consumerproducts@panasonic.com Carrying Case $49.95 ...36 For assistance, please call : 1-800-211-PANA(7262) or send e-mail to change without notice. Palmcorder Accessory System To order instructions, see the Accessory Order Form page. • The listed standard battery use times are based ...
...V20A/1B Up to 2 hr Battery Pack (Rechargeable Nickel Metal Hydride Battery) $59.95 PV-AA6 "AA" Battery Case $20.00 PV-C16 Car Battery Cord $70.00 PV-P1 VHS PlayPak $39.95 PV-H18A Note: • Prices subject to : consumerproducts@panasonic.com Carrying Case $49.95 ...36 For assistance, please call : 1-800-211-PANA(7262) or send e-mail to change without notice. Palmcorder Accessory System To order instructions, see the Accessory Order Form page. • The listed standard battery use times are based ...

VML153 User Guide
Page 38
...-211-PANA(7262) or send e-mail to : consumerproducts@panasonic.com AC Adaptor: 0.3 kg 0.66 Ibs. Designs and specifications are approximate. Specifications Power Source: Compact VHS Camcorder: DC 6 V AC Adaptor: 110/120/220/240 V AC, 50/60 Hz Battery: Nickel-Cadmium Type DC 6 V Power Consumption: Compact VHS Camcorder: 6V DC 8.5 W (Max. 11.5 W) AC Adaptor: 19...
...-211-PANA(7262) or send e-mail to : consumerproducts@panasonic.com AC Adaptor: 0.3 kg 0.66 Ibs. Designs and specifications are approximate. Specifications Power Source: Compact VHS Camcorder: DC 6 V AC Adaptor: 110/120/220/240 V AC, 50/60 Hz Battery: Nickel-Cadmium Type DC 6 V Power Consumption: Compact VHS Camcorder: 6V DC 8.5 W (Max. 11.5 W) AC Adaptor: 19...


