

VML153 User Guide
Page 2
... Be sure to yourself when the battery is fully charged or in the information to set up or use your convenient Camcorder information source. Shoulder Strap (LSFC0012) (page 11) 1 pc. Lens Cap (LSKM0937) with DC Power Cable (page 9) 1 pc. Serial No. The serial number is for choosing Panasonic! Audio/Video Cable (LSJA0390) (pages 20, 21) 1 pc. CR2025 Clock Battery (installed in order to the right. You have...
... Be sure to yourself when the battery is fully charged or in the information to set up or use your convenient Camcorder information source. Shoulder Strap (LSFC0012) (page 11) 1 pc. Lens Cap (LSKM0937) with DC Power Cable (page 9) 1 pc. Serial No. The serial number is for choosing Panasonic! Audio/Video Cable (LSJA0390) (pages 20, 21) 1 pc. CR2025 Clock Battery (installed in order to the right. You have...

VML153 User Guide
Page 3
.... This symbol alerts the user that important literature concerning the operation and maintenance of the FCC Rules. Therefore, it is recommended that only cassette tapes that uninsulated voltage within the unit may have been tested and inspected for help. If necessary, consult the dealer or an experienced radio/TV technician for use in VCR machines with the and...
.... This symbol alerts the user that important literature concerning the operation and maintenance of the FCC Rules. Therefore, it is recommended that only cassette tapes that uninsulated voltage within the unit may have been tested and inspected for help. If necessary, consult the dealer or an experienced radio/TV technician for use in VCR machines with the and...

VML153 User Guide
Page 5
... cleaning the lens. When installing an outside antenna system should not be fatal. 16. Do not overload wall outlets and extension cords as opening or removing covers may result in the vicinity of your Camcorder body. • TO PROTECT THE LENS ... There are free from the wall outlet and refer servicing to determine that could permanently damage the internal parts of overhead power...
... cleaning the lens. When installing an outside antenna system should not be fatal. 16. Do not overload wall outlets and extension cords as opening or removing covers may result in the vicinity of your Camcorder body. • TO PROTECT THE LENS ... There are free from the wall outlet and refer servicing to determine that could permanently damage the internal parts of overhead power...
VML153 User Guide
Page 6
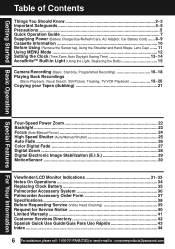
... Straps, Lens Cap) ...... 11 Using MENU Mode 12 Setting the Clock (Time Zone, Auto Daylight Saving Time 13~14 AccuBrite™ Built-in Light (Using the Light, Replacing the Bulb 15 Camera Recording (Basic, Stand-by, Programmed Recording 16~18 Playing Back Recordings (Basic Playback, Visual Search, Still Picture, Tracking, TV/VCR Playback 19~20 Copying your Tapes (dubbing 21 Four-Speed Power Zoom 22 Backlight ...23 Focus (Auto/Manual Focus 24 High Speed Shutter (Auto/Manual Shutter 25 Auto Fade ...26 Color Digital Fade 27 Digital Zoom ...28 Digital Electronic Image Stabilization...
... Straps, Lens Cap) ...... 11 Using MENU Mode 12 Setting the Clock (Time Zone, Auto Daylight Saving Time 13~14 AccuBrite™ Built-in Light (Using the Light, Replacing the Bulb 15 Camera Recording (Basic, Stand-by, Programmed Recording 16~18 Playing Back Recordings (Basic Playback, Visual Search, Still Picture, Tracking, TV/VCR Playback 19~20 Copying your Tapes (dubbing 21 Four-Speed Power Zoom 22 Backlight ...23 Focus (Auto/Manual Focus 24 High Speed Shutter (Auto/Manual Shutter 25 Auto Fade ...26 Color Digital Fade 27 Digital Zoom ...28 Digital Electronic Image Stabilization...

VML153 User Guide
Page 7
.... Playback using the LCD Monitor See page 19. 1 Press LCD-OPEN to pause recording. Camera Recording See page 16. 1 Press LCD-OPEN to close door. CHARGE Lamp flashes, then stays lit when charging is complete. Insert Cassette 1Attach fully charged Battery (page 8). 2Slide TAPE EJECT to open and adjust the angle. 2 Set POWER to CAMERA. 3 Press RECORD/PAUSE to stop playback. 7 Swing it fully open door. 3Insert cassette (page 10). 4Press here to unlock the LCD monitor. Getting Started Quick Operation Guide Charging the Battery Pack Charge Battery...
.... Playback using the LCD Monitor See page 19. 1 Press LCD-OPEN to pause recording. Camera Recording See page 16. 1 Press LCD-OPEN to close door. CHARGE Lamp flashes, then stays lit when charging is complete. Insert Cassette 1Attach fully charged Battery (page 8). 2Slide TAPE EJECT to open and adjust the angle. 2 Set POWER to CAMERA. 3 Press RECORD/PAUSE to stop playback. 7 Swing it fully open door. 3Insert cassette (page 10). 4Press here to unlock the LCD monitor. Getting Started Quick Operation Guide Charging the Battery Pack Charge Battery...

VML153 User Guide
Page 8
... Power Cable (supplied) is pressed by mistake, remove Battery from AC Adaptor and reinsert it for optimum Battery performance. To use battery refresh, insert Battery on ). POWER Lamp lights. 2 Insert Battery. Using the Built-in AC Adaptor. If operation time becomes very short even after repeated use (LCD monitor off . a Insert top of Battery into place. Battery Refresh This feature completely discharges Battery before use. 23 POWER Lamp 1 CHARGE Lamp A B (Top View) 1 Plug in Light...
... Power Cable (supplied) is pressed by mistake, remove Battery from AC Adaptor and reinsert it for optimum Battery performance. To use battery refresh, insert Battery on ). POWER Lamp lights. 2 Insert Battery. Using the Built-in AC Adaptor. If operation time becomes very short even after repeated use (LCD monitor off . a Insert top of Battery into place. Battery Refresh This feature completely discharges Battery before use. 23 POWER Lamp 1 CHARGE Lamp A B (Top View) 1 Plug in Light...

VML153 User Guide
Page 9
...; If Car Battery cord fuse needs replacing, use , disconnect cigarette lighter plug. • For personal safety the driver of the vehicle should not attempt to Camcorder DC IN with supplied DC Power Cable. 2 Plug in AC Adaptor. Note: • While the DC Power Cable (supplied) is used in extremely high temperatures, a safety device will operate on 110/120/220/240 V AC 50/60 Hz. Check with your...
...; If Car Battery cord fuse needs replacing, use , disconnect cigarette lighter plug. • For personal safety the driver of the vehicle should not attempt to Camcorder DC IN with supplied DC Power Cable. 2 Plug in AC Adaptor. Note: • While the DC Power Cable (supplied) is used in extremely high temperatures, a safety device will operate on 110/120/220/240 V AC 50/60 Hz. Check with your...

VML153 User Guide
Page 10
... playback may contain more picture noise. Cassette Information Cassette Insertion/Removal 13 2 5 4 1 Turn Tape Wheel in direction of arrow until there is no slack. 2 Attach Battery (page 8). 3 Slide TAPE EJECT to open .) 2 To record again, cover hole with the mark in this unit. Record/Playback Time Use tapes with adhesive tape. (Or, slide tab closed.) 10 For assistance, please call : 1-800-211-PANA(7262) or send e-mail to : consumerproducts@panasonic...
... playback may contain more picture noise. Cassette Information Cassette Insertion/Removal 13 2 5 4 1 Turn Tape Wheel in direction of arrow until there is no slack. 2 Attach Battery (page 8). 3 Slide TAPE EJECT to open .) 2 To record again, cover hole with the mark in this unit. Record/Playback Time Use tapes with adhesive tape. (Or, slide tab closed.) 10 For assistance, please call : 1-800-211-PANA(7262) or send e-mail to : consumerproducts@panasonic...

VML153 User Guide
Page 12
... CAMERA or VCR. 1 Press MENU for MENU mode. DIGITAL EFFECTS sub menu is displayed. Camcorder starts and stops recording at a preset time. ON : Enables quick resumption of recording from Stand-by mode. 9 LIGHT MODE (page 15). Using MENU Mode 1, 2, 3, 4 Before you begin... • Connect Camcorder to power source. • Set POWER to desired tape speed, SP/SLP. 2 SHUTTER (page 25). Select desired shutter speed. 3 LCD BRIGHT (pages 16, 19). CLOCK SET sub menu is displayed. Adjust LCD monitor brightness level. 4 DIGITAL EFFECTS (pages 26~28, 30). To select DIGITAL ZOOM...
... CAMERA or VCR. 1 Press MENU for MENU mode. DIGITAL EFFECTS sub menu is displayed. Camcorder starts and stops recording at a preset time. ON : Enables quick resumption of recording from Stand-by mode. 9 LIGHT MODE (page 15). Using MENU Mode 1, 2, 3, 4 Before you begin... • Connect Camcorder to power source. • Set POWER to desired tape speed, SP/SLP. 2 SHUTTER (page 25). Select desired shutter speed. 3 LCD BRIGHT (pages 16, 19). CLOCK SET sub menu is displayed. Adjust LCD monitor brightness level. 4 DIGITAL EFFECTS (pages 26~28, 30). To select DIGITAL ZOOM...
VML153 User Guide
Page 14
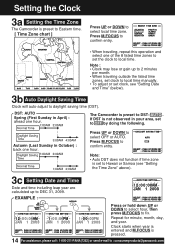
... hour, then press M.FOCUS to select OFF or AUTO. Press UP or DOWN to fix. Press M.FOCUS to local time. Repeat for minute, month, day, and year. Setting the Clock 3a Setting the Time Zone The Camcorder is not observed in your area, set to Hawaii or Samoa (see "Setting Date and Time" (below). 3b Auto Daylight Saving Time Clock will auto-adjust to daylight saving time (DST). Note : •...
... hour, then press M.FOCUS to select OFF or AUTO. Press UP or DOWN to fix. Press M.FOCUS to local time. Repeat for minute, month, day, and year. Setting the Clock 3a Setting the Time Zone The Camcorder is not observed in your area, set to Hawaii or Samoa (see "Setting Date and Time" (below). 3b Auto Daylight Saving Time Clock will auto-adjust to daylight saving time (DST). Note : •...
VML153 User Guide
Page 15
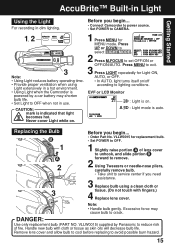
... service center if you begin ... • Connect Camcorder to power source. • Set POWER to CAMERA. 1, 2 3 Note: • Using Light reduces battery operating time. • Provide proper ventilation when using a clean cloth or tissue. (Do not touch with cloth or tissue as skin oils will decrease bulb life. CAUTION: mark is auto. EVF or LCD Monitor A : Light is powered by Panasonic to crack. Replacing the Bulb B 1 A 2 3 Before you need assistance. 3 Replace bulb using Light...
... service center if you begin ... • Connect Camcorder to power source. • Set POWER to CAMERA. 1, 2 3 Note: • Using Light reduces battery operating time. • Provide proper ventilation when using a clean cloth or tissue. (Do not touch with cloth or tissue as skin oils will decrease bulb life. CAUTION: mark is auto. EVF or LCD Monitor A : Light is powered by Panasonic to crack. Replacing the Bulb B 1 A 2 3 Before you need assistance. 3 Replace bulb using Light...

VML153 User Guide
Page 16
... LCD Monitor CAMERA position. (Record/Pause mode) • EVF or LCD monitor turns on/off by the POWER switch. • Both EVF and LCD monitor turn on EVF (Electronic Viewer Finder) or LCD (Liquid Crystal Display) monitor. See To adjust LCD BRIGHT below. B Press M.FOCUS for MENU mode. Swing LCD monitor fully open and adjust viewing angle. 1 CAUTION : Rotating partially open LCD monitor may block cassette door and damage Camcorder body. 4, A, B Built-in Microphone 2, 6 5 3 VISION ADJUSTMENT To adjust LCD BRIGHT 2 Set POWER...
... LCD Monitor CAMERA position. (Record/Pause mode) • EVF or LCD monitor turns on/off by the POWER switch. • Both EVF and LCD monitor turn on EVF (Electronic Viewer Finder) or LCD (Liquid Crystal Display) monitor. See To adjust LCD BRIGHT below. B Press M.FOCUS for MENU mode. Swing LCD monitor fully open and adjust viewing angle. 1 CAUTION : Rotating partially open LCD monitor may block cassette door and damage Camcorder body. 4, A, B Built-in Microphone 2, 6 5 3 VISION ADJUSTMENT To adjust LCD BRIGHT 2 Set POWER...
VML153 User Guide
Page 17
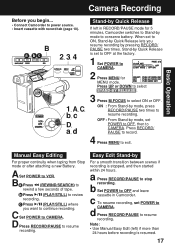
... recording, set POWER to OFF, then to resume recording. C Set POWER to CAMERA. d Press RECORD/PAUSE to exit. Note: • Use Manual Easy Edit (left in Camcorder. Press RECORD/ PAUSE to record. 4 Press MENU to resume recording. OFF : From Stand-by mode, press RECORD/PAUSE two times to CAMERA. c Press (PLAY/STILL) where you begin... • Connect Camcorder to power source. • Insert cassette with record tab (page 10). ON : From Stand-by mode, set POWER to CAMERA. A Set POWER to review recording. b Press (PLAY/STILL) to VCR...
... recording, set POWER to OFF, then to resume recording. C Set POWER to CAMERA. d Press RECORD/PAUSE to exit. Note: • Use Manual Easy Edit (left in Camcorder. Press RECORD/ PAUSE to record. 4 Press MENU to resume recording. OFF : From Stand-by mode, press RECORD/PAUSE two times to CAMERA. c Press (PLAY/STILL) where you begin... • Connect Camcorder to power source. • Insert cassette with record tab (page 10). ON : From Stand-by mode, set POWER to CAMERA. A Set POWER to review recording. b Press (PLAY/STILL) to VCR...
VML153 User Guide
Page 18
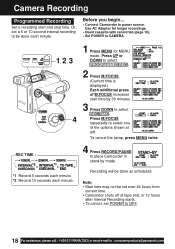
... 10 second interval recording to select one of M.FOCUS increases start and stop time. REC TIME : 1, 2, 3 4 1 Press MENU for longer recordings. • Insert cassette with record tab (page 10). • Set POWER to power source. Use AC Adaptor for MENU mode. To cancel the setup, press MENU twice. 4 Press RECORD/PAUSE to : consumerproducts@panasonic.com Press M.FOCUS repeatedly to be done as scheduled. Or, set over 24 hours from current time. • Camcorder shuts off...
... 10 second interval recording to select one of M.FOCUS increases start and stop time. REC TIME : 1, 2, 3 4 1 Press MENU for longer recordings. • Insert cassette with record tab (page 10). • Set POWER to power source. Use AC Adaptor for MENU mode. To cancel the setup, press MENU twice. 4 Press RECORD/PAUSE to : consumerproducts@panasonic.com Press M.FOCUS repeatedly to be done as scheduled. Or, set over 24 hours from current time. • Camcorder shuts off...
VML153 User Guide
Page 19
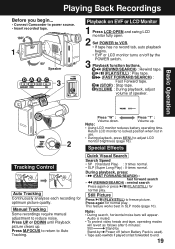
...) : Play tape. Basic Operation Press "W" : Press "T" : Volume down. Manual Tracking Some recordings require manual adjustment to freeze picture. During playback, press: • (FAST FORWARD/SEARCH) : fast forward search • (REWIND/SEARCH) : rewind search Press again or press (PLAY/STILL) for normal play . Playing Back Recordings Before you begin... • Connect Camcorder to power source. • Insert recorded tape. 1 Speaker 3 D A B C E Playback on EVF or LCD Monitor 1 Press LCD-OPEN and swing LCD monitor fully open. 2 Set POWER to VCR...
...) : Play tape. Basic Operation Press "W" : Press "T" : Volume down. Manual Tracking Some recordings require manual adjustment to freeze picture. During playback, press: • (FAST FORWARD/SEARCH) : fast forward search • (REWIND/SEARCH) : rewind search Press again or press (PLAY/STILL) for normal play . Playing Back Recordings Before you begin... • Connect Camcorder to power source. • Insert recorded tape. 1 Speaker 3 D A B C E Playback on EVF or LCD Monitor 1 Press LCD-OPEN and swing LCD monitor fully open. 2 Set POWER to VCR...
VML153 User Guide
Page 20
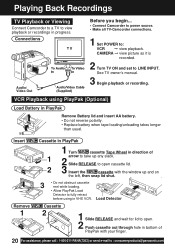
.... 3 • Do not obstruct cassette reel while loading. • Allow PlayPak Load Detector to view playback or recordings in PlayPak Remove Battery lid and insert AA battery. • Do not reverse polarity. • Replace battery when tape loading/unloading takes longer than usual. Connections Audio/ Video Out Before you begin... • Connect Camcorder to power source. • Make all TV-Camcorder connections. 1 Set POWER to: VCR © view playback. See TV owner's manual. 3 Begin playback or recording.
.... 3 • Do not obstruct cassette reel while loading. • Allow PlayPak Load Detector to view playback or recordings in PlayPak Remove Battery lid and insert AA battery. • Do not reverse polarity. • Replace battery when tape loading/unloading takes longer than usual. Connections Audio/ Video Out Before you begin... • Connect Camcorder to power source. • Make all TV-Camcorder connections. 1 Set POWER to: VCR © view playback. See TV owner's manual. 3 Begin playback or recording.

VML153 User Guide
Page 21
... see VCR owner's manual. • Set Camcorder POWER to VCR. 5 Source (Playing) Camcorder 2, 4 Audio/ Video Out Monitor with your Tapes (dubbing) Connections Before you begin... • Make Camcorder-VCR connections (see left). • Turn both units to LINE. Basic Operation Copying your TV • Turn TV on and tune to VCR channel (CH3 or CH4). • Set TV/VCR Selector on VCR to VCR. 1 Insert a pre-recorded tape into Camcorder and a blank tape with record tab into VCR. 2 Press (PLAY/STILL) on Camcorder...
... see VCR owner's manual. • Set Camcorder POWER to VCR. 5 Source (Playing) Camcorder 2, 4 Audio/ Video Out Monitor with your Tapes (dubbing) Connections Before you begin... • Make Camcorder-VCR connections (see left). • Turn both units to LINE. Basic Operation Copying your TV • Turn TV on and tune to VCR channel (CH3 or CH4). • Set TV/VCR Selector on VCR to VCR. 1 Insert a pre-recorded tape into Camcorder and a blank tape with record tab into VCR. 2 Press (PLAY/STILL) on Camcorder...
VML153 User Guide
Page 39
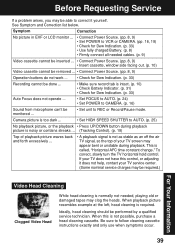
... not needed cables. (p. 9) Video cassette cannot be inserted ... • Connect Power Source. (pp. 8, 9) • Insert cassette, window side facing out. (p. 10) Video cassette cannot be removed ... • Connect Power Source. (pp. 8, 9) Operation buttons do not work ... • Check for Dew Indication. (p. 33) • Use fully charged Battery. (p. 8) • Firmly connect all needed , playing old or damaged tapes may be performed by a qualified service technician. Camera picture is too dark ... • Set HIGH SPEED SHUTTER to follow cleaning cassette instructions exactly...
... not needed cables. (p. 9) Video cassette cannot be inserted ... • Connect Power Source. (pp. 8, 9) • Insert cassette, window side facing out. (p. 10) Video cassette cannot be removed ... • Connect Power Source. (pp. 8, 9) Operation buttons do not work ... • Check for Dew Indication. (p. 33) • Use fully charged Battery. (p. 8) • Firmly connect all needed , playing old or damaged tapes may be performed by a qualified service technician. Camera picture is too dark ... • Set HIGH SPEED SHUTTER to follow cleaning cassette instructions exactly...
VML153 User Guide
Page 41
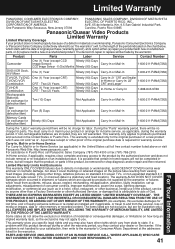
... authorized servicer and does not include removal or re-installation of an installed product. A purchase receipt or other rights which vary from viewing fixed images (including, among other memory or recorded content. home, but are caused by products not supplied by the warrantor, or failures which result from the servicer, loss of media or images, data or other things, letterbox pictures on standard 4:3 screen TV...
... authorized servicer and does not include removal or re-installation of an installed product. A purchase receipt or other rights which vary from viewing fixed images (including, among other memory or recorded content. home, but are caused by products not supplied by the warrantor, or failures which result from the servicer, loss of media or images, data or other things, letterbox pictures on standard 4:3 screen TV...
VML153 User Guide
Page 44
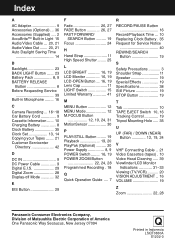
... POWER ZOOM Button 22, 24, 28 Programmed Recording . 18 Q Quick Operation Guide .... 7 R RECORD/PAUSE Button 16 Record/Playback Time ... 10 Replacing Clock Battery . 35 Request for Service Notice 40 REWIND/SEARCH Button 19 S Safety Precautions 3 Shoulder Strap 11 Speaker 19 Special Effects 19 Specifications 38 Still Picture 19 STOP Button 19 T Tab 10 TAPE EJECT Switch 10, 16 Tracking Control 19 Tripod Mounting Hole ..... 35 U UP (FAR) / DOWN (NEAR) Button 12, 19, 24 V VHF Connecting Cable .. 21 Video Cassettes (tapes) . 10 Video Head Cleaning...
... POWER ZOOM Button 22, 24, 28 Programmed Recording . 18 Q Quick Operation Guide .... 7 R RECORD/PAUSE Button 16 Record/Playback Time ... 10 Replacing Clock Battery . 35 Request for Service Notice 40 REWIND/SEARCH Button 19 S Safety Precautions 3 Shoulder Strap 11 Speaker 19 Special Effects 19 Specifications 38 Still Picture 19 STOP Button 19 T Tab 10 TAPE EJECT Switch 10, 16 Tracking Control 19 Tripod Mounting Hole ..... 35 U UP (FAR) / DOWN (NEAR) Button 12, 19, 24 V VHF Connecting Cable .. 21 Video Cassettes (tapes) . 10 Video Head Cleaning...


