
Operating Instructions
Page 4
Table of Contents Document Management System Section Document Scanner...90 Main Window 90 Tool Menu ...92 Image Scanning 94 Panafax Desktop ...96 General Description 96 Connection Configurations 97 Installation and Setup 99 Main Window and Toolbar 104 Sending Document 106 ...124 Task Bar Display 124 Task Bar Menu 125 Display Status Details 126 Configuration Editor ...129 Main Window 129 User Parameters Folder 131 Fax Parameters Folder 132 Journal Folder 133 Phone Book Setting Shortcut Activation Folder 134 Phonebook Editor ...135 Features...135 Activation Procedure 136 Main Window...
Table of Contents Document Management System Section Document Scanner...90 Main Window 90 Tool Menu ...92 Image Scanning 94 Panafax Desktop ...96 General Description 96 Connection Configurations 97 Installation and Setup 99 Main Window and Toolbar 104 Sending Document 106 ...124 Task Bar Display 124 Task Bar Menu 125 Display Status Details 126 Configuration Editor ...129 Main Window 129 User Parameters Folder 131 Fax Parameters Folder 132 Journal Folder 133 Phone Book Setting Shortcut Activation Folder 134 Phonebook Editor ...135 Features...135 Activation Procedure 136 Main Window...
Operating Instructions
Page 11
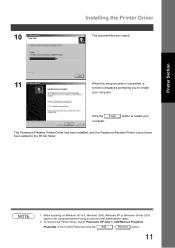
... is displayed prompting you to restart your The Panasonic/Panafax Printer Driver has been installed, and the Panasonic/Panafax Printer icon(s) have been added to the Printer folder. button to the computer/network using an account with administrator rights. 2 To remove the Printer Driver, select Panasonic UF-xxxx in Add/Remove Programs Properties in the Control...
... is displayed prompting you to restart your The Panasonic/Panafax Printer Driver has been installed, and the Panasonic/Panafax Printer icon(s) have been added to the Printer folder. button to the computer/network using an account with administrator rights. 2 To remove the Printer Driver, select Panasonic UF-xxxx in Add/Remove Programs Properties in the Control...

Operating Instructions
Page 43
Document Management System Section 7 Verify the installation destination and click the Next button. 8 Verify the data folder destination and click the Next button. 9 Select the type of Panafax Desktop configuration either Standalone/Server or Client. (See pages 97 and 98). Continued on the next page... 43 Installing the Document Management System 6 Click Typical.
Document Management System Section 7 Verify the installation destination and click the Next button. 8 Verify the data folder destination and click the Next button. 9 Select the type of Panafax Desktop configuration either Standalone/Server or Client. (See pages 97 and 98). Continued on the next page... 43 Installing the Document Management System 6 Click Typical.

Operating Instructions
Page 45
Installing the Document Management System 13 When the setup process is completed, a screen is now complete. The Panasonic Document Management System folder has been added to the computer using an account with the directions on Windows 98/Windows NT, after... rebooting your computer. Document Management System Section NOTE 1. Install in accordance with administrator rights. 45 button to restart your When installing Panafax Desktop on the screen. When installing on Windows NT 4.0, Windows 2000, Windows XP or Windows Server 2003, logon to the Program menu, and...
Installing the Document Management System 13 When the setup process is completed, a screen is now complete. The Panasonic Document Management System folder has been added to the computer using an account with the directions on Windows 98/Windows NT, after... rebooting your computer. Document Management System Section NOTE 1. Install in accordance with administrator rights. 45 button to restart your When installing Panafax Desktop on the screen. When installing on Windows NT 4.0, Windows 2000, Windows XP or Windows Server 2003, logon to the Program menu, and...
Operating Instructions
Page 96
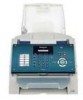
... overflows during the transfer of the device. Compatible Models - UF-590/790 - UF-4000/4100 - The transmission is 999. Please consult your Network Administrator. 96 Panafax Desktop General Description Panafax Desktop is a PC Faxing application specifically designed to temporarily disable the Anti-virus software when... You may interfere and/or cause the Panafax Desktop from sending a PC Fax Job to the size that can be required to complement the Panasonic line of printing the hard copy locally before faxing it may be easily faxed to a remote location directly, without having...
... overflows during the transfer of the device. Compatible Models - UF-590/790 - UF-4000/4100 - The transmission is 999. Please consult your Network Administrator. 96 Panafax Desktop General Description Panafax Desktop is a PC Faxing application specifically designed to temporarily disable the Anti-virus software when... You may interfere and/or cause the Panafax Desktop from sending a PC Fax Job to the size that can be required to complement the Panasonic line of printing the hard copy locally before faxing it may be easily faxed to a remote location directly, without having...
Operating Instructions
Page 97
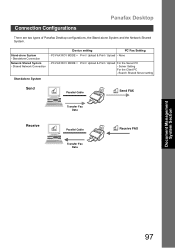
... - None - Search Shared Server setting Standalone System Send aaa Parallel Cable aaa Send FAX Transfer Fax Data Receive ddd Parallel Cable Transfer Fax Data ddd Receive FAX Document Management System Section 97 Connection Configurations Panafax Desktop There are two types of Panafax Desktop configurations, the Stand-alone System and the Network Shared System. Server Setting For...
... - None - Search Shared Server setting Standalone System Send aaa Parallel Cable aaa Send FAX Transfer Fax Data Receive ddd Parallel Cable Transfer Fax Data ddd Receive FAX Document Management System Section 97 Connection Configurations Panafax Desktop There are two types of Panafax Desktop configurations, the Stand-alone System and the Network Shared System. Server Setting For...
Operating Instructions
Page 98
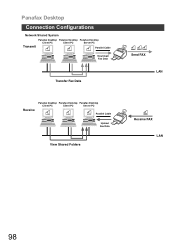
Panafax Desktop Connection Configurations Network Shared System Transmit Panafax Desktop Client PC aaa Panafax Desktop Client PC bbb Panafax Desktop Server PC Parallel Cable ccc Download Fax Data Transfer Fax Data aaa bbb ccc Send FAX LAN Receive Panafax Desktop Panafax Desktop Panafax Desktop Client PC Client PC Server PC ddd ddd ddd Parallel Cable Upload Fax Data View Shared Folders ddd Receive FAX LAN 98
Panafax Desktop Connection Configurations Network Shared System Transmit Panafax Desktop Client PC aaa Panafax Desktop Client PC bbb Panafax Desktop Server PC Parallel Cable ccc Download Fax Data Transfer Fax Data aaa bbb ccc Send FAX LAN Receive Panafax Desktop Panafax Desktop Panafax Desktop Client PC Client PC Server PC ddd ddd ddd Parallel Cable Upload Fax Data View Shared Folders ddd Receive FAX LAN 98
Operating Instructions
Page 99
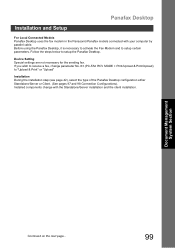
... page... 99 Before using the Panafax Desktop, it is necessary to activate the Fax Modem and to setup the Panafax Desktop. If you wish to receive a fax, change with your computer by parallel cable. Installation and Setup Panafax Desktop For Local Connected Models Panafax Desktop uses the fax modem in the Panasonic/Panafax models connected with the Standalone/Server...
... page... 99 Before using the Panafax Desktop, it is necessary to activate the Fax Modem and to setup the Panafax Desktop. If you wish to receive a fax, change with your computer by parallel cable. Installation and Setup Panafax Desktop For Local Connected Models Panafax Desktop uses the fax modem in the Panasonic/Panafax models connected with the Standalone/Server...

Operating Instructions
Page 100
The unit will be ready to send and receive fax massages if the device and PC are unnecessary. Note: Confirm that the device is started. Panafax Desktop Installation and Setup Setup for Standalone System Special settings are connected with the parallel cable and Panafax Desktop is not in the Energy Saver Mode or Sleep Mode when you start Panafax Desktop. 100
The unit will be ready to send and receive fax massages if the device and PC are unnecessary. Note: Confirm that the device is started. Panafax Desktop Installation and Setup Setup for Standalone System Special settings are connected with the parallel cable and Panafax Desktop is not in the Energy Saver Mode or Sleep Mode when you start Panafax Desktop. 100

Operating Instructions
Page 101
... appears on the next page... Document Management System Section 2 The PC Fax Device Locator appears. The default setting is usually all right. • Shared Folder Settings This is set up when Panafax Desktop is to save the Fax log data. Double-click the icon on the Windows Desktop. Click the... OK button when you finish the settings. • Fax Log Data Folder Location Specify the location to be shared. The ...
... appears on the next page... Document Management System Section 2 The PC Fax Device Locator appears. The default setting is usually all right. • Shared Folder Settings This is set up when Panafax Desktop is to save the Fax log data. Double-click the icon on the Windows Desktop. Click the... OK button when you finish the settings. • Fax Log Data Folder Location Specify the location to be shared. The ...

Operating Instructions
Page 102
... this case, we recommend you changed it from the default setting. • Password Input the Server Password if it was changed from the default setting. Panafax Desktop Installation and Setup 2 Device Search Ranges appears. Specification of Computer Name Input the Server Computer Name. -
... this case, we recommend you changed it from the default setting. • Password Input the Server Password if it was changed from the default setting. Panafax Desktop Installation and Setup 2 Device Search Ranges appears. Specification of Computer Name Input the Server Computer Name. -
Operating Instructions
Page 103
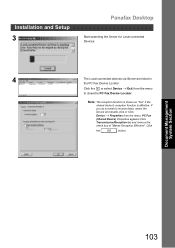
Installation and Setup 3 Panafax Desktop Start searching the Server for Local connected Devices. 4 The Local connected devices via Server are listed in the PC Fax Device Locator. If you do not wish to close the PC Fax Device Locator. Document Management System Section 103 Click the x or select ...Device → Exit from the menu to receive faxes, select the Device and double-click or Click Device → Properties from the menu. PC Fax (Shared Device) Properties appears.Click Transmission/Reception tab and remove the check box of "Makes...
Installation and Setup 3 Panafax Desktop Start searching the Server for Local connected Devices. 4 The Local connected devices via Server are listed in the PC Fax Device Locator. If you do not wish to close the PC Fax Device Locator. Document Management System Section 103 Click the x or select ...Device → Exit from the menu to receive faxes, select the Device and double-click or Click Device → Properties from the menu. PC Fax (Shared Device) Properties appears.Click Transmission/Reception tab and remove the check box of "Makes...
Operating Instructions
Page 104
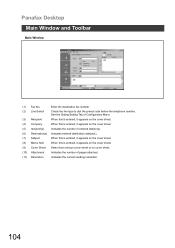
Panafax Desktop Main Window and Toolbar Main Window (1) (2) (3) (4) (7) (8) (9) (5) (6) (10) (11) (1) Fax No. Enter the destination fax number. (2) Line Select Check the line type to dial the preset code before the telephone number. See the Dialing Setting Tab of Configuration Menu. (3) Recipient ...
Panafax Desktop Main Window and Toolbar Main Window (1) (2) (3) (4) (7) (8) (9) (5) (6) (10) (11) (1) Fax No. Enter the destination fax number. (2) Line Select Check the line type to dial the preset code before the telephone number. See the Dialing Setting Tab of Configuration Menu. (3) Recipient ...

Operating Instructions
Page 105
Used to show the Send/Receive Log Manager. Used to show the On-line help. Document Management System Section 105 Used to open your personal Phone Book. Used to view the cover sheet or transmission file. Main Window and Toolbar Toolbar Panafax Desktop Used to create or edit a Cover Sheet. Used to start the transmission. Used to select the file to be sent.
Used to show the Send/Receive Log Manager. Used to show the On-line help. Document Management System Section 105 Used to open your personal Phone Book. Used to view the cover sheet or transmission file. Main Window and Toolbar Toolbar Panafax Desktop Used to create or edit a Cover Sheet. Used to start the transmission. Used to select the file to be sent.
Operating Instructions
Page 106
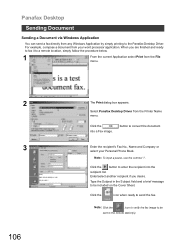
Click the button to enter the recipient into a Fax image. Note: Click the icon to verify the fax image to the Panafax Desktop Driver. Select Panafax Desktop Driver from any Windows Application by simply printing to be included on the Cover Sheet. Type the Subject ... brief message to be sent to convert the document Enter the recipient's Fax No., Name and Company or select your word processor application. Panafax Desktop Sending Document Sending a Document via Windows Application You can send a fax directly from the Printer Name menu. For example, compose a document from ...
Click the button to enter the recipient into a Fax image. Note: Click the icon to verify the fax image to the Panafax Desktop Driver. Select Panafax Desktop Driver from any Windows Application by simply printing to be included on the Cover Sheet. Type the Subject ... brief message to be sent to convert the document Enter the recipient's Fax No., Name and Company or select your word processor application. Panafax Desktop Sending Document Sending a Document via Windows Application You can send a fax directly from the Printer Name menu. For example, compose a document from ...

Operating Instructions
Page 107
Document Management System Section 107 Sending Document 4 Panafax Desktop Click the OK button to start the transmission.
Document Management System Section 107 Sending Document 4 Panafax Desktop Click the OK button to start the transmission.
Operating Instructions
Page 108
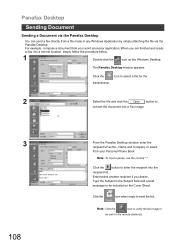
... station(s). Type the Subject in any Windows Application by simply attaching the file via the Panafax Desktop. Enter/select another recipient if you are finished and ready to fax it to convert the document into the recipient list. Click the icon when ready to... on the Cover Sheet. Note: Click the icon to verify the fax image to send the fax. The Panafax Desktop window appears. When you desire. Panafax Desktop Sending Document Sending a Document via the Panafax Desktop You can send a fax directly from your Personal Phone Book. For example, compose a document ...
... station(s). Type the Subject in any Windows Application by simply attaching the file via the Panafax Desktop. Enter/select another recipient if you are finished and ready to fax it to convert the document into the recipient list. Click the icon when ready to... on the Cover Sheet. Note: Click the icon to verify the fax image to send the fax. The Panafax Desktop window appears. When you desire. Panafax Desktop Sending Document Sending a Document via the Panafax Desktop You can send a fax directly from your Personal Phone Book. For example, compose a document ...
Operating Instructions
Page 109
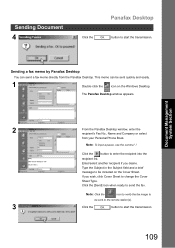
... 1 Double-click the icon on the Cover Sheet. Document Management System Section 2 From the Panafax Desktop window, enter the recipient's Fax No., Name and Company or select from the Panafax Desktop. Enter/select another recipient if you wish, click Cover Sheet to change the Cover Sheet... to start the transmission. Sending Document 4 Panafax Desktop Click the OK button to start the transmission. 109 Note: Click the icon to verify the fax image to be included on the Windows Desktop. This memo can send a fax memo directly from your Personal Phone Book. Click...
... 1 Double-click the icon on the Cover Sheet. Document Management System Section 2 From the Panafax Desktop window, enter the recipient's Fax No., Name and Company or select from the Panafax Desktop. Enter/select another recipient if you wish, click Cover Sheet to change the Cover Sheet... to start the transmission. Sending Document 4 Panafax Desktop Click the OK button to start the transmission. 109 Note: Click the icon to verify the fax image to be included on the Windows Desktop. This memo can send a fax memo directly from your Personal Phone Book. Click...

Operating Instructions
Page 110
... Select a transaction from the log then click the icon to view the received fax. 3 The received fax is displayed on the connected PC. Panafax Desktop Receiving Document Receive Setting 1 Confirm the Panasonic Communications Utility icon is in the taskbar tray. 2 Right-click the Panasonic Communications Utility Icon to show the menu and select the PC...
... Select a transaction from the log then click the icon to view the received fax. 3 The received fax is displayed on the connected PC. Panafax Desktop Receiving Document Receive Setting 1 Confirm the Panasonic Communications Utility icon is in the taskbar tray. 2 Right-click the Panasonic Communications Utility Icon to show the menu and select the PC...

Operating Instructions
Page 111
... 2 Click the button. Click the Personal Details button to delete the address. 3 Tab • Name: Enter the recipient's name. • Fax No.: Enter the fax number. • Call Type: Select how the call should be used on the Cover Sheet. 5 Click the OK button to open the Phone... input a pause, use the comma (,). 4 Tab Enter the Company Name, Department, Job Title, Address, Direct Phone No. The maximum number of the fax number. Click the Acquire Device's Phone Book button to enable the retrieval of the recipient to be dialed. of the phonebook data from step 2. 111...
... 2 Click the button. Click the Personal Details button to delete the address. 3 Tab • Name: Enter the recipient's name. • Fax No.: Enter the fax number. • Call Type: Select how the call should be used on the Cover Sheet. 5 Click the OK button to open the Phone... input a pause, use the comma (,). 4 Tab Enter the Company Name, Department, Job Title, Address, Direct Phone No. The maximum number of the fax number. Click the Acquire Device's Phone Book button to enable the retrieval of the recipient to be dialed. of the phonebook data from step 2. 111...


