
TH32LR11UH User Guide
Page 2
... not remove cover or back. Refer servicing to receive low-power analog broadcasts via an antenna. Do not place containers with the appliance. Refer servicing to work as required by law) on February 17, 2009, after that date to record or display programming from a separate TV tuner. Please check with this apparatus to tune the digital signal received with a TV tuner that relies on a TV antenna, that important operating and servicing instructions...
... not remove cover or back. Refer servicing to receive low-power analog broadcasts via an antenna. Do not place containers with the appliance. Refer servicing to work as required by law) on February 17, 2009, after that date to record or display programming from a separate TV tuner. Please check with this apparatus to tune the digital signal received with a TV tuner that relies on a TV antenna, that important operating and servicing instructions...

TH32LR11UH User Guide
Page 3
... or when unused for replacement of the obsolete outlet. 10) Protect the power cord from being walked on the AC cord power plug is securely connected. 3 Important Safety Instructions 1) Read these instructions. 2) Keep these instructions. 3) Heed all warnings. 4) Follow all instructions. 5) Do not use attachments / accessories specified by the manufacturer. 12) Use only with the cart, stand, tripod, bracket, or table specified...
... or when unused for replacement of the obsolete outlet. 10) Protect the power cord from being walked on the AC cord power plug is securely connected. 3 Important Safety Instructions 1) Read these instructions. 2) Keep these instructions. 3) Heed all warnings. 4) Follow all instructions. 5) Do not use attachments / accessories specified by the manufacturer. 12) Use only with the cart, stand, tripod, bracket, or table specified...

TH32LR11UH User Guide
Page 4
... Safety Instructions 3 FCC STATEMENT 5 Safety Precautions 6 Maintenance 7 Accessories 8 Accessories Supplied 8 Location 8 Preparation for Wall-hanging 9 Connections 9 PC Input Terminals connection 10 SERIAL Terminals connection 11 Power ON / OFF 12 Initial selections 13 Selecting the input signal 13 Selecting the On-Screen Menu Language 13 Basic Controls 14 ASPECT Controls 16 MULTI PIP 17 Advanced PIP 18 Digital Zoom 19 On-Screen Menu Displays 20 Adjusting POS. /SIZE 21 PICTURE Adjustments 22 ADVANCED SETTINGS 23 SOUND Adjustment 24 PRESENT TIME SETUP / SET UP TIMER...
... Safety Instructions 3 FCC STATEMENT 5 Safety Precautions 6 Maintenance 7 Accessories 8 Accessories Supplied 8 Location 8 Preparation for Wall-hanging 9 Connections 9 PC Input Terminals connection 10 SERIAL Terminals connection 11 Power ON / OFF 12 Initial selections 13 Selecting the input signal 13 Selecting the On-Screen Menu Language 13 Basic Controls 14 ASPECT Controls 16 MULTI PIP 17 Advanced PIP 18 Digital Zoom 19 On-Screen Menu Displays 20 Adjusting POS. /SIZE 21 PICTURE Adjustments 22 ADVANCED SETTINGS 23 SOUND Adjustment 24 PRESENT TIME SETUP / SET UP TIMER...
TH32LR11UH User Guide
Page 5
...-32LR11UH Responsible Party: Contact Source: Panasonic Corporation of the FCC Rules. If you display a still picture for help. This equipment generates, uses and can be determined by turning the equipment off and on the screen. of the Video Electronics Standard Association. FCC CAUTION: To assure continued compliance, follow the attached installation instructions and use only shielded interface cables when connecting to computer or peripheral...
...-32LR11UH Responsible Party: Contact Source: Panasonic Corporation of the FCC Rules. If you display a still picture for help. This equipment generates, uses and can be determined by turning the equipment off and on the screen. of the Video Electronics Standard Association. FCC CAUTION: To assure continued compliance, follow the attached installation instructions and use only shielded interface cables when connecting to computer or peripheral...
TH32LR11UH User Guide
Page 6
When using the LCD Display Do not bring your hands, face or objects close . Install your Display. Disconnect the power plug from becoming dusty. • Built-up . Clean the power cable regularly to prevent them from your infrared sensor in a place away from direct or reflected light from being released through the ventilation holes. Note: Image retention may cause instability which...
When using the LCD Display Do not bring your hands, face or objects close . Install your Display. Disconnect the power plug from becoming dusty. • Built-up . Clean the power cable regularly to prevent them from your infrared sensor in a place away from direct or reflected light from being released through the ventilation holes. Note: Image retention may cause instability which...
TH32LR11UH User Guide
Page 7
... also keep the space between the bottom of the panel with wet hands. • Doing so may cause damage to the internal circuitry. Do not handle the power cord plug with fingernails or other setting-up method, follow the manual of it repaired at the rear.) AC Power Supply Cord The Display is particularly dirty, soak the cloth in contact with...
... also keep the space between the bottom of the panel with wet hands. • Doing so may cause damage to the internal circuitry. Do not handle the power cord plug with fingernails or other setting-up method, follow the manual of it repaired at the rear.) AC Power Supply Cord The Display is particularly dirty, soak the cloth in contact with...

TH32LR11UH User Guide
Page 9
A Remove four screws B B Pull out the pedestal Foam mat or thick soft cloth A WARNING Failure to use a Panasonic bracket or choosing to mount the unit yourself will void your unit's warranty. Follow the steps below ceiling lights (such as spotlights, floodlights, or halogen lights) which •typically give off high heat. Preparation for Wall-hanging Accessories Before mounting the display on Computer (see...
A Remove four screws B B Pull out the pedestal Foam mat or thick soft cloth A WARNING Failure to use a Panasonic bracket or choosing to mount the unit yourself will void your unit's warranty. Follow the steps below ceiling lights (such as spotlights, floodlights, or halogen lights) which •typically give off high heat. Preparation for Wall-hanging Accessories Before mounting the display on Computer (see...

TH32LR11UH User Guide
Page 13
... Display. POWER INPUT M Selecting the On-Screen Menu Language Press to select OSD LANGUAGE. Press to display the SET UP menu. Press to select the input signal to be played back from the source connected to select your preferred language. Press to the component/RGB input terminals. (see page 29) • In 2 screen display, the same input mode cannot be selected if the terminal board is also possible by installing...
... Display. POWER INPUT M Selecting the On-Screen Menu Language Press to select OSD LANGUAGE. Press to display the SET UP menu. Press to select the input signal to be played back from the source connected to select your preferred language. Press to the component/RGB input terminals. (see page 29) • In 2 screen display, the same input mode cannot be selected if the terminal board is also possible by installing...

TH32LR11UH User Guide
Page 14
... with unit buttons. 1. Press ENTER/Ŷ. Green • DPMS Orange (With PC input signal and during operation of PC's screensaver.) 14 Indicator not illuminated (The unit will switch. (see page 20) Normal Viewing PICTURE SET UP SOUND POS. /SIZE -/ź VOL +/Ÿ ENTER/Ŷ Enter / Aspect button This button is locked by initial setting. (see page 16, 20) Volume Adjustment Volume Up "+" Down "-" When the menu screen is displayed: "+" : press to...
... with unit buttons. 1. Press ENTER/Ŷ. Green • DPMS Orange (With PC input signal and during operation of PC's screensaver.) 14 Indicator not illuminated (The unit will switch. (see page 20) Normal Viewing PICTURE SET UP SOUND POS. /SIZE -/ź VOL +/Ÿ ENTER/Ŷ Enter / Aspect button This button is locked by initial setting. (see page 16, 20) Volume Adjustment Volume Up "+" Down "-" When the menu screen is displayed: "+" : press to...

TH32LR11UH User Guide
Page 15
... mode (see page 16) POWER button The Display must first be plugged into the wall outlet and turned on the selected input signal. (Ex. R button (see page 13) When a dual input terminal board is attached, A or B is displayed depending on at a concert hall or cinema. POS. /SIZE button (see page 21) OFF TIMER button The Display can be preset to switch to mute the sound. Remote Control Transmitter Basic Controls The remote control...
... mode (see page 16) POWER button The Display must first be plugged into the wall outlet and turned on the selected input signal. (Ex. R button (see page 13) When a dual input terminal board is attached, A or B is displayed depending on at a concert hall or cinema. POS. /SIZE button (see page 21) OFF TIMER button The Display can be preset to switch to mute the sound. Remote Control Transmitter Basic Controls The remote control...

TH32LR11UH User Guide
Page 18
... picture depending on the type of signals displayed on the main picture and depending on them satisfactorily. • Following combinations of two analog signals cannot be displayed as follows. Component, PC (RGB) - Each time pressing this button main picture and sub picture will be displayed simultaneously; Notes: • If "INPUT lock" in Options menu is set to other than "Off", MULTI PIP function isn't available. • Sound output is from the picture...
... picture depending on the type of signals displayed on the main picture and depending on them satisfactorily. • Following combinations of two analog signals cannot be displayed as follows. Component, PC (RGB) - Each time pressing this button main picture and sub picture will be displayed simultaneously; Notes: • If "INPUT lock" in Options menu is set to other than "Off", MULTI PIP function isn't available. • Sound output is from the picture...

TH32LR11UH User Guide
Page 20
..., 23) SET UP 1/2 SIGNAL COMPONENT/RGB-IN SELECT RGB INPUT LABEL PC POWER SAVE OFF STANDBY SAVE OFF POWER MANAGEMENT OFF AUTO POWER OFF OSD LANGUAGE OFF ENGLISH (US) SET UP 2/2 SET UP TIMER PRESENT TIME SETUP SIDE BAR ADJUST BRIGHT SOUND NORMALIZE NORMAL AUDIO MENU BASS MID TREBLE BALANCE SURROUND AUDIO OUT (PIP) STANDARD 0 0 0 0 OFF MAIN (see page 24) SIGNAL [ VIDEO ] 3D Y/C FILTER (NTSC) COLOR SYSTEM 3 : 2 PULLDOWN Panasonic AUTO (4 : 3) NOISE REDUCTION ON AUTO OFF 4:3 OFF...
..., 23) SET UP 1/2 SIGNAL COMPONENT/RGB-IN SELECT RGB INPUT LABEL PC POWER SAVE OFF STANDBY SAVE OFF POWER MANAGEMENT OFF AUTO POWER OFF OSD LANGUAGE OFF ENGLISH (US) SET UP 2/2 SET UP TIMER PRESENT TIME SETUP SIDE BAR ADJUST BRIGHT SOUND NORMALIZE NORMAL AUDIO MENU BASS MID TREBLE BALANCE SURROUND AUDIO OUT (PIP) STANDARD 0 0 0 0 OFF MAIN (see page 24) SIGNAL [ VIDEO ] 3D Y/C FILTER (NTSC) COLOR SYSTEM 3 : 2 PULLDOWN Panasonic AUTO (4 : 3) NOISE REDUCTION ON AUTO OFF 4:3 OFF...

TH32LR11UH User Guide
Page 23
... SETTINGS Item BLACK EXTENSION INPUT LEVEL Effect Less More Less More Details Adjusts the dark shades of dark pictures such as an adjustment reference. Helpful Hint ( / NORMALIZE Normalization) On the remote control unit, while the "ADVANCED SETTINGS" menu is displayed, if either the N button is pressed at any time or the ACTION ( ) button is pressed during "VIDEO (S VIDEO)" input signal. • In PICTURE, there is not a noticeable change the level of parts...
... SETTINGS Item BLACK EXTENSION INPUT LEVEL Effect Less More Less More Details Adjusts the dark shades of dark pictures such as an adjustment reference. Helpful Hint ( / NORMALIZE Normalization) On the remote control unit, while the "ADVANCED SETTINGS" menu is displayed, if either the N button is pressed at any time or the ACTION ( ) button is pressed during "VIDEO (S VIDEO)" input signal. • In PICTURE, there is not a noticeable change the level of parts...

TH32LR11UH User Guide
Page 25
... menu. 2 Press to select POWER ON TIME / POWER OFF TIME. PRESENT TIME OF DAY 99:99 button: Forward POWER ON FUNCTION OFF button: Back POWER ON TIME 0:00 POWER OFF FUNCTION OFF Notes: POWER OFF TIME 0:00 • Pressing " " or " " button once changes POWER ON TIME / POWER OFF TIME 1 minute. • Pressing " " or " " button continuously changes POWER ON TIME / POWER OFF TIME by 15 minutes. 2 Press to display the SET UP TIMER screen or PRESENT TIME SETUP screen. Then set . 25 Disconnecting the AC cord. SET...
... menu. 2 Press to select POWER ON TIME / POWER OFF TIME. PRESENT TIME OF DAY 99:99 button: Forward POWER ON FUNCTION OFF button: Back POWER ON TIME 0:00 POWER OFF FUNCTION OFF Notes: POWER OFF TIME 0:00 • Pressing " " or " " button once changes POWER ON TIME / POWER OFF TIME 1 minute. • Pressing " " or " " button continuously changes POWER ON TIME / POWER OFF TIME by 15 minutes. 2 Press to display the SET UP TIMER screen or PRESENT TIME SETUP screen. Then set . 25 Disconnecting the AC cord. SET...

TH32LR11UH User Guide
Page 29
STANDBY SAVE OFF COMPONENT RGB POWER MANAGEMENT OFF AUTO POWER OFF OFF OSD LANGUAGE ENGLISH (US) 3 Press to exit from adjust mode. YUV signals "YUV" RGB signals "RGB" 1 Press to display the SET UP menu. 2 Press to display the SET UP menu. SET UP 1/2 SIGNAL YUV/RGB-IN SELECT INPUT LABEL POWER SAVE STANDBY SAVE POWER MANAGEMENT AUTO POWER OFF OSD LANGUAGE RGB PC OFF OFF OFF OFF ENGLISH (US) 29 Y, PB, PR signals "COMPONENT" RGB...
STANDBY SAVE OFF COMPONENT RGB POWER MANAGEMENT OFF AUTO POWER OFF OFF OSD LANGUAGE ENGLISH (US) 3 Press to exit from adjust mode. YUV signals "YUV" RGB signals "RGB" 1 Press to display the SET UP menu. 2 Press to display the SET UP menu. SET UP 1/2 SIGNAL YUV/RGB-IN SELECT INPUT LABEL POWER SAVE STANDBY SAVE POWER MANAGEMENT AUTO POWER OFF OSD LANGUAGE RGB PC OFF OFF OFF OFF ENGLISH (US) 29 Y, PB, PR signals "COMPONENT" RGB...

TH32LR11UH User Guide
Page 31
... system set ON/OFF. SIGNAL [ VIDEO ] Press to match the input signal. Mode Function COLOR SYSTEM Set the color system to select each adjustment (such as "AUTO SETUP") on the "POS. /SIZE" menu as movie pictures, which are recorded at 24 frames per second. Be sure to achieve a more natural interpretation of the input signal. SET UP for Input Signals COLOR SYSTEM / Panasonic AUTO Select SIGNAL from NTSC/PAL/SECAM, however, M.NTSC signal is not displayed...
... system set ON/OFF. SIGNAL [ VIDEO ] Press to match the input signal. Mode Function COLOR SYSTEM Set the color system to select each adjustment (such as "AUTO SETUP") on the "POS. /SIZE" menu as movie pictures, which are recorded at 24 frames per second. Be sure to achieve a more natural interpretation of the input signal. SET UP for Input Signals COLOR SYSTEM / Panasonic AUTO Select SIGNAL from NTSC/PAL/SECAM, however, M.NTSC signal is not displayed...

TH32LR11UH User Guide
Page 35
... the remote control. ID select Sets panel ID number when panel is on the remote control. On: Enables the external control by the ID. On: Locks all the buttons on main unit. User1:You can only use , , , , , buttons on or in the standby state. On: Sets Advanced PIP mode (see page 17). Disable: Disables the "Off-timer function". Normal: Power returns in as the same state as the value input in the single screen display mode...
... the remote control. ID select Sets panel ID number when panel is on the remote control. On: Enables the external control by the ID. On: Locks all the buttons on main unit. User1:You can only use , , , , , buttons on or in the standby state. On: Sets Advanced PIP mode (see page 17). Disable: Disables the "Off-timer function". Normal: Power returns in as the same state as the value input in the single screen display mode...

TH32LR11UH User Guide
Page 36
... unit together with time delay according to the setting. Notes: • During this setting. On: Display the clock. The clock is blinking green. • This function also works when the power recovers from the fixed serial terminal. (see page 25) Sets All Aspect mode (advanced aspect setting) or default aspect mode. After you press POWER switch to the "Button lock", "Remocon User level" or "Remote ID" adjustments, set all the values...
... unit together with time delay according to the setting. Notes: • During this setting. On: Display the clock. The clock is blinking green. • This function also works when the power recovers from the fixed serial terminal. (see page 25) Sets All Aspect mode (advanced aspect setting) or default aspect mode. After you press POWER switch to the "Button lock", "Remocon User level" or "Remote ID" adjustments, set all the values...
TH32LR11UH User Guide
Page 39
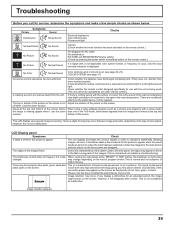
...;icker in 4:3 mode changes. LCD Display panel Symptoms It takes a while for service, determine the symptoms and make a few simple checks as a cinema size program) with a non-applicable color system format, or frequency is input, only the input terminal indication is not a problem. There may change depending on the kind of program shown: This is normal and not indicative of red, blue, green, or black. Please note this...
...;icker in 4:3 mode changes. LCD Display panel Symptoms It takes a while for service, determine the symptoms and make a few simple checks as a cinema size program) with a non-applicable color system format, or frequency is input, only the input terminal indication is not a problem. There may change depending on the kind of program shown: This is normal and not indicative of red, blue, green, or black. Please note this...

TH32LR11UH User Guide
Page 43
Mass and dimensions shown are subject to change without notice. Specifications Power Source Power Consumption Power on Stand-by condition Power off condition Aspect Ratio Screen size (No.of pixels) Operating condition Temperature Humidity Applicable signals Scanning format PC signals Connection terminals PC IN SERIAL Dimensions (W × H × D) Including pedestal Display Set only Mass (weight) Including pedestal Display Set only Sound Speaker Audio Output TH-32LR11UK, TH-32LR11UH 110 - 127 V AC, 50/60 Hz 160 W Save...
Mass and dimensions shown are subject to change without notice. Specifications Power Source Power Consumption Power on Stand-by condition Power off condition Aspect Ratio Screen size (No.of pixels) Operating condition Temperature Humidity Applicable signals Scanning format PC signals Connection terminals PC IN SERIAL Dimensions (W × H × D) Including pedestal Display Set only Mass (weight) Including pedestal Display Set only Sound Speaker Audio Output TH-32LR11UK, TH-32LR11UH 110 - 127 V AC, 50/60 Hz 160 W Save...


