

TH32LHD7UXK User Guide
Page 3
Servicing is securely connected. 3 A polarized plug has two blades with the manufacturer's instructions. 8) Do not install near any heat sources such as power-supply cord or plug is damaged, liquid has been spilled or objects have fallen into your safety. When a cart is used, use attachments / accessories specified by the manufacturer. 12) Use only with the cart, stand, tripod, bracket, or table specified...
Servicing is securely connected. 3 A polarized plug has two blades with the manufacturer's instructions. 8) Do not install near any heat sources such as power-supply cord or plug is damaged, liquid has been spilled or objects have fallen into your safety. When a cart is used, use attachments / accessories specified by the manufacturer. 12) Use only with the cart, stand, tripod, bracket, or table specified...
TH32LHD7UXK User Guide
Page 4
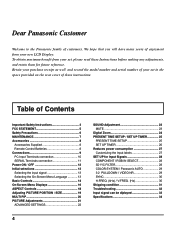
... Instructions 3 FCC STATEMENT 5 Safety Precautions 6 MAINTENANCE 7 Accessories 8 Accessories Supplied 8 Remote Control Batteries 8 Connections 9 PC Input Terminals connection 10 SERIAL Terminals connection 11 Power ON / OFF 12 Initial selections 13 Selecting the input signal 13 Selecting the On-Screen Menu Language 13 Basic Controls 14 On-Screen Menu Displays 16 ASPECT Controls 18 Adjusting PICTURE POSITION / SIZE 19 MULTI PIP 20 PICTURE Adjustments 21 ADVANCED SETTINGS 22 4 SOUND Adjustment 23 MUTE 23 Digital Zoom 24 PRESENT TIME SETUP / SET UP TIMER 25 PRESENT TIME...
... Instructions 3 FCC STATEMENT 5 Safety Precautions 6 MAINTENANCE 7 Accessories 8 Accessories Supplied 8 Remote Control Batteries 8 Connections 9 PC Input Terminals connection 10 SERIAL Terminals connection 11 Power ON / OFF 12 Initial selections 13 Selecting the input signal 13 Selecting the On-Screen Menu Language 13 Basic Controls 14 On-Screen Menu Displays 16 ASPECT Controls 18 Adjusting PICTURE POSITION / SIZE 19 MULTI PIP 20 PICTURE Adjustments 21 ADVANCED SETTINGS 22 4 SOUND Adjustment 23 MUTE 23 Digital Zoom 24 PRESENT TIME SETUP / SET UP TIMER 25 PRESENT TIME...
TH32LHD7UXK User Guide
Page 7
... wall outlet. Contact an Authorized Service Center for a long period of time, unplug the power cord from the LCD Display, unplug the power cord immediately. • Continuous use of 3 15/16" (10 cm) or more at the top, bottom, left and right, 1 31/32" (5 cm) or more at the bottom, and 2 3/4" (7 cm) or more at the rear. When disconnecting the power cable, hold the plug...
... wall outlet. Contact an Authorized Service Center for a long period of time, unplug the power cord from the LCD Display, unplug the power cord immediately. • Continuous use of 3 15/16" (10 cm) or more at the top, bottom, left and right, 1 31/32" (5 cm) or more at the bottom, and 2 3/4" (7 cm) or more at the rear. When disconnecting the power cable, hold the plug...

TH32LHD7UXK User Guide
Page 8
... Alkaline batteries for the Remote Control Transmitter (AA Battery × 2) PICTURE SOUND SET UP MULTI ZOOM PIP SWAP SELECT MOVE PICTURE POS. /SIZE ASPECT PC OFF TIMER DISPLAY Ferrite core (Small size) × 2 Ferrite core (Large size) × 2 Fixing bands × 2 Warranty AC cord Remote Control Batteries Requires two AA batteries. 1. Turn the transmitter face down. Do not combine a used batteries. 5. Two "AA" size Helpful Hint: For frequent remote control users, replace old batteries with...
... Alkaline batteries for the Remote Control Transmitter (AA Battery × 2) PICTURE SOUND SET UP MULTI ZOOM PIP SWAP SELECT MOVE PICTURE POS. /SIZE ASPECT PC OFF TIMER DISPLAY Ferrite core (Small size) × 2 Ferrite core (Large size) × 2 Fixing bands × 2 Warranty AC cord Remote Control Batteries Requires two AA batteries. 1. Turn the transmitter face down. Do not combine a used batteries. 5. Two "AA" size Helpful Hint: For frequent remote control users, replace old batteries with...
TH32LHD7UXK User Guide
Page 9
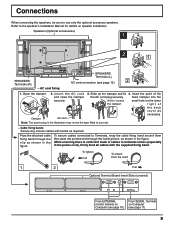
... SLOT2 AUDIO PC IN SERIAL From EXTERNAL monitor terminal on Computer (see page 10) From SERIAL Terminal on Computer (see page 12) 2 - Refer to use only the optional accessory speakers. Speakers (Optional accessories) 1 2 1 SPEAKERS Terminals (R) R AUDIO L IN VIDEO IN VIDEO OUT S VIDEO IN AV R AUDIO L VD HD PR/CR/R PB/CB/B Y/G COMPONENT/RGB IN SLOT 1 SLOT 2 AUDIO PC IN SERIAL SPEAKERS Terminals (L) AC cord connection (see page 11) 9 Connections When connecting the speakers...
... SLOT2 AUDIO PC IN SERIAL From EXTERNAL monitor terminal on Computer (see page 10) From SERIAL Terminal on Computer (see page 12) 2 - Refer to use only the optional accessory speakers. Speakers (Optional accessories) 1 2 1 SPEAKERS Terminals (R) R AUDIO L IN VIDEO IN VIDEO OUT S VIDEO IN AV R AUDIO L VD HD PR/CR/R PB/CB/B Y/G COMPONENT/RGB IN SLOT 1 SLOT 2 AUDIO PC IN SERIAL SPEAKERS Terminals (L) AC cord connection (see page 11) 9 Connections When connecting the speakers...
TH32LHD7UXK User Guide
Page 12
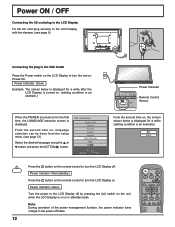
... Remote Control Sensor When the POWER is turned on : Power-On. Power Indicator: Red (standby) Press the button on the remote control to turn the set on for a while (setting condition is an example). PICTURE SOUND SET UP MULTI ZOOM PIP SWAP SELECT MOVE PICTURE POS. /SIZE ASPECT 12 Power Indicator: Green INPUT SURROUND VOL N R Turn the power to the LCD Display with the clamper. (see page 13) Select the desired language using the or button and press the ACTION ( ) button. Fix...
... Remote Control Sensor When the POWER is turned on : Power-On. Power Indicator: Red (standby) Press the button on the remote control to turn the set on for a while (setting condition is an example). PICTURE SOUND SET UP MULTI ZOOM PIP SWAP SELECT MOVE PICTURE POS. /SIZE ASPECT 12 Power Indicator: Green INPUT SURROUND VOL N R Turn the power to the LCD Display with the clamper. (see page 13) Select the desired language using the or button and press the ACTION ( ) button. Fix...

TH32LHD7UXK User Guide
Page 13
... select the input signal to be played back from the source connected to the component/RGB input terminals. (see page 28) • In 2 screen display, the same input mode cannot be selected for the main picture and sub picture. Press to display the SET UP menu. Initial selections Selecting the input signal Select the input signals to be selected if the terminal board is not installed into the SLOT. • Select...
... select the input signal to be played back from the source connected to the component/RGB input terminals. (see page 28) • In 2 screen display, the same input mode cannot be selected for the main picture and sub picture. Press to display the SET UP menu. Initial selections Selecting the input signal Select the input signals to be selected if the terminal board is not installed into the SLOT. • Select...
TH32LHD7UXK User Guide
Page 14
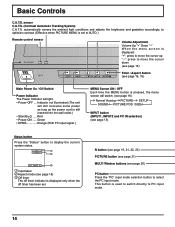
... Viewing PICTURE SETUP SOUND PICTURE POS. /SIZE INPUT button (INPUT1, INPUT2 and PC IN selection) (see page 13) Status button Press the "Status" button to move the cursor down (see page 16) INPUT MENU -/ VOL +/ ENTER/ Enter / Aspect button (see page 18) 3 Off timer The off timer indicator is displayed only when the off timer has been set to AUTO.) Remote control sensor TH-32LHD7 Volume Adjustment Volume Up "+" Down "-" When the menu screen is used to switch directly...
... Viewing PICTURE SETUP SOUND PICTURE POS. /SIZE INPUT button (INPUT1, INPUT2 and PC IN selection) (see page 13) Status button Press the "Status" button to move the cursor down (see page 16) INPUT MENU -/ VOL +/ ENTER/ Enter / Aspect button (see page 18) 3 Off timer The off timer indicator is displayed only when the off timer has been set to AUTO.) Remote control sensor TH-32LHD7 Volume Adjustment Volume Up "+" Down "-" When the menu screen is used to switch directly...

TH32LHD7UXK User Guide
Page 15
... turned on and off each AUDIO MENU SURROUND ON (STANDARD, AUTO). SURROUND button The surround setting switches on at a concert hall or cinema. You can be completely enveloped in sound; just as if you were at the power switch (see page 12). R button (see page 24) ZOOM MOVE Press to previous menu screen. PICTURE SOUND SET UP MULTI ZOOM PIP SWAP SELECT MOVE PICTURE POS. /SIZE ASPECT PC OFF TIMER DISPLAY...
... turned on and off each AUDIO MENU SURROUND ON (STANDARD, AUTO). SURROUND button The surround setting switches on at a concert hall or cinema. You can be completely enveloped in sound; just as if you were at the power switch (see page 12). R button (see page 24) ZOOM MOVE Press to previous menu screen. PICTURE SOUND SET UP MULTI ZOOM PIP SWAP SELECT MOVE PICTURE POS. /SIZE ASPECT PC OFF TIMER DISPLAY...
TH32LHD7UXK User Guide
Page 16
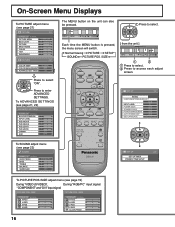
Press to access each adjust screen. Normal Viewing PICTURE SETUP SOUND PICTURE POS. /SIZE INPUT SURROUND [ from the unit ] INPUT MENU -/ VOL +/ ENTER/ 1 2 1 Press to select. 2 Press to enter ADVANCED SETTINGS. On-Screen Menu Displays To PICTURE adjust menu (see page 19) During "VIDEO (S VIDEO)", During "RGB/PC" input signal. "COMPONENT" and "DVI" input signal. INPUT MENU -/ VOL +/ ENTER/ Each time the MENU button is pressed, the menu screen will switch. VOL N R PICTURE SOUND SET UP MULTI ZOOM PIP SWAP SELECT MOVE SET UP 1/2 SIGNAL COMPONENT/RGB-IN SELECT ...
Press to access each adjust screen. Normal Viewing PICTURE SETUP SOUND PICTURE POS. /SIZE INPUT SURROUND [ from the unit ] INPUT MENU -/ VOL +/ ENTER/ 1 2 1 Press to select. 2 Press to enter ADVANCED SETTINGS. On-Screen Menu Displays To PICTURE adjust menu (see page 19) During "VIDEO (S VIDEO)", During "RGB/PC" input signal. "COMPONENT" and "DVI" input signal. INPUT MENU -/ VOL +/ ENTER/ Each time the MENU button is pressed, the menu screen will switch. VOL N R PICTURE SOUND SET UP MULTI ZOOM PIP SWAP SELECT MOVE SET UP 1/2 SIGNAL COMPONENT/RGB-IN SELECT ...
TH32LHD7UXK User Guide
Page 17
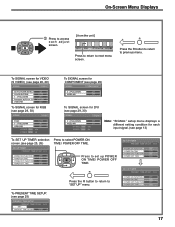
... "SET UP" menu. On-Screen Menu Displays 2 Press to access each input signal. (see page 13) To SET UP TIMER selection screen.(see page 25, 26) SET UP TIMER PRESENT TIME OF DAY 99:99 POWER ON FUNCTION OFF POWER ON TIME 0:00 POWER OFF FUNCTION OFF POWER OFF TIME 0:00 Press to select POWER ON TIME / POWER OFF TIME. R Press the R button to return to set up POWER ON TIME/ POWER OFF TIME. To SIGNAL screen for VIDEO (S VIDEO) (see page 28, 29) SIGNAL [ VIDEO...
... "SET UP" menu. On-Screen Menu Displays 2 Press to access each input signal. (see page 13) To SET UP TIMER selection screen.(see page 25, 26) SET UP TIMER PRESENT TIME OF DAY 99:99 POWER ON FUNCTION OFF POWER ON TIME 0:00 POWER OFF FUNCTION OFF POWER OFF TIME 0:00 Press to select POWER ON TIME / POWER OFF TIME. R Press the R button to return to set up POWER ON TIME/ POWER OFF TIME. To SIGNAL screen for VIDEO (S VIDEO) (see page 28, 29) SIGNAL [ VIDEO...

TH32LHD7UXK User Guide
Page 18
... the image size to a former adjustment. 18 INPUT SURROUND VOL N R [During MULTI PIP Operations] • Picture and Picture, Picture in Picture • Others : NORMAL FULL : Aspect switching is not memorized. The size of 16:9 and 4:3 program material. When viewing such programs, it is recommended that 9 elongation is memorized separately for each time the ENTER button is expanded Changes in Panasonic AUTO with the Panasonic AUTO mode setting (see page 29). Mode NORMAL Picture 4 NORMAL 3 Explanation...
... the image size to a former adjustment. 18 INPUT SURROUND VOL N R [During MULTI PIP Operations] • Picture and Picture, Picture in Picture • Others : NORMAL FULL : Aspect switching is not memorized. The size of 16:9 and 4:3 program material. When viewing such programs, it is recommended that 9 elongation is memorized separately for each time the ENTER button is expanded Changes in Panasonic AUTO with the Panasonic AUTO mode setting (see page 29). Mode NORMAL Picture 4 NORMAL 3 Explanation...

TH32LHD7UXK User Guide
Page 19
..." signal from adjust mode. PICTURE SOUND SET UP MULTI ZOOM PIP SWAP SELECT MOVE PICTURE POS. /SIZE ASPECT PC OFF TIMER 4 R Press to exit from a VCR or DVD player is not memorized. PICTURE POS. /SIZE NORMALIZE NORMAL H-POS H-SIZE V-POS V-SIZE CLOCK PHASE H-POS Adjust the horizontal position. V-SIZE Adjust the vertical size. During "VIDEO (S VIDEO)", "COMPONENT" and "DVI" input signal. This picture position movement cannot be controlled by the PICTURE POS. / SIZE function. • If adjusting the PICTURE V-POS / V-SIZE in mode...
..." signal from adjust mode. PICTURE SOUND SET UP MULTI ZOOM PIP SWAP SELECT MOVE PICTURE POS. /SIZE ASPECT PC OFF TIMER 4 R Press to exit from a VCR or DVD player is not memorized. PICTURE POS. /SIZE NORMALIZE NORMAL H-POS H-SIZE V-POS V-SIZE CLOCK PHASE H-POS Adjust the horizontal position. V-SIZE Adjust the vertical size. During "VIDEO (S VIDEO)", "COMPONENT" and "DVI" input signal. This picture position movement cannot be controlled by the PICTURE POS. / SIZE function. • If adjusting the PICTURE V-POS / V-SIZE in mode...

TH32LHD7UXK User Guide
Page 21
PICTURE Adjustments 1 PICTURE Press to display the PICTURE menu. 2 Select to switch between modes. DYNAMIC For viewing in standard (evening lighting) environments. Press the left or right button to change the picture and color of the environment. STANDARD For viewing in brighter environments. Note: If you would like to switch between modes. Press to select the menu to select "ON". PICTURE SOUND SET UP MULTI ZOOM PIP SWAP SELECT MOVE PICTURE POS. /SIZE ASPECT PICTURE NORMALIZE...
PICTURE Adjustments 1 PICTURE Press to display the PICTURE menu. 2 Select to switch between modes. DYNAMIC For viewing in standard (evening lighting) environments. Press the left or right button to change the picture and color of the environment. STANDARD For viewing in brighter environments. Note: If you would like to switch between modes. Press to select the menu to select "ON". PICTURE SOUND SET UP MULTI ZOOM PIP SWAP SELECT MOVE PICTURE POS. /SIZE ASPECT PICTURE NORMALIZE...

TH32LHD7UXK User Guide
Page 22
... input signal is DVI.) W/B HIGH R Less Adjusts the white balance for each step in gradation. N Helpful Hint ( / NORMALIZE Normalization) On the remote control unit, while the "ADVANCED SETTINGS" menu is displayed, if either the N button is pressed at any time or the ACTION ( ) button is adjusted. Reddish Greenish SHARPNESS Less Adjusts picture sharpness. More W/B LOW B Less Adjusts the white balance for easier viewing of dark pictures such as follows. 1. Adjust the white...
... input signal is DVI.) W/B HIGH R Less Adjusts the white balance for each step in gradation. N Helpful Hint ( / NORMALIZE Normalization) On the remote control unit, while the "ADVANCED SETTINGS" menu is displayed, if either the N button is pressed at any time or the ACTION ( ) button is adjusted. Reddish Greenish SHARPNESS Less Adjusts picture sharpness. More W/B LOW B Less Adjusts the white balance for easier viewing of dark pictures such as follows. 1. Adjust the white...

TH32LHD7UXK User Guide
Page 23
... returned to the factory settings. N Helpful Hint ( / NORMALIZE Normalization) While the "SOUND" menu is displayed, if either the N button on the remote control is pressed at any time or the ACTION ( ) button is changed. 23 Sound is also reactivated when power is turned off or volume level is pressed during "NORMALIZE", then all adjustment values are memorized separately for each item. AUTO Automatically controls proper volume level. Select the desired...
... returned to the factory settings. N Helpful Hint ( / NORMALIZE Normalization) While the "SOUND" menu is displayed, if either the N button on the remote control is pressed at any time or the ACTION ( ) button is changed. 23 Sound is also reactivated when power is turned off or volume level is pressed during "NORMALIZE", then all adjustment values are memorized separately for each item. AUTO Automatically controls proper volume level. Select the desired...

TH32LHD7UXK User Guide
Page 24
... the following buttons can be operated. [Remote control] INPUT SURROUND VOL N R SURROUND button MUTE button VOL button [Unit] INPUT MENU -/ VOL +/ ENTER/ PICTURE SOUND SET UP MULTI ZOOM PIP SWAP SELECT MOVE PICTURE POS. /SIZE ASPECT PC OFF TIMER OFF TIMER button 2 Select the area of the displayed image. 1 Display the "Operation Guide". VOL button 3 Select the magnification required for the following composite signals: NTSC, PAL, SECAM 24 Press on the enlargement location to...
... the following buttons can be operated. [Remote control] INPUT SURROUND VOL N R SURROUND button MUTE button VOL button [Unit] INPUT MENU -/ VOL +/ ENTER/ PICTURE SOUND SET UP MULTI ZOOM PIP SWAP SELECT MOVE PICTURE POS. /SIZE ASPECT PC OFF TIMER OFF TIMER button 2 Select the area of the displayed image. 1 Display the "Operation Guide". VOL button 3 Select the magnification required for the following composite signals: NTSC, PAL, SECAM 24 Press on the enlargement location to...

TH32LHD7UXK User Guide
Page 28
..." menu during VIDEO (S VIDEO) input signal mode. ("SIGNAL [VIDEO]" menu is installed. SIGNAL [ VIDEO ] Note: When ON, this setting only affects NTSC input signals. 3D Y/C FILTER (NTSC) COLOR SYSTEM 3 : 2 PULLDOWN Panasonic AUTO (4 : 3) VIDEO NR ON AUTO OFF NORMAL OFF 28 Note: Selection may not be possible, depending on which optional board is displayed.) SET UP 1/2 1 Press to select the "COMPONENT / RGB-IN SELECT". SIGNAL COMPONENT/RGB-IN SELECT Press to exit from adjust mode. RGB INPUT LABEL PC POWER...
..." menu during VIDEO (S VIDEO) input signal mode. ("SIGNAL [VIDEO]" menu is installed. SIGNAL [ VIDEO ] Note: When ON, this setting only affects NTSC input signals. 3D Y/C FILTER (NTSC) COLOR SYSTEM 3 : 2 PULLDOWN Panasonic AUTO (4 : 3) VIDEO NR ON AUTO OFF NORMAL OFF 28 Note: Selection may not be possible, depending on which optional board is displayed.) SET UP 1/2 1 Press to select the "COMPONENT / RGB-IN SELECT". SIGNAL COMPONENT/RGB-IN SELECT Press to exit from adjust mode. RGB INPUT LABEL PC POWER...
TH32LHD7UXK User Guide
Page 32
... Color Color controls set at a location with good ventilation. Normal Sound This is not a problem. Please note this does not affect the performance of liquid crystal panels and is a characteristic of your LCD. No remote control operations can be heard from the unit. When the power is turned on, a sound of the display panel being used. (The unit cannot be red spots, blue spots and green spots on the remote control.) No Picture...
... Color Color controls set at a location with good ventilation. Normal Sound This is not a problem. Please note this does not affect the performance of liquid crystal panels and is a characteristic of your LCD. No remote control operations can be heard from the unit. When the power is turned on, a sound of the display panel being used. (The unit cannot be red spots, blue spots and green spots on the remote control.) No Picture...
TH32LHD7UXK User Guide
Page 35
... or refurbished parts, free of charge in the USA of the original purchase in the event of a defect in materials or workmanship as follow: MODELS Part Warranty Labor Warranty LCD Display 1 Year 1 Year Exceptions All Accessories (Ex: Cables & etc) 10 days none Service in the USA may other rights, which result installation, set-up adjustments, improper antenna, inadequate signal pickup, maladjustment of consumer controls, improper operation, power line...
... or refurbished parts, free of charge in the USA of the original purchase in the event of a defect in materials or workmanship as follow: MODELS Part Warranty Labor Warranty LCD Display 1 Year 1 Year Exceptions All Accessories (Ex: Cables & etc) 10 days none Service in the USA may other rights, which result installation, set-up adjustments, improper antenna, inadequate signal pickup, maladjustment of consumer controls, improper operation, power line...


