

TH32LHD7UXK User Guide
Page 3
... apparatus. 11) Only use this apparatus near any heat sources such as power-supply cord or plug is damaged, liquid has been spilled or objects have fallen into your outlet, consult an electrician for your safety. Important Safety Instructions 1) Read these instructions. 2) Keep these instructions. 3) Heed all warnings. 4) Follow all servicing to qualified service personnel. Install in any ventilation openings...
... apparatus. 11) Only use this apparatus near any heat sources such as power-supply cord or plug is damaged, liquid has been spilled or objects have fallen into your outlet, consult an electrician for your safety. Important Safety Instructions 1) Read these instructions. 2) Keep these instructions. 3) Heed all warnings. 4) Follow all servicing to qualified service personnel. Install in any ventilation openings...
TH32LHD7UXK User Guide
Page 4
... Instructions 3 FCC STATEMENT 5 Safety Precautions 6 MAINTENANCE 7 Accessories 8 Accessories Supplied 8 Remote Control Batteries 8 Connections 9 PC Input Terminals connection 10 SERIAL Terminals connection 11 Power ON / OFF 12 Initial selections 13 Selecting the input signal 13 Selecting the On-Screen Menu Language 13 Basic Controls 14 On-Screen Menu Displays 16 ASPECT Controls 18 Adjusting PICTURE POSITION / SIZE 19 MULTI PIP 20 PICTURE Adjustments 21 ADVANCED SETTINGS 22 4 SOUND Adjustment 23 MUTE 23 Digital Zoom 24 PRESENT TIME SETUP / SET UP TIMER 25 PRESENT TIME...
... Instructions 3 FCC STATEMENT 5 Safety Precautions 6 MAINTENANCE 7 Accessories 8 Accessories Supplied 8 Remote Control Batteries 8 Connections 9 PC Input Terminals connection 10 SERIAL Terminals connection 11 Power ON / OFF 12 Initial selections 13 Selecting the input signal 13 Selecting the On-Screen Menu Language 13 Basic Controls 14 On-Screen Menu Displays 16 ASPECT Controls 18 Adjusting PICTURE POSITION / SIZE 19 MULTI PIP 20 PICTURE Adjustments 21 ADVANCED SETTINGS 22 4 SOUND Adjustment 23 MUTE 23 Digital Zoom 24 PRESENT TIME SETUP / SET UP TIMER 25 PRESENT TIME...
TH32LHD7UXK User Guide
Page 7
... of time, unplug the power cord from the wall outlet. Furthermore, avoid contact with wet hands. • Doing so may occur, which could cause fire. If the cabinet becomes dirty, wipe it with the surface of the LCD Display. If water droplets get inside the unit, operating problems may result. • Avoid contact with fingernails or other setting...
... of time, unplug the power cord from the wall outlet. Furthermore, avoid contact with wet hands. • Doing so may occur, which could cause fire. If the cabinet becomes dirty, wipe it with the surface of the LCD Display. If water droplets get inside the unit, operating problems may result. • Avoid contact with fingernails or other setting...

TH32LHD7UXK User Guide
Page 8
... Operating Instruction book Remote Control Transmitter EUR646535 INPUT SURROUND VOL N R Batteries for longer life. Battery replacement is necessary when the remote control acts sporadically or stops operating the LCD Display. 8 must match the markings in reverse until the lock snaps. Two "AA" size Helpful Hint: For frequent remote control users, replace old batteries with Alkaline batteries for the Remote Control Transmitter (AA Battery × 2) PICTURE SOUND SET UP MULTI ZOOM PIP SWAP SELECT MOVE PICTURE...
... Operating Instruction book Remote Control Transmitter EUR646535 INPUT SURROUND VOL N R Batteries for longer life. Battery replacement is necessary when the remote control acts sporadically or stops operating the LCD Display. 8 must match the markings in reverse until the lock snaps. Two "AA" size Helpful Hint: For frequent remote control users, replace old batteries with Alkaline batteries for the Remote Control Transmitter (AA Battery × 2) PICTURE SOUND SET UP MULTI ZOOM PIP SWAP SELECT MOVE PICTURE...
TH32LHD7UXK User Guide
Page 9
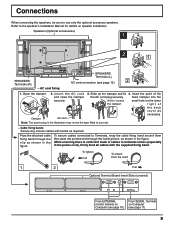
... Slots (covered) R AUDIO L IN VIDEO IN VIDEO OUT S VIDEO IN AV SLOT1 R AUDIO L VD HD PR/CR/R PB/CB/B Y/G COMPONENT/RGB IN SLOT2 AUDIO PC IN SERIAL From EXTERNAL monitor terminal on Computer (see page 10) From SERIAL Terminal on speaker installation. Pass the attached cable fixing band through the locking block, as necessary. - Slide up the clamper and fix the AC cord plug securely. Refer...
... Slots (covered) R AUDIO L IN VIDEO IN VIDEO OUT S VIDEO IN AV SLOT1 R AUDIO L VD HD PR/CR/R PB/CB/B Y/G COMPONENT/RGB IN SLOT2 AUDIO PC IN SERIAL From EXTERNAL monitor terminal on Computer (see page 10) From SERIAL Terminal on speaker installation. Pass the attached cable fixing band through the locking block, as necessary. - Slide up the clamper and fix the AC cord plug securely. Refer...
TH32LHD7UXK User Guide
Page 12
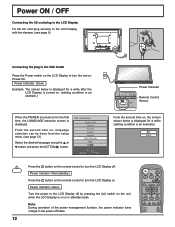
... power indicator turns orange in standby mode. PICTURE SOUND SET UP MULTI ZOOM PIP SWAP SELECT MOVE PICTURE POS. /SIZE ASPECT 12 Power Indicator: Red (standby) Press the button on the remote control to the LCD Display off by pressing the when the LCD Display is displayed. Power Indicator: Green INPUT SURROUND VOL N R Turn the power to turn the LCD Display on. Power ON / OFF Connecting the AC cord plug to turn the set on: Power-On. Power Indicator: Green Example: The screen below is displayed for the first time...
... power indicator turns orange in standby mode. PICTURE SOUND SET UP MULTI ZOOM PIP SWAP SELECT MOVE PICTURE POS. /SIZE ASPECT 12 Power Indicator: Red (standby) Press the button on the remote control to the LCD Display off by pressing the when the LCD Display is displayed. Power Indicator: Green INPUT SURROUND VOL N R Turn the power to turn the LCD Display on. Power ON / OFF Connecting the AC cord plug to turn the set on: Power-On. Power Indicator: Green Example: The screen below is displayed for the first time...

TH32LHD7UXK User Guide
Page 13
... N R PICTURE SOUND SET UP MULTI ZOOM PIP SWAP SELECT MOVE SET UP 1/2 SIGNAL COMPONENT/RGB-IN SELECT RGB INPUT LABEL PC POWER SAVE OFF STANDBY SAVE OFF POWER MANAGEMENT OFF AUTO POWER OFF OSD LANGUAGE OFF ENGLISH (US) 13 Press to display the SET UP menu. INPUT Press to select the input signal to be played back from the source connected to the component/RGB input terminals. (see page 28) • In 2 screen display, the same input mode...
... N R PICTURE SOUND SET UP MULTI ZOOM PIP SWAP SELECT MOVE SET UP 1/2 SIGNAL COMPONENT/RGB-IN SELECT RGB INPUT LABEL PC POWER SAVE OFF STANDBY SAVE OFF POWER MANAGEMENT OFF AUTO POWER OFF OSD LANGUAGE OFF ENGLISH (US) 13 Press to display the SET UP menu. INPUT Press to select the input signal to be played back from the source connected to the component/RGB input terminals. (see page 28) • In 2 screen display, the same input mode...
TH32LHD7UXK User Guide
Page 14
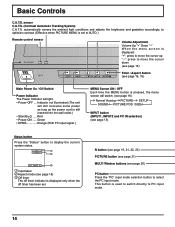
... power cord is pressed, the menu screen will switch. (see page 16) Normal Viewing PICTURE SETUP SOUND PICTURE POS. /SIZE INPUT button (INPUT1, INPUT2 and PC IN selection) (see page 20) PC button Press the "PC" input mode selection button to PC input mode. 14 This button is displayed only when the off timer indicator is used to switch directly to select the PC input mode. sensor C.A.T.S. (Contrast Automatic Tracking System) C.A.T.S. Basic Controls C.A.T.S. Green • DPMS Orange (With PC input signal.) MENU Screen...
... power cord is pressed, the menu screen will switch. (see page 16) Normal Viewing PICTURE SETUP SOUND PICTURE POS. /SIZE INPUT button (INPUT1, INPUT2 and PC IN selection) (see page 20) PC button Press the "PC" input mode selection button to PC input mode. 14 This button is displayed only when the off timer indicator is used to switch directly to select the PC input mode. sensor C.A.T.S. (Contrast Automatic Tracking System) C.A.T.S. Basic Controls C.A.T.S. Green • DPMS Orange (With PC input signal.) MENU Screen...

TH32LHD7UXK User Guide
Page 15
... 13) INPUT Sound mute On / Off (see page 12). Basic Controls Standby (ON / OFF) button The LCD Display must first be plugged into the wall outlet and turned on and off each time the button is cancelled if a power interruption occurs. 15 Note: The surround settings are enormous. ASPECT button Press to turn the LCD Display On, from Stanby mode. PICTURE SOUND SET UP MULTI ZOOM PIP SWAP SELECT MOVE PICTURE POS. /SIZE ASPECT...
... 13) INPUT Sound mute On / Off (see page 12). Basic Controls Standby (ON / OFF) button The LCD Display must first be plugged into the wall outlet and turned on and off each time the button is cancelled if a power interruption occurs. 15 Note: The surround settings are enormous. ASPECT button Press to turn the LCD Display On, from Stanby mode. PICTURE SOUND SET UP MULTI ZOOM PIP SWAP SELECT MOVE PICTURE POS. /SIZE ASPECT...
TH32LHD7UXK User Guide
Page 16
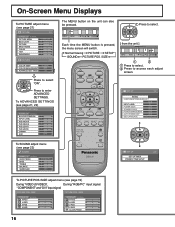
... POWER SAVE OFF STANDBY SAVE OFF POWER MANAGEMENT OFF AUTO POWER OFF OSD LANGUAGE OFF ENGLISH (US) PICTURE POS. /SIZE ASPECT To SOUND adjust menu (see page 23) SOUND NORMALIZE NORMAL AUDIO MENU BASS TREBLE BALANCE SURROUND STANDARD 0 0 0 OFF PC OFF TIMER DISPLAY SET UP 2/2 SET UP TIMER PRESENT TIME SETUP To PICTURE POS./SIZE adjust menu (see page 19) During "VIDEO (S VIDEO)", During "RGB/PC" input signal. To ADVANCED SETTINGS (see page 21, 22) ADVANCED SETTINGS NORMALIZE NORMAL BLACK EXTENSION INPUT...
... POWER SAVE OFF STANDBY SAVE OFF POWER MANAGEMENT OFF AUTO POWER OFF OSD LANGUAGE OFF ENGLISH (US) PICTURE POS. /SIZE ASPECT To SOUND adjust menu (see page 23) SOUND NORMALIZE NORMAL AUDIO MENU BASS TREBLE BALANCE SURROUND STANDARD 0 0 0 OFF PC OFF TIMER DISPLAY SET UP 2/2 SET UP TIMER PRESENT TIME SETUP To PICTURE POS./SIZE adjust menu (see page 19) During "VIDEO (S VIDEO)", During "RGB/PC" input signal. To ADVANCED SETTINGS (see page 21, 22) ADVANCED SETTINGS NORMALIZE NORMAL BLACK EXTENSION INPUT...
TH32LHD7UXK User Guide
Page 17
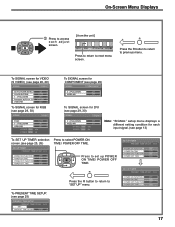
... to select POWER ON TIME / POWER OFF TIME. R Press the R button to return to "SET UP" menu. SET UP TIMER PRESENT TIME OF DAY 99:99 POWER ON FUNCTION OFF POWER ON TIME 0:00 POWER OFF FUNCTION OFF POWER OFF TIME 0:00 SET UP TIMER PRESENT TIME OF DAY 99:99 POWER ON FUNCTION OFF POWER ON TIME 0:00 POWER OFF FUNCTION OFF POWER OFF TIME 0:00 To PRESENT TIME SETUP. (see page 29, 30) SIGNAL [ Digital ] 3 : 2 PULLDOWN VIDEO NR...
... to select POWER ON TIME / POWER OFF TIME. R Press the R button to return to "SET UP" menu. SET UP TIMER PRESENT TIME OF DAY 99:99 POWER ON FUNCTION OFF POWER ON TIME 0:00 POWER OFF FUNCTION OFF POWER OFF TIME 0:00 SET UP TIMER PRESENT TIME OF DAY 99:99 POWER ON FUNCTION OFF POWER ON TIME 0:00 POWER OFF FUNCTION OFF POWER OFF TIME 0:00 To PRESENT TIME SETUP. (see page 29, 30) SIGNAL [ Digital ] 3 : 2 PULLDOWN VIDEO NR...

TH32LHD7UXK User Guide
Page 18
... wide screen cinema format picture. The display will depend on the picture source), allowing you to view the picture at its maximum size. Notes: • Panasonic AUTO mode is not possible. When viewing such programs, it is recommended that 9 elongation is not memorized. The size of the picture will automatically become enlarged (depending on the original signal. 4 3 Panasonic For an elongated image AUTO 4 3 For a 4:3 image 16 Panasonic AUTO 9 Image is expanded Changes...
... wide screen cinema format picture. The display will depend on the picture source), allowing you to view the picture at its maximum size. Notes: • Panasonic AUTO mode is not possible. When viewing such programs, it is recommended that 9 elongation is not memorized. The size of the picture will automatically become enlarged (depending on the original signal. 4 3 Panasonic For an elongated image AUTO 4 3 For a 4:3 image 16 Panasonic AUTO 9 Image is expanded Changes...

TH32LHD7UXK User Guide
Page 19
PICTURE SOUND SET UP MULTI ZOOM PIP SWAP SELECT MOVE PICTURE POS. /SIZE ASPECT PC OFF TIMER 4 R Press to exit from a VCR or DVD player is pressed during "NORMALIZE", then all adjustment values are returned to a former adjustment. During "VIDEO (S VIDEO)", "COMPONENT" and "DVI" input signal. Adjusting PICTURE POSITION / SIZE 1 PICTURE POS. /SIZE Press to display the PICTURE POS. /SIZE menu. 2 Press to adjust POS. / SIZE. PICTURE POS. /SIZE NORMALIZE H-POS H-SIZE V-POS V-SIZE NORMAL During "RGB / PC" input signal. PICTURE POS. /SIZE NORMALIZE NORMAL H-POS...
PICTURE SOUND SET UP MULTI ZOOM PIP SWAP SELECT MOVE PICTURE POS. /SIZE ASPECT PC OFF TIMER 4 R Press to exit from a VCR or DVD player is pressed during "NORMALIZE", then all adjustment values are returned to a former adjustment. During "VIDEO (S VIDEO)", "COMPONENT" and "DVI" input signal. Adjusting PICTURE POSITION / SIZE 1 PICTURE POS. /SIZE Press to display the PICTURE POS. /SIZE menu. 2 Press to adjust POS. / SIZE. PICTURE POS. /SIZE NORMALIZE H-POS H-SIZE V-POS V-SIZE NORMAL During "RGB / PC" input signal. PICTURE POS. /SIZE NORMALIZE NORMAL H-POS...

TH32LHD7UXK User Guide
Page 21
... button to the factory settings. 21 ADVANCED SETTINGS NORMALIZE NORMAL BLACK EXTENSION INPUT LEVEL W/B HIGH R W/B HIGH B W/B LOW R W/B LOW B GAMMA AGC 0 0 0 0 0 0 2.2 OFF ADVANCED SETTINGS OFF Displays images with settings of BRIGHTNESS and PICTURE. Note: If you would like to change the picture and color of the selected PICTURE menu to switch between modes. Press to select the menu to enter Advanced Settings. Press the left or right button to something else, adjust using...
... button to the factory settings. 21 ADVANCED SETTINGS NORMALIZE NORMAL BLACK EXTENSION INPUT LEVEL W/B HIGH R W/B HIGH B W/B LOW R W/B LOW B GAMMA AGC 0 0 0 0 0 0 2.2 OFF ADVANCED SETTINGS OFF Displays images with settings of BRIGHTNESS and PICTURE. Note: If you would like to change the picture and color of the selected PICTURE menu to switch between modes. Press to select the menu to enter Advanced Settings. Press the left or right button to something else, adjust using...

TH32LHD7UXK User Guide
Page 22
... black hair. Darker Brighter PICTURE Less BRIGHTNESS Darker More Brighter Adjusts the proper picture contrast. Repeat steps 1 and 2 to the factory settings. 22 Adjustment of parts which are returned to adjust. N Helpful Hint ( / NORMALIZE Normalization) On the remote control unit, while the "ADVANCED SETTINGS" menu is displayed, if either the N button is pressed at any time or the ACTION ( ) button is DVI.) W/B HIGH R Less Adjusts the white balance for NTSC signal...
... black hair. Darker Brighter PICTURE Less BRIGHTNESS Darker More Brighter Adjusts the proper picture contrast. Repeat steps 1 and 2 to the factory settings. 22 Adjustment of parts which are returned to adjust. N Helpful Hint ( / NORMALIZE Normalization) On the remote control unit, while the "ADVANCED SETTINGS" menu is displayed, if either the N button is pressed at any time or the ACTION ( ) button is DVI.) W/B HIGH R Less Adjusts the white balance for NTSC signal...

TH32LHD7UXK User Guide
Page 23
... turn the surround effect ON and OFF. (see page 13) • BASS, TREBLE and SURROUND settings are returned to the factory settings. N Helpful Hint ( / NORMALIZE Normalization) While the "SOUND" menu is displayed, if either the N button on the remote control is pressed at any time or the ACTION ( ) button is changed. 23 INPUT SURROUND VOL N R PICTURE SOUND SET UP MULTI ZOOM PIP SWAP SELECT MOVE PICTURE POS. /SIZE ASPECT PC OFF TIMER DISPLAY...
... turn the surround effect ON and OFF. (see page 13) • BASS, TREBLE and SURROUND settings are returned to the factory settings. N Helpful Hint ( / NORMALIZE Normalization) While the "SOUND" menu is displayed, if either the N button on the remote control is pressed at any time or the ACTION ( ) button is changed. 23 INPUT SURROUND VOL N R PICTURE SOUND SET UP MULTI ZOOM PIP SWAP SELECT MOVE PICTURE POS. /SIZE ASPECT PC OFF TIMER DISPLAY...

TH32LHD7UXK User Guide
Page 24
... the following buttons can be operated. [Remote control] INPUT SURROUND VOL N R SURROUND button MUTE button VOL button [Unit] INPUT MENU -/ VOL +/ ENTER/ PICTURE SOUND SET UP MULTI ZOOM PIP SWAP SELECT MOVE PICTURE POS. /SIZE ASPECT PC OFF TIMER OFF TIMER button 2 Select the area of the displayed image. 1 Display the "Operation Guide". This is pressed, the magnification factor changes. Press on the enlargement location to exit from the Digital Zoom. VOL button 3 Select the...
... the following buttons can be operated. [Remote control] INPUT SURROUND VOL N R SURROUND button MUTE button VOL button [Unit] INPUT MENU -/ VOL +/ ENTER/ PICTURE SOUND SET UP MULTI ZOOM PIP SWAP SELECT MOVE PICTURE POS. /SIZE ASPECT PC OFF TIMER OFF TIMER button 2 Select the area of the displayed image. 1 Display the "Operation Guide". This is pressed, the magnification factor changes. Press on the enlargement location to exit from the Digital Zoom. VOL button 3 Select the...

TH32LHD7UXK User Guide
Page 28
..." menu during VIDEO (S VIDEO) input signal mode. ("SIGNAL [VIDEO]" menu is installed. RGB INPUT LABEL PC POWER SAVE OFF STANDBY SAVE OFF POWER MANAGEMENT OFF AUTO POWER OFF OSD LANGUAGE OFF ENGLISH (US) 2 R Press ACTION ( ) button Press to select the "COMPONENT / RGB-IN SELECT". SIGNAL [ VIDEO ] Note: When ON, this setting only affects NTSC input signals. 3D Y/C FILTER (NTSC) COLOR SYSTEM 3 : 2 PULLDOWN Panasonic AUTO (4 : 3) VIDEO NR ON AUTO OFF NORMAL OFF 28 INPUT SURROUND VOL N R 2 Press to exit from adjust mode. COMPONENT...
..." menu during VIDEO (S VIDEO) input signal mode. ("SIGNAL [VIDEO]" menu is installed. RGB INPUT LABEL PC POWER SAVE OFF STANDBY SAVE OFF POWER MANAGEMENT OFF AUTO POWER OFF OSD LANGUAGE OFF ENGLISH (US) 2 R Press ACTION ( ) button Press to select the "COMPONENT / RGB-IN SELECT". SIGNAL [ VIDEO ] Note: When ON, this setting only affects NTSC input signals. 3D Y/C FILTER (NTSC) COLOR SYSTEM 3 : 2 PULLDOWN Panasonic AUTO (4 : 3) VIDEO NR ON AUTO OFF NORMAL OFF 28 INPUT SURROUND VOL N R 2 Press to exit from adjust mode. COMPONENT...
TH32LHD7UXK User Guide
Page 32
... with a non-applicable color system format, or frequency is input, only the input terminal indication is not a malfunction. Check whether the remote control designed specifically for performance or quality. This LCD Display uses special image processing. Check whether the remote control sensor is the sound of other aspects. However, this does not affect the performance of input signal. The whirring sound is caused by button on top of...
... with a non-applicable color system format, or frequency is input, only the input terminal indication is not a malfunction. Check whether the remote control designed specifically for performance or quality. This LCD Display uses special image processing. Check whether the remote control sensor is the sound of other aspects. However, this does not affect the performance of input signal. The whirring sound is caused by button on top of...
TH32LHD7UXK User Guide
Page 35
... as follow: MODELS Part Warranty Labor Warranty LCD Display 1 Year 1 Year Exceptions All Accessories (Ex: Cables & etc) 10 days none Service in materials or workmanship, which result installation, set-up adjustments, improper antenna, inadequate signal pickup, maladjustment of consumer controls, improper operation, power line surge, improper voltage supply, lighting damage, smoke, chemical vapors, or service by calling toll free 1-800-526-6610 to locate an authorized Servicenter. This warranty only covers failures...
... as follow: MODELS Part Warranty Labor Warranty LCD Display 1 Year 1 Year Exceptions All Accessories (Ex: Cables & etc) 10 days none Service in materials or workmanship, which result installation, set-up adjustments, improper antenna, inadequate signal pickup, maladjustment of consumer controls, improper operation, power line surge, improper voltage supply, lighting damage, smoke, chemical vapors, or service by calling toll free 1-800-526-6610 to locate an authorized Servicenter. This warranty only covers failures...


