Receiver
Page 3
...Adjusting Dolby Pro Logic x "MUSIC " mode further/ Adjusting NEO:6's "MUSIC " mode further/ Adjusting SFC (Sound Field Control) further 26 Convenient functions under remote control Adjusting the subwoofer level/Silencing speakers temporarily/ Dimming the display light (Dimmer 27 Using headphones 27 Sound effect/Convenient functions Basic operation 28 Adjusting the bass/Adjusting the treble/Adjusting the volume balance/Changing the audio output (Dual program)/Adjusting the brightness of the display/Sleep timer 29 Setting the receiver Basic operation 30 Setting speakers and their numbers...
...Adjusting Dolby Pro Logic x "MUSIC " mode further/ Adjusting NEO:6's "MUSIC " mode further/ Adjusting SFC (Sound Field Control) further 26 Convenient functions under remote control Adjusting the subwoofer level/Silencing speakers temporarily/ Dimming the display light (Dimmer 27 Using headphones 27 Sound effect/Convenient functions Basic operation 28 Adjusting the bass/Adjusting the treble/Adjusting the volume balance/Changing the audio output (Dual program)/Adjusting the brightness of the display/Sleep timer 29 Setting the receiver Basic operation 30 Setting speakers and their numbers...
Receiver
Page 4
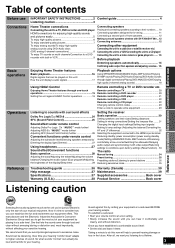
... BI-AMP READY POWER SPEAKERS MULTI CH A B SURROUND AUTO SPEAKER DETECTOR AUX S VIDEO IN VIDEO IN L AUDIO IN R TUNE For connecting a video camera etc. (á page 13) 4 RQT8549 HDMI MENU SETUP INPUT SELECTOR ENTER VOLUME RETURN For connecting a For switching the headphone (á page 27) multi-channel surround function on and off /Source switching/ Switching remote control modes (á pages 20 to 16, 18 and 27) Radio display Lights up Lights up when 2-channel mix is functioning Sleep timer when PCM FIX indicator is selected Unit display 2CH MIX TUNED SPEAKERS BI-WIRE...
... BI-AMP READY POWER SPEAKERS MULTI CH A B SURROUND AUTO SPEAKER DETECTOR AUX S VIDEO IN VIDEO IN L AUDIO IN R TUNE For connecting a video camera etc. (á page 13) 4 RQT8549 HDMI MENU SETUP INPUT SELECTOR ENTER VOLUME RETURN For connecting a For switching the headphone (á page 27) multi-channel surround function on and off /Source switching/ Switching remote control modes (á pages 20 to 16, 18 and 27) Radio display Lights up Lights up when 2-channel mix is functioning Sleep timer when PCM FIX indicator is selected Unit display 2CH MIX TUNED SPEAKERS BI-WIRE...
Receiver
Page 5
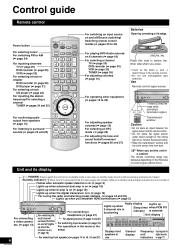
...a Panasonic TV (VIERA) or DVD recorder (DIGA) available for HDMI connections in order to digitally transmit multi-channel sounds in DVD-Audio. • The [HDMI] indicator stays on unit is off Audio Video Audio Speakers Video Audio Speakers This unit Video Audio This unit Video Audio DVD recorder or DVD player DVD recorder or DVD player Note • Make connections instructed in picture quality. AUTO SPEAKER ADVANCED WIRELESS DETECTOR DUAL AMP BI-AMP READY POWER SPEAKERS MULTI CH A B SURROUND AUTO SPEAKER DETECTOR AUX S VIDEO IN VIDEO IN L AUDIO IN R TUNE HDMI MENU...
...a Panasonic TV (VIERA) or DVD recorder (DIGA) available for HDMI connections in order to digitally transmit multi-channel sounds in DVD-Audio. • The [HDMI] indicator stays on unit is off Audio Video Audio Speakers Video Audio Speakers This unit Video Audio This unit Video Audio DVD recorder or DVD player DVD recorder or DVD player Note • Make connections instructed in picture quality. AUTO SPEAKER ADVANCED WIRELESS DETECTOR DUAL AMP BI-AMP READY POWER SPEAKERS MULTI CH A B SURROUND AUTO SPEAKER DETECTOR AUX S VIDEO IN VIDEO IN L AUDIO IN R TUNE HDMI MENU...
Receiver
Page 6
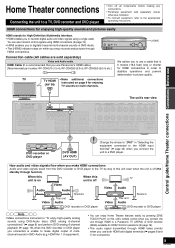
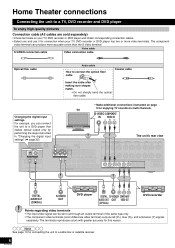
... DIGITAL S-VIDEO COMPONENT AUDIO OUT OUT VIDEO OUT (OPTICAL) DVD recorder Points regarding video terminals • The input video signal can connect the unit to a DVD player that makes optical output only by performing the steps instructed in "Changing the digital input settings" (á page 32). Home Theater connections Connecting the unit to a TV, DVD recorder and DVD player To enjoy high-quality pictures Connection cable (All cables are sold separately) • Check terminals on your TV, DVD recorder or DVD player and obtain corresponding connection cables. • Select...
... DIGITAL S-VIDEO COMPONENT AUDIO OUT OUT VIDEO OUT (OPTICAL) DVD recorder Points regarding video terminals • The input video signal can connect the unit to a DVD player that makes optical output only by performing the steps instructed in "Changing the digital input settings" (á page 32). Home Theater connections Connecting the unit to a TV, DVD recorder and DVD player To enjoy high-quality pictures Connection cable (All cables are sold separately) • Check terminals on your TV, DVD recorder or DVD player and obtain corresponding connection cables. • Select...
Receiver
Page 12
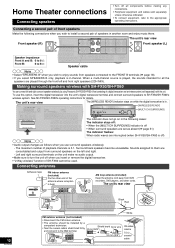
...'s wireless system. AUTO SPEAKER ADVANCED WIRELESS DETECTOR DUAL AMP BI-AMP READY POWER SPEAKERS MULTI CH A B SURROUND AUTO SPEAKER DETECTOR AUX S VIDEO IN VIDEO IN L AUDIO IN R TUNE HDMI MENU SETUP INPUT SELECTOR ENTER RETURN VOLUME [WIRELESS READY] [MULTI CH SURROUND] The indicator does not go on while the digital transceiver is in the following connections when you use this option, insert the digital transceiver into the unit's digital transceiver terminal and connect surround speakers to turn the unit off when you insert or remove...
...'s wireless system. AUTO SPEAKER ADVANCED WIRELESS DETECTOR DUAL AMP BI-AMP READY POWER SPEAKERS MULTI CH A B SURROUND AUTO SPEAKER DETECTOR AUX S VIDEO IN VIDEO IN L AUDIO IN R TUNE HDMI MENU SETUP INPUT SELECTOR ENTER RETURN VOLUME [WIRELESS READY] [MULTI CH SURROUND] The indicator does not go on while the digital transceiver is in the following connections when you use this option, insert the digital transceiver into the unit's digital transceiver terminal and connect surround speakers to turn the unit off when you insert or remove...
Receiver
Page 13
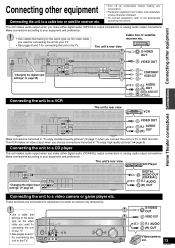
... DUAL AMP BI-AMP READY POWER SPEAKERS MULTI CH A B SURROUND AUTO SPEAKER DETECTOR AUX S VIDEO IN VIDEO IN L AUDIO IN R TUNE HDMI MENU SETUP INPUT SELECTOR ENTER RETURN VOLUME S-VIDEO OUT VIDEO OUT (L) AUDIO (R) OUT Video camera etc. 13 RQT8549 Make connections according to your equipment and preference. • Use cables that belongs to the same type as the video cable you connect the unit to a video camera or game player etc. Home Theater connections Connections BeCfoornenuesceting other equipment Connecting other equipment Connecting the unit to a cable box or...
... DUAL AMP BI-AMP READY POWER SPEAKERS MULTI CH A B SURROUND AUTO SPEAKER DETECTOR AUX S VIDEO IN VIDEO IN L AUDIO IN R TUNE HDMI MENU SETUP INPUT SELECTOR ENTER RETURN VOLUME S-VIDEO OUT VIDEO OUT (L) AUDIO (R) OUT Video camera etc. 13 RQT8549 Make connections according to your equipment and preference. • Use cables that belongs to the same type as the video cable you connect the unit to a video camera or game player etc. Home Theater connections Connections BeCfoornenuesceting other equipment Connecting other equipment Connecting the unit to a cable box or...
Receiver
Page 14
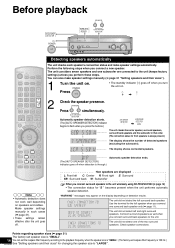
....) The display shows the number of the two surround speakers. Make speaker settings manually in that order. ˣ (The connection status for the left and right surround speakers. Before playback SPEAKERS A B AUTO SPEAKER DETECTOR [ ] POWER WIRELESS READY AUTO SPEAKER DETECTOR AUTO SPEAKER ADVANCED WIRELESS DETECTOR DUAL AMP BI-AMP READY POWER SPEAKERS MULTI CH A B SURROUND AUTO SPEAKER DETECTOR AUX S VIDEO IN VIDEO IN L AUDIO IN R TUNE HDMI MENU SETUP INPUT SELECTOR ENTER RETURN VOLUME RECEIVER AV SYSTEM RECORDER TV DVD TUNER CD BAND PLAYER VCR DVD ANALOG...
....) The display shows the number of the two surround speakers. Make speaker settings manually in that order. ˣ (The connection status for the left and right surround speakers. Before playback SPEAKERS A B AUTO SPEAKER DETECTOR [ ] POWER WIRELESS READY AUTO SPEAKER DETECTOR AUTO SPEAKER ADVANCED WIRELESS DETECTOR DUAL AMP BI-AMP READY POWER SPEAKERS MULTI CH A B SURROUND AUTO SPEAKER DETECTOR AUX S VIDEO IN VIDEO IN L AUDIO IN R TUNE HDMI MENU SETUP INPUT SELECTOR ENTER RETURN VOLUME RECEIVER AV SYSTEM RECORDER TV DVD TUNER CD BAND PLAYER VCR DVD ANALOG...

Receiver
Page 15
... SPEAKERS A setting is output from speakers and adjusting volumes Through these steps, you connect one surround back speaker) SUBW : Subwoofer Volume range: -- Press TEST Adjustment range: -10 dB to +10 dB (Factory setting: 0 dB) SUBW only: MIN (minimum) ↔ 1 to the normal listening level. When using a BI-WIRE connection (á page 11) Select "YES " in steps 4 and 5. Press TEST • A test signal is selected SPEAKERS A When SPEAKERS A and SPEAKERS B settings are displayed L : Front left C : Center R : Front right RS : Surround right LS : Surround...
... SPEAKERS A setting is output from speakers and adjusting volumes Through these steps, you connect one surround back speaker) SUBW : Subwoofer Volume range: -- Press TEST Adjustment range: -10 dB to +10 dB (Factory setting: 0 dB) SUBW only: MIN (minimum) ↔ 1 to the normal listening level. When using a BI-WIRE connection (á page 11) Select "YES " in steps 4 and 5. Press TEST • A test signal is selected SPEAKERS A When SPEAKERS A and SPEAKERS B settings are displayed L : Front left C : Center R : Front right RS : Surround right LS : Surround...
Receiver
Page 16
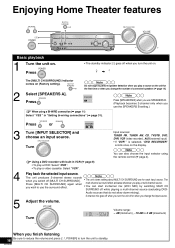
...play a source on (Factory setting). Enjoying Home Theater features SPEAKERS A B [ ] POWER MULTI CH SURROUND AUTO SPEAKER ADVANCED WIRELESS DETECTOR DUAL AMP BI-AMP READY POWER SPEAKERS MULTI CH A B SURROUND AUTO SPEAKER DETECTOR AUX S VIDEO IN VIDEO IN L AUDIO IN R TUNE HDMI MENU SETUP INPUT SELECTOR ENTER RETURN VOLUME INPUT SELECTOR VOLUME Basic playback 1 Turn the unit on the display. MULTI CH SURROUND Note Do not forget to 0 dB (maximum) When you play a video cassette: Select "VCR ". Adjust the volume. SPEAKERS SPEAKERS Press A or B SPEAKERS BI-WIRE...
...play a source on (Factory setting). Enjoying Home Theater features SPEAKERS A B [ ] POWER MULTI CH SURROUND AUTO SPEAKER ADVANCED WIRELESS DETECTOR DUAL AMP BI-AMP READY POWER SPEAKERS MULTI CH A B SURROUND AUTO SPEAKER DETECTOR AUX S VIDEO IN VIDEO IN L AUDIO IN R TUNE HDMI MENU SETUP INPUT SELECTOR ENTER RETURN VOLUME INPUT SELECTOR VOLUME Basic playback 1 Turn the unit on the display. MULTI CH SURROUND Note Do not forget to 0 dB (maximum) When you play a video cassette: Select "VCR ". Adjust the volume. SPEAKERS SPEAKERS Press A or B SPEAKERS BI-WIRE...
Receiver
Page 18
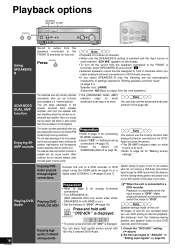
...settings selected in such cases. Advanced dual amplifier offers you sounds that are canceled when you make analog 6-channel connections for "Making bi-amp settings". Cancel the "DVD 6CH " setting. (á above ) is displayed. Playback options SPEAKERS A B ADVANCED DUAL AMP [BI-AMP] AUTO SPEAKER ADVANCED WIRELESS DETECTOR DUAL AMP BI-AMP READY POWER SPEAKERS MULTI CH A B SURROUND AUTO SPEAKER DETECTOR AUX S VIDEO IN VIDEO IN L AUDIO IN R TUNE HDMI MENU SETUP INPUT SELECTOR ENTER RETURN VOLUME RECEIVER AV SYSTEM RECORDER TV DVD TUNER CD BAND PLAYER VCR DVD...
...settings selected in such cases. Advanced dual amplifier offers you sounds that are canceled when you make analog 6-channel connections for "Making bi-amp settings". Cancel the "DVD 6CH " setting. (á above ) is displayed. Playback options SPEAKERS A B ADVANCED DUAL AMP [BI-AMP] AUTO SPEAKER ADVANCED WIRELESS DETECTOR DUAL AMP BI-AMP READY POWER SPEAKERS MULTI CH A B SURROUND AUTO SPEAKER DETECTOR AUX S VIDEO IN VIDEO IN L AUDIO IN R TUNE HDMI MENU SETUP INPUT SELECTOR ENTER RETURN VOLUME RECEIVER AV SYSTEM RECORDER TV DVD TUNER CD BAND PLAYER VCR DVD...
Receiver
Page 19
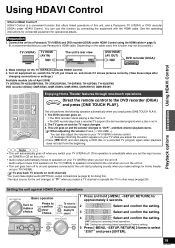
... input source as TUNER or CD on this function by connecting the equipment with the HDMI cable. Audio output moves from the beginning. See the operating instructions for connected equipment for activating linked operations (Factory setting) 5 Press [-MENU, -SETUP, RETURN] 2 times to select "EXIT " and press [ENTER]. 19 RQT8549 This unit goes on multi-channels You must make digital audio (OPTICAL) output connections (á page 9) for Home theater on the TV (VIERA) to speakers connected to the unit when you use...
... input source as TUNER or CD on this function by connecting the equipment with the HDMI cable. Audio output moves from the beginning. See the operating instructions for connected equipment for activating linked operations (Factory setting) 5 Press [-MENU, -SETUP, RETURN] 2 times to select "EXIT " and press [ENTER]. 19 RQT8549 This unit goes on multi-channels You must make digital audio (OPTICAL) output connections (á page 9) for Home theater on the TV (VIERA) to speakers connected to the unit when you use...

Receiver
Page 20
... DIRECT NAVITGOAPTOMRENU DIRECT NAVITGOAPTOMRENU 0 DISC DIRECT TUNING VOLUME ENTER SKIP SLOW/SEARCH STOP PAUSE PLAY DRIVE SELECT DVD RECORDER CM SKIP ONE TOUCH PLAY FUNCTIONS ENTER SUB MENU RETURN SUBWOOFER TEST TV OFF LEVEL EFFECT VOL NEO : 6 TV/VIDEO Remote controlling a TV To turn the TV on or off AV SYSTEM To change the TV/video input mode on or off To skip a track or chapter To look for a scene you wish to watch To play a program...
... DIRECT NAVITGOAPTOMRENU DIRECT NAVITGOAPTOMRENU 0 DISC DIRECT TUNING VOLUME ENTER SKIP SLOW/SEARCH STOP PAUSE PLAY DRIVE SELECT DVD RECORDER CM SKIP ONE TOUCH PLAY FUNCTIONS ENTER SUB MENU RETURN SUBWOOFER TEST TV OFF LEVEL EFFECT VOL NEO : 6 TV/VIDEO Remote controlling a TV To turn the TV on or off AV SYSTEM To change the TV/video input mode on or off To skip a track or chapter To look for a scene you wish to watch To play a program...
Receiver
Page 23
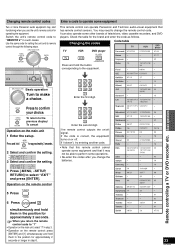
... PLAYER DVD ANALOG 6CH Press and hold them in the position for approximately 2 seconds. ENTER Press to "REMOTE 2 " in step 6. When you return the remote control code to "1" • Operation on the main unit: select "1" in the position for operating the equipment. Changing remote control codes Two or more Panasonic audio equipment may start functioning when you use INPUT SELECTOR Basic operation Turn to make a choice. 0 Enter the first digit. Switch the unit's remote control code...
... PLAYER DVD ANALOG 6CH Press and hold them in the position for approximately 2 seconds. ENTER Press to "REMOTE 2 " in step 6. When you return the remote control code to "1" • Operation on the main unit: select "1" in the position for operating the equipment. Changing remote control codes Two or more Panasonic audio equipment may start functioning when you use INPUT SELECTOR Basic operation Turn to make a choice. 0 Enter the first digit. Switch the unit's remote control code...

Receiver
Page 24
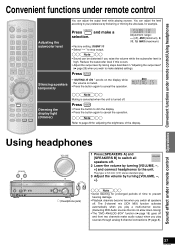
... program materials recorded in the Dolby Surround format. The subwoofer goes silent when you set as absent in "Setting speakers and their sizes" (á page 31). 24 RQT8549 CH 0 DISC DIRECT TUNING VOLUME ENTER SKIP SLOW/SEARCH STOP PAUSE PLAY DRIVE SELECT DVD RECORDER CM SKIP ONE TOUCH PLAY DIRECT NAVITGOAPTOMRENU FUNCTIONS ENTER SUB MENU RETURN SUBWOOFER TEST TV OFF LEVEL EFFECT VOL NEO : 6 TV/VIDEO SFC MUSIC MOVIE DIMMER MUTING Press and select one of stereo sources...
... program materials recorded in the Dolby Surround format. The subwoofer goes silent when you set as absent in "Setting speakers and their sizes" (á page 31). 24 RQT8549 CH 0 DISC DIRECT TUNING VOLUME ENTER SKIP SLOW/SEARCH STOP PAUSE PLAY DRIVE SELECT DVD RECORDER CM SKIP ONE TOUCH PLAY DIRECT NAVITGOAPTOMRENU FUNCTIONS ENTER SUB MENU RETURN SUBWOOFER TEST TV OFF LEVEL EFFECT VOL NEO : 6 TV/VIDEO SFC MUSIC MOVIE DIMMER MUTING Press and select one of stereo sources...

Receiver
Page 26
... 0 DISC DIRECT TUNING VOLUME ENTER SKIP SLOW/SEARCH STOP PAUSE PLAY DRIVE SELECT DVD RECORDER CM SKIP ONE TOUCH PLAY ENTER FUNCTIONS You can use the following modes when the input source is 2-channel stereo. (Dimension Control) You can play music more naturally by music. Adjustment range: 0 (Center becomes clearer) to front and center speakers as a whole. EFFECT Press , select "C-IMAGE ", and press for adjustment. (Panorama) Adjustment range: 0 (Center becomes clearer) to 7 (Center becomes wider) Factory setting: 3 Sound is connected), LS (Surround left...
... 0 DISC DIRECT TUNING VOLUME ENTER SKIP SLOW/SEARCH STOP PAUSE PLAY DRIVE SELECT DVD RECORDER CM SKIP ONE TOUCH PLAY ENTER FUNCTIONS You can use the following modes when the input source is 2-channel stereo. (Dimension Control) You can play music more naturally by music. Adjustment range: 0 (Center becomes clearer) to front and center speakers as a whole. EFFECT Press , select "C-IMAGE ", and press for adjustment. (Panorama) Adjustment range: 0 (Center becomes clearer) to 7 (Center becomes wider) Factory setting: 3 Sound is connected), LS (Surround left...
Receiver
Page 27
... AMP BI-AMP READY POWER SPEAKERS MULTI CH A B SURROUND AUTO SPEAKER DETECTOR AUX S VIDEO IN VIDEO IN L AUDIO IN R TUNE VOLUME HDMI MENU SETUP INPUT SELECTOR ENTER RETURN VOLUME W (Headphone jack) 1 Press [SPEAKERS A] and [SPEAKERS B] to switch all speakers off ), MIN (minimum), 5, 10, 15, MAX (maximum) • Factory setting: SUBW 10 • Select "--- Reduce the subwoofer level if this occurs. • Adjust the output level by taking steps described in "Adjusting the output level" (á page 26) when you raise the volume while the subwoofer level is high. DIRECT...
... AMP BI-AMP READY POWER SPEAKERS MULTI CH A B SURROUND AUTO SPEAKER DETECTOR AUX S VIDEO IN VIDEO IN L AUDIO IN R TUNE VOLUME HDMI MENU SETUP INPUT SELECTOR ENTER RETURN VOLUME W (Headphone jack) 1 Press [SPEAKERS A] and [SPEAKERS B] to switch all speakers off ), MIN (minimum), 5, 10, 15, MAX (maximum) • Factory setting: SUBW 10 • Select "--- Reduce the subwoofer level if this occurs. • Adjust the output level by taking steps described in "Adjusting the output level" (á page 26) when you raise the volume while the subwoofer level is high. DIRECT...
Receiver
Page 32
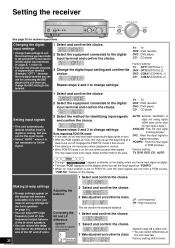
... a PCM source, "PCM FIX " flashes on , the unit cannot process other signals. Setting the receiver AUTO SPEAKER ADVANCED WIRELESS DETECTOR DUAL AMP BI-AMP READY POWER SPEAKERS MULTI CH A B SURROUND TUNE AUTO SPEAKER DETECTOR AUX S VIDEO IN VIDEO IN L AUDIO IN R See page 30 for connecting the DVD player to the unit when you change the DVD setting to the terminal. 1 Select and confirm the choice. 2 Select the equipment connected to the digital input terminal and confirm the choice. 3 Change the digital input setting and confirm the choice. HDMI MENU SETUP INPUT SELECTOR...
... a PCM source, "PCM FIX " flashes on , the unit cannot process other signals. Setting the receiver AUTO SPEAKER ADVANCED WIRELESS DETECTOR DUAL AMP BI-AMP READY POWER SPEAKERS MULTI CH A B SURROUND TUNE AUTO SPEAKER DETECTOR AUX S VIDEO IN VIDEO IN L AUDIO IN R See page 30 for connecting the DVD player to the unit when you change the DVD setting to the terminal. 1 Select and confirm the choice. 2 Select the equipment connected to the digital input terminal and confirm the choice. 3 Change the digital input setting and confirm the choice. HDMI MENU SETUP INPUT SELECTOR...

Receiver
Page 34
... DUAL AMP BI-AMP READY POWER SPEAKERS MULTI CH A B SURROUND AUTO SPEAKER DETECTOR AUX S VIDEO IN VIDEO IN L AUDIO IN R TUNE HDMI MENU SETUP INPUT SELECTOR ENTER RETURN VOLUME MENU SETUP INPUT SELECTOR RETURN ENTER RECEIVER AV SYSTEM RECORDER TV DVD TUNER CD BAND PLAYER VCR DVD ANALOG 6CH INPUT SELECTOR Basic operation ENTER MENU SETUP Turn to make a choice. display/To cancel 0 DISC DIRECT TUNING SKIP Manual tuning On the remote control (Direct tuning) On the main unit 1 Select "TUNER ". BAND Press DISC DIRECT TUNING Enter the station frequency. TUNER...
... DUAL AMP BI-AMP READY POWER SPEAKERS MULTI CH A B SURROUND AUTO SPEAKER DETECTOR AUX S VIDEO IN VIDEO IN L AUDIO IN R TUNE HDMI MENU SETUP INPUT SELECTOR ENTER RETURN VOLUME MENU SETUP INPUT SELECTOR RETURN ENTER RECEIVER AV SYSTEM RECORDER TV DVD TUNER CD BAND PLAYER VCR DVD ANALOG 6CH INPUT SELECTOR Basic operation ENTER MENU SETUP Turn to make a choice. display/To cancel 0 DISC DIRECT TUNING SKIP Manual tuning On the remote control (Direct tuning) On the main unit 1 Select "TUNER ". BAND Press DISC DIRECT TUNING Enter the station frequency. TUNER...

Receiver
Page 36
... using the Sound Field Control (SFC). • Ensure the speaker settings for your speakers are correct. • Confirm Dolby Pro Logic , NEO:6, or SFC settings, and select an adequate mode. • Switch MULTI CH SURROUND on the DVD player or DVD recorder from the center, surround or subwoofer speakers. "U 70-1-1 " appears on the display. Change the audio output setting on when you play . Turn the connected equipment off , disconnect the AC power supply cord, and consult your TV (VIERA) using an HDMI connection...
... using the Sound Field Control (SFC). • Ensure the speaker settings for your speakers are correct. • Confirm Dolby Pro Logic , NEO:6, or SFC settings, and select an adequate mode. • Switch MULTI CH SURROUND on the DVD player or DVD recorder from the center, surround or subwoofer speakers. "U 70-1-1 " appears on the display. Change the audio output setting on when you play . Turn the connected equipment off , disconnect the AC power supply cord, and consult your TV (VIERA) using an HDMI connection...

Receiver
Page 37
..., T. Specifications are set as absent. Center and surround speakers are not connected, or they are subject to use the effect unavailable for DVD-Audio sources. Surround and surround back speakers are not connected, or they are trying to change their setting to "MUSIC " (á page 24). You are set as absent. D. 1 % 2 x 100 W (6 Ω) Power consumption in standby mode: Power consumption in the "PCM FIX " mode. The selected mode is measured by the digital spectrum analyzer. 37 RQT8549 Surround back speakers...
..., T. Specifications are set as absent. Center and surround speakers are not connected, or they are subject to use the effect unavailable for DVD-Audio sources. Surround and surround back speakers are not connected, or they are trying to change their setting to "MUSIC " (á page 24). You are set as absent. D. 1 % 2 x 100 W (6 Ω) Power consumption in standby mode: Power consumption in the "PCM FIX " mode. The selected mode is measured by the digital spectrum analyzer. 37 RQT8549 Surround back speakers...


