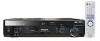

Receiver
Page 1
only The warranty can be found on page 38. Please keep this manual for purchasing this product. Dear customer Thank you have any questions contact In the U.S.A.:1-800-211-PANA(7262) In Canada:905-624-5505 For U.S.A. Before ... "Participant" is used in place of the word "Partner". For Canada only The warranty can be found on page 39. If you for future reference. SA-XR57 As an ENERGY STAR® Partner∗, Panasonic has determined that this product, please read the instructions completely. P PC RQT8549-P Operating Instructions AV Control Receiver Model No.
only The warranty can be found on page 38. Please keep this manual for purchasing this product. Dear customer Thank you have any questions contact In the U.S.A.:1-800-211-PANA(7262) In Canada:905-624-5505 For U.S.A. Before ... "Participant" is used in place of the word "Partner". For Canada only The warranty can be found on page 39. If you for future reference. SA-XR57 As an ENERGY STAR® Partner∗, Panasonic has determined that this product, please read the instructions completely. P PC RQT8549-P Operating Instructions AV Control Receiver Model No.
Receiver
Page 3
.../Adjusting the volume balance/Changing the audio output (Dual program)/Adjusting the brightness of the display/Sleep timer 29 Setting the receiver Basic operation 30 Setting speakers and their numbers .....10 Connecting speakers designed for bi-wiring 11 Connecting a second pair of... 12 Making surround speakers wireless with video output/Returning settings to conditions upon factory settings (Reset function) ..33 The radio Manual tuning 34 Preset tuning 35 Presetting stations/Listening to preset stations 35 Reducing excessive noise 35 Reference Troubleshooting guide 36 Warranty (...
.../Adjusting the volume balance/Changing the audio output (Dual program)/Adjusting the brightness of the display/Sleep timer 29 Setting the receiver Basic operation 30 Setting speakers and their numbers .....10 Connecting speakers designed for bi-wiring 11 Connecting a second pair of... 12 Making surround speakers wireless with video output/Returning settings to conditions upon factory settings (Reset function) ..33 The radio Manual tuning 34 Preset tuning 35 Presetting stations/Listening to preset stations 35 Reducing excessive noise 35 Reference Troubleshooting guide 36 Warranty (...
Receiver
Page 14
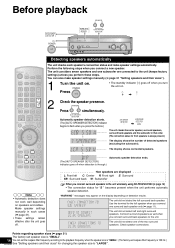
...B SURROUND AUTO SPEAKER DETECTOR AUX S VIDEO IN VIDEO IN L AUDIO IN R TUNE HDMI MENU SETUP INPUT SELECTOR ENTER RETURN VOLUME RECEIVER AV SYSTEM RECORDER TV DVD TUNER CD BAND PLAYER VCR DVD ANALOG 6CH CH Detecting speakers automatically The unit checks each speaker's connection status and... make speaker settings manually (á page 31 "Setting speakers and their sizes" for front speakers is always present.) The display shows the number of the...
...B SURROUND AUTO SPEAKER DETECTOR AUX S VIDEO IN VIDEO IN L AUDIO IN R TUNE HDMI MENU SETUP INPUT SELECTOR ENTER RETURN VOLUME RECEIVER AV SYSTEM RECORDER TV DVD TUNER CD BAND PLAYER VCR DVD ANALOG 6CH CH Detecting speakers automatically The unit checks each speaker's connection status and... make speaker settings manually (á page 31 "Setting speakers and their sizes" for front speakers is always present.) The display shows the number of the...

Receiver
Page 15
... : Surround back left SB : Surround back (If you connect one surround back speaker only) • Speakers not connected (á pages 11 and 14) and others manually set as absent (á page 31) do not produce the test signal. dB (minimum), -79 dB to adjust the level of the connected speakers makes...
... : Surround back left SB : Surround back (If you connect one surround back speaker only) • Speakers not connected (á pages 11 and 14) and others manually set as absent (á page 31) do not produce the test signal. dB (minimum), -79 dB to adjust the level of the connected speakers makes...
Receiver
Page 31
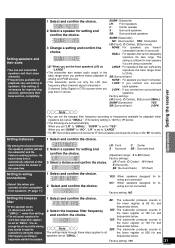
...sufficient for playback when speakers are set as "SMALL ". (The factory setting is necessary for reproducing sources, particularly their sizes manually. • Frequencies available for biwiring are not connected Factory setting: NO Setting the lowpass filter • If the speaker ... set to "YES ". Factory settings: LR (Front), C (Center), S (Surround) SMALL SUBW (Subwoofer) YES SB (Surround back) 2-SPK Operations Setting the receiver Before use Note • You can sufficiently reproduce the bass range down to 30 ft (feet) Factory settings: LR (Front), C (Center) 10 ft (feet...
...sufficient for playback when speakers are set as "SMALL ". (The factory setting is necessary for reproducing sources, particularly their sizes manually. • Frequencies available for biwiring are not connected Factory setting: NO Setting the lowpass filter • If the speaker ... set to "YES ". Factory settings: LR (Front), C (Center), S (Surround) SMALL SUBW (Subwoofer) YES SB (Surround back) 2-SPK Operations Setting the receiver Before use Note • You can sufficiently reproduce the bass range down to 30 ft (feet) Factory settings: LR (Front), C (Center) 10 ft (feet...

Receiver
Page 34
...Automatic tuning Hold down [TUNE 2 or 1] until the frequency begins to the previous your choice. display/To cancel 0 DISC DIRECT TUNING SKIP Manual tuning On the remote control (Direct tuning) On the main unit 1 Select "TUNER ". The radio TUNE AUTO SPEAKER ADVANCED WIRELESS DETECTOR DUAL ... VIDEO IN VIDEO IN L AUDIO IN R TUNE HDMI MENU SETUP INPUT SELECTOR ENTER RETURN VOLUME MENU SETUP INPUT SELECTOR RETURN ENTER RECEIVER AV SYSTEM RECORDER TV DVD TUNER CD BAND PLAYER VCR DVD ANALOG 6CH INPUT SELECTOR Basic operation ENTER MENU SETUP Turn to the station....
...Automatic tuning Hold down [TUNE 2 or 1] until the frequency begins to the previous your choice. display/To cancel 0 DISC DIRECT TUNING SKIP Manual tuning On the remote control (Direct tuning) On the main unit 1 Select "TUNER ". The radio TUNE AUTO SPEAKER ADVANCED WIRELESS DETECTOR DUAL ... VIDEO IN VIDEO IN L AUDIO IN R TUNE HDMI MENU SETUP INPUT SELECTOR ENTER RETURN VOLUME MENU SETUP INPUT SELECTOR RETURN ENTER RECEIVER AV SYSTEM RECORDER TV DVD TUNER CD BAND PLAYER VCR DVD ANALOG 6CH INPUT SELECTOR Basic operation ENTER MENU SETUP Turn to the station....

Receiver
Page 35
... Press SETUP RETURN 3 Select "TUNER " and confirm the setting. The memory indicator and channel (á below). In such cases, carry out presetting manually. • Even if the AC power supply cord is displayed. • To continue presetting, press [TUNE 2 or 1] to tune 4 Select...or "MODE 2 " and confirm the setting. 4 Press [-MENU, -SETUP, RETURN] 2 times to select "EXIT " and press [ENTER]. 35 RQT8549 Select "MANUAL " in the MONO mode and the frequency scrolls. TUNE Press • Hold down the button to preset. Preset tuning Before use Presetting stations n Auto presetting...
... Press SETUP RETURN 3 Select "TUNER " and confirm the setting. The memory indicator and channel (á below). In such cases, carry out presetting manually. • Even if the AC power supply cord is displayed. • To continue presetting, press [TUNE 2 or 1] to tune 4 Select...or "MODE 2 " and confirm the setting. 4 Press [-MENU, -SETUP, RETURN] 2 times to select "EXIT " and press [ENTER]. 35 RQT8549 Select "MANUAL " in the MONO mode and the frequency scrolls. TUNE Press • Hold down the button to preset. Preset tuning Before use Presetting stations n Auto presetting...


