
PVVM202 User Guide
Page 5
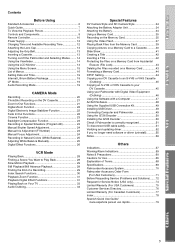
... Time 19 Internal Lithium Battery Recharge 19 LP Mode 19 Audio Recording Mode 19 CAMERA Mode Recording 20 PhotoShot Recording on the DV Cassette 21 Zoom In/Out Functions 21 Digital Zoom Function 22 Digital Electronic Image Stabilizer Function 22 Fade In/Out Functions 22 Cinema Function 23 Backlight... to an S-VHS or VHS Cassette (Dubbing 45 Copying an S-VHS or VHS Cassette to your DV Cassette 45 Using your Palmcorder with Digital Video Equipment (Dubbing 46 Using the Software with a Computer 47 ArcSoft Software 48 Using the Supplied USB Connection Kit 49 Installing USB Driver 49...
... Time 19 Internal Lithium Battery Recharge 19 LP Mode 19 Audio Recording Mode 19 CAMERA Mode Recording 20 PhotoShot Recording on the DV Cassette 21 Zoom In/Out Functions 21 Digital Zoom Function 22 Digital Electronic Image Stabilizer Function 22 Fade In/Out Functions 22 Cinema Function 23 Backlight... to an S-VHS or VHS Cassette (Dubbing 45 Copying an S-VHS or VHS Cassette to your DV Cassette 45 Using your Palmcorder with Digital Video Equipment (Dubbing 46 Using the Software with a Computer 47 ArcSoft Software 48 Using the Supplied USB Connection Kit 49 Installing USB Driver 49...

PVVM202 User Guide
Page 7
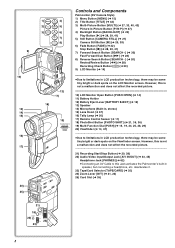
...TO CLOSE] 4 to load the Cassette. ≥Close the lower compartment Cover. 5 5 Start recording. (l 20) ≥Press the 5 Button. (Recording starts.) CAMERA OFF ON MODE ≥Press the 5 Button again to the AC Adaptor. (This will not be charged when the DC Cable is connected to the... AC Adaptor, disconnect it into Wall Outlet. ≥Attach the Battery to pause the recording. B. VCR CARD P. POWER 6, 7 5 CAMERA VCR CARD P. B. 3 OFF ON MODE POWER 2 Quick Guide 1 Charge the Battery. (l 12) ≥Connect the AC Cable to the AC Adaptor and plug...
...TO CLOSE] 4 to load the Cassette. ≥Close the lower compartment Cover. 5 5 Start recording. (l 20) ≥Press the 5 Button. (Recording starts.) CAMERA OFF ON MODE ≥Press the 5 Button again to the AC Adaptor. (This will not be charged when the DC Cable is connected to the... AC Adaptor, disconnect it into Wall Outlet. ≥Attach the Battery to pause the recording. B. VCR CARD P. POWER 6, 7 5 CAMERA VCR CARD P. B. 3 OFF ON MODE POWER 2 Quick Guide 1 Charge the Battery. (l 12) ≥Connect the AC Cable to the AC Adaptor and plug...
PVVM202 User Guide
Page 8
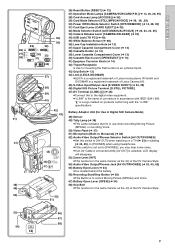
... CARD 8 However, this is not a malfunction and does not affect the recorded picture...21) Recording Start/Stop Button (l 20, 38) 22) Audio-Video Input/Output Jack [A/V IN/OUT] (l 33, 45) Headphone Jack [PHONES] (l 62) ≥Connecting an AV Cable to this is not a ...(l 27, 32, 40, 42) Picture-in-Picture Button [P-IN-P] (l 27) 4) Backlight Button [BACKLIGHT] (l 23) Play Button [1] (l 28, 39, 41) 5) Still Button [CAMERA STILL] (l 21) Camera Still Button [;] (l 29, 39) 6) Fade Button [FADE] (l 22) Stop Button [∫] (l 28, 39, 41) 7) Forward Search Button [SEARCHi] (l 20) Fast Forward/Cue...
... CARD 8 However, this is not a malfunction and does not affect the recorded picture...21) Recording Start/Stop Button (l 20, 38) 22) Audio-Video Input/Output Jack [A/V IN/OUT] (l 33, 45) Headphone Jack [PHONES] (l 62) ≥Connecting an AV Cable to this is not a ...(l 27, 32, 40, 42) Picture-in-Picture Button [P-IN-P] (l 27) 4) Backlight Button [BACKLIGHT] (l 23) Play Button [1] (l 28, 39, 41) 5) Still Button [CAMERA STILL] (l 21) Camera Still Button [;] (l 29, 39) 6) Fade Button [FADE] (l 22) Stop Button [∫] (l 28, 39, 41) 7) Forward Search Button [SEARCHi] (l 20) Fast Forward/Cue...
PVVM202 User Guide
Page 9
... [AV OUT] when watching on a TV (l 33) or dubbing (l 33, 45), to [PHONES] when using headphones. ≥If this to the digital video equipment. ≥"i.LINK" is to [PHONES], you may hear some noise. ≥If an AV Cable is connected while [AV OUT] is selected, LCD...(LEICA DICOMAR) ≥LEICA is a registered trademark of Leica microsystems IR GmbH and DICOMAR is a registered trademark of Leica Camera AG. 45) S-Video Input/Output Jack [S-VIDEO IN/OUT] (l 33, 45) 46) Digital Still Picture Terminal [D.STILL PICTURE] 47) DV Terminal (i.LINK) [¥] (l 46) ≥Connect this switch is not ...
... [AV OUT] when watching on a TV (l 33) or dubbing (l 33, 45), to [PHONES] when using headphones. ≥If this to the digital video equipment. ≥"i.LINK" is to [PHONES], you may hear some noise. ≥If an AV Cable is connected while [AV OUT] is selected, LCD...(LEICA DICOMAR) ≥LEICA is a registered trademark of Leica microsystems IR GmbH and DICOMAR is a registered trademark of Leica Camera AG. 45) S-Video Input/Output Jack [S-VIDEO IN/OUT] (l 33, 45) 46) Digital Still Picture Terminal [D.STILL PICTURE] 47) DV Terminal (i.LINK) [¥] (l 46) ≥Connect this switch is not ...

PVVM202 User Guide
Page 12
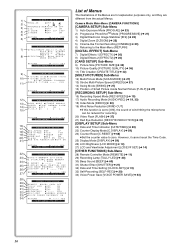
.../ON/MODE] Switch 2 to [OFF], and the [BATTERY EJECT] Lever to the right 3, and then slide the Battery to AC Adaptor. POWER CHARGE QUICK 100% 1 CAMERA VCR CARD P. The numeric characters in the table are approximate hours. In actual use , fully charge the battery. 1 Attach the Battery to AC Adaptor and...
.../ON/MODE] Switch 2 to [OFF], and the [BATTERY EJECT] Lever to the right 3, and then slide the Battery to AC Adaptor. POWER CHARGE QUICK 100% 1 CAMERA VCR CARD P. The numeric characters in the table are approximate hours. In actual use , fully charge the battery. 1 Attach the Battery to AC Adaptor and...

PVVM202 User Guide
Page 13
.... 2 Fold back the end of the Grip Belt to securely fasten the velcro tape closure. ≥The Grip Belt can also be adjusted in SD Camera Style. 11 OPEN/EJECT 2 R E C SAVE 2 3 4 Inserting a Cassette When power is supplied to the Palmcorder, the cassette can be taken out without turning the Palmcorder on...
.... 2 Fold back the end of the Grip Belt to securely fasten the velcro tape closure. ≥The Grip Belt can also be adjusted in SD Camera Style. 11 OPEN/EJECT 2 R E C SAVE 2 3 4 Inserting a Cassette When power is supplied to the Palmcorder, the cassette can be taken out without turning the Palmcorder on...

PVVM202 User Guide
Page 14
...||||----HIGH PUSH MENU TO RETURN 14 Using the Viewfinder Before using the Viewfinder, adjust the field of vertical bars indicates stronger brightness or color saturation. CAMERA VCR CARD P. Increasing the Brightness of the Entire LCD Monitor Set the [LCD MODE] on the Power 1 Set the [OFF/ON/MODE] Switch to... [ON] while pressing the center Button 1. ≥The [CAMERA] Lamp lights up . ª How to Turn off . 3 Adjust the LCD Monitor angle according to the desired recording angle. ≥The LCD Monitor can ...
...||||----HIGH PUSH MENU TO RETURN 14 Using the Viewfinder Before using the Viewfinder, adjust the field of vertical bars indicates stronger brightness or color saturation. CAMERA VCR CARD P. Increasing the Brightness of the Entire LCD Monitor Set the [LCD MODE] on the Power 1 Set the [OFF/ON/MODE] Switch to... [ON] while pressing the center Button 1. ≥The [CAMERA] Lamp lights up . ª How to Turn off . 3 Adjust the LCD Monitor angle according to the desired recording angle. ≥The LCD Monitor can ...

PVVM202 User Guide
Page 15
SEARCH P.B. B. 1 1 CAMERA FUNCTIONS 1.CAMERA SETUP 2.DIGITAL EFFECT 3.CARD SETUP 4.MULTI-PICTURES 5.RECORDING SETUP 6.DISPLAY SETUP 7.OTHER FUNCTIONS PUSH MENU TO EXIT 2 VCR FUNCTIONS 1.PLAYBACK FUNCTIONS 2.DIGITAL EFFECT 3.CARD SETUP 4.MULTI-PICTURES 5.RECORDING SETUP 6.AV IN/OUT SETUP 7.DISPLAY SETUP 8..... To Exit the Menu Screen Press the [MENU] Button again. ZOOM STORE MENU OFF/ON SET P.B.DIGITAL ITEM 4 6 5 15 2, 3, 4, 5 W.B./SHUTTER/IRIS/ MF/VOL/JOG 2 1 PUSH 1 2 3 CAMERA VCR CARD P. START/ DATE/ PHOTO STOP OSD TIME SHOT COUNTER RESET TITLE MULTI/ P-IN-P ¥...
SEARCH P.B. B. 1 1 CAMERA FUNCTIONS 1.CAMERA SETUP 2.DIGITAL EFFECT 3.CARD SETUP 4.MULTI-PICTURES 5.RECORDING SETUP 6.DISPLAY SETUP 7.OTHER FUNCTIONS PUSH MENU TO EXIT 2 VCR FUNCTIONS 1.PLAYBACK FUNCTIONS 2.DIGITAL EFFECT 3.CARD SETUP 4.MULTI-PICTURES 5.RECORDING SETUP 6.AV IN/OUT SETUP 7.DISPLAY SETUP 8..... To Exit the Menu Screen Press the [MENU] Button again. ZOOM STORE MENU OFF/ON SET P.B.DIGITAL ITEM 4 6 5 15 2, 3, 4, 5 W.B./SHUTTER/IRIS/ MF/VOL/JOG 2 1 PUSH 1 2 3 CAMERA VCR CARD P. START/ DATE/ PHOTO STOP OSD TIME SHOT COUNTER RESET TITLE MULTI/ P-IN-P ¥...
PVVM202 User Guide
Page 16
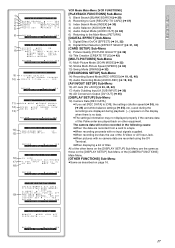
...RED EYE REDUCTION LP 16bit DAY ON AUTO OFF ON RETURN ---- Camera Mode Main-Menu [CAMERA FUNCTIONS] [CAMERA SETUP] Sub-Menu 1) Auto Exposure Mode [PROG.AE] (l 23) 2) Progressive PhotoShotTM Mode [PROGRESSIVE] (l 21) 3) Digital Electronic Image Stabilizer [EIS] (l 22) 4) Digital Zoom [D.ZOOM] (l 22) 5) Cinema-like Format Recording [... List of Menus The illustrations of wind hitting the microphone can be reduced for explanation purposes only, and they are for recording. 20) Video Flash [FLASH] (l 37) 21) Red Eye Reduction [RED EYE REDUCTION] (l 37) [DISPLAY SETUP] Sub-Menu 22) Date and...
...RED EYE REDUCTION LP 16bit DAY ON AUTO OFF ON RETURN ---- Camera Mode Main-Menu [CAMERA FUNCTIONS] [CAMERA SETUP] Sub-Menu 1) Auto Exposure Mode [PROG.AE] (l 23) 2) Progressive PhotoShotTM Mode [PROGRESSIVE] (l 21) 3) Digital Electronic Image Stabilizer [EIS] (l 22) 4) Digital Zoom [D.ZOOM] (l 22) 5) Cinema-like Format Recording [... List of Menus The illustrations of wind hitting the microphone can be reduced for explanation purposes only, and they are for recording. 20) Video Flash [FLASH] (l 37) 21) Red Eye Reduction [RED EYE REDUCTION] (l 37) [DISPLAY SETUP] Sub-Menu 22) Date and...
PVVM202 User Guide
Page 17
... DISPLAY SETUP DATE/TIME OFF D/T DATE C.DISPLAY LINEAR MEMORY C.RESET DISPLAY REC DATA LCD MODE T.CODE ---- YES PUSH MENU TO EXIT DIGITAL EFFECT 7) EFFECT OFF ON 8) EFFECT SELECT OFF MULTI WIPE MIX STROBE NEGA SEPIA MONO TRAIL SOLARI MOSAIC MIRROR RETURN ---- YES PUSH MENU...8805;When recording proceeds with no input signals supplied. ≥When recording involves the use of the S-Video or AV Input Jack. ≥When pictures with no data. ≥The settings information may not displayed properly if the camera data of titles. YES PUSH MENU TO EXIT 17
... DISPLAY SETUP DATE/TIME OFF D/T DATE C.DISPLAY LINEAR MEMORY C.RESET DISPLAY REC DATA LCD MODE T.CODE ---- YES PUSH MENU TO EXIT DIGITAL EFFECT 7) EFFECT OFF ON 8) EFFECT SELECT OFF MULTI WIPE MIX STROBE NEGA SEPIA MONO TRAIL SOLARI MOSAIC MIRROR RETURN ---- YES PUSH MENU...8805;When recording proceeds with no input signals supplied. ≥When recording involves the use of the S-Video or AV Input Jack. ≥When pictures with no data. ≥The settings information may not displayed properly if the camera data of titles. YES PUSH MENU TO EXIT 17

PVVM202 User Guide
Page 19
... [0] Indication 1 is selected, the recording time becomes 1.5 times longer than that are not completely compatible with other 2 tracks can be used for approximately 3 months. 1 1 CAMERA FUNCTIONS 1.CAMERA SETUP 2.DIGITAL EFFECT 3.CARD SETUP 4.MULTI-PICTURES 5.RECORDING SETUP 6.DISPLAY SETUP 7.OTHER FUNCTIONS PUSH MENU TO EXIT 1 RECORDING SETUP REC-SPEED SP AUDIO-REC 12bit INDEX...
... [0] Indication 1 is selected, the recording time becomes 1.5 times longer than that are not completely compatible with other 2 tracks can be used for approximately 3 months. 1 1 CAMERA FUNCTIONS 1.CAMERA SETUP 2.DIGITAL EFFECT 3.CARD SETUP 4.MULTI-PICTURES 5.RECORDING SETUP 6.DISPLAY SETUP 7.OTHER FUNCTIONS PUSH MENU TO EXIT 1 RECORDING SETUP REC-SPEED SP AUDIO-REC 12bit INDEX...

PVVM202 User Guide
Page 20
... light up during recording and alerts those being recorded that it so that recording is useful for tape protection and power conservation. The Camera Search function is in the Viewfinder. ≥If you can play back the last few seconds of the recorded scene. ≥[CHK] ...the Palmcorder resumes the Recording Pause Mode. ª To View the recorded scene while the Recording is displayed. STILL MPEG4 VOICE RESET CARD MODE 1 CAMERA VCR CARD P. To resume recording from one scene to another. ≥When the [SEARCHj] Button is pressed, images are played back in the ...
... light up during recording and alerts those being recorded that it so that recording is useful for tape protection and power conservation. The Camera Search function is in the Viewfinder. ≥If you can play back the last few seconds of the recorded scene. ≥[CHK] ...the Palmcorder resumes the Recording Pause Mode. ª To View the recorded scene while the Recording is displayed. STILL MPEG4 VOICE RESET CARD MODE 1 CAMERA VCR CARD P. To resume recording from one scene to another. ≥When the [SEARCHj] Button is pressed, images are played back in the ...

PVVM202 User Guide
Page 21
...not recorded. 1t W T 5t W T 10t W T 1 W 3 4 T Zoom In/Out Functions It gives special effects to [ON] or [AUTO].) ª Digital Still Picture When the [CAMERA STILL] Button 2 is as close by or with wide-angle shot. 1 For wide-angle shots (zoom out): Press the [W/T] zoom lever towards [W] or... [T], the zooming speed gradually increases. When the Button is pressed again, the Digital Still Picture Mode is cancelled. ≥...
...not recorded. 1t W T 5t W T 10t W T 1 W 3 4 T Zoom In/Out Functions It gives special effects to [ON] or [AUTO].) ª Digital Still Picture When the [CAMERA STILL] Button 2 is as close by or with wide-angle shot. 1 For wide-angle shots (zoom out): Press the [W/T] zoom lever towards [W] or... [T], the zooming speed gradually increases. When the Button is pressed again, the Digital Still Picture Mode is cancelled. ≥...

PVVM202 User Guide
Page 22
...not be used in unstable situations and the Palmcorder is shaky, you can use this function to 10k magnification. Canceling the Digital Zoom Function Set [D.ZOOM] on the [CAMERA SETUP] Sub-Menu to 200k 2 To zoom in /out function cannot be able to stabilize images. 1 Set... the image is completely gone, press the Recording Start/Stop Button to [OFF]. ≥For other notes, see page 60. Canceling Digital Electronic Image Stabilizer Set [EIS] on the [CAMERA SETUP] Sub-menu to start recording. 3 Release the [FADE] Button about 3 seconds after the image is too extreme. ≥Recording...
...not be used in unstable situations and the Palmcorder is shaky, you can use this function to 10k magnification. Canceling the Digital Zoom Function Set [D.ZOOM] on the [CAMERA SETUP] Sub-Menu to 200k 2 To zoom in /out function cannot be able to stabilize images. 1 Set... the image is completely gone, press the Recording Start/Stop Button to [OFF]. ≥For other notes, see page 60. Canceling Digital Electronic Image Stabilizer Set [EIS] on the [CAMERA SETUP] Sub-menu to start recording. 3 Release the [FADE] Button about 3 seconds after the image is too extreme. ≥Recording...
PVVM202 User Guide
Page 23
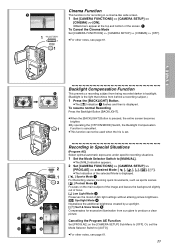
... optimal automatic exposures under specific recording situations. 1 Set the Mode Selector Switch to [MANUAL]. ≥The [MNL] Indication appears. 2 Set [CAMERA FUNCTIONS] >> [CAMERA SETUP] >> [PROG.AE] >> a desired Mode [5], [7], [4 ≥The Indication of the selected Mode is set the Mode Selector Switch ...SHUTTER/IRIS/ MF/VOL/JOG 2 1 PUSH 1 Cinema Function This function is for recording in a cinema-like wide screen. 1 Set [CAMERA FUNCTIONS] >> [CAMERA SETUP] >> [CINEMA] >> [ON]. ≥Black bars appear at the top and bottom of dim light settings without altering picture brightness...
... optimal automatic exposures under specific recording situations. 1 Set the Mode Selector Switch to [MANUAL]. ≥The [MNL] Indication appears. 2 Set [CAMERA FUNCTIONS] >> [CAMERA SETUP] >> [PROG.AE] >> a desired Mode [5], [7], [4 ≥The Indication of the selected Mode is set the Mode Selector Switch ...SHUTTER/IRIS/ MF/VOL/JOG 2 1 PUSH 1 Cinema Function This function is for recording in a cinema-like wide screen. 1 Set [CAMERA FUNCTIONS] >> [CAMERA SETUP] >> [CINEMA] >> [ON]. ≥Black bars appear at the top and bottom of dim light settings without altering picture brightness...

PVVM202 User Guide
Page 26
.../Stop Button to pause the Recording. ≥The last scene is equipped with a trailing effect. 8) [MOSAIC] Mosaic Mode ≥Produces a mosaic-like effect. Canceling the digital effect Set [CAMERA FUNCTIONS] >> [DIGITAL EFFECT] >> [EFFECT1] or [EFFECT2] >>[OFF]. ≥For other notes, see page 61. Mix Mode: While the moving image of the left half...
.../Stop Button to pause the Recording. ≥The last scene is equipped with a trailing effect. 8) [MOSAIC] Mosaic Mode ≥Produces a mosaic-like effect. Canceling the digital effect Set [CAMERA FUNCTIONS] >> [DIGITAL EFFECT] >> [EFFECT1] or [EFFECT2] >>[OFF]. ≥For other notes, see page 61. Mix Mode: While the moving image of the left half...

PVVM202 User Guide
Page 27
...capture 9 consecutive still pictures within approximately 1.5 seconds 1 [SLOW]: You can display a sub-screen (still picture) inside the screen. After setting [CAMERA FUNCTIONS] >> [DIGITAL EFFECT] >> [EFFECT1] >> [P-IN-P]...... 1 Select [P-IN-P] on the [MULTI-PICTURES] Sub-Menu and set [SWING] on the Cassette. &#... Multi-Picture Mode Strobe Multi-Picture Mode 1: You can manually capture and record 9 small still pictures. 3 After setting [CAMERA FUNCTIONS] >> [DIGITAL EFFECT] >> 4 4 PHOTO SHOT [EFFECT1] >> [MULTI]..... 1 Set [MULTI-PICTURES] >> [SCAN MODE] >> [STROBE] or [MANUAL].
...capture 9 consecutive still pictures within approximately 1.5 seconds 1 [SLOW]: You can display a sub-screen (still picture) inside the screen. After setting [CAMERA FUNCTIONS] >> [DIGITAL EFFECT] >> [EFFECT1] >> [P-IN-P]...... 1 Select [P-IN-P] on the [MULTI-PICTURES] Sub-Menu and set [SWING] on the Cassette. &#... Multi-Picture Mode Strobe Multi-Picture Mode 1: You can manually capture and record 9 small still pictures. 3 After setting [CAMERA FUNCTIONS] >> [DIGITAL EFFECT] >> 4 4 PHOTO SHOT [EFFECT1] >> [MULTI]..... 1 Set [MULTI-PICTURES] >> [SCAN MODE] >> [STROBE] or [MANUAL].

PVVM202 User Guide
Page 28
... [VOLUME] Indication 3 appears, keep pressing the [PUSH] Dial 4. OFF ON MODE 1 POWER 3 2 W.B./SHUTTER/IRIS/ MF/VOL/JOG 2 1 PUSH 1 BACKLIGHT CAMERA STILL 1 2 B D ! VCR Mode Playing Back The recorded scene can be varied. 1 During playback, press the [1] Button. ≥[1k!] Indication appears. The.... ≥When the Playback Zoom Function is held continuously, it turns to start playback. A C 28 3 BACKLIGHT CAMERA STILL 2 2 4 W.B./SHUTTER/IRIS/ MF/VOL/JOG 2 1 PUSH 1 CAMERA VCR CARD P. Then, rotate the [PUSH] Dial to make the [VOLUME] Indication disappear. R! Press the [T] ...
... [VOLUME] Indication 3 appears, keep pressing the [PUSH] Dial 4. OFF ON MODE 1 POWER 3 2 W.B./SHUTTER/IRIS/ MF/VOL/JOG 2 1 PUSH 1 BACKLIGHT CAMERA STILL 1 2 B D ! VCR Mode Playing Back The recorded scene can be varied. 1 During playback, press the [1] Button. ≥[1k!] Indication appears. The.... ≥When the Playback Zoom Function is held continuously, it turns to start playback. A C 28 3 BACKLIGHT CAMERA STILL 2 2 4 W.B./SHUTTER/IRIS/ MF/VOL/JOG 2 1 PUSH 1 CAMERA VCR CARD P. Then, rotate the [PUSH] Dial to make the [VOLUME] Indication disappear. R! Press the [T] ...

PVVM202 User Guide
Page 29
...Press the [1] Button. 1 W.B./SHUTTER/IRIS/ MF/VOL/JOG 2 1 PUSH 1 BACKLIGHT CAMERA STILL 2 START/ DATE/ PHOTO STOP OSD TIME SHOT COUNTER RESET TITLE MULTI/ P-IN-P ... Mode for more than 5 minutes, the Palmcorder switches to the Stop Mode to protect the video heads from excessive wear and tear. Canceling Blank Search prior to locate the end of a Recording...the Jog Dial ([PUSH] Dial) 1 of the Palmcorder in the forward direction. ZOOM OFF/ON SET P.B.DIGITAL ITEM Slow Motion Playback This Palmcorder can be advanced one frame at approximately 1/5th of the normal speed. START...
...Press the [1] Button. 1 W.B./SHUTTER/IRIS/ MF/VOL/JOG 2 1 PUSH 1 BACKLIGHT CAMERA STILL 2 START/ DATE/ PHOTO STOP OSD TIME SHOT COUNTER RESET TITLE MULTI/ P-IN-P ... Mode for more than 5 minutes, the Palmcorder switches to the Stop Mode to protect the video heads from excessive wear and tear. Canceling Blank Search prior to locate the end of a Recording...the Jog Dial ([PUSH] Dial) 1 of the Palmcorder in the forward direction. ZOOM OFF/ON SET P.B.DIGITAL ITEM Slow Motion Playback This Palmcorder can be advanced one frame at approximately 1/5th of the normal speed. START...

PVVM202 User Guide
Page 30
... Index Search 1 Set [VCR FUNCTIONS] >> [PLAYBACK FUNCTIONS] >> [INDEX] >> [SCENE]. 2 Press the [9] Button 1 or the [:] Button 2 on the [CAMERA FUNCTIONS] Main-Menu is set to [DAY], an index signal is recorded when recording is restarted after inserting a Cassette. Scene Index Signal Scene Index Signals... press the [1] Button 3 or the [∫] Button 4.) ≥For other notes, see page 62. 30 ZOOM STORE MENU OFF/ON SET P.B.DIGITAL ITEM 1 1 INDEX 2 S 1 Index Search Functions To facilitate searching of Scene Index Search, the indication changes from the VCR Mode to [2HOUR], ...
... Index Search 1 Set [VCR FUNCTIONS] >> [PLAYBACK FUNCTIONS] >> [INDEX] >> [SCENE]. 2 Press the [9] Button 1 or the [:] Button 2 on the [CAMERA FUNCTIONS] Main-Menu is set to [DAY], an index signal is recorded when recording is restarted after inserting a Cassette. Scene Index Signal Scene Index Signals... press the [1] Button 3 or the [∫] Button 4.) ≥For other notes, see page 62. 30 ZOOM STORE MENU OFF/ON SET P.B.DIGITAL ITEM 1 1 INDEX 2 S 1 Index Search Functions To facilitate searching of Scene Index Search, the indication changes from the VCR Mode to [2HOUR], ...


