
PVVM202 User Guide
Page 2
...) NO USER-SERVICEABLE PARTS INSIDE REFER SERVICING TO QUALIFIED SERVICE PERSONNEL This symbol warns the user that may not cause harmful interference, and (2) this device must use only the provided shielded interfacing cable with ferrite core when connecting the digital Palmcorder to provide reasonable protection against harmful interference when operated in a residential environment. Declaration of Conformity Model No.: PV-VM202 Trade Name: Panasonic Responsible...
...) NO USER-SERVICEABLE PARTS INSIDE REFER SERVICING TO QUALIFIED SERVICE PERSONNEL This symbol warns the user that may not cause harmful interference, and (2) this device must use only the provided shielded interfacing cable with ferrite core when connecting the digital Palmcorder to provide reasonable protection against harmful interference when operated in a residential environment. Declaration of Conformity Model No.: PV-VM202 Trade Name: Panasonic Responsible...
PVVM202 User Guide
Page 5
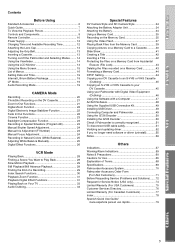
... Before Using Standard Accessories 6 Quick Guide 7 To View the Playback Picture 7 Controls and Components 8 Remote Controller 10 Power Supply 12 Charging Time and Available Recording Time 12 Attaching the Lens Cap 13 Adjusting the Grip Belt 13 Inserting a Cassette 13 Turning on/off the Palmcorder and Selecting Modes ........ 14 Using the Viewfinder 14 Using the LCD Monitor 14 Using the Menu Screen 15 List of Menus 16 Setting Date and Time 19 Internal Lithium Battery Recharge 19 LP Mode 19 Audio Recording Mode 19 CAMERA Mode Recording...
... Before Using Standard Accessories 6 Quick Guide 7 To View the Playback Picture 7 Controls and Components 8 Remote Controller 10 Power Supply 12 Charging Time and Available Recording Time 12 Attaching the Lens Cap 13 Adjusting the Grip Belt 13 Inserting a Cassette 13 Turning on/off the Palmcorder and Selecting Modes ........ 14 Using the Viewfinder 14 Using the LCD Monitor 14 Using the Menu Screen 15 List of Menus 16 Setting Date and Time 19 Internal Lithium Battery Recharge 19 LP Mode 19 Audio Recording Mode 19 CAMERA Mode Recording...
PVVM202 User Guide
Page 9
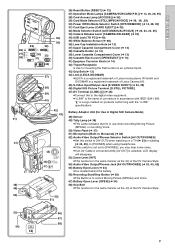
... the DV Camera Style. 54) Audio-Video Output/Phones Jack [AV OUT/PHONES] (l 33, 45, 62) 55) Battery Eject Lever (l 34) ≥It is located behind the battery. 56) Recording Start/Stop Button (l 38) ≥This Button is to the digital video equipment. ≥"i.LINK" is selected, LCD display will disappear. 53) Zoom Lever [W/T] ≥This functions in accordance with the "i.LINK" specifications. POWER 31) ACCESS CARD EJECT FOCUS 33) CAMERA RELEASE TO PC...
... the DV Camera Style. 54) Audio-Video Output/Phones Jack [AV OUT/PHONES] (l 33, 45, 62) 55) Battery Eject Lever (l 34) ≥It is located behind the battery. 56) Recording Start/Stop Button (l 38) ≥This Button is to the digital video equipment. ≥"i.LINK" is selected, LCD display will disappear. 53) Zoom Lever [W/T] ≥This functions in accordance with the "i.LINK" specifications. POWER 31) ACCESS CARD EJECT FOCUS 33) CAMERA RELEASE TO PC...
PVVM202 User Guide
Page 16
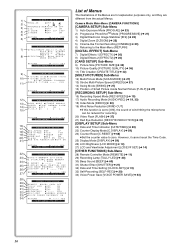
... reset the Time Code. 25) Display Mode [DISPLAY] (l 59) 26) LCD Brightness [LCD MODE] (l 14) 27) LCD and Viewfinder Adjustment [LCD/EVF SET] (l 14) [OTHER FUNCTIONS] Sub-Menu 28) Remote Controller Mode [REMOTE] (l 11) 29) Recording Lamp [TALLY LED] (l 20) 30) Beep Sound [BEEP] (l 60) 31) Shutter Effect [SHUTTER] (l 21) 32) Date and Time Setting [CLOCK-SET] (l 19) 33) Self-Recording [SELF-REC] (l 20) 34) Voice Power Save [VOICE POWER SAVE] (l 63) 16 YES PUSH MENU TO EXIT 16) 17) 18) 19) 20) 21) RECORDING SETUP REC-SPEED...
... reset the Time Code. 25) Display Mode [DISPLAY] (l 59) 26) LCD Brightness [LCD MODE] (l 14) 27) LCD and Viewfinder Adjustment [LCD/EVF SET] (l 14) [OTHER FUNCTIONS] Sub-Menu 28) Remote Controller Mode [REMOTE] (l 11) 29) Recording Lamp [TALLY LED] (l 20) 30) Beep Sound [BEEP] (l 60) 31) Shutter Effect [SHUTTER] (l 21) 32) Date and Time Setting [CLOCK-SET] (l 19) 33) Self-Recording [SELF-REC] (l 20) 34) Voice Power Save [VOICE POWER SAVE] (l 63) 16 YES PUSH MENU TO EXIT 16) 17) 18) 19) 20) 21) RECORDING SETUP REC-SPEED...

PVVM202 User Guide
Page 19
... check the time before recording. Internal Lithium Battery Recharge The internal lithium battery sustains the operation of the clock. If the [0] Indication 1 is near discharge. 1 Connect the AC Adaptor to the Palmcorder with LP Mode. (l 33) Audio Recording Mode The sound quality of SP Mode. When the [0] Indication 1 is lit, the internal lithium battery is flashing, charge the built-in the Palmcorder may be used for approximately 3 months. 1 1 CAMERA FUNCTIONS 1.CAMERA SETUP 2.DIGITAL EFFECT 3.CARD SETUP 4.MULTI-PICTURES 5.RECORDING SETUP 6.DISPLAY SETUP...
... check the time before recording. Internal Lithium Battery Recharge The internal lithium battery sustains the operation of the clock. If the [0] Indication 1 is near discharge. 1 Connect the AC Adaptor to the Palmcorder with LP Mode. (l 33) Audio Recording Mode The sound quality of SP Mode. When the [0] Indication 1 is lit, the internal lithium battery is flashing, charge the built-in the Palmcorder may be used for approximately 3 months. 1 1 CAMERA FUNCTIONS 1.CAMERA SETUP 2.DIGITAL EFFECT 3.CARD SETUP 4.MULTI-PICTURES 5.RECORDING SETUP 6.DISPLAY SETUP...
PVVM202 User Guide
Page 33
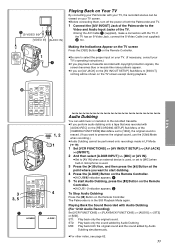
... an external device is erased. (If you set to the Video and Audio Input Jacks of the TV. ≥Using the A/V Cable 1 (supplied), make a connection with the TV. Making the Indications Appear on the TV screen Press the [OSD] Button 3 on the Remote Controller. ≥Be sure to select the proper input on your TV. (If necessary, consult your TV's operating instructions.) ≥If you play back a Cassette recorded with Audio...
... an external device is erased. (If you set to the Video and Audio Input Jacks of the TV. ≥Using the A/V Cable 1 (supplied), make a connection with the TV. Making the Indications Appear on the TV screen Press the [OSD] Button 3 on the Remote Controller. ≥Be sure to select the proper input on your TV. (If necessary, consult your TV's operating instructions.) ≥If you play back a Cassette recorded with Audio...

PVVM202 User Guide
Page 39
3, !, 3 BACKLIGHT CAMERA STILL 2, , 2 RESET STILL MPEG4 VOICE CARD MODE CAMERA OFF ON MODE VCR CARD P. Releasing the Button brings back to adjust the volume. (l 28) 39 POWER 1, , 1 ACCESS 1 CARD CONTENTS PICTURE MPEG4 VOICE 2 PICTURE 100-0012 3 4 2 MPEG4 MOL012.ASF 3 4 VOICE 3 4 Playing Back Files from the Memory Card It allows you to play back files recorded on a Card. ≥When you set the Palmcorder to Card Playback Mode, the Card Contents 1 are displayed to inform you which kind(s) of data (still picture, moving picture and...
3, !, 3 BACKLIGHT CAMERA STILL 2, , 2 RESET STILL MPEG4 VOICE CARD MODE CAMERA OFF ON MODE VCR CARD P. Releasing the Button brings back to adjust the volume. (l 28) 39 POWER 1, , 1 ACCESS 1 CARD CONTENTS PICTURE MPEG4 VOICE 2 PICTURE 100-0012 3 4 2 MPEG4 MOL012.ASF 3 4 VOICE 3 4 Playing Back Files from the Memory Card It allows you to play back files recorded on a Card. ≥When you set the Palmcorder to Card Playback Mode, the Card Contents 1 are displayed to inform you which kind(s) of data (still picture, moving picture and...

PVVM202 User Guide
Page 40
... 2 1 PUSH BACKLIGHT CAMERA STILL 2, 4 1 RESET STILL MPEG4 VOICE CARD MODE CAMERA VCR CARD P. B. The picture will be recorded to the tape position when the [PHOTO SHOT] button is pressed at Step 1) ª Using File Search Mode 1 Set [CARD FUNCTIONS] >> [CARD EDITING] >> [FILE SEARCH] >> [YES]. ≥The file search screen 5 appears. 2 Rotate the [PUSH] Dial to select the desired number of data. 2 Press the [MULTI] Button. ≥The files recorded on the Memory Card are displayed in copying the pictures. ≥For other...
... 2 1 PUSH BACKLIGHT CAMERA STILL 2, 4 1 RESET STILL MPEG4 VOICE CARD MODE CAMERA VCR CARD P. B. The picture will be recorded to the tape position when the [PHOTO SHOT] button is pressed at Step 1) ª Using File Search Mode 1 Set [CARD FUNCTIONS] >> [CARD EDITING] >> [FILE SEARCH] >> [YES]. ≥The file search screen 5 appears. 2 Rotate the [PUSH] Dial to select the desired number of data. 2 Press the [MULTI] Button. ≥The files recorded on the Memory Card are displayed in copying the pictures. ≥For other...
PVVM202 User Guide
Page 47
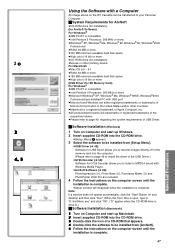
3 1 3 4, 5 Using the Software with a Computer An image stored on the DV Cassette can be installed from [Setup Menu]. ≥USB Driver (l 49): Software for USB Driver allows you to transfer images directly off of the memory card into the computer (Please refer to page 49 to install the driver of USB Driver. ª Software Installation (Windows) 1 Turn on Computer and start up Macintosh. 2 Insert supplied CD-ROM into the CD-ROM drive. ≥[Setup Menu] 1 appears. 3 Select the software to your desktop...
3 1 3 4, 5 Using the Software with a Computer An image stored on the DV Cassette can be installed from [Setup Menu]. ≥USB Driver (l 49): Software for USB Driver allows you to transfer images directly off of the memory card into the computer (Please refer to page 49 to install the driver of USB Driver. ª Software Installation (Windows) 1 Turn on Computer and start up Macintosh. 2 Insert supplied CD-ROM into the CD-ROM drive. ≥[Setup Menu] 1 appears. 3 Select the software to your desktop...
PVVM202 User Guide
Page 49
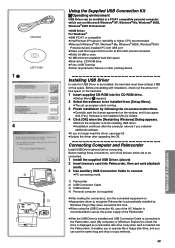
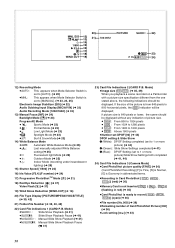
... copy methods. 49 Before proceeding with USB port ≥Video card that supports16 bit color at least 2 MB of the Palmcorder. ≥After the USB Driver is installed and USB Connection Cable is inserted into the CD-ROM drive. ≥[Setup Menu] 1 appears. 2 Select the software to be installed from [Setup Menu]. ≥The set card playback mode. 3 Use auxiliary USB Connection Cable to connect. ≥PC connecting mode. 1) Palmcorder 2) USB Connection Cable 3) USB terminal 4) Personal computer (not supplied) ≥After making these connections, turn the connected...
... copy methods. 49 Before proceeding with USB port ≥Video card that supports16 bit color at least 2 MB of the Palmcorder. ≥After the USB Driver is installed and USB Connection Cable is inserted into the CD-ROM drive. ≥[Setup Menu] 1 appears. 2 Select the software to be installed from [Setup Menu]. ≥The set card playback mode. 3 Use auxiliary USB Connection Cable to connect. ≥PC connecting mode. 1) Palmcorder 2) USB Connection Cable 3) USB terminal 4) Personal computer (not supplied) ≥After making these connections, turn the connected...
PVVM202 User Guide
Page 51
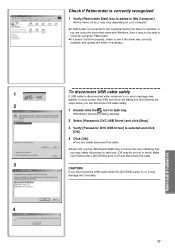
... [Panasonic DVC USB Driver] and click [Stop]. 3 Verify [Panasonic DVC USB Driver] is selected and click [OK]. 4 Click [OK]. ≥You can disconnect the cable safely. 2 1 Double click the icon in task tray. (OS may be able to correctly recognize Palmcorder. ≥If it doesn't function properly, check to see if the driver was correctly installed, and update the driver if necessary. 1 To disconnect USB cable...
... [Panasonic DVC USB Driver] and click [Stop]. 3 Verify [Panasonic DVC USB Driver] is selected and click [OK]. 4 Click [OK]. ≥You can disconnect the cable safely. 2 1 Double click the icon in task tray. (OS may be able to correctly recognize Palmcorder. ≥If it doesn't function properly, check to see if the driver was correctly installed, and update the driver if necessary. 1 To disconnect USB cable...
PVVM202 User Guide
Page 58
... & Snow Mode (l 23) 14) White Balance Mode ≥AWB: Automatic White Balance Mode (l 25) ≥1: Last manually adjusted White Balance setting (l 25) ≥|: Fluorescent light Mode (l 25) ≥z: Outdoor Mode (l 25) ≥{: Indoor Mode (recording under incandescent lighting) (l 25) 15) Shutter Speed [1/500] (l 24) 16) Iris Value [F2.4] (F number) (l 24) 17) Progressive PhotoShotTM Mode [æ] (l 21) 18) Red Eye Reduction [£] (l 37) Video Flash [ß] (l 37) 19) Wind Noise Reduction [WIND-CUT] (l 16) 20) File Type Display [PICTURE/MPEG4...
... & Snow Mode (l 23) 14) White Balance Mode ≥AWB: Automatic White Balance Mode (l 25) ≥1: Last manually adjusted White Balance setting (l 25) ≥|: Fluorescent light Mode (l 25) ≥z: Outdoor Mode (l 25) ≥{: Indoor Mode (recording under incandescent lighting) (l 25) 15) Shutter Speed [1/500] (l 24) 16) Iris Value [F2.4] (F number) (l 24) 17) Progressive PhotoShotTM Mode [æ] (l 21) 18) Red Eye Reduction [£] (l 37) Video Flash [ß] (l 37) 19) Wind Noise Reduction [WIND-CUT] (l 16) 20) File Type Display [PICTURE/MPEG4...
PVVM202 User Guide
Page 59
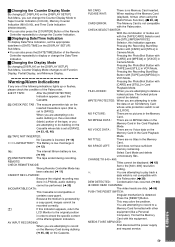
... [DISPLAY SETUP] Sub-Menu. ≥You can also press the [DATE/TIME] Button of the Remote Controller repeatedly to display or change the Date/Time Indication. ª Changing the Display Mode By changing [DISPLAY] on the Cassette whose write protection switch is set at [SAVE]. (l 33, 45, 46) Y TAPE NOT INSERTED: No Cassette is inserted. (l 13) X LOW BATTERY: The Battery is low. Because the medium is protected by a copy guard, images cannot be performed. (l 33) INCOMPATIBLE DATA: This Cassette...
... [DISPLAY SETUP] Sub-Menu. ≥You can also press the [DATE/TIME] Button of the Remote Controller repeatedly to display or change the Date/Time Indication. ª Changing the Display Mode By changing [DISPLAY] on the Cassette whose write protection switch is set at [SAVE]. (l 33, 45, 46) Y TAPE NOT INSERTED: No Cassette is inserted. (l 13) X LOW BATTERY: The Battery is low. Because the medium is protected by a copy guard, images cannot be performed. (l 33) INCOMPATIBLE DATA: This Cassette...
PVVM202 User Guide
Page 62
...-Menu. A file number is recorded with each picture as to make it possible to use the Memory Stop function (l 68), Audio Dubbing is terminated automatically when the tape reaches this operation, we suggest that you take the precautionary measure of storing important images in speaker of the Palmcorder. When the A/V Cable is inserted into the AV Jack, the internal speaker works. ª Selecting the Sound during playback cannot be output...
...-Menu. A file number is recorded with each picture as to make it possible to use the Memory Stop function (l 68), Audio Dubbing is terminated automatically when the tape reaches this operation, we suggest that you take the precautionary measure of storing important images in speaker of the Palmcorder. When the A/V Cable is inserted into the AV Jack, the internal speaker works. ª Selecting the Sound during playback cannot be output...
PVVM202 User Guide
Page 63
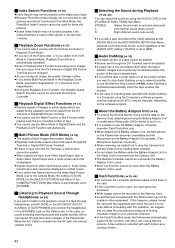
...;MPEG4 data cannot perform Cue/Review Playback, Slow Motion Playback (forward direction and reverse direction), Still Advance Playback (forward direction and reverse direction) or Jog Playback. ≥During automatic copying tape pictures onto a card, the remaining number of pictures that is, mixed [L] and [R] of the stereo sound. ≥When the color of the screen changes or blurs, adjust the shutter speed manually to 1/30, 1/60 or 1/120. ≥If the [PICTURE/MPEG4/VOICE] Selector is set to the Recording Pause Mode...
...;MPEG4 data cannot perform Cue/Review Playback, Slow Motion Playback (forward direction and reverse direction), Still Advance Playback (forward direction and reverse direction) or Jog Playback. ≥During automatic copying tape pictures onto a card, the remaining number of pictures that is, mixed [L] and [R] of the stereo sound. ≥When the color of the screen changes or blurs, adjust the shutter speed manually to 1/30, 1/60 or 1/120. ≥If the [PICTURE/MPEG4/VOICE] Selector is set to the Recording Pause Mode...

PVVM202 User Guide
Page 66
... disappears naturally. ª Digital Video Head Cleaner If the heads (the parts that make contact with the head cleaner, the Palmcorder needs to 3 hours before . ≥If the heads become difficult. Insert a Video Cassette and start recording. Please consult a distributor or Panasonic Service center. ≥Video head cleaners can be purchased from getting clogged with dirt, dust, or other functions operate. If the Battery is used in an extremely...
... disappears naturally. ª Digital Video Head Cleaner If the heads (the parts that make contact with the head cleaner, the Palmcorder needs to 3 hours before . ≥If the heads become difficult. Insert a Video Cassette and start recording. Please consult a distributor or Panasonic Service center. ≥Video head cleaners can be purchased from getting clogged with dirt, dust, or other functions operate. If the Battery is used in an extremely...

PVVM202 User Guide
Page 67
... images and sounds. To store the Battery for MEGA STILLTM Pictures Recording. ≥Be sure to keep the Lens Hood attached to the Palmcorder so as the internal temperature increases, it goes back to the normal brightness...Extremely high precision technology is not practical to the beginning. Card ≥When the Card is being read, do not remove the Card, turn the Lens...
... images and sounds. To store the Battery for MEGA STILLTM Pictures Recording. ≥Be sure to keep the Lens Hood attached to the Palmcorder so as the internal temperature increases, it goes back to the normal brightness...Extremely high precision technology is not practical to the beginning. Card ≥When the Card is being read, do not remove the Card, turn the Lens...
PVVM202 User Guide
Page 68
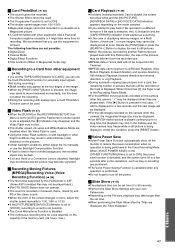
.... ª Memory Stop Function The Memory Stop Function is assigned to each image on a tape. Rewinding or fast-forwarding a tape to a desired position 1 Set [DISPLAY SETUP] >> [C.DISPLAY] >> [MEMORY]. 2 Reset the Tape Counter to zero at the tape position from [ON] to play it automatically records data, such as Time Code and date/time, as a part of the sub-code at each recording. ≥When a new (previously unrecorded) Cassette is capable of Terms ª Digital Video System In a digital video system, images and sounds are...
.... ª Memory Stop Function The Memory Stop Function is assigned to each image on a tape. Rewinding or fast-forwarding a tape to a desired position 1 Set [DISPLAY SETUP] >> [C.DISPLAY] >> [MEMORY]. 2 Reset the Tape Counter to zero at the tape position from [ON] to play it automatically records data, such as Time Code and date/time, as a part of the sub-code at each recording. ≥When a new (previously unrecorded) Cassette is capable of Terms ª Digital Video System In a digital video system, images and sounds are...

PVVM202 User Guide
Page 70
... 64 MB SD Memory Card 32 MB SD Memory Card 16 MB SD Memory Card USB Reader/Writer for SD Memory Card (compatible with MultiMediaCard) SD PCMCIA Adaptor (compatible with MultiMediaCard) PV-PD2100 (USA only) Digital Video Printer PV-DRS2 PC Connection Unit (Includes RS-232C connection cables and PHOTOVU LINK Software) *Please refer to page 12, concerning the battery charging time and available recording time. *NOTE: Accessories and/or model numbers may vary...
... 64 MB SD Memory Card 32 MB SD Memory Card 16 MB SD Memory Card USB Reader/Writer for SD Memory Card (compatible with MultiMediaCard) SD PCMCIA Adaptor (compatible with MultiMediaCard) PV-PD2100 (USA only) Digital Video Printer PV-DRS2 PC Connection Unit (Includes RS-232C connection cables and PHOTOVU LINK Software) *Please refer to page 12, concerning the battery charging time and available recording time. *NOTE: Accessories and/or model numbers may vary...
PVVM202 User Guide
Page 78
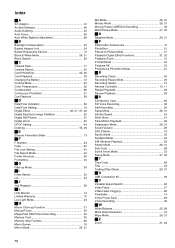
... Auto Focus 68 Auto White Balance Adjustment 68 ªB Backlight Compensation 23 Battery Adaptor Unit 34 Before Requesting Service 72 Black & White Mode 26, 31 Blank Search 29 ªC Camera Data 17 Camera Search 20 Card PhotoShot 35, 36 Card Playback 39 Charging the Battery 12 Cinema Mode 23 Color Temperature 25 Condensation 66 Continuous PhotoShot 21 Cue Playback 28 ªD Date/Time Indication 59 Date/Time Setting 19 Digital Effect 26, 27, 31, 32 Digital Electronic Image Stabilizer 22 Digital...
... Auto Focus 68 Auto White Balance Adjustment 68 ªB Backlight Compensation 23 Battery Adaptor Unit 34 Before Requesting Service 72 Black & White Mode 26, 31 Blank Search 29 ªC Camera Data 17 Camera Search 20 Card PhotoShot 35, 36 Card Playback 39 Charging the Battery 12 Cinema Mode 23 Color Temperature 25 Condensation 66 Continuous PhotoShot 21 Cue Playback 28 ªD Date/Time Indication 59 Date/Time Setting 19 Digital Effect 26, 27, 31, 32 Digital Electronic Image Stabilizer 22 Digital...


