
Digital Video Camera
Page 8
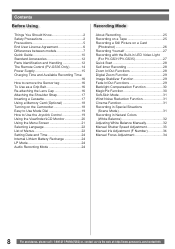
... a Cassette 17 Using a Memory Card (Optional 18 Turning on the Camcorder 18 Easy to Use Mode Dial 19 How to Use the Joystick Control 19 Using the Viewfinder/LCD Monitor 20 Using the Menu Screen 21 Selecting Language 22 List of Menus 22 Setting Date and Time 24 Internal Lithium Battery Recharge 24 LP Mode 24 Audio Recording Mode 24 Recording Mode About Recording 25 Recording on a Tape 25 Recording a Still Picture on a Card (Photoshot 26 Recording Yourself 27 Recording with the Built-in LED Video Light...
... a Cassette 17 Using a Memory Card (Optional 18 Turning on the Camcorder 18 Easy to Use Mode Dial 19 How to Use the Joystick Control 19 Using the Viewfinder/LCD Monitor 20 Using the Menu Screen 21 Selecting Language 22 List of Menus 22 Setting Date and Time 24 Internal Lithium Battery Recharge 24 LP Mode 24 Audio Recording Mode 24 Recording Mode About Recording 25 Recording on a Tape 25 Recording a Still Picture on a Card (Photoshot 26 Recording Yourself 27 Recording with the Built-in LED Video Light...
Digital Video Camera
Page 13
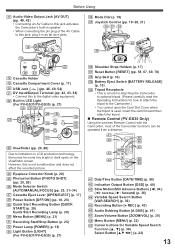
...) Quick Start Recording Lamp (p. 28) 30 Menu Button [MENU] (p. 21) 31 Recording Start/Stop Button (p. 25) 32 Power Lamp [POWER] (p. 18) 33 Light Button [LIGHT] (For PV-GS31/PV-GS35) (p. 27) 36 Shoulder Strap Holders (p. 17) 37 Reset Button [RESET] (pp. 58, 67, 69, 70) 38 Grip Belt (p. 16) 39 Battery Eject Switch [BATTERY RELEASE] (p. 15) 40 Tripod Receptacle • This is used. However, this to the digital video equipment. 22 Built-in LCD...
...) Quick Start Recording Lamp (p. 28) 30 Menu Button [MENU] (p. 21) 31 Recording Start/Stop Button (p. 25) 32 Power Lamp [POWER] (p. 18) 33 Light Button [LIGHT] (For PV-GS31/PV-GS35) (p. 27) 36 Shoulder Strap Holders (p. 17) 37 Reset Button [RESET] (pp. 58, 67, 69, 70) 38 Grip Belt (p. 16) 39 Battery Eject Switch [BATTERY RELEASE] (p. 15) 40 Tripod Receptacle • This is used. However, this to the digital video equipment. 22 Built-in LCD...
Digital Video Camera
Page 19
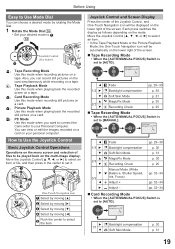
... Skin Mode p. 31 ▲ 2/2 ▼ MagicPix Mode Recording Check p. 30 p. 25 „ Tape Recording Mode • When the [AUTO/MANUAL/FOCUS] Switch is set to [MANUAL]. How to Use the Joystick Control Basic Joystick Control Operations Operations on the menu screen and selection of the screen. Each press switches the display as follows depending on the lower right of files to 1 . 34 Joystick Control (See below) 1 : Tape Recording Mode Use this mode when you can view or edit the images recorded on a card on...
... Skin Mode p. 31 ▲ 2/2 ▼ MagicPix Mode Recording Check p. 30 p. 25 „ Tape Recording Mode • When the [AUTO/MANUAL/FOCUS] Switch is set to [MANUAL]. How to Use the Joystick Control Basic Joystick Control Operations Operations on the menu screen and selection of the screen. Each press switches the display as follows depending on the lower right of files to 1 . 34 Joystick Control (See below) 1 : Tape Recording Mode Use this mode when you can view or edit the images recorded on a card on...
Digital Video Camera
Page 20
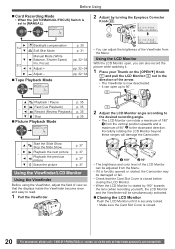
...° towards the lens (when recording yourself), the LCD Monitor and the Viewfinder will damage the Camcorder. ▲ ► - ◄ ▼ Start the Slide Show Stop the Slide Show Playback the next picture Playback the previous picture Erase the picture p. 37 p. 37 p. 37 p. 37 Using the Viewfinder/LCD Monitor Using the Viewfinder Before using the Viewfinder, adjust the field of view so that the displays inside the Viewfinder...
...° towards the lens (when recording yourself), the LCD Monitor and the Viewfinder will damage the Camcorder. ▲ ► - ◄ ▼ Start the Slide Show Stop the Slide Show Playback the next picture Playback the previous picture Erase the picture p. 37 p. 37 p. 37 p. 37 Using the Viewfinder/LCD Monitor Using the Viewfinder Before using the Viewfinder, adjust the field of view so that the displays inside the Viewfinder...

Digital Video Camera
Page 22
...Only) USB Functions Mode (pp. 49, 54) [ D.ZOOM] Digital Zoom (p. 29) [ ZOOM MIC] Zoom Microphone (p. 28) [ DATE/TIME] Date and Time Indication (p. 58) [ INITIAL SET] Initial Setting Mode (p. 58) [ SETUP] Setup Sub-Menu [ FADE COLOR] Fade color (p. 29) [ AUDIO REC] Audio Recording Mode (p. 24) [ DISPLAY] Display Mode (p. 58) [ REMOTE] (PV-GS35 Only) Remote Control Mode (p. 15) [ BEEP SOUND] Beep Sound (p. 59) [ LCD SET] LCD Adjustment (p. 21) [ EVF SET] Viewfinder Adjustment (p. 21) [ DEMO MODE] Demonstration Mode • If you set to [ DEMO MODE] >> [ON] without inserting a cassette or a card...
...Only) USB Functions Mode (pp. 49, 54) [ D.ZOOM] Digital Zoom (p. 29) [ ZOOM MIC] Zoom Microphone (p. 28) [ DATE/TIME] Date and Time Indication (p. 58) [ INITIAL SET] Initial Setting Mode (p. 58) [ SETUP] Setup Sub-Menu [ FADE COLOR] Fade color (p. 29) [ AUDIO REC] Audio Recording Mode (p. 24) [ DISPLAY] Display Mode (p. 58) [ REMOTE] (PV-GS35 Only) Remote Control Mode (p. 15) [ BEEP SOUND] Beep Sound (p. 59) [ LCD SET] LCD Adjustment (p. 21) [ EVF SET] Viewfinder Adjustment (p. 21) [ DEMO MODE] Demonstration Mode • If you set to [ DEMO MODE] >> [ON] without inserting a cassette or a card...
Digital Video Camera
Page 24
... [ ADVANCE] >> [ REC SPEED] >> [LP]. Before Using Setting Date and Time Since the internal clock of the Camcorder has a slight imprecision make sure to check the time before recording because the built-in clock is not very accurate. Internal Lithium Battery Recharge The internal lithium battery sustains the operation of the recorded sound. • Set to Tape/Card Recording Mode. 1 Set [ BASIC] >> [ CLOCK SET] >> [YES]. Playback on other digital video equipment or on the playback image or some functions will be disabled. - In...
... [ ADVANCE] >> [ REC SPEED] >> [LP]. Before Using Setting Date and Time Since the internal clock of the Camcorder has a slight imprecision make sure to check the time before recording because the built-in clock is not very accurate. Internal Lithium Battery Recharge The internal lithium battery sustains the operation of the recorded sound. • Set to Tape/Card Recording Mode. 1 Set [ BASIC] >> [ CLOCK SET] >> [YES]. Playback on other digital video equipment or on the playback image or some functions will be disabled. - In...
Digital Video Camera
Page 25
... use the Card Recording Mode. When recording with the [AUTO/MANUAL/ FOCUS] Switch 26 set the Mode Dial 34 to Card Recording Mode [ ]. Recording on , Automatic White Balance Adjustment (p. 32) may not function correctly. To Check the Recording You can be adjusted manually. (pp. 32, 34) 26 • Before turning on a card, set the Mode Dial 34 to Tape Recording Mode [ ]. After checking, the Camcorder resumes the Recording Pause Mode. 25 In some cases, they cannot be adjusted automatically and need to be recorded, this indication will flash in red.) Recording...
... use the Card Recording Mode. When recording with the [AUTO/MANUAL/ FOCUS] Switch 26 set the Mode Dial 34 to Card Recording Mode [ ]. Recording on , Automatic White Balance Adjustment (p. 32) may not function correctly. To Check the Recording You can be adjusted manually. (pp. 32, 34) 26 • Before turning on a card, set the Mode Dial 34 to Tape Recording Mode [ ]. After checking, the Camcorder resumes the Recording Pause Mode. 25 In some cases, they cannot be adjusted automatically and need to be recorded, this indication will flash in red.) Recording...
Digital Video Camera
Page 41
... Memory Card from scenes that have already been recorded on a cassette. 1 Set the Mode Dial 34 to Tape Playback Mode. • The One-Touch Navigation icon is used, you can dub audio while listening to the pre-recorded sound from a Tape onto a Card Still pictures can be performed on a recording made in LP Mode. (p. 24) • Set to Tape Playback Mode. 1 Insert an external microphone securely into the microphone. 5 Press the [ ] Button 52 on the Remote Control to stop audio...
... Memory Card from scenes that have already been recorded on a cassette. 1 Set the Mode Dial 34 to Tape Playback Mode. • The One-Touch Navigation icon is used, you can dub audio while listening to the pre-recorded sound from a Tape onto a Card Still pictures can be performed on a recording made in LP Mode. (p. 24) • Set to Tape Playback Mode. 1 Insert an external microphone securely into the microphone. 5 Press the [ ] Button 52 on the Remote Control to stop audio...
Digital Video Camera
Page 42
... unrecorded DVD-RAM or cassette in the digital mode. • Set to Tape Playback Mode (Player/Recorder) 1 Connect the Camcorder and digital video equipment with the DV cable. 1 2 Turn on the Camcorder and set to Tape Playback Mode. 3 Select the input channel on the TV set and recorder. Editing Mode Copying onto a DVD Recorder or a VCR (Dubbing) Pictures recorded by using a 4-pin to start playback. • The image and sound are inserted as far as they go. • Check the connected terminal. Player/Recorder: 2 Insert the Cassette and set...
... unrecorded DVD-RAM or cassette in the digital mode. • Set to Tape Playback Mode (Player/Recorder) 1 Connect the Camcorder and digital video equipment with the DV cable. 1 2 Turn on the Camcorder and set to Tape Playback Mode. 3 Select the input channel on the TV set and recorder. Editing Mode Copying onto a DVD Recorder or a VCR (Dubbing) Pictures recorded by using a 4-pin to start playback. • The image and sound are inserted as far as they go. • Check the connected terminal. Player/Recorder: 2 Insert the Cassette and set...
Digital Video Camera
Page 44
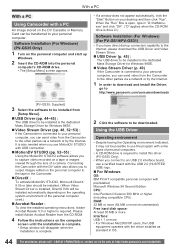
... more recommended) Free hard disk space: At least 30 MB or more Interface: USB 1.1 or more • For Windows Me/2000/XP users, the USB equipment operates with a PC An image stored on a tape or images viewed through the lens of personal computers. • A CD-ROM drive is complete. 2 Click the software to be transferred to capture video recorded on the DV Cassette or Memory Card can be downloaded. It is connected to your personal...
... more recommended) Free hard disk space: At least 30 MB or more Interface: USB 1.1 or more • For Windows Me/2000/XP users, the USB equipment operates with a PC An image stored on a tape or images viewed through the lens of personal computers. • A CD-ROM drive is complete. 2 Click the software to be transferred to capture video recorded on the DV Cassette or Memory Card can be downloaded. It is connected to your personal...
Digital Video Camera
Page 45
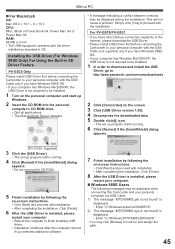
Installing the USB Driver (For Windows 98SE Only) For Using the Built-in OS. For PV-GS19/PV-GS31 • If you have direct dial-up connection capability to the Internet, please download the USB Driver. • Please install USB Driver first before connecting the Camcorder to your personal computer with the USB Cable only if you selected additional software. 7 Finish installation by following the on-screen instructions. • Click [Next] and...
Installing the USB Driver (For Windows 98SE Only) For Using the Built-in OS. For PV-GS19/PV-GS31 • If you have direct dial-up connection capability to the Internet, please download the USB Driver. • Please install USB Driver first before connecting the Camcorder to your personal computer with the USB Cable only if you selected additional software. 7 Finish installation by following the on-screen instructions. • Click [Next] and...
Digital Video Camera
Page 52
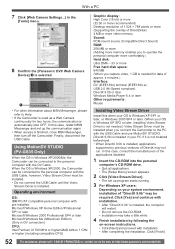
... (Supporting the overlay of DirectDraw) 4 MB or more video memory Sound: PCM sound source (Compatible Direct Sound) RAM: 256 MB or more (Adding more memory enables you to operate the personal computer more comfortably.) Hard disk: Ultra DMA - 33 or more Free hard disk space: 640 MB (When you capture video, 1 GB is needed .) Video Stream Driver must be installed when you connect the Camcorder to the PC with the USB Cable, however, Video Stream Driver must...
... (Supporting the overlay of DirectDraw) 4 MB or more video memory Sound: PCM sound source (Compatible Direct Sound) RAM: 256 MB or more (Adding more memory enables you to operate the personal computer more comfortably.) Hard disk: Ultra DMA - 33 or more Free hard disk space: 640 MB (When you capture video, 1 GB is needed .) Video Stream Driver must be installed when you connect the Camcorder to the PC with the USB Cable, however, Video Stream Driver must...
Digital Video Camera
Page 55
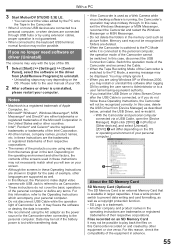
... battery power is lost while transferring data. • If the Camcorder is connected to the PC Mode, a warning message may install or uninstall this Manual, the Panasonic make digital video camera with the type of the OS. 1 Select [Start] (>> [Settings]) >> [Control Panel], select the software or the driver from [Add/Remove Programs] to the user manual of the products you will see on your screen. • Although the screens in these Operating Instructions are shown in English...
... battery power is lost while transferring data. • If the Camcorder is connected to the PC Mode, a warning message may install or uninstall this Manual, the Panasonic make digital video camera with the type of the OS. 1 Select [Start] (>> [Settings]) >> [Control Panel], select the software or the driver from [Add/Remove Programs] to the user manual of the products you will see on your screen. • Although the screens in these Operating Instructions are shown in English...
Digital Video Camera
Page 58
... set to ON „ Power Save Mode Set [ SETUP] >> [ POWER SAVE] >> [5 MINUTES] or [OFF]. [OFF]: When about 5 minutes passed without any operation, the standby mode automatically will not erase a clock setting (p. 24) that cannot be switched to all functions. Set to [ON] and the display mode can change the Date/Time Indication by repeatedly pressing the [DATE/TIME] Button on the Remote Control (PV-GS35 only). „ To Change the Display Mode Set [ SETUP] >> [ DISPLAY] >> [ON] or [OFF]. Take out the cassette...
... set to ON „ Power Save Mode Set [ SETUP] >> [ POWER SAVE] >> [5 MINUTES] or [OFF]. [OFF]: When about 5 minutes passed without any operation, the standby mode automatically will not erase a clock setting (p. 24) that cannot be switched to all functions. Set to [ON] and the display mode can change the Date/Time Indication by repeatedly pressing the [DATE/TIME] Button on the Remote Control (PV-GS35 only). „ To Change the Display Mode Set [ SETUP] >> [ DISPLAY] >> [ON] or [OFF]. Take out the cassette...
Digital Video Camera
Page 59
... Sounds • Set to perform audio dubbing on a non-recorded tape. Check the sentence displayed on a Tape/Card with the USB Cable connected to turn on the power 2 Beeps • When you overwrite-record on the SD Memory Card is incompatible. You are attempting Audio Dubbing or Digital Dubbing on the [ SETUP] is inserted, condensation occurs, and at other than [OFF] in MotionDV Mode. WRONG TAPE FORMAT: You are attempting to the Camcorder. This cassette...
... Sounds • Set to perform audio dubbing on a non-recorded tape. Check the sentence displayed on a Tape/Card with the USB Cable connected to turn on the power 2 Beeps • When you overwrite-record on the SD Memory Card is incompatible. You are attempting Audio Dubbing or Digital Dubbing on the [ SETUP] is inserted, condensation occurs, and at other than [OFF] in MotionDV Mode. WRONG TAPE FORMAT: You are attempting to the Camcorder. This cassette...
Digital Video Camera
Page 60
... the Tape/Card Recording Mode is set, the Lamp turns on the card. The Lamp will go off and the Camcorder will be turned off when not in LED Video Light • The subject should be within 4.9 feet (1.5 meters) of the screen changes or blurs, adjust the shutter speed manually to 1/60 or 1/100. If so, back up your important data on the [ SETUP] Sub-Menu is set to [ON], the beep sound...
... the Tape/Card Recording Mode is set, the Lamp turns on the card. The Lamp will go off and the Camcorder will be turned off when not in LED Video Light • The subject should be within 4.9 feet (1.5 meters) of the screen changes or blurs, adjust the shutter speed manually to 1/60 or 1/100. If so, back up your important data on the [ SETUP] Sub-Menu is set to [ON], the beep sound...

Digital Video Camera
Page 61
... [ ] indication flashes. • Under fluorescent lighting, image brightness may change . • If you record a subject illuminated with the MagicPix Function, it is recommended that you use a tripod. • The MagicPix Function makes the signal charging time of CCD longer up to pause recording. „ Backlight Compensation Function • When setting the Iris manually, the Backlight Compensation Function does not work. • If you operate the [OFF/ON] Switch or Mode Dial...
... [ ] indication flashes. • Under fluorescent lighting, image brightness may change . • If you record a subject illuminated with the MagicPix Function, it is recommended that you use a tripod. • The MagicPix Function makes the signal charging time of CCD longer up to pause recording. „ Backlight Compensation Function • When setting the Iris manually, the Backlight Compensation Function does not work. • If you operate the [OFF/ON] Switch or Mode Dial...
Digital Video Camera
Page 63
... Lens Cap. „ Cautions for Recording (Digital Dubbing) • Do not plug or unplug the DV Cable during recording, switch to the Picture Playback Mode and then delete unnecessary files. • If there are no water enters the Camcorder. • Water may cause the Camcorder or Cassette to be displayed cannot be adversely affected. 63 Thereafter, turn off the Camcorder power and detach the Battery or AC Adaptor and then connect...
... Lens Cap. „ Cautions for Recording (Digital Dubbing) • Do not plug or unplug the DV Cable during recording, switch to the Picture Playback Mode and then delete unnecessary files. • If there are no water enters the Camcorder. • Water may cause the Camcorder or Cassette to be displayed cannot be adversely affected. 63 Thereafter, turn off the Camcorder power and detach the Battery or AC Adaptor and then connect...
Digital Video Camera
Page 68
... you set ? SEARCH] button on the Remote Control to edit a tape portion that matches the input terminals used for which the auto focus does not operate correctly. (p. 70) If so, use the manual focus mode to select [12bit] mode when recording. If you set to 3 minutes shorter than the actual remaining tape time. To hear the sounds separately, set [ SETUP] >> [ AUDIO OUT] >> [STEREO] and reproduced a picture containing the main sound and sub sound? If you selected video input...
... you set ? SEARCH] button on the Remote Control to edit a tape portion that matches the input terminals used for which the auto focus does not operate correctly. (p. 70) If so, use the manual focus mode to select [12bit] mode when recording. If you set to 3 minutes shorter than the actual remaining tape time. To hear the sounds separately, set [ SETUP] >> [ AUDIO OUT] >> [STEREO] and reproduced a picture containing the main sound and sub sound? If you selected video input...
Digital Video Camera
Page 69
... by the USB cable, the Camcorder is turned off the power to the AV terminal. • Is a picture containing a copyright protection signal (copy guard) being recorded? If so, the Camcorder needs repair. Do not attempt to pages 44~45. Set [ PICT. Even if a card is recorded in multiple modes. The Camcorder malfunctions on the screen. Insert a tape. • Did you edit, do not press the [RESET] Button, the power to play a tape without...
... by the USB cable, the Camcorder is turned off the power to the AV terminal. • Is a picture containing a copyright protection signal (copy guard) being recorded? If so, the Camcorder needs repair. Do not attempt to pages 44~45. Set [ PICT. Even if a card is recorded in multiple modes. The Camcorder malfunctions on the screen. Insert a tape. • Did you edit, do not press the [RESET] Button, the power to play a tape without...


