
Digital Video Camera
Page 8
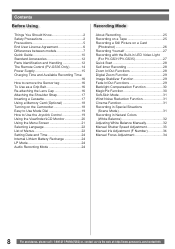
... a Cassette 17 Using a Memory Card (Optional 18 Turning on the Camcorder 18 Easy to Use Mode Dial 19 How to Use the Joystick Control 19 Using the Viewfinder/LCD Monitor 20 Using the Menu Screen 21 Selecting Language 22 List of Menus 22 Setting Date and Time 24 Internal Lithium Battery Recharge 24 LP Mode 24 Audio Recording Mode 24 Recording Mode About Recording 25 Recording on a Tape 25 Recording a Still Picture on a Card (Photoshot 26 Recording Yourself 27 Recording with the Built-in LED Video Light...
... a Cassette 17 Using a Memory Card (Optional 18 Turning on the Camcorder 18 Easy to Use Mode Dial 19 How to Use the Joystick Control 19 Using the Viewfinder/LCD Monitor 20 Using the Menu Screen 21 Selecting Language 22 List of Menus 22 Setting Date and Time 24 Internal Lithium Battery Recharge 24 LP Mode 24 Audio Recording Mode 24 Recording Mode About Recording 25 Recording on a Tape 25 Recording a Still Picture on a Card (Photoshot 26 Recording Yourself 27 Recording with the Built-in LED Video Light...
Digital Video Camera
Page 13
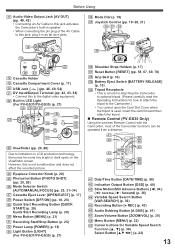
... Menu Button [MENU] (p. 21) 31 Recording Start/Stop Button (p. 25) 32 Power Lamp [POWER] (p. 18) 33 Light Button [LIGHT] (For PV-GS31/PV-GS35) (p. 27) 36 Shoulder Strap Holders (p. 17) 37 Reset Button [RESET] (pp. 58, 67, 69, 70) 38 Grip Belt (p. 16) 39 Battery Eject Switch [BATTERY RELEASE] (p. 15) 40 Tripod Receptacle • This is used. Before Using 17 Audio-Video Output Jack [AV OUT] (pp. 40, 42) • Connecting an AV Cable to...
... Menu Button [MENU] (p. 21) 31 Recording Start/Stop Button (p. 25) 32 Power Lamp [POWER] (p. 18) 33 Light Button [LIGHT] (For PV-GS31/PV-GS35) (p. 27) 36 Shoulder Strap Holders (p. 17) 37 Reset Button [RESET] (pp. 58, 67, 69, 70) 38 Grip Belt (p. 16) 39 Battery Eject Switch [BATTERY RELEASE] (p. 15) 40 Tripod Receptacle • This is used. Before Using 17 Audio-Video Output Jack [AV OUT] (pp. 40, 42) • Connecting an AV Cable to...
Digital Video Camera
Page 19
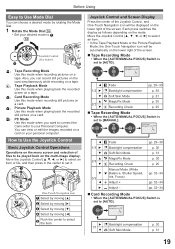
... view or edit the images recorded on a card on a card. : PC Mode Use this mode when you want to connect the Camcorder to be displayed on the lower right of files to your personal computer. How to Use the Joystick Control Basic Joystick Control Operations Operations on the menu screen and selection of the screen. „ Tape Recording Mode • When the [AUTO/MANUAL/FOCUS] Switch is set to [AUTO]. Each press switches the display as follows depending on the multi-image display...
... view or edit the images recorded on a card on a card. : PC Mode Use this mode when you want to connect the Camcorder to be displayed on the lower right of files to your personal computer. How to Use the Joystick Control Basic Joystick Control Operations Operations on the menu screen and selection of the screen. „ Tape Recording Mode • When the [AUTO/MANUAL/FOCUS] Switch is set to [AUTO]. Each press switches the display as follows depending on the multi-image display...
Digital Video Camera
Page 20
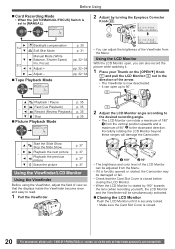
... the displays inside the Viewfinder become clear and easy to read. 1 Pull the Viewfinder. 1 180° 2 90° • The brightness and color level of the LCD Monitor can adjust the brightness of 90° 2 to [MANUAL]. Using the LCD Monitor With the LCD Monitor open up to 90°. 2 ▲ Playback / Pause ► - ◄ Fast (Cue Playback) Rewind (Review Playback) ▼ Stop „ Picture Playback Mode One...
... the displays inside the Viewfinder become clear and easy to read. 1 Pull the Viewfinder. 1 180° 2 90° • The brightness and color level of the LCD Monitor can adjust the brightness of 90° 2 to [MANUAL]. Using the LCD Monitor With the LCD Monitor open up to 90°. 2 ▲ Playback / Pause ► - ◄ Fast (Cue Playback) Rewind (Review Playback) ▼ Stop „ Picture Playback Mode One...

Digital Video Camera
Page 22
...Only) USB Functions Mode (pp. 49, 54) [ D.ZOOM] Digital Zoom (p. 29) [ ZOOM MIC] Zoom Microphone (p. 28) [ DATE/TIME] Date and Time Indication (p. 58) [ INITIAL SET] Initial Setting Mode (p. 58) [ SETUP] Setup Sub-Menu [ FADE COLOR] Fade color (p. 29) [ AUDIO REC] Audio Recording Mode (p. 24) [ DISPLAY] Display Mode (p. 58) [ REMOTE] (PV-GS35 Only) Remote Control Mode (p. 15) [ BEEP SOUND] Beep Sound (p. 59) [ LCD SET] LCD Adjustment (p. 21) [ EVF SET] Viewfinder Adjustment (p. 21) [ DEMO MODE] Demonstration Mode • If you set to [ DEMO MODE] >> [ON] without inserting a cassette or a card...
...Only) USB Functions Mode (pp. 49, 54) [ D.ZOOM] Digital Zoom (p. 29) [ ZOOM MIC] Zoom Microphone (p. 28) [ DATE/TIME] Date and Time Indication (p. 58) [ INITIAL SET] Initial Setting Mode (p. 58) [ SETUP] Setup Sub-Menu [ FADE COLOR] Fade color (p. 29) [ AUDIO REC] Audio Recording Mode (p. 24) [ DISPLAY] Display Mode (p. 58) [ REMOTE] (PV-GS35 Only) Remote Control Mode (p. 15) [ BEEP SOUND] Beep Sound (p. 59) [ LCD SET] LCD Adjustment (p. 21) [ EVF SET] Viewfinder Adjustment (p. 21) [ DEMO MODE] Demonstration Mode • If you set to [ DEMO MODE] >> [ON] without inserting a cassette or a card...
Digital Video Camera
Page 24
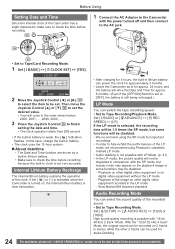
... flashes. Slow Motion/Still Advance playback Audio Recording Mode You can select the sound quality of the clock. Set [ BASIC] or [ ADVANCE] >> [ REC SPEED] >> [LP]. Playback on other digital video equipment recorded in clock is not very accurate. Playback of the image on other 2 tracks can switch the tape recording speed. • Set to Tape Recording/Playback Mode. In this case, charge the built-in battery. • The clock uses the 12-hour system. „ About date/time • The Date and Time function...
... flashes. Slow Motion/Still Advance playback Audio Recording Mode You can select the sound quality of the clock. Set [ BASIC] or [ ADVANCE] >> [ REC SPEED] >> [LP]. Playback on other digital video equipment recorded in clock is not very accurate. Playback of the image on other 2 tracks can switch the tape recording speed. • Set to Tape Recording/Playback Mode. In this case, charge the built-in battery. • The clock uses the 12-hour system. „ About date/time • The Date and Time function...
Digital Video Camera
Page 25
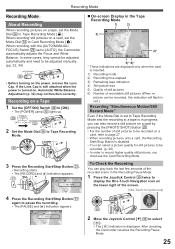
... still pictures, you can play back the last few seconds of the recorded scene in progress, you must use the Card Recording Mode. After checking, the Camcorder resumes the Recording Pause Mode. 25 If the Lens Cap is still attached when the power is displayed. When recording still pictures on a card, set the Mode Dial 34 to [AUTO], the Camcorder automatically adjusts the Focus and White Balance. When recording with the [AUTO/MANUAL/ FOCUS] Switch 26 set to Card Recording Mode [ ]. Recording Mode Recording Mode About Recording When recording pictures on a tape, set the Mode...
... still pictures, you can play back the last few seconds of the recorded scene in progress, you must use the Card Recording Mode. After checking, the Camcorder resumes the Recording Pause Mode. 25 If the Lens Cap is still attached when the power is displayed. When recording still pictures on a card, set the Mode Dial 34 to [AUTO], the Camcorder automatically adjusts the Focus and White Balance. When recording with the [AUTO/MANUAL/ FOCUS] Switch 26 set to Card Recording Mode [ ]. Recording Mode Recording Mode About Recording When recording pictures on a tape, set the Mode...
Digital Video Camera
Page 41
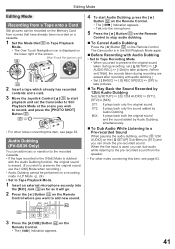
.... Editing Mode Editing Mode Recording from a Tape onto a Card Still pictures can be performed on a recording made in LP Mode. (p. 24) • Set to Tape Playback Mode. 1 Insert an external microphone securely into the microphone. 5 Press the [ ] Button 52 on the Remote Control to stop audio dubbing. „ To Cancel Audio Dubbing Press the [ ] Button 52 on the Remote Control. • The [ ] Indication appears. 41 It plays back only the sound added by 12bit Audio Dubbing Set [ SETUP] >> [ 12bit AUDIO...
.... Editing Mode Editing Mode Recording from a Tape onto a Card Still pictures can be performed on a recording made in LP Mode. (p. 24) • Set to Tape Playback Mode. 1 Insert an external microphone securely into the microphone. 5 Press the [ ] Button 52 on the Remote Control to stop audio dubbing. „ To Cancel Audio Dubbing Press the [ ] Button 52 on the Remote Control. • The [ ] Indication appears. 41 It plays back only the sound added by 12bit Audio Dubbing Set [ SETUP] >> [ 12bit AUDIO...
Digital Video Camera
Page 42
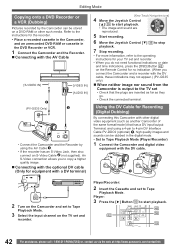
.../Recorder) 1 Connect the Camcorder and digital video equipment with the DV cable. 1 2 Turn on the Camcorder and set to Tape Playback Mode. 3 Select the input channel on the TV set and recorder. An S-Video connection allows you connect the Camcorder and a recorder with the AV Cable [S-VIDEO IN] 2 (PV-GS35 Only) [VIDEO IN] [AUDIO IN] 1 MIC A/V • Connect the Camcorder and the Recorder by the Camcorder can be stored on the Remote Control for no indication. (When you to copy a higher quality image...
.../Recorder) 1 Connect the Camcorder and digital video equipment with the DV cable. 1 2 Turn on the Camcorder and set to Tape Playback Mode. 3 Select the input channel on the TV set and recorder. An S-Video connection allows you connect the Camcorder and a recorder with the AV Cable [S-VIDEO IN] 2 (PV-GS35 Only) [VIDEO IN] [AUDIO IN] 1 MIC A/V • Connect the Camcorder and the Recorder by the Camcorder can be stored on the Remote Control for no indication. (When you to copy a higher quality image...
Digital Video Camera
Page 44
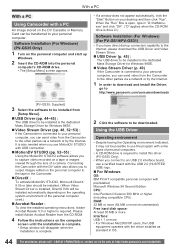
... Camcorder is connected to capture video recorded on the DV Cassette or Memory Card can send video from the CD-ROM. 4 Follow the instructions on the computer screen until the installation is connected to your personal computer, you to your personal computer. With a PC With a PC Using Camcorder with a PC An image stored on a tape or images viewed through the lens of a camera. Connecting the Camcorder with preinstalled; Please install Adobe Acrobat Reader from the Camcorder...
... Camcorder is connected to capture video recorded on the DV Cassette or Memory Card can send video from the CD-ROM. 4 Follow the instructions on the computer screen until the installation is connected to your personal computer, you to your personal computer. With a PC With a PC Using Camcorder with a PC An image stored on a tape or images viewed through the lens of a camera. Connecting the Camcorder with preinstalled; Please install Adobe Acrobat Reader from the Camcorder...
Digital Video Camera
Page 45
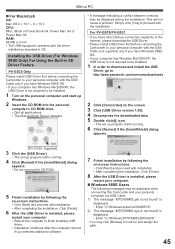
...-ROM into the personal computer's CD-ROM drive. • Quit all applications. • The [Setup Menu] Screen appears. • A message indicating a conflict between versions may click [Browse] to proceed with installation. • After completing the installation, Click [Finish]. 8 After the USB Driver is installed, please restart your computer. „ Windows 98SE Users The following messages may be displayed when connecting this Camcorder and your personal computer via USB Cable. 1) The message...
...-ROM into the personal computer's CD-ROM drive. • Quit all applications. • The [Setup Menu] Screen appears. • A message indicating a conflict between versions may click [Browse] to proceed with installation. • After completing the installation, Click [Finish]. 8 After the USB Driver is installed, please restart your computer. „ Windows 98SE Users The following messages may be displayed when connecting this Camcorder and your personal computer via USB Cable. 1) The message...
Digital Video Camera
Page 52
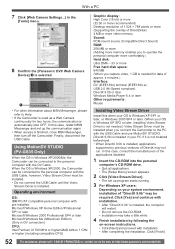
.../2000/Me, the Camcorder can be installed when you connect the Camcorder to operate the personal computer more comfortably.) Hard disk: Ultra DMA - 33 or more memory enables you capture video, 1 GB is needed .) Video Stream Driver must be connected to the personal computer with the USB Cable and use MotionDV STUDIO. With a PC 7 Click [Web Camera Settings...] in the [Tools] menu. 8 Confirm the [Panasonic DVC Web Camera Device] 1 is selected...
.../2000/Me, the Camcorder can be installed when you connect the Camcorder to operate the personal computer more comfortably.) Hard disk: Ultra DMA - 33 or more memory enables you capture video, 1 GB is needed .) Video Stream Driver must be connected to the personal computer with the USB Cable and use MotionDV STUDIO. With a PC 7 Click [Web Camera Settings...] in the [Tools] menu. 8 Confirm the [Panasonic DVC Web Camera Device] 1 is selected...
Digital Video Camera
Page 55
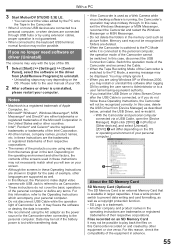
... the screens in these instructions may freeze the software or destroy the data in transfer. • We recommend using Windows XP or Windows 2000, you may simply ignore it. • When you no longer need software or driver (Uninstall) The screens may vary with USB Jack is referred to play back the files on this case, disconnect the USB Connection Cable. You may install or uninstall this Manual, the Panasonic make digital video camera...
... the screens in these instructions may freeze the software or destroy the data in transfer. • We recommend using Windows XP or Windows 2000, you may simply ignore it. • When you no longer need software or driver (Uninstall) The screens may vary with USB Jack is referred to play back the files on this case, disconnect the USB Connection Cable. You may install or uninstall this Manual, the Panasonic make digital video camera...
Digital Video Camera
Page 58
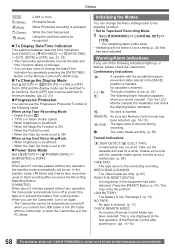
...; The Camcorder automatically records the date and time of the Remote Control after you use the Progressive Photoshot Function in the equipment has been detected. Set to [OFF] and it on the Remote Control (PV-GS35 only). „ To Change the Display Mode Set [ SETUP] >> [ DISPLAY] >> [ON] or [OFF]. NEED HEAD CLEANING: The video heads are dirty. (p. 65) Textual Indications DEW DETECT/ EJECT TAPE: Condensation has occurred. This may solve the problem. REMOTE: An incorrect Remote Control mode has...
...; The Camcorder automatically records the date and time of the Remote Control after you use the Progressive Photoshot Function in the equipment has been detected. Set to [OFF] and it on the Remote Control (PV-GS35 only). „ To Change the Display Mode Set [ SETUP] >> [ DISPLAY] >> [ON] or [OFF]. NEED HEAD CLEANING: The video heads are dirty. (p. 65) Textual Indications DEW DETECT/ EJECT TAPE: Condensation has occurred. This may solve the problem. REMOTE: An incorrect Remote Control mode has...
Digital Video Camera
Page 59
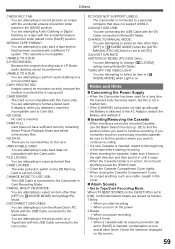
... Picture Playback Mode and delete unnecessary files. TURN OFF THE VIDEO LIGHT: D.ZOOM] You are attempting to play back data not compatible with the accidental erasure prevention slider placed in the [SAVE] position. CHANGE TO MANUAL MODE: You are attempting to perform audio dubbing on a non-recorded tape. Others CHECK REC TAB: You are no recorded files on the card. WRONG TAPE FORMAT: You are attempting to [LOCK]. CARD ERROR: The Card is set to select an item other times. NO DATA...
... Picture Playback Mode and delete unnecessary files. TURN OFF THE VIDEO LIGHT: D.ZOOM] You are attempting to play back data not compatible with the accidental erasure prevention slider placed in the [SAVE] position. CHANGE TO MANUAL MODE: You are attempting to perform audio dubbing on a non-recorded tape. Others CHECK REC TAB: You are no recorded files on the card. WRONG TAPE FORMAT: You are attempting to [LOCK]. CARD ERROR: The Card is set to select an item other times. NO DATA...
Digital Video Camera
Page 60
... MagicPix Function is used, however, the White Balance of the scene last recorded is retained.) • Since about half the power of the screen changes or blurs, adjust the shutter speed manually to [ON], the beep sound will make conditions even brighter. • The LED video light enables simply lightening the images taken in the following case: • Neither a card nor a tape has been inserted while the Tape/Card Recording Mode is...
... MagicPix Function is used, however, the White Balance of the scene last recorded is retained.) • Since about half the power of the screen changes or blurs, adjust the shutter speed manually to [ON], the beep sound will make conditions even brighter. • The LED video light enables simply lightening the images taken in the following case: • Neither a card nor a tape has been inserted while the Tape/Card Recording Mode is...

Digital Video Camera
Page 61
... use a tripod. • The MagicPix Function makes the signal charging time of CCD longer up to approx. 30× longer than usual, so that dark scenes that you turn the Image Stabilizer off . • White Balance cannot be set. • The Shutter Speed cannot be adjusted. • The Scene Mode cannot be set. • When recording with the external microphone (PV-GS35 Only). „ Digital Zoom Functions • The larger the digital zoom...
... use a tripod. • The MagicPix Function makes the signal charging time of CCD longer up to approx. 30× longer than usual, so that dark scenes that you turn the Image Stabilizer off . • White Balance cannot be set. • The Shutter Speed cannot be adjusted. • The Scene Mode cannot be set. • When recording with the external microphone (PV-GS35 Only). „ Digital Zoom Functions • The larger the digital zoom...
Digital Video Camera
Page 63
... cables. • If you can. „ Playing Back on the recorder, digital dubbing is played back. • In the case of importing data recorded with Audio Dubbing to wipe the camera body carefully. Cautions for Use „ After Use 1 Take out the Cassette. (p. 17) 2 Set the [OFF/ON] Switch to [OFF]. 3 Take out the Card. (p. 18) 4 Detach the power supply and retract the Viewfinder or the LCD...
... cables. • If you can. „ Playing Back on the recorder, digital dubbing is played back. • In the case of importing data recorded with Audio Dubbing to wipe the camera body carefully. Cautions for Use „ After Use 1 Take out the Cassette. (p. 17) 2 Set the [OFF/ON] Switch to [OFF]. 3 Take out the Card. (p. 18) 4 Detach the power supply and retract the Viewfinder or the LCD...
Digital Video Camera
Page 68
....panasonic.com/contactinfo To play back a cassette with no audio dubbing, set [ SETUP] >> [ AUDIO OUT] >> [STEREO] and reproduced a picture containing the main sound and sub sound? Although the Camcorder is restored. Please read the operating instructions of digital video systems. It is characteristic of your TV and select the channel that is automatically adjusted. • There are continuously recorded, the remaining tape time cannot be seen. • Have you set [ SETUP] >> [ DISPLAY...
....panasonic.com/contactinfo To play back a cassette with no audio dubbing, set [ SETUP] >> [ AUDIO OUT] >> [STEREO] and reproduced a picture containing the main sound and sub sound? Although the Camcorder is restored. Please read the operating instructions of digital video systems. It is characteristic of your TV and select the channel that is automatically adjusted. • There are continuously recorded, the remaining tape time cannot be seen. • Have you set [ SETUP] >> [ DISPLAY...
Digital Video Camera
Page 69
... to play a tape with a soft cloth, and then connect the cable to repair the appliance by the PC. • Is the USB driver installed? Card Recorded pictures are dirty, playback image cannot be damaged. QUALITY] >> [ (High)]. (p. 26) A file recorded on the PC. (The audio of the Camcorder dirty? Locked files cannot be deleted. (p. 39) • For the SD Memory Card, if its write protect switch is set to the Camcorder is disabled. (p. 63) Photoshot playback images do...
... to play a tape with a soft cloth, and then connect the cable to repair the appliance by the PC. • Is the USB driver installed? Card Recorded pictures are dirty, playback image cannot be damaged. QUALITY] >> [ (High)]. (p. 26) A file recorded on the PC. (The audio of the Camcorder dirty? Locked files cannot be deleted. (p. 39) • For the SD Memory Card, if its write protect switch is set to the Camcorder is disabled. (p. 63) Photoshot playback images do...


