

Digital Video Camera
Page 8
... Power supply 16 Charging time and recordable time 17 Inserting/removing a cassette 17 Inserting/removing a card 18 Using the lens cover 19 Turning the Camcorder on 19 Selecting a mode 20 How to use the joystick 20 Switching the language 21 Using the menu screen 22 Setting date and time 23 Adjusting LCD monitor/viewfinder 23 Using the remote control 24 Magic Wire Remote Control with Narration Mic 26 Record mode Check before recording 27 Recording on a tape 28 Recording still pictures on a card while recording image onto a tape 28 Check the recording 29 Blank search function...
... Power supply 16 Charging time and recordable time 17 Inserting/removing a cassette 17 Inserting/removing a card 18 Using the lens cover 19 Turning the Camcorder on 19 Selecting a mode 20 How to use the joystick 20 Switching the language 21 Using the menu screen 22 Setting date and time 23 Adjusting LCD monitor/viewfinder 23 Using the remote control 24 Magic Wire Remote Control with Narration Mic 26 Record mode Check before recording 27 Recording on a tape 28 Recording still pictures on a card while recording image onto a tape 28 Check the recording 29 Blank search function...
Digital Video Camera
Page 20
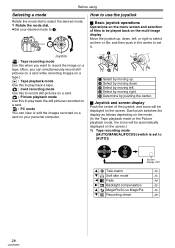
... record still pictures on a card while recording images on a tape.) : Tape playback mode Use this to play back the still pictures recorded on a card. Each push switches the display as follows depending on the mode. (In the Tape playback mode or the Picture playback mode, the icons will be automatically displayed on the screen.) 1) Tape recording mode ([AUTO/MANUAL/FOCUS] switch is set to play back a tape. : Card recording mode Use this to record still pictures on the screen. PC How to use the joystick ª Basic joystick operations Operations on the menu screen and selection of files...
... record still pictures on a card while recording images on a tape.) : Tape playback mode Use this to play back the still pictures recorded on a card. Each push switches the display as follows depending on the mode. (In the Tape playback mode or the Picture playback mode, the icons will be automatically displayed on the screen.) 1) Tape recording mode ([AUTO/MANUAL/FOCUS] switch is set to play back a tape. : Card recording mode Use this to record still pictures on the screen. PC How to use the joystick ª Basic joystick operations Operations on the menu screen and selection of files...
Digital Video Camera
Page 21
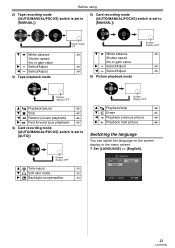
... You can switch the language on the screen display or the menu screen. 1 Set [LANGUAGE] >> [English]. Screen display OFF 3 Playback/pause -42- 4 Stop -42- 2 Rewind (review playback) -42- 1 Fast forward (cue playback) -42- 4) Card recording mode ([AUTO/MANUAL/FOCUS] switch is set to [MANUAL]) 4 White balance Shutter speed Iris or gain value 1 Select/Adjust 2 Select/Adjust 3) Tape playback mode Screen display OFF -39- -39-39- 4 White balance Shutter speed Iris or gain value 1 Select/Adjust 2 Select/Adjust 6) Picture playback mode Screen display OFF -39...
... You can switch the language on the screen display or the menu screen. 1 Set [LANGUAGE] >> [English]. Screen display OFF 3 Playback/pause -42- 4 Stop -42- 2 Rewind (review playback) -42- 1 Fast forward (cue playback) -42- 4) Card recording mode ([AUTO/MANUAL/FOCUS] switch is set to [MANUAL]) 4 White balance Shutter speed Iris or gain value 1 Select/Adjust 2 Select/Adjust 3) Tape playback mode Screen display OFF -39- -39-39- 4 White balance Shutter speed Iris or gain value 1 Select/Adjust 2 Select/Adjust 6) Picture playback mode Screen display OFF -39...
Digital Video Camera
Page 23
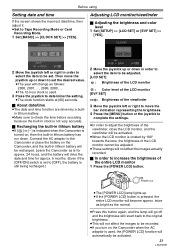
... not affect the images actually recorded. ª In order to Tape Recording Mode or Card Recording Mode. 1 Set [BASIC] >> [CLOCK SET] >> [YES]. Adjusting LCD monitor/viewfinder ª Adjusting the brightness and color level 1 Set [SETUP] >> [LCD SET] or [EVF SET] >> [YES]. 2 Move the joystick left or right to move the joystick up or down to set . Leave the Camcorder as is for approx. 24 hours, and the battery will drive the date and time for approx...
... not affect the images actually recorded. ª In order to Tape Recording Mode or Card Recording Mode. 1 Set [BASIC] >> [CLOCK SET] >> [YES]. Adjusting LCD monitor/viewfinder ª Adjusting the brightness and color level 1 Set [SETUP] >> [LCD SET] or [EVF SET] >> [YES]. 2 Move the joystick left or right to move the joystick up or down to set . Leave the Camcorder as is for approx. 24 hours, and the battery will drive the date and time for approx...
Digital Video Camera
Page 24
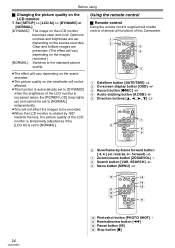
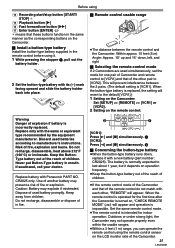
... the remote control ª Remote control Using the remote control supplied will not affect the images to be recorded. ≥When the LCD monitor is rotated by -frame forward button [E, D] (E: reverse, D: forward) -42- (7) Zoom/volume button [ZOOM/VOL] ¢ (8) Search button [VAR. SEARCH MENU ENTER (3) (4) (5) (1) Date/time button [DATE/TIME] -61- (2) On-screen display button [OSD] -44(3) Record button [¥REC] -48- (4) Audio dubbing button [A.DUB] -49(5) Direction buttons 22- (6) OSD DATE/ PHOTO TIME SHOT START/ STOP ¥REC A.DUB ZOOM T V/REW PLAY FF/W STILL ADV PAUSE...
... the remote control ª Remote control Using the remote control supplied will not affect the images to be recorded. ≥When the LCD monitor is rotated by -frame forward button [E, D] (E: reverse, D: forward) -42- (7) Zoom/volume button [ZOOM/VOL] ¢ (8) Search button [VAR. SEARCH MENU ENTER (3) (4) (5) (1) Date/time button [DATE/TIME] -61- (2) On-screen display button [OSD] -44(3) Record button [¥REC] -48- (4) Audio dubbing button [A.DUB] -49(5) Direction buttons 22- (6) OSD DATE/ PHOTO TIME SHOT START/ STOP ¥REC A.DUB ZOOM T V/REW PLAY FF/W STILL ADV PAUSE...
Digital Video Camera
Page 25
... Camcorder: Set [SETUP] >> [REMOTE] >> [VCR1] or [VCR2]. 2 Setting on , "CHECK REMOTE MODE" (-66-) will appear and operation is impossible. Do not recharge, disassemble or dispose of in fire. 2 STILL ADV PAUSE STILL ADV VOL STOP 1 VAR [VCR1]: Press [D] and [∫] simultaneously. 1 [VCR2]: Press [E] and [∫] simultaneously. 2 ª Concerning the button-type battery ≥When the button-type battery runs down , left, and right ª Selecting the remote control mode If 2 Camcorders...
... Camcorder: Set [SETUP] >> [REMOTE] >> [VCR1] or [VCR2]. 2 Setting on , "CHECK REMOTE MODE" (-66-) will appear and operation is impossible. Do not recharge, disassemble or dispose of in fire. 2 STILL ADV PAUSE STILL ADV VOL STOP 1 VAR [VCR1]: Press [D] and [∫] simultaneously. 1 [VCR2]: Press [E] and [∫] simultaneously. 2 ª Concerning the button-type battery ≥When the button-type battery runs down , left, and right ª Selecting the remote control mode If 2 Camcorders...

Digital Video Camera
Page 27
... balance setting (-39-) ≥Shutter speed setting (-40-) ≥Iris/gain value setting (-40-) ≥Focus setting (-40-) ª Recording mode You can switch the tape recording mode. ≥Set to Tape Recording/Playback Mode. 1 Set [BASIC] or [ADVANCE] >> [REC SPEED] >> [SP] or [LP]. Please turn the Camcorder on after opening the lens cover.) ≥Grip belt adjustment (-14-) ≥Power supply (-16-) ≥Insert a cassette/card. (-17-, -18-) ≥Setting date/time (-23-) ≥Adjustment of the image on light sources or scenes. Record mode Record mode Check before important...
... balance setting (-39-) ≥Shutter speed setting (-40-) ≥Iris/gain value setting (-40-) ≥Focus setting (-40-) ª Recording mode You can switch the tape recording mode. ≥Set to Tape Recording/Playback Mode. 1 Set [BASIC] or [ADVANCE] >> [REC SPEED] >> [SP] or [LP]. Please turn the Camcorder on after opening the lens cover.) ≥Grip belt adjustment (-14-) ≥Power supply (-16-) ≥Insert a cassette/card. (-17-, -18-) ≥Setting date/time (-23-) ≥Adjustment of the image on light sources or scenes. Record mode Record mode Check before important...

Digital Video Camera
Page 29
... [PHOTO SHOT] button does not work if it is difficult to reduce the slight shaking from the last image. 1 2 1 Shutter chance mark ± (The white lamp flashes.): Focusing ¥ (The green lamp lights up .): Almost in focus 2 Focus area 2 Press the [PHOTO SHOT] button fully. ª To record still pictures clearly ≥When zooming in on the subject automatically. After checking, the Camcorder will be set to a recording pause. ≥Set to Tape Recording Mode...
... [PHOTO SHOT] button does not work if it is difficult to reduce the slight shaking from the last image. 1 2 1 Shutter chance mark ± (The white lamp flashes.): Focusing ¥ (The green lamp lights up .): Almost in focus 2 Focus area 2 Press the [PHOTO SHOT] button fully. ª To record still pictures clearly ≥When zooming in on the subject automatically. After checking, the Camcorder will be set to a recording pause. ≥Set to Tape Recording Mode...

Digital Video Camera
Page 30
...], the mega pixel recording mode is set [PICT. QUALITY] >> [ ], mosaic-pattern noise may appear on a playback image depending on the picture content. ≥When the [PICTURE SIZE] is set to be disabled depending on the other than that in [640]. ª On-screen display in the focus area, the subject may degrade or not play back data recorded on a card, do not insert or remove a card. ≥Another product...
...], the mega pixel recording mode is set [PICT. QUALITY] >> [ ], mosaic-pattern noise may appear on a playback image depending on the picture content. ≥When the [PICTURE SIZE] is set to be disabled depending on the other than that in [640]. ª On-screen display in the focus area, the subject may degrade or not play back data recorded on a card, do not insert or remove a card. ≥Another product...
Digital Video Camera
Page 51
..." Button on your personal computer with the USB connection Cable. 1 Turn on the personal computer and start up program starts running. 4 Click [Restart] if the [InstallShield] dialog appears. ≥Do not remove the CD-ROM. 5 Finish installation by the Internet. It is also needed when you to capture video recorded on a tape or images viewed through the lens of personal computers. ≥A CD-ROM drive is required to install...
..." Button on your personal computer with the USB connection Cable. 1 Turn on the personal computer and start up program starts running. 4 Click [Restart] if the [InstallShield] dialog appears. ≥Do not remove the CD-ROM. 5 Finish installation by the Internet. It is also needed when you to capture video recorded on a tape or images viewed through the lens of personal computers. ≥A CD-ROM drive is required to install...
Digital Video Camera
Page 53
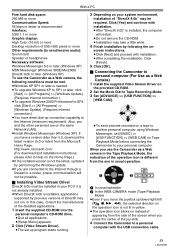
... the screen when you press the center of the joy stick. 4 Connect the Camcorder to a personal computer with the USB connection cable. 53 LSQT0861 Click [Yes] and continue with installation. ≥After completing the installation, Click [Finish]. 5 Click [OK]. ª Connecting the Camcorder to personal computer (For Use as a Web Camera) 1 Install the supplied Video Stream Driver on the provided CD-ROM. 2 Set the Mode Dial to Tape Recording Mode. 3 Set [ADVANCE] >> [USB FUNCTION] >> [WEB CAM...
... the screen when you press the center of the joy stick. 4 Connect the Camcorder to a personal computer with the USB connection cable. 53 LSQT0861 Click [Yes] and continue with installation. ≥After completing the installation, Click [Finish]. 5 Click [OK]. ª Connecting the Camcorder to personal computer (For Use as a Web Camera) 1 Install the supplied Video Stream Driver on the provided CD-ROM. 2 Set the Mode Dial to Tape Recording Mode. 3 Set [ADVANCE] >> [USB FUNCTION] >> [WEB CAM...
Digital Video Camera
Page 54
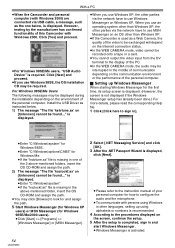
..., the screen is not displayed if the Windows Messenger setup has already been done.) For more details, please read the corresponding Help file. 1 Click [Click here to use Windows XP, the other parties via USB cable, a message, such as a Web Camera, the quality of the video to be exchanged will depend on the Internet connection status. ≥In the WEB CAMERA mode, video cannot be recorded onto a tape or a card...
..., the screen is not displayed if the Windows Messenger setup has already been done.) For more details, please read the corresponding Help file. 1 Click [Click here to use Windows XP, the other parties via USB cable, a message, such as a Web Camera, the quality of the video to be exchanged will depend on the Internet connection status. ≥In the WEB CAMERA mode, video cannot be recorded onto a tape or a card...

Digital Video Camera
Page 58
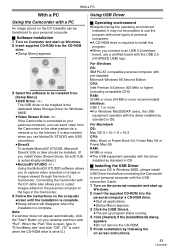
... Card data. 58 LSQT0861 With a PC Connecting the Camcorder to a personal computer 1 Set the Mode Dial to Tape Recording Mode or Tape Playback Mode. 2 Set [BASIC] or [ADVANCE] >> [USB FUNCTION] >> [MOTION DV]. ≥It enters MotionDV STUDIO Mode. 3 Connect the Camcorder to the personal computer with USB connection cable. ≥You can record the video edited by the PC onto the Tape in the Camcorder. ≥When 2 or more USB devices are connected to a personal computer, or when devices are connected...
... Card data. 58 LSQT0861 With a PC Connecting the Camcorder to a personal computer 1 Set the Mode Dial to Tape Recording Mode or Tape Playback Mode. 2 Set [BASIC] or [ADVANCE] >> [USB FUNCTION] >> [MOTION DV]. ≥It enters MotionDV STUDIO Mode. 3 Connect the Camcorder to the personal computer with USB connection cable. ≥You can record the video edited by the PC onto the Tape in the Camcorder. ≥When 2 or more USB devices are connected to a personal computer, or when devices are connected...
Digital Video Camera
Page 60
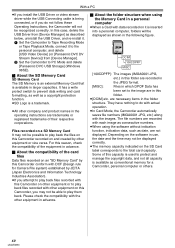
... using the software without indication function, indication data, such as date, are recorded in the JPEG format. [MISC]: Files in which DPOF Data has been set to play them back. It has a write protect switch to prevent data writing and card formatting, as well as described below, uninstall the USB Driver, and re-install it. 1 Set the Camcorder to Tape Recording Mode or Tape Playback Mode, connect it is inserted into a personal computer, folders will not be displayed...
... using the software without indication function, indication data, such as date, are recorded in the JPEG format. [MISC]: Files in which DPOF Data has been set to play them back. It has a write protect switch to prevent data writing and card formatting, as well as described below, uninstall the USB Driver, and re-install it. 1 Set the Camcorder to Tape Recording Mode or Tape Playback Mode, connect it is inserted into a personal computer, folders will not be displayed...
Digital Video Camera
Page 63
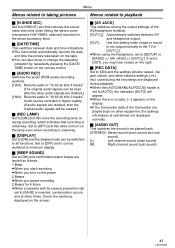
... right. ª [REC DATA] Set to [ON] and the settings (shutter speed, iris/ gain values, and white balance settings (-39-), etc.) used during the recordings are displayed during recording, which indicates that recording is underway. ª [DISPLAY] Set to [ON] and the display mode can be switched to all functions. Menu Menus related to taking pictures Menus related to playback ª [H.SHOE MIC] Set to [LOWCUT] and this setting when image or sound is not output normally to the...
... right. ª [REC DATA] Set to [ON] and the settings (shutter speed, iris/ gain values, and white balance settings (-39-), etc.) used during the recordings are displayed during recording, which indicates that recording is underway. ª [DISPLAY] Set to [ON] and the display mode can be switched to all functions. Menu Menus related to taking pictures Menus related to playback ª [H.SHOE MIC] Set to [LOWCUT] and this setting when image or sound is not output normally to the...

Digital Video Camera
Page 65
... recording is used -26- : External microphone supporting the smart accessory shoe -13- AUTO : MNL : MF: 5k: Automatic mode -27Manual mode -38Manual focus -40Zoom magnification indication -31- : Back light mode -32- Others Others Indications Various functions and the Camcorder status are shown on -35- : ßi/ßAi: ßj/ßAj: £: VIdeo flash turned off -35Video flash (setting to [i]) -35Video flash (setting to [j]) -35- Basic indications r: Remaining battery power 0h00m00s00f: Time code 3:30:45PM: Date/Time indication Recording...
... recording is used -26- : External microphone supporting the smart accessory shoe -13- AUTO : MNL : MF: 5k: Automatic mode -27Manual mode -38Manual focus -40Zoom magnification indication -31- : Back light mode -32- Others Others Indications Various functions and the Camcorder status are shown on -35- : ßi/ßAi: ßj/ßAj: £: VIdeo flash turned off -35Video flash (setting to [i]) -35Video flash (setting to [j]) -35- Basic indications r: Remaining battery power 0h00m00s00f: Time code 3:30:45PM: Date/Time indication Recording...
Digital Video Camera
Page 67
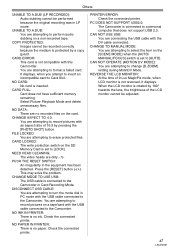
... MagicPix mode, when LCD monitor is connected to the Camcorder. This may solve the problem. Select Picture Playback Mode and delete unnecessary files. CARD FULL: Card does not have sufficient memory remaining. NEED HEAD CLEANING: The video heads are attempting to record pictures with the USB cable connected to a personal computer that does not support USB 2.0. NO PAPER IN PRINTER: There is set to select the item on a non-recorded tape. FILE LOCKED: You are attempting to [AUTO]. CHANGE TO MANUAL MODE: You...
... MagicPix mode, when LCD monitor is connected to the Camcorder. This may solve the problem. Select Picture Playback Mode and delete unnecessary files. CARD FULL: Card does not have sufficient memory remaining. NEED HEAD CLEANING: The video heads are attempting to record pictures with the USB cable connected to a personal computer that does not support USB 2.0. NO PAPER IN PRINTER: There is set to select the item on a non-recorded tape. FILE LOCKED: You are attempting to [AUTO]. CHANGE TO MANUAL MODE: You...

Digital Video Camera
Page 68
...;Zoom microphone ≥Wind noise reduction ≥Scene mode ≥Change of white balance ≥Adjusting the shutter speed, iris/gain ≥Variable-speed search ≥Deleting files ≥Formatting ≥Audio dubbing ≥While recording to a tape ≥During demo mode ≥When RapidFire Consecutive Photoshot is used ≥When the MagicPix function is used ≥When the microphone of the Magic Wire Remote Control with Narration Mic or an external microphone is used ≥When setting the [AUTO/ MANUAL/FOCUS] switch...
...;Zoom microphone ≥Wind noise reduction ≥Scene mode ≥Change of white balance ≥Adjusting the shutter speed, iris/gain ≥Variable-speed search ≥Deleting files ≥Formatting ≥Audio dubbing ≥While recording to a tape ≥During demo mode ≥When RapidFire Consecutive Photoshot is used ≥When the MagicPix function is used ≥When the microphone of the Magic Wire Remote Control with Narration Mic or an external microphone is used ≥When setting the [AUTO/ MANUAL/FOCUS] switch...
Digital Video Camera
Page 70
... displayed. • In some recording subjects and surroundings for digital video (optional). (-72-) 70 LSQT0861 Clean the heads by -frame playback or other than the tape running condition, warning, and date indications disappear. To play back a cassette with no audio dubbing, set [SETUP] >> [12bit AUDIO] >> [ST2]? SEARCH] button on recording and the sound dubbed at the same time. • Have you set [12bit AUDIO] >> [ST1]. (-49-) • Is the variable speed search function working , focusing...
... displayed. • In some recording subjects and surroundings for digital video (optional). (-72-) 70 LSQT0861 Clean the heads by -frame playback or other than the tape running condition, warning, and date indications disappear. To play back a cassette with no audio dubbing, set [SETUP] >> [12bit AUDIO] >> [ST2]? SEARCH] button on recording and the sound dubbed at the same time. • Have you set [12bit AUDIO] >> [ST1]. (-49-) • Is the variable speed search function working , focusing...

Digital Video Camera
Page 71
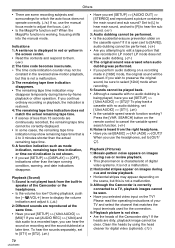
..., and then connect the cable to [LOCK], then deletion is still not restored, detach the power connected, and consult the dealer who you press the menu button or the recording start/stop button? QUALITY] >> [ ]. (-30-) 2: A file recorded on the picture. Locked files cannot be deleted. (-46-) • For the SD Memory Card, if its write protect switch is soiled, noises may be played.) • Is the video stream driver installed? 71 LSQT0861...
..., and then connect the cable to [LOCK], then deletion is still not restored, detach the power connected, and consult the dealer who you press the menu button or the recording start/stop button? QUALITY] >> [ ]. (-30-) 2: A file recorded on the picture. Locked files cannot be deleted. (-46-) • For the SD Memory Card, if its write protect switch is soiled, noises may be played.) • Is the video stream driver installed? 71 LSQT0861...


