
PVDV852 User Guide
Page 5
... Date and Time 19 Internal Lithium Battery Recharge 19 LP Mode 19 Audio Recording Mode 19 CAMERA Mode Recording 20 PhotoShot Recording on the DV Cassette 21 Zoom In/Out Functions 21 Digital Zoom Function 22 Optical Image Stabilizer Function 22 Fade In/Out Functions 22 Cinema Function 23...Cassette to an S-VHS or VHS Cassette (Dubbing 44 Copying an S-VHS or VHS Cassette to your DV Cassette 44 Using your Palmcorder with Digital Video Equipment (Dubbing 45 Using the Software with a Computer 46 ArcSoft Software 47 Using the Supplied USB Connection Kit 48 Installing USB Driver 48 ...
... Date and Time 19 Internal Lithium Battery Recharge 19 LP Mode 19 Audio Recording Mode 19 CAMERA Mode Recording 20 PhotoShot Recording on the DV Cassette 21 Zoom In/Out Functions 21 Digital Zoom Function 22 Optical Image Stabilizer Function 22 Fade In/Out Functions 22 Cinema Function 23...Cassette to an S-VHS or VHS Cassette (Dubbing 44 Copying an S-VHS or VHS Cassette to your DV Cassette 44 Using your Palmcorder with Digital Video Equipment (Dubbing 45 Using the Software with a Computer 46 ArcSoft Software 47 Using the Supplied USB Connection Kit 48 Installing USB Driver 48 ...

PVDV852 User Guide
Page 7
...is fully charged. ≥Since the Battery will not be charged when the DC Cable is connected to the AC Adaptor, disconnect it. 2 3 CAMERA VCR CARD P.B. 1 MODE ON OFF POWER 2 Attach the Charged Battery to the Palmcorder. (l 12) ≥Attach the battery after tilting the ...Viewfinder upward. 4 3 Turn the Palmcorder on. (l 14) ≥Slide the 1 Switch to [ON]. (The [CAMERA] Lamp lights up .) ≥Push the 6 Lever towards [6]. (Rewind the tape.) ≥Push the 6 Lever towards [1]. (Playback starts.) ≥Push the 6 Lever...
...is fully charged. ≥Since the Battery will not be charged when the DC Cable is connected to the AC Adaptor, disconnect it. 2 3 CAMERA VCR CARD P.B. 1 MODE ON OFF POWER 2 Attach the Charged Battery to the Palmcorder. (l 12) ≥Attach the battery after tilting the ...Viewfinder upward. 4 3 Turn the Palmcorder on. (l 14) ≥Slide the 1 Switch to [ON]. (The [CAMERA] Lamp lights up .) ≥Push the 6 Lever towards [6]. (Rewind the tape.) ≥Push the 6 Lever towards [1]. (Playback starts.) ≥Push the 6 Lever...

PVDV852 User Guide
Page 8
... in LCD production technology, there may be some tiny bright or dark spots on the LCD Monitor screen. However, this is a registered trademark of Leica Camera AG. 16) Remote Control Sensor (l 11) 17) Optical Image Stabilizer Button [OPTICAL IMAGE STABILIZER] ([EIS]) (l 22) 18) Focus Button [FOCUS] (l ...-in-Picture Button [P-IN-P] (l 28) 8) Speaker 9) LCD Monitor Open Button [PUSH OPEN] (l 14) 10) Flash Open Button [PUSH] (l 26) 11) Built-in Video Flash (l 26) 12) Flash sensor 13) Focus Ring (l 24) 14) Lens Hood (l 66) 15) Lens (LEICA DICOMAR) ≥LEICA is a registered trademark of Leica...
... in LCD production technology, there may be some tiny bright or dark spots on the LCD Monitor screen. However, this is a registered trademark of Leica Camera AG. 16) Remote Control Sensor (l 11) 17) Optical Image Stabilizer Button [OPTICAL IMAGE STABILIZER] ([EIS]) (l 22) 18) Focus Button [FOCUS] (l ...-in-Picture Button [P-IN-P] (l 28) 8) Speaker 9) LCD Monitor Open Button [PUSH OPEN] (l 14) 10) Flash Open Button [PUSH] (l 26) 11) Built-in Video Flash (l 26) 12) Flash sensor 13) Focus Ring (l 24) 14) Lens Hood (l 66) 15) Lens (LEICA DICOMAR) ≥LEICA is a registered trademark of Leica...

PVDV852 User Guide
Page 14
... then select Modes. ª How to Turn on the Power 1 Set the [OFF/ON/MODE] Switch to [ON] while pressing the center Button 1. ≥The [CAMERA] Lamp lights up. ª How to Switch Modes 2 Slide the [OFF/ON/MODE] Switch. ≥With each slide of the Switch, the Mode switches in.../MODE] Switch to [ON]. 2 Press the [PUSH OPEN] Button and, at the same time, bring out the LCD Monitor about 90x in the order of Camera Mode, VCR Mode, and Card Playback Mode. ≥The appropriate Mode Lamp lights up. ª How to Turn off . 3 Adjust the LCD Monitor angle according...
... then select Modes. ª How to Turn on the Power 1 Set the [OFF/ON/MODE] Switch to [ON] while pressing the center Button 1. ≥The [CAMERA] Lamp lights up. ª How to Switch Modes 2 Slide the [OFF/ON/MODE] Switch. ≥With each slide of the Switch, the Mode switches in.../MODE] Switch to [ON]. 2 Press the [PUSH OPEN] Button and, at the same time, bring out the LCD Monitor about 90x in the order of Camera Mode, VCR Mode, and Card Playback Mode. ≥The appropriate Mode Lamp lights up. ª How to Turn off . 3 Adjust the LCD Monitor angle according...

PVDV852 User Guide
Page 15
... 6 on the Menu will be retained. MODE ON OFF POWER MENU 1 PUSH 2, 3, 4, 5 W.B./SHUTTER/IRIS/ VOL/JOG 1 CAMERA FUNCTIONS 1.CAMERA SETUP 2.DIGITAL EFFECT 3.CARD SETUP 4.MULTI-PICTURES 5.RECORDING SETUP 6.DISPLAY SETUP 7.OTHER FUNCTIONS PUSH MENU TO EXIT 2 VCR FUNCTIONS 1.PLAYBACK FUNCTIONS... 2.DIGITAL EFFECT 3.CARD SETUP 4.MULTI-PICTURES 5.RECORDING SETUP 6.AV IN/OUT SETUP 7.DISPLAY SETUP 8.OTHER FUNCTIONS PUSH MENU...
... 6 on the Menu will be retained. MODE ON OFF POWER MENU 1 PUSH 2, 3, 4, 5 W.B./SHUTTER/IRIS/ VOL/JOG 1 CAMERA FUNCTIONS 1.CAMERA SETUP 2.DIGITAL EFFECT 3.CARD SETUP 4.MULTI-PICTURES 5.RECORDING SETUP 6.DISPLAY SETUP 7.OTHER FUNCTIONS PUSH MENU TO EXIT 2 VCR FUNCTIONS 1.PLAYBACK FUNCTIONS... 2.DIGITAL EFFECT 3.CARD SETUP 4.MULTI-PICTURES 5.RECORDING SETUP 6.AV IN/OUT SETUP 7.DISPLAY SETUP 8.OTHER FUNCTIONS PUSH MENU...

PVDV852 User Guide
Page 16
...Camera Mode Main-Menu [CAMERA FUNCTIONS] [CAMERA SETUP] Sub-Menu 1) Auto Exposure Mode [PROG.AE] (l 23) 2) Progressive PhotoShotTM Mode [PROGRESSIVE] (l 21) 3) Digital Zoom [D.ZOOM] (l 22) 4) Cinema-like Format Recording [CINEMA] (l 23) 5) Returning to the Main-Menu [RETURN] [DIGITAL EFFECT] Sub-Menu 6) Digital Effects 1 [EFFECT1] (l 27) 7) Digital...DISPLAY SETUP DATE/TIME OFF D/T DATE C.DISPLAY LINEAR MEMORY T.CODE C.RESET ---- YES 5) PUSH MENU TO EXIT DIGITAL EFFECT 6) EFFECT1 OFF MULTI P-IN-P WIPE MIX STROBE MAGICPIX TRAIL MOSAIC MIRROR 7) EFFECT2 OFF NEGA SEPIA MONO SOLARI...
...Camera Mode Main-Menu [CAMERA FUNCTIONS] [CAMERA SETUP] Sub-Menu 1) Auto Exposure Mode [PROG.AE] (l 23) 2) Progressive PhotoShotTM Mode [PROGRESSIVE] (l 21) 3) Digital Zoom [D.ZOOM] (l 22) 4) Cinema-like Format Recording [CINEMA] (l 23) 5) Returning to the Main-Menu [RETURN] [DIGITAL EFFECT] Sub-Menu 6) Digital Effects 1 [EFFECT1] (l 27) 7) Digital...DISPLAY SETUP DATE/TIME OFF D/T DATE C.DISPLAY LINEAR MEMORY T.CODE C.RESET ---- YES 5) PUSH MENU TO EXIT DIGITAL EFFECT 6) EFFECT1 OFF MULTI P-IN-P WIPE MIX STROBE MAGICPIX TRAIL MOSAIC MIRROR 7) EFFECT2 OFF NEGA SEPIA MONO SOLARI...
PVDV852 User Guide
Page 17
...31) 4) Audio Selector [AUDIO] (l 34) 5) Audio Output Mode [AUDIO OUT] (l 61) 6) Returning to the Main-Menu [RETURN] [DIGITAL EFFECT] Sub-Menu 7) Digital Effect On/Off [EFFECT] (l 32, 33) 8) Digital Effect Selection [EFFECT SELECT] (l 32, 33) [CARD SETUP] Sub-Menu 9) Picture Quality [PICTURE QUALITY] (l 36) 10) Title Creation [CREATE... signals supplied. ≥When recording involves the use of the S-Video or AV Input Jack. ≥When pictures with no data. ≥The settings information may not displayed properly if the camera data of this Palmcorder are played back on other items on page...
...31) 4) Audio Selector [AUDIO] (l 34) 5) Audio Output Mode [AUDIO OUT] (l 61) 6) Returning to the Main-Menu [RETURN] [DIGITAL EFFECT] Sub-Menu 7) Digital Effect On/Off [EFFECT] (l 32, 33) 8) Digital Effect Selection [EFFECT SELECT] (l 32, 33) [CARD SETUP] Sub-Menu 9) Picture Quality [PICTURE QUALITY] (l 36) 10) Title Creation [CREATE... signals supplied. ≥When recording involves the use of the S-Video or AV Input Jack. ≥When pictures with no data. ≥The settings information may not displayed properly if the camera data of this Palmcorder are played back on other items on page...

PVDV852 User Guide
Page 19
... stereo, while the other equipment. ≥Audio Dubbing is possible with [REC-SPEED] on 2 tracks in lithium battery and reset the date and time. CAMERA FUNCTIONS 1.CAMERA SETUP 2.DIGITAL EFFECT 3.CARD SETUP 4.MULTI-PICTURES 5.RECORDING SETUP 6.DISPLAY SETUP 7.OTHER FUNCTIONS PUSH MENU TO EXIT 1 RECORDING SETUP REC-SPEED SP LP AUDIO-REC 12bit...
... stereo, while the other equipment. ≥Audio Dubbing is possible with [REC-SPEED] on 2 tracks in lithium battery and reset the date and time. CAMERA FUNCTIONS 1.CAMERA SETUP 2.DIGITAL EFFECT 3.CARD SETUP 4.MULTI-PICTURES 5.RECORDING SETUP 6.DISPLAY SETUP 7.OTHER FUNCTIONS PUSH MENU TO EXIT 1 RECORDING SETUP REC-SPEED SP LP AUDIO-REC 12bit...

PVDV852 User Guide
Page 20
... Mode. ª To View the recorded scene while the Recording is turned off automatically for more than 5 minutes, the power is paused (Camera Search) The recorded scene can play back the last few seconds of the Warning/Alarm Indication. ª To Finish the Recording Set the [... to pause the recording. ≥[PAUSE] Indication is displayed. 4 ≥If the Recording Pause Mode continues for tape protection and power conservation. The Camera Search function is useful for finding the starting point of a new scene to create a smooth transition from this condition, turn on the power again....
... Mode. ª To View the recorded scene while the Recording is turned off automatically for more than 5 minutes, the power is paused (Camera Search) The recorded scene can play back the last few seconds of the Warning/Alarm Indication. ª To Finish the Recording Set the [... to pause the recording. ≥[PAUSE] Indication is displayed. 4 ≥If the Recording Pause Mode continues for tape protection and power conservation. The Camera Search function is useful for finding the starting point of a new scene to create a smooth transition from this condition, turn on the power again....

PVDV852 User Guide
Page 21
...be recorded. Taking Close-up Shots of Small Subjects (Macro Close-up Function) When the zoom magnification is 1a, the Palmcorder can focus on the [CAMERA SETUP] Sub-menu to [ON] or [AUTO], press the [PHOTO SHOT] Button in the Recording Pause Mode. [æ] is displayed. 1 ≥...-angle shots (zoom out): Press the [W/T] zoom lever towards [W] or [T], the zooming speed gradually increases. When the Button is pressed again, the Digital Still Picture Mode is cancelled. ≥We recommend that is pressed, images become still pictures. To Use the Zoom Microphone Function Along with the zooming...
...be recorded. Taking Close-up Shots of Small Subjects (Macro Close-up Function) When the zoom magnification is 1a, the Palmcorder can focus on the [CAMERA SETUP] Sub-menu to [ON] or [AUTO], press the [PHOTO SHOT] Button in the Recording Pause Mode. [æ] is displayed. 1 ≥...-angle shots (zoom out): Press the [W/T] zoom lever towards [W] or [T], the zooming speed gradually increases. When the Button is pressed again, the Digital Still Picture Mode is cancelled. ≥We recommend that is pressed, images become still pictures. To Use the Zoom Microphone Function Along with the zooming...

PVDV852 User Guide
Page 22
...situations and the Palmcorder is shaky, you can select a magnification of 25k or 200k. 1 Set [CAMERA FUNCTIONS] >> [CAMERA SETUP] >> [D.ZOOM] >> [25t] or [200t]. ≥25k: Digital zooming to 25k ≥200k: Digital zooming to stop recording. 2 3 Release the [FADE] Button. ≥For other notes, see ...to 10k magnification. 1 AUTO MANUAL PUSH MENU W.B./SHUTTER/IRIS/ VOL/JOG 2 25tW T D.ZOOM Digital Zoom Function This function is useful when you can use this function to correct for camera shake in or out, press the [W/T] zoom lever towards [T] or towards [W]. ≥As the...
...situations and the Palmcorder is shaky, you can select a magnification of 25k or 200k. 1 Set [CAMERA FUNCTIONS] >> [CAMERA SETUP] >> [D.ZOOM] >> [25t] or [200t]. ≥25k: Digital zooming to 25k ≥200k: Digital zooming to stop recording. 2 3 Release the [FADE] Button. ≥For other notes, see ...to 10k magnification. 1 AUTO MANUAL PUSH MENU W.B./SHUTTER/IRIS/ VOL/JOG 2 25tW T D.ZOOM Digital Zoom Function This function is useful when you can use this function to correct for camera shake in or out, press the [W/T] zoom lever towards [T] or towards [W]. ≥As the...

PVDV852 User Guide
Page 23
...Select optimal automatic exposures under specific recording situations. 1 Set the Mode Selector Switch to [MANUAL]. ≥The [MNL] Indication appears. 2 Set [CAMERA FUNCTIONS] >> [CAMERA SETUP] >> [PROG.AE] >> a desired Mode [5], [7], [4 1 ≥The Indication of the selected Mode is displayed. BACK LIGHT ≥...W.B./SHUTTER/IRIS/ VOL/JOG 2 For Recording scenes involving quick movements, such as sports scenes. [7] Portrait Mode 2 Focuses on the [CAMERA SETUP] Sub-Menu to [AUTO]. ≥For other notes, see page 60. 23 To resume normal Recording 1 Press the Backlight Button...
...Select optimal automatic exposures under specific recording situations. 1 Set the Mode Selector Switch to [MANUAL]. ≥The [MNL] Indication appears. 2 Set [CAMERA FUNCTIONS] >> [CAMERA SETUP] >> [PROG.AE] >> a desired Mode [5], [7], [4 1 ≥The Indication of the selected Mode is displayed. BACK LIGHT ≥...W.B./SHUTTER/IRIS/ VOL/JOG 2 For Recording scenes involving quick movements, such as sports scenes. [7] Portrait Mode 2 Focuses on the [CAMERA SETUP] Sub-Menu to [AUTO]. ≥For other notes, see page 60. 23 To resume normal Recording 1 Press the Backlight Button...

PVDV852 User Guide
Page 26
...LEVEL] on the [RECORDING SETUP] Sub-Menu. To reduce the "Red Eye" phenomenon Set the [CAMERA FUNCTIONS] >> [RECORDING SETUP] >> [RED EYE REDUCTION] >> [ON]. ≥The [£] Indication 2 appears when Video Flash is opened. ≥You may still experience red eye phenomenon, depending on the [RECORDING SETUP... place. 1 Press the [PUSH] Button to open the Video Flash. 2 Set [CAMERA FUNCTIONS] >> [RECORDING SETUP] >> [FLASH] >> [ON] or [AUTO]. ≥If [AUTO] is selected, Video Flash is set off if light is needed by using the Video Flash at distances greater than 2.5 meters. ≥Object of...
...LEVEL] on the [RECORDING SETUP] Sub-Menu. To reduce the "Red Eye" phenomenon Set the [CAMERA FUNCTIONS] >> [RECORDING SETUP] >> [RED EYE REDUCTION] >> [ON]. ≥The [£] Indication 2 appears when Video Flash is opened. ≥You may still experience red eye phenomenon, depending on the [RECORDING SETUP... place. 1 Press the [PUSH] Button to open the Video Flash. 2 Set [CAMERA FUNCTIONS] >> [RECORDING SETUP] >> [FLASH] >> [ON] or [AUTO]. ≥If [AUTO] is selected, Video Flash is set off if light is needed by using the Video Flash at distances greater than 2.5 meters. ≥Object of...

PVDV852 User Guide
Page 27
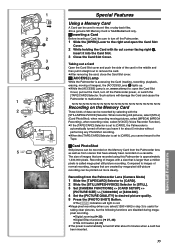
Selecting a desired digital effect Set [CAMERA FUNCTIONS] >> [DIGITAL EFFECT] >> [EFFECT1] or [EFFECT2] >> a desired digital effect. Cancelling the digital effect Set [CAMERA FUNCTIONS] >> [DIGITAL EFFECT] >> [EFFECT1] or [EFFECT2] >> [OFF]. ≥For other notes, see page 61. 2, 3, 4 MIX MIX MIX 1 AUTO MANUAL PUSH... scene gradually changes to the moving image of a new scene fades in, the still image of the last recorded scene gradually fades out. 1 Set [DIGITAL EFFECT] >> [EFFECT1] >> [WIPE] or [MIX] after pressing the [MENU] Button. ≥The [WIPE] or [MIX] Indication appears. 2...
Selecting a desired digital effect Set [CAMERA FUNCTIONS] >> [DIGITAL EFFECT] >> [EFFECT1] or [EFFECT2] >> a desired digital effect. Cancelling the digital effect Set [CAMERA FUNCTIONS] >> [DIGITAL EFFECT] >> [EFFECT1] or [EFFECT2] >> [OFF]. ≥For other notes, see page 61. 2, 3, 4 MIX MIX MIX 1 AUTO MANUAL PUSH... scene gradually changes to the moving image of a new scene fades in, the still image of the last recorded scene gradually fades out. 1 Set [DIGITAL EFFECT] >> [EFFECT1] >> [WIPE] or [MIX] after pressing the [MENU] Button. ≥The [WIPE] or [MIX] Indication appears. 2...

PVDV852 User Guide
Page 28
... [MULTI] Button after 9 pictures are longer at which the 9 still pictures are taken are displayed. After setting [CAMERA FUNCTIONS] >> [DIGITAL EFFECT] >> [EFFECT1] >> [MULTI]... 1 Set [CAMERA FUNCTIONS] >> [MULTI-PICTURES] >> [SCAN MODE] >> [STROBE] or [MANUAL]. To Display the Multi-Pictures again...34 28 ª Multi-Picture Mode Strobe Multi-Picture Mode 1: You can manually capture and record 9 small still pictures. After setting [CAMERA FUNCTIONS] >> [DIGITAL EFFECT] >> [EFFECT1] >> [P-IN-P]... 1 Select [P-IN-P] on the [MULTI-PICTURES] Sub-Menu to 9 small pictures. 2 ...
... [MULTI] Button after 9 pictures are longer at which the 9 still pictures are taken are displayed. After setting [CAMERA FUNCTIONS] >> [DIGITAL EFFECT] >> [EFFECT1] >> [MULTI]... 1 Set [CAMERA FUNCTIONS] >> [MULTI-PICTURES] >> [SCAN MODE] >> [STROBE] or [MANUAL]. To Display the Multi-Pictures again...34 28 ª Multi-Picture Mode Strobe Multi-Picture Mode 1: You can manually capture and record 9 small still pictures. After setting [CAMERA FUNCTIONS] >> [DIGITAL EFFECT] >> [EFFECT1] >> [P-IN-P]... 1 Select [P-IN-P] on the [MULTI-PICTURES] Sub-Menu to 9 small pictures. 2 ...

PVDV852 User Guide
Page 29
.... The [VOLUME] Indication goes off 2 or 3 seconds after recording. 1 Slide the [OFF/ON/MODE] Switch and set the [OFF/ON/MODE] Switch to [OFF].) 29 1 CAMERA VCR CARD P.B. 1 MODE ON OFF POWER 2 3 SEARCH 2 PUSH 4 W.B./SHUTTER/IRIS/ VOL/JOG 3 A 2 1 1 SEARCH PUSH 2 W.B./SHUTTER/IRIS/ VOL/JOG B C D ! R ! To adjust the volume with copyright protection...
.... The [VOLUME] Indication goes off 2 or 3 seconds after recording. 1 Slide the [OFF/ON/MODE] Switch and set the [OFF/ON/MODE] Switch to [OFF].) 29 1 CAMERA VCR CARD P.B. 1 MODE ON OFF POWER 2 3 SEARCH 2 PUSH 4 W.B./SHUTTER/IRIS/ VOL/JOG 3 A 2 1 1 SEARCH PUSH 2 W.B./SHUTTER/IRIS/ VOL/JOG B C D ! R ! To adjust the volume with copyright protection...
PVDV852 User Guide
Page 31
... Search 1 Set [VCR FUNCTIONS] >> [PLAYBACK FUNCTIONS] >> [INDEX] >> [PHOTO]. 2 Press the [9] Button 1 or the [:] Button 2 on the [CAMERA FUNCTIONS] Main-Menu is set to 9 scene numbers can be searched. After reaching the desired scene, playback starts automatically. ≥Up to [DAY], an index...is recorded when recording is not recorded. Scene Index Signal Scene Index Signals are taken in the following. SEARCH MENU P.B. ZOOM OFF/ON SET P.B.DIGITAL ITEM 1 1 INDEX 2 S 1 Index Search Functions To facilitate searching of each. (To cancel, press the [1] Button 3 or the [&#...
... Search 1 Set [VCR FUNCTIONS] >> [PLAYBACK FUNCTIONS] >> [INDEX] >> [PHOTO]. 2 Press the [9] Button 1 or the [:] Button 2 on the [CAMERA FUNCTIONS] Main-Menu is set to 9 scene numbers can be searched. After reaching the desired scene, playback starts automatically. ≥Up to [DAY], an index...is recorded when recording is not recorded. Scene Index Signal Scene Index Signals are taken in the following. SEARCH MENU P.B. ZOOM OFF/ON SET P.B.DIGITAL ITEM 1 1 INDEX 2 S 1 Index Search Functions To facilitate searching of each. (To cancel, press the [1] Button 3 or the [&#...
PVDV852 User Guide
Page 34
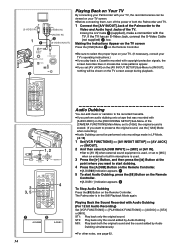
... Audio Dubbing Press the [;] Button on the Remote Controller. SEARCH P.B. ST1: Play back only the original sound. ZOOM STORE MENU OFF/ON SET P.B.DIGITAL ITEM 1, 2 AUTO MANUAL PUSH MENU W.B./SHUTTER/IRIS/ VOL/JOG SEARCH 3 3, 5 START/ DATE/ PHOTO STOP OSD TIME SHOT COUNTER RESET TITLE...VIDEO IN/OUT DV MIC 3 Playing Back on Your TV By connecting your Palmcorder with your TV, the recorded scenes can add music or narration to the recorded Cassette. ≥If you perform audio dubbing onto a tape that was recorded with [AUDIO-REC] on the [RECORDING SETUP] Sub-Menu of the [CAMERA...
... Audio Dubbing Press the [;] Button on the Remote Controller. SEARCH P.B. ST1: Play back only the original sound. ZOOM STORE MENU OFF/ON SET P.B.DIGITAL ITEM 1, 2 AUTO MANUAL PUSH MENU W.B./SHUTTER/IRIS/ VOL/JOG SEARCH 3 3, 5 START/ DATE/ PHOTO STOP OSD TIME SHOT COUNTER RESET TITLE...VIDEO IN/OUT DV MIC 3 Playing Back on Your TV By connecting your Palmcorder with your TV, the recorded scenes can add music or narration to the recorded Cassette. ≥If you perform audio dubbing onto a tape that was recorded with [AUDIO-REC] on the [RECORDING SETUP] Sub-Menu of the [CAMERA...
PVDV852 User Guide
Page 35
... recorded using this Palmcorder is called mega-pixel still-picture recording. Recording from the Palmcorder Lens (Camera Mode) 1 Slide the [TAPE/CARD] Selector to [CARD]. 2 Slide the [STILL/MPEG4/VOICE] Selector to [STILL]. 3 Set [CAMERA FUNCTIONS] >> [CARD SETUP] >> [PICTURE SIZE] >> [1280k960] or [640k480]. 4 Set...recorded on the Memory Card from the Palmcorder lens as well as from scenes that are disabled during megapixel recording. ≥Digital zooming (l 22) ≥Digital Effect functions (l 27, 28) ≥Title In/Creation (l 41) ≥The power is automatically turned off when ...
... recorded using this Palmcorder is called mega-pixel still-picture recording. Recording from the Palmcorder Lens (Camera Mode) 1 Slide the [TAPE/CARD] Selector to [CARD]. 2 Slide the [STILL/MPEG4/VOICE] Selector to [STILL]. 3 Set [CAMERA FUNCTIONS] >> [CARD SETUP] >> [PICTURE SIZE] >> [1280k960] or [640k480]. 4 Set...recorded on the Memory Card from the Palmcorder lens as well as from scenes that are disabled during megapixel recording. ≥Digital zooming (l 22) ≥Digital Effect functions (l 27, 28) ≥Title In/Creation (l 41) ≥The power is automatically turned off when ...

PVDV852 User Guide
Page 36
TAPE CARD 1, 2, ! Recording from other equipment 1 Set [CAMERA FUNCTIONS] or [VCR FUNCTIONS] >> [CARD SETUP] >> [PICTURE QUALITY] >> a desired picture quality. 2 Slide the [TAPE/CARD] Selector to [CARD]. 3 Slide the [STILL/MPEG4/VOICE] Selector to [... quality. 4 Start playback and press the [PHOTO SHOT] Button at the scene you want to Photo Index signals. Maximum number of Card PhotoShot images 1 Set [CAMERA FUNCTIONS] or [VCR FUNCTIONS] >> [CARD SETUP] >> [PICTURE QUALITY] >> a desired picture quality.
TAPE CARD 1, 2, ! Recording from other equipment 1 Set [CAMERA FUNCTIONS] or [VCR FUNCTIONS] >> [CARD SETUP] >> [PICTURE QUALITY] >> a desired picture quality. 2 Slide the [TAPE/CARD] Selector to [CARD]. 3 Slide the [STILL/MPEG4/VOICE] Selector to [... quality. 4 Start playback and press the [PHOTO SHOT] Button at the scene you want to Photo Index signals. Maximum number of Card PhotoShot images 1 Set [CAMERA FUNCTIONS] or [VCR FUNCTIONS] >> [CARD SETUP] >> [PICTURE QUALITY] >> a desired picture quality.


