
PVDF2004 User Guide
Page 7
... ART 250, PART H) SERVICE 1 DO NOT SERVICE PRODUCT YOURSELF If, after carefully following detailed operating instructions, the unit does not operate properly, do not attempt to gently remove dust or debris. Use a clean, dry, chemically untreated cloth to open or remove covers, or make any object through openings in unit. Any substance, such as original parts. OUTDOOR ANTENNA INSTALLATION 1 SAFE ANTENNA AND CABLE CONNECTION An outside...
... ART 250, PART H) SERVICE 1 DO NOT SERVICE PRODUCT YOURSELF If, after carefully following detailed operating instructions, the unit does not operate properly, do not attempt to gently remove dust or debris. Use a clean, dry, chemically untreated cloth to open or remove covers, or make any object through openings in unit. Any substance, such as original parts. OUTDOOR ANTENNA INSTALLATION 1 SAFE ANTENNA AND CABLE CONNECTION An outside...

PVDF2004 User Guide
Page 11
... or deletes a channel. If pressed in DVD mode, the disc tray opens or closes. Displays the last channel you were watching. Mutes the sound instantly. Changes input source. Rewinds tape and searches previous scene. Stops recording or playback. Selects the desired audio mode. Displays Play List. (DVD-RAM) 24 SET Sets selected menu. 25 VOLUME UP/DOWN Adjusts volume. 26 PLAY Begins playback. 27 FF/SLOW+ Fast forwards tape and searches next scene. Displays Direct Navigator. (DVD-RAM). In Playback mode, skips over 1 to next menu screen. Resets to "0:00:00...
... or deletes a channel. If pressed in DVD mode, the disc tray opens or closes. Displays the last channel you were watching. Mutes the sound instantly. Changes input source. Rewinds tape and searches previous scene. Stops recording or playback. Selects the desired audio mode. Displays Play List. (DVD-RAM) 24 SET Sets selected menu. 25 VOLUME UP/DOWN Adjusts volume. 26 PLAY Begins playback. 27 FF/SLOW+ Fast forwards tape and searches next scene. Displays Direct Navigator. (DVD-RAM). In Playback mode, skips over 1 to next menu screen. Resets to "0:00:00...

PVDF2004 User Guide
Page 12
... Records a program. 20 Remote Sensor Receives infrared signal from other component. (LINE 2) 3 Disc Tray Place compatible discs here. 4 Cassette Compartment 5 Phones Jack 6 Video Input Connector 2 7 POWER 8 STOP STILL 8' (PV-DF2004 only) 9 PLAY 10 SKIP ◄◄ 11 SKIP►► Insert VHS tapes here. Connect an ear phone or headphones. FAST Fast forwards tape and searches 18 FORWARD/ next scene. Increases slow SEARCH motion speed in Still mode. Begins playback. Goes to next menu screen...
... Records a program. 20 Remote Sensor Receives infrared signal from other component. (LINE 2) 3 Disc Tray Place compatible discs here. 4 Cassette Compartment 5 Phones Jack 6 Video Input Connector 2 7 POWER 8 STOP STILL 8' (PV-DF2004 only) 9 PLAY 10 SKIP ◄◄ 11 SKIP►► Insert VHS tapes here. Connect an ear phone or headphones. FAST Fast forwards tape and searches 18 FORWARD/ next scene. Increases slow SEARCH motion speed in Still mode. Begins playback. Goes to next menu screen...

PVDF2004 User Guide
Page 16
Digital connection Connect an amplifier with built in Dolby Digital or DTS decoders. OPTICAL Amplifier with Dolby Digital or DTS decoders to enjoy surround sound. There are two types of 96 kHz. Connecting the Audio Output Terminal Enjoy the powerful movie theater and hall-like sound available with sampling frequencies of connection, digital and analog. Firmly connect the cable to enjoy high-quality stereo sound with multiple channel audio found on DVDs by connecting an...
Digital connection Connect an amplifier with built in Dolby Digital or DTS decoders. OPTICAL Amplifier with Dolby Digital or DTS decoders to enjoy surround sound. There are two types of 96 kHz. Connecting the Audio Output Terminal Enjoy the powerful movie theater and hall-like sound available with sampling frequencies of connection, digital and analog. Firmly connect the cable to enjoy high-quality stereo sound with multiple channel audio found on DVDs by connecting an...

PVDF2004 User Guide
Page 17
.... Otherwise, any equipment and arrange it may not work properly with the Dolby Surround mark. Supporting 5.1-channel surround sound, as well as stereo (2-channel) sound, this unit, as well as other U.S. For information on audio output from the optical digital audio output connector Disc DVD-V Sound recording format Dolby Digital Linear PCM (48/96 kHz 16/20/24 bit) Optical digital audio output from connector Dolby Digital bitstream (1-5.1 ch) or PCM (48 kHz sampling/16 bit only)*1 Linear...
.... Otherwise, any equipment and arrange it may not work properly with the Dolby Surround mark. Supporting 5.1-channel surround sound, as well as stereo (2-channel) sound, this unit, as well as other U.S. For information on audio output from the optical digital audio output connector Disc DVD-V Sound recording format Dolby Digital Linear PCM (48/96 kHz 16/20/24 bit) Optical digital audio output from connector Dolby Digital bitstream (1-5.1 ch) or PCM (48 kHz sampling/16 bit only)*1 Linear...
PVDF2004 User Guide
Page 18
... display SET CLOCK Menu screen. Plug the unit power cord into an AC wall outlet. Initial Setup -Ready to the Public Broadcasting Service (PBS) channel in Terminal, then try to make all cable or antenna connections before powering on. AUTO CLOCK SET IS INCOMPLETE PLEASE SET CLOCK BY PRESSING ACTION KEY a. If you use a DSS receiver, it to Play- Press ▲▼ to manually set . Check connection of Antenna/Cable to the RF in your time zone. SET CLOCK...
... display SET CLOCK Menu screen. Plug the unit power cord into an AC wall outlet. Initial Setup -Ready to the Public Broadcasting Service (PBS) channel in Terminal, then try to make all cable or antenna connections before powering on. AUTO CLOCK SET IS INCOMPLETE PLEASE SET CLOCK BY PRESSING ACTION KEY a. If you use a DSS receiver, it to Play- Press ▲▼ to manually set . Check connection of Antenna/Cable to the RF in your time zone. SET CLOCK...
PVDF2004 User Guide
Page 25
... button on the remote or unit is selected. SELECT: END :PROG SET:SET • Make sure a tape is inserted if Playback mode is ON-TIMER mode selection order selected. • Make sure a disc is inserted if Disc Lowest channel CH01 Disc (DVD/CD) mode is pressed within 60 minutes after unit turns itself back off . 1 Press PROG to display SET PROGRAM screen. 2 Press ▲▼ to select "SLEEP TIMER." 3 Press SET repeatedly to clear the time in one of 3 modes (TV, VCR Playback...
... button on the remote or unit is selected. SELECT: END :PROG SET:SET • Make sure a tape is inserted if Playback mode is ON-TIMER mode selection order selected. • Make sure a disc is inserted if Disc Lowest channel CH01 Disc (DVD/CD) mode is pressed within 60 minutes after unit turns itself back off . 1 Press PROG to display SET PROGRAM screen. 2 Press ▲▼ to select "SLEEP TIMER." 3 Press SET repeatedly to clear the time in one of 3 modes (TV, VCR Playback...

PVDF2004 User Guide
Page 28
... Audio/Video Output Connector. • When AUDIO MENU mode is adjusted for a movie-like feel. AUTO Volume level High CD Standard TV TV Volume level High CD Standard TV TV Low Low AUDIO MENU : NORMAL AUDIO MENU : AUTO MOVIE Sound suited to movies. 4 Press ACTION three times to select desired mode. SET UP VIDEO/AUDIO VIDEO MENU :NORMAL VIDEO ADJUST AUDIO MENU :MUSIC AUDIO ADJUST SELECT: SET:SET END :ACTION NORMAL MOVIE NIGHT Factory setting. Audio Menu 1 Do steps 1 - 5 at :http://www.panasonic.com/contactinfo SET UP TV CAPTION INPUT SELECT :TUNER SET...
... Audio/Video Output Connector. • When AUDIO MENU mode is adjusted for a movie-like feel. AUTO Volume level High CD Standard TV TV Volume level High CD Standard TV TV Low Low AUDIO MENU : NORMAL AUDIO MENU : AUTO MOVIE Sound suited to movies. 4 Press ACTION three times to select desired mode. SET UP VIDEO/AUDIO VIDEO MENU :NORMAL VIDEO ADJUST AUDIO MENU :MUSIC AUDIO ADJUST SELECT: SET:SET END :ACTION NORMAL MOVIE NIGHT Factory setting. Audio Menu 1 Do steps 1 - 5 at :http://www.panasonic.com/contactinfo SET UP TV CAPTION INPUT SELECT :TUNER SET...

PVDF2004 User Guide
Page 43
...: V-Chip Control is activated. TV / VCR Operation 43 LOCK US MOVIES :OFF CHANGE SETTINGS US TV PROGRAMS :OFF CHANGE SETTINGS NEXT PAGE SELECT: SET:SET END :ACTION 3 Press ▲▼ to select "CANADIAN FRENCH." 4 Press SET to display screen. LOCK CANADIAN ENGLISH :OFF CHANGE SETTINGS CANADIAN FRENCH :OFF CHANGE SETTINGS PREVIOUS PAGE SELECT: SET:SET END :ACTION 7 Press ▲▼ to select "VIEW E PROGRAMS?." 8 Press SET to display screen. VIEW E PROGRAMS? : YES G UNLOCKED 8 ANS+ 13 ANS+ 16 ANS+ 18 ANS+ GENERAL AUDIENCE SELECT: SET:SET END :ACTION...
...: V-Chip Control is activated. TV / VCR Operation 43 LOCK US MOVIES :OFF CHANGE SETTINGS US TV PROGRAMS :OFF CHANGE SETTINGS NEXT PAGE SELECT: SET:SET END :ACTION 3 Press ▲▼ to select "CANADIAN FRENCH." 4 Press SET to display screen. LOCK CANADIAN ENGLISH :OFF CHANGE SETTINGS CANADIAN FRENCH :OFF CHANGE SETTINGS PREVIOUS PAGE SELECT: SET:SET END :ACTION 7 Press ▲▼ to select "VIEW E PROGRAMS?." 8 Press SET to display screen. VIEW E PROGRAMS? : YES G UNLOCKED 8 ANS+ 13 ANS+ 16 ANS+ 18 ANS+ GENERAL AUDIENCE SELECT: SET:SET END :ACTION...

PVDF2004 User Guide
Page 44
... SELECT: END :ACTION SET:SET LOCK CANADIAN ENGLISH :OFF CHANGE SETTINGS CANADIAN FRENCH :OFF CHANGE SETTINGS PREVIOUS PAGE SELECT: SET:SET END :ACTION 44 For assistance, please call : 1-800-211-PANA(7262) or, contact us via the web at:http://www.panasonic.com/contactinfo ENTER :0-9 CH 08 PROGRAM RATING EXCEEDED RATING:13ANS+ ACCESS CODE ---- SELECT NUMBER keys SET To View a Blocked Program/Movie ■ Temporarily Deactivate V-Chip Control Press NUMBER keys to "OFF" using...
... SELECT: END :ACTION SET:SET LOCK CANADIAN ENGLISH :OFF CHANGE SETTINGS CANADIAN FRENCH :OFF CHANGE SETTINGS PREVIOUS PAGE SELECT: SET:SET END :ACTION 44 For assistance, please call : 1-800-211-PANA(7262) or, contact us via the web at:http://www.panasonic.com/contactinfo ENTER :0-9 CH 08 PROGRAM RATING EXCEEDED RATING:13ANS+ ACCESS CODE ---- SELECT NUMBER keys SET To View a Blocked Program/Movie ■ Temporarily Deactivate V-Chip Control Press NUMBER keys to "OFF" using...
PVDF2004 User Guide
Page 51
Press DISPLAY in Play or Stop mode to display "On-Screen Display." • Each press of DISPLAY changes the on some discs, may result in poor picture quality, or may not operate at all. 51 Disc Operation Selected unit information PLAY REPEAT:CHAPTER PLAY REPEAT:DISC RANDOM PLAY SELECT: SET :SET PLAY REPEAT:PROGRAM SET :SET END :DISPLAY SELECT: SET :SET END:DISPLAY Normal Screen ZOOM 2 ZOOM 2 ZOOM 2 ZOOM 2 ZOOM 2 Notes • The subtitle cannot be enlarged nor can its position be changed. • During picture zoom, "ZOOM1" or...
Press DISPLAY in Play or Stop mode to display "On-Screen Display." • Each press of DISPLAY changes the on some discs, may result in poor picture quality, or may not operate at all. 51 Disc Operation Selected unit information PLAY REPEAT:CHAPTER PLAY REPEAT:DISC RANDOM PLAY SELECT: SET :SET PLAY REPEAT:PROGRAM SET :SET END :DISPLAY SELECT: SET :SET END:DISPLAY Normal Screen ZOOM 2 ZOOM 2 ZOOM 2 ZOOM 2 ZOOM 2 Notes • The subtitle cannot be enlarged nor can its position be changed. • During picture zoom, "ZOOM1" or...
PVDF2004 User Guide
Page 52
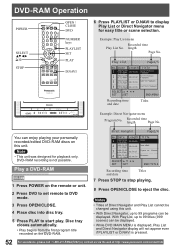
... via the web at:http://www.panasonic.com/contactinfo Notes • Titles of Direct Navigator and Play List cannot be changed using this unit. DVD-RAM Operation POWER SELECT 10 STOP OPEN / CLOSE DVD NUMBER keys PLAYLIST SET PLAY D.NAVI 6 Press PLAYLIST or D.NAVI to 99 programs can be displayed. Play List Page1/5 No. Disc tray closes automatically. • Play begins from the first program title recorded on this unit. • With Direct Navigator, up to 99 titles...
... via the web at:http://www.panasonic.com/contactinfo Notes • Titles of Direct Navigator and Play List cannot be changed using this unit. DVD-RAM Operation POWER SELECT 10 STOP OPEN / CLOSE DVD NUMBER keys PLAYLIST SET PLAY D.NAVI 6 Press PLAYLIST or D.NAVI to 99 programs can be displayed. Play List Page1/5 No. Disc tray closes automatically. • Play begins from the first program title recorded on this unit. • With Direct Navigator, up to 99 titles...

PVDF2004 User Guide
Page 58
... tracks can program specific tracks and order of programs in Stop mode to display MAIN MENU. 2 Press to select "DVD." 3 Press SET to select another track. • The selected track is removed.) 58 For assistance, please call : 1-800-211-PANA(7262) or, contact us via the web at:http://www.panasonic.com/contactinfo Special Disc Operation ACTION SELECT NUMBER keys CLEAR SET 6 Press ▲▼ to select "PROGRAM PLAY." 7 Press SET to display PLAY MODE screen. PROGRAM PLAY DISC PROGRAM 1 6 11...
... tracks can program specific tracks and order of programs in Stop mode to display MAIN MENU. 2 Press to select "DVD." 3 Press SET to select another track. • The selected track is removed.) 58 For assistance, please call : 1-800-211-PANA(7262) or, contact us via the web at:http://www.panasonic.com/contactinfo Special Disc Operation ACTION SELECT NUMBER keys CLEAR SET 6 Press ▲▼ to select "PROGRAM PLAY." 7 Press SET to display PLAY MODE screen. PROGRAM PLAY DISC PROGRAM 1 6 11...

PVDF2004 User Guide
Page 59
...DVD MAIN MENU DISC LANGUAGES AUDIO OUTPUT STILL MODE :AUTO TV MODE :4:3 Pan&Scan PLAY MODE SELECT SET END : :SET :ACTION 6 Press ▲▼ to select "RANDOM PLAY." 7 Press SET to begin random play , then press CLEAR. PLAY MODE PROGRAM PLAY RANDOM PLAY SELECT SET END : :SET :ACTION To cancel, press STOP during play . Cursor moves to "OFF." (Unit Information Screen) PLAY REPEAT:OFF PROGRAM PLAY SET :SET END:DISPLAY 5 Press ▲▼ to select "DISC." (Unit Information Screen) PLAY REPEAT:DISC PROGRAM PLAY SELECT: SET :SET END:DISPLAY 6 Press SET to display PLAY MODE...
...DVD MAIN MENU DISC LANGUAGES AUDIO OUTPUT STILL MODE :AUTO TV MODE :4:3 Pan&Scan PLAY MODE SELECT SET END : :SET :ACTION 6 Press ▲▼ to select "RANDOM PLAY." 7 Press SET to begin random play , then press CLEAR. PLAY MODE PROGRAM PLAY RANDOM PLAY SELECT SET END : :SET :ACTION To cancel, press STOP during play . Cursor moves to "OFF." (Unit Information Screen) PLAY REPEAT:OFF PROGRAM PLAY SET :SET END:DISPLAY 5 Press ▲▼ to select "DISC." (Unit Information Screen) PLAY REPEAT:DISC PROGRAM PLAY SELECT: SET :SET END:DISPLAY 6 Press SET to display PLAY MODE...
PVDF2004 User Guide
Page 62
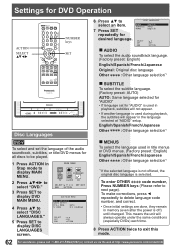
...DVD LOCK LANGUAGE TV CLOCK CH SELECT: SET:SET END :ACTION DVD MAIN MENU DISC LANGUAGES AUDIO OUTPUT STILL MODE :AUTO TV MODE :4:3 Pan&Scan SELECT SET END : :SET :ACTION MENUS To select the language used in Stop mode to display MAIN MENU. 2 Press to select "DVD." 3 Press SET to display DVD MAIN MENU. 4 Press ▲▼ to select "DISC LANGUAGES." 5 Press SET to DISC LANGUAGES select an item. 7 Press SET AUDIO :English SUBTITLE :AUTO MENUS :English repeatedly for all discs to be played. 1 Press ACTION in title menus or DVD menus. (Factory preset: English) English...
...DVD LOCK LANGUAGE TV CLOCK CH SELECT: SET:SET END :ACTION DVD MAIN MENU DISC LANGUAGES AUDIO OUTPUT STILL MODE :AUTO TV MODE :4:3 Pan&Scan SELECT SET END : :SET :ACTION MENUS To select the language used in Stop mode to display MAIN MENU. 2 Press to select "DVD." 3 Press SET to display DVD MAIN MENU. 4 Press ▲▼ to select "DISC LANGUAGES." 5 Press SET to DISC LANGUAGES select an item. 7 Press SET AUDIO :English SUBTITLE :AUTO MENUS :English repeatedly for all discs to be played. 1 Press ACTION in title menus or DVD menus. (Factory preset: English) English...

PVDF2004 User Guide
Page 65
... times to select "STILL MODE." 5 Press SET repeatedly for late-night listening. [Dolby Digital DVDs only]. This setting will be connected Recommended setting LPCM (DVD) Dolby Digital dts Selecting STILL MODE DVD-V Set to reduce jitter in a displayed still picture or a motion picture. 1 Press ACTION in above table. 8 Press ACTION to redisplay DVD MAIN MENU and go to step 4 to select "PCM." Type of noise as shown in Stop mode to display MAIN MENU. 2 Press to select "DVD." 3 Press SET to exit this mode...
... times to select "STILL MODE." 5 Press SET repeatedly for late-night listening. [Dolby Digital DVDs only]. This setting will be connected Recommended setting LPCM (DVD) Dolby Digital dts Selecting STILL MODE DVD-V Set to reduce jitter in a displayed still picture or a motion picture. 1 Press ACTION in above table. 8 Press ACTION to redisplay DVD MAIN MENU and go to step 4 to select "PCM." Type of noise as shown in Stop mode to display MAIN MENU. 2 Press to select "DVD." 3 Press SET to exit this mode...
PVDF2004 User Guide
Page 68
... sound... Adjust VOLUME control. 22 Poor TV reception... Install a directional antenna. 14 TV programs cannot be selected... Make sure DSS/CABLE box (if used) is left on the unit. Monitor Make sure your antenna system (TV or CABLE) is noisy or contains streaks... Adjust BRIGHTNESS, SHARPNESS, and PICTURE controls in the SET UP Video Adjustment. 28-29 Ghost (multiple) images... VCR cannot be performed... ACTION, PLAY, SELECT, SET POWER, etc. Power PROBLEM No power... No playback picture, or the playback picture is correctly set...
... sound... Adjust VOLUME control. 22 Poor TV reception... Install a directional antenna. 14 TV programs cannot be selected... Make sure DSS/CABLE box (if used) is left on the unit. Monitor Make sure your antenna system (TV or CABLE) is noisy or contains streaks... Adjust BRIGHTNESS, SHARPNESS, and PICTURE controls in the SET UP Video Adjustment. 28-29 Ghost (multiple) images... VCR cannot be performed... ACTION, PLAY, SELECT, SET POWER, etc. Power PROBLEM No power... No playback picture, or the playback picture is correctly set...

PVDF2004 User Guide
Page 80
.... Time Number The elapsed play a disc encoded with a regional code, the DVD player must be heard above the noise of the equipment and the highest level of multi-channel audio data (e.g., 5.1 channel) before distortion occurs. Use to quickly find scenes. (May not work with some discs.) Title Number For DVD discs with only 2 speakers. Track Number Numbers assigned to tracks on CDs to allow entire movies to digital. Feature Virtual surround sound playback is...
.... Time Number The elapsed play a disc encoded with a regional code, the DVD player must be heard above the noise of the equipment and the highest level of multi-channel audio data (e.g., 5.1 channel) before distortion occurs. Use to quickly find scenes. (May not work with some discs.) Title Number For DVD discs with only 2 speakers. Track Number Numbers assigned to tracks on CDs to allow entire movies to digital. Feature Virtual surround sound playback is...
PVDF2004 User Guide
Page 82
... 12 Change Language Setting 21 Changing your secret code 39 Channel & Function Display 45 CHANNEL UP/DOWN button 11 Closed Caption Mode Feature 26 Commercial Skip 33 Connecting the "1, 2" AV Input Terminals . 15 Connecting the Audio Output Terminal ..... 16 Connecting the RF in Terminal 14 Copy Your Tapes (Dubbing 38 D Digital Auto Tracking 37 Direct Navigator 53 Discs that can be played 9 Disc Handling 10 Disc Languages 62 Disc Operation -Using Information Screen-.....54 Disc Tray 12 DISPLAY button 11 DST (Daylight Saving Time 8 DVD button 11 DVD Volume Adjust 60 E Eject...
... 12 Change Language Setting 21 Changing your secret code 39 Channel & Function Display 45 CHANNEL UP/DOWN button 11 Closed Caption Mode Feature 26 Commercial Skip 33 Connecting the "1, 2" AV Input Terminals . 15 Connecting the Audio Output Terminal ..... 16 Connecting the RF in Terminal 14 Copy Your Tapes (Dubbing 38 D Digital Auto Tracking 37 Direct Navigator 53 Discs that can be played 9 Disc Handling 10 Disc Languages 62 Disc Operation -Using Information Screen-.....54 Disc Tray 12 DISPLAY button 11 DST (Daylight Saving Time 8 DVD button 11 DVD Volume Adjust 60 E Eject...

PVDF2004 User Guide
Page 83
... Surround Sound 61 VCR Lock 37 VHF/UHF Antenna Input Terminal 13 Video Adjustment 29 Video Input Connector 1 13 Video Input Connector 2 12 Video Menu 28 Vocal selection for Karaoke discs 49 VOLUME UP/DOWN button 11 W Warning and Instruction Displays 67 Weak Signal Display Feature 23 Z Zero Search 33 ZOOM/COUNTER RESET button 11 83 Information P Pause a Recording 31 Phones Jack 12 Picture Zoom 51 Playback Auto Eject 36 Playback a Tape 30 Play a DVD-RAM 52 PLAY button 11 Play Disc 46 Play List 53 POWER button 11...
... Surround Sound 61 VCR Lock 37 VHF/UHF Antenna Input Terminal 13 Video Adjustment 29 Video Input Connector 1 13 Video Input Connector 2 12 Video Menu 28 Vocal selection for Karaoke discs 49 VOLUME UP/DOWN button 11 W Warning and Instruction Displays 67 Weak Signal Display Feature 23 Z Zero Search 33 ZOOM/COUNTER RESET button 11 83 Information P Pause a Recording 31 Phones Jack 12 Picture Zoom 51 Playback Auto Eject 36 Playback a Tape 30 Play a DVD-RAM 52 PLAY button 11 Play Disc 46 Play List 53 POWER button 11...


