

Operating Instructions
Page 1
TQBJ0222 Read these instructions completely before operating this unit. Operating Instructions DLP® Based Projector Commercial Use PT-D4000U Model No.
TQBJ0222 Read these instructions completely before operating this unit. Operating Instructions DLP® Based Projector Commercial Use PT-D4000U Model No.
Operating Instructions
Page 2
...to the presence of electric shock to the presence of uninsulated "dangerous voltage" within an equilateral triangle is required. Model number: PT-D4000U Serial number: IMPORTANT SAFETY NOTICE WARNING: TO REDUCE THE RISK OF FIRE OR ELECTRIC SHOCK, DO NOT EXPOSE THIS PRODUCT TO... the product. WARNING RISK OF ELECTRIC SHOCK. RISQUE DE CHOC ÉLECTRIQUE. Do not defeat the purpose of your Panasonic DLP® based projector. Dear Panasonic Customer: This instruction booklet provides all the necessary operating information that may be found on the power plug. CAUTION: This...
...to the presence of electric shock to the presence of uninsulated "dangerous voltage" within an equilateral triangle is required. Model number: PT-D4000U Serial number: IMPORTANT SAFETY NOTICE WARNING: TO REDUCE THE RISK OF FIRE OR ELECTRIC SHOCK, DO NOT EXPOSE THIS PRODUCT TO... the product. WARNING RISK OF ELECTRIC SHOCK. RISQUE DE CHOC ÉLECTRIQUE. Do not defeat the purpose of your Panasonic DLP® based projector. Dear Panasonic Customer: This instruction booklet provides all the necessary operating information that may be found on the power plug. CAUTION: This...
Operating Instructions
Page 4
... 2 Precautions with regard to safety 5 Accessories 7 Precautions on handling 8 Name and function of parts 9 Remote control 9 Front and side of the projector 11 Rear view of the main unit/Controls on rear panel ..........12 Side-mounted connection terminals 13 Using the remote control unit 14 Loading dry ...30 KEYSTONE 30 How to use ADVANCED MENU 30 DIGITAL CINEMA REALITY 30 BLANKING 30 INPUT RESOLUTION 31 CLAMP POSITION 31 RASTER POSITION 31 XGA MODE 31 SXGA MODE 31 Changing the display language 31 OPTION1 settings 32 COLOR CORRECTION 32 CONTRAST MODE 32 4 AUTO SIGNAL 32 ...
... 2 Precautions with regard to safety 5 Accessories 7 Precautions on handling 8 Name and function of parts 9 Remote control 9 Front and side of the projector 11 Rear view of the main unit/Controls on rear panel ..........12 Side-mounted connection terminals 13 Using the remote control unit 14 Loading dry ...30 KEYSTONE 30 How to use ADVANCED MENU 30 DIGITAL CINEMA REALITY 30 BLANKING 30 INPUT RESOLUTION 31 CLAMP POSITION 31 RASTER POSITION 31 XGA MODE 31 SXGA MODE 31 Changing the display language 31 OPTION1 settings 32 COLOR CORRECTION 32 CONTRAST MODE 32 4 AUTO SIGNAL 32 ...

Operating Instructions
Page 5
...an Authorized Service Center for example, by a qualified technician. • If installation is not carried out correctly, there is emitted from the projector. In addition, turn off the power and disconnect the power cord plug when you are coming loose from the wall. Insert the power cord...8226; If not using too many adapters), overheating may occur and fire may result in electric shocks. 5 Never attempt to modify or disassemble the projector. • High voltages can result in fire or electric shocks. • Contact an Authorized Service Center for repairs. Do not do anything ...
...an Authorized Service Center for example, by a qualified technician. • If installation is not carried out correctly, there is emitted from the projector. In addition, turn off the power and disconnect the power cord plug when you are coming loose from the wall. Insert the power cord...8226; If not using too many adapters), overheating may occur and fire may result in electric shocks. 5 Never attempt to modify or disassemble the projector. • High voltages can result in fire or electric shocks. • Contact an Authorized Service Center for repairs. Do not do anything ...
Operating Instructions
Page 6
... and -) are correct when inserting the batteries. - The batteries have a protective outer covering. If the battery fluid leaks, do not touch the projector or the cable. • Electric shocks can result if this may cause the batteries to leak, overheat or explode. Always disconnect all cables before handling... cause the falling down of batteries. - Rinse with clean water and seek medical advice immediately. • Battery fluid on your weight on this projector. • Failure to observe this may result in place of the unit. When replacing the lamp, allow at once. • Do not ...
... and -) are correct when inserting the batteries. - The batteries have a protective outer covering. If the battery fluid leaks, do not touch the projector or the cable. • Electric shocks can result if this may cause the batteries to leak, overheat or explode. Always disconnect all cables before handling... cause the falling down of batteries. - Rinse with clean water and seek medical advice immediately. • Battery fluid on your weight on this projector. • Failure to observe this may result in place of the unit. When replacing the lamp, allow at once. • Do not ...
Operating Instructions
Page 7
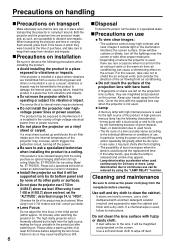
...direct sunlight or near stoves. Ask your face close to the broken pieces. • Failure to clean the inside of the projector. Ask an Authorized Service Center to clean inside the projector at least once a year. • If dust is a good idea to observe this is not done. If not ... • Take particular care in fire or corruption of mercury as fluorescent lamps, and the broken pieces may cause injury. Please discuss with your projector. Do not use the old lamp unit. • The lamp section may cause the outer casing or internal components to absorb the gas which was...
...direct sunlight or near stoves. Ask your face close to the broken pieces. • Failure to clean the inside of the projector. Ask an Authorized Service Center to clean inside the projector at least once a year. • If dust is a good idea to observe this is not done. If not ... • Take particular care in fire or corruption of mercury as fluorescent lamps, and the broken pieces may cause injury. Please discuss with your projector. Do not use the old lamp unit. • The lamp section may cause the outer casing or internal components to absorb the gas which was...
Operating Instructions
Page 8
...cause heating focus drift. 8 Disposal To discard the product, call a specialized technician or contact an Authorized Service Center for installation. If the projector is installed in a place where vibrations are transmitted from a source of driving power and others or mounted in a car or a vessel,... cloth dampened with a kitchen detergent solution (neutral) and squeezed to continuous use can cause a shimmering effect on the screen. Both the projector and the projection lens are precision-made and, as such, are susceptible to a ceiling. Avoid installing the product in the period just ...
...cause heating focus drift. 8 Disposal To discard the product, call a specialized technician or contact an Authorized Service Center for installation. If the projector is installed in a place where vibrations are transmitted from a source of driving power and others or mounted in a car or a vessel,... cloth dampened with a kitchen detergent solution (neutral) and squeezed to continuous use can cause a shimmering effect on the screen. Both the projector and the projection lens are precision-made and, as such, are susceptible to a ceiling. Avoid installing the product in the period just ...

Operating Instructions
Page 9
...displayed. Numeric (0 - 9) buttons (pages 15, 36) These buttons are also used by service personnel for systems where more than one projector is active, a message "AUTO SETUP" appears on the screen. STATUS button (page 25) Press this button while projecting an image automatically... out the image temporarily. AUTO SETUP button (page 25) Pressing this button to send information about the projector's status via E-mail. While the auto setup feature is being used to display projector information. POWER ON ( I ) button (page 21) Turns on -screen indication function. Input selector ...
...displayed. Numeric (0 - 9) buttons (pages 15, 36) These buttons are also used by service personnel for systems where more than one projector is active, a message "AUTO SETUP" appears on the screen. STATUS button (page 25) Press this button while projecting an image automatically... out the image temporarily. AUTO SETUP button (page 25) Pressing this button to send information about the projector's status via E-mail. While the auto setup feature is being used to display projector information. POWER ON ( I ) button (page 21) Turns on -screen indication function. Input selector ...
Operating Instructions
Page 11
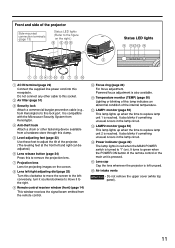
... Lighting or blinking of this clamp. It also blinks if something unusual occurs in the lamp circuit. Lens cap Cap the lens whenever the projector is reached. Remote control receiver window (front) (page 14) This window receives the signal beam emitted from a hardware store through this lamp... indicates an abnormal condition of the projector. (The leveling feet at the front left unused. Anti-theft hook Attach a chain or other cable to the right. LAMP1 monitor (page 50...
... Lighting or blinking of this clamp. It also blinks if something unusual occurs in the lamp circuit. Lens cap Cap the lens whenever the projector is reached. Remote control receiver window (front) (page 14) This window receives the signal beam emitted from a hardware store through this lamp... indicates an abnormal condition of the projector. (The leveling feet at the front left unused. Anti-theft hook Attach a chain or other cable to the right. LAMP1 monitor (page 50...
Operating Instructions
Page 12
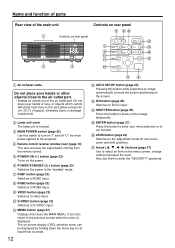
... select an item on rear panel Air exhaust vents Do not place your hands or face, or objects which cannot withstand heat close to the projector. Remote control receiver window (rear) (page 14) This also receives the signal beam coming from the remote control. POWER STANDBY ( ) button (page 23) Switches the...
... select an item on rear panel Air exhaust vents Do not place your hands or face, or objects which cannot withstand heat close to the projector. Remote control receiver window (rear) (page 14) This also receives the signal beam coming from the remote control. POWER STANDBY ( ) button (page 23) Switches the...
Operating Instructions
Page 13
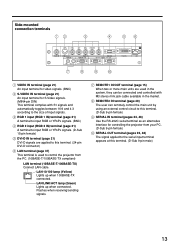
...-D IN LAN VIDEO IN terminal (page 21) An input terminal for video signals. (BNC) S-VIDEO IN terminal (page 21) An input terminal for controlling the projector from the PC. (10BASE-T/100BASE-TX compliant) LAN terminal (10BASE-T/100BASE-TX) Connect LAN cable. RGB 1 input (RGB 1 IN) terminal (page 21) A ...21) A terminal to input RGB or YPBPR signals. (D-Sub 15-pin female) DVI-D IN terminal (page 21) DVI-D signals are used to control the projector from your PC. (D-Sub 9-pin female) SERIAL OUT terminal (pages 23, 48) The signal applied to the serial input terminal appears at this terminal. ...
...-D IN LAN VIDEO IN terminal (page 21) An input terminal for video signals. (BNC) S-VIDEO IN terminal (page 21) An input terminal for controlling the projector from the PC. (10BASE-T/100BASE-TX compliant) LAN terminal (10BASE-T/100BASE-TX) Connect LAN cable. RGB 1 input (RGB 1 IN) terminal (page 21) A ...21) A terminal to input RGB or YPBPR signals. (D-Sub 15-pin female) DVI-D IN terminal (page 21) DVI-D signals are used to control the projector from your PC. (D-Sub 9-pin female) SERIAL OUT terminal (pages 23, 48) The signal applied to the serial input terminal appears at this terminal. ...
Operating Instructions
Page 14
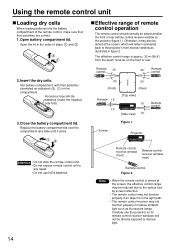
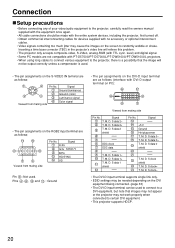
... control, make sure that their polarities orientated as illustrated in the compartment. Close the battery compartment lid. Carefully site the projector so its remote control receiver windows will reflect commands back to intense light. 14 Otherwise, it clicks. Open battery compartment lid... ambient light such as fluorescent lamps. Effective range of remote control operation The remote control should normally be directly exposed to the projector's front receiver window as indicated ( , ) in figure 2. Using the remote control unit Loading dry cells When loading batteries ...
... control, make sure that their polarities orientated as illustrated in the compartment. Close the battery compartment lid. Carefully site the projector so its remote control receiver windows will reflect commands back to intense light. 14 Otherwise, it clicks. Open battery compartment lid... ambient light such as fluorescent lamps. Effective range of remote control operation The remote control should normally be directly exposed to the projector's front receiver window as indicated ( , ) in figure 2. Using the remote control unit Loading dry cells When loading batteries ...

Operating Instructions
Page 15
... to use the ID ALL button of the remote control when using only a single projector. The ID number of the projector is pressed, the projector can be controlled regardless of the ID number of the projector (simultaneous control mode). Attention • Do not press the ID SET button accidentally...jack cable available in the market to simultaneously control the multiple main units with a cable When multiple main units are susceptible to the secondary projector M3 stereo mini jack cable (available in the market) Attention • Use two-core shielded cable of length smaller than 15 m (49...
... to use the ID ALL button of the remote control when using only a single projector. The ID number of the projector is pressed, the projector can be controlled regardless of the ID number of the projector (simultaneous control mode). Attention • Do not press the ID SET button accidentally...jack cable available in the market to simultaneously control the multiple main units with a cable When multiple main units are susceptible to the secondary projector M3 stereo mini jack cable (available in the market) Attention • Use two-core shielded cable of length smaller than 15 m (49...

Operating Instructions
Page 16
...from the MAIN MENU) to choose the appropriate projection scheme. (page 34) FLOOR CEILING FRONT (Default position) ;Installation geometry When planning the projector and screen geometry, refer to bottom edge L Screen 100 (3.9) 200 (7.9) 100 (3.9) 200 (7.9) of projected image. Attention • Do not place or... a clearance of at least 50 cm (19.7") so that the ventilation opening on user's needs or viewing conditions. After the projector is roughly positioned, picture size and vertical picture positioning can be used depending on the rear panel will not be finely adjusted with...
...from the MAIN MENU) to choose the appropriate projection scheme. (page 34) FLOOR CEILING FRONT (Default position) ;Installation geometry When planning the projector and screen geometry, refer to bottom edge L Screen 100 (3.9) 200 (7.9) 100 (3.9) 200 (7.9) of projected image. Attention • Do not place or... a clearance of at least 50 cm (19.7") so that the ventilation opening on user's needs or viewing conditions. After the projector is roughly positioned, picture size and vertical picture positioning can be used depending on the rear panel will not be finely adjusted with...
Operating Instructions
Page 20
...Some PC models are not compatible with PT-D5700U/PT-D5700UL/PT-DW5100U/PT-DW5100UL projectors. • When using long cables to connect various equipment to the projector, there is a possibility that the image will relieve this problem. • The projector only accepts composite-video, S-Video, ... DVI-D input terminal can be output correctly unless a compensator is used to connect to a DVI equipment, but note that images may not appear or the projector may be needed depending on PC): Viewed from mating side Pin No. D. S data 2+ T. Signal +5 V Ground Hot plug sense T. D. S data 1 ...
...Some PC models are not compatible with PT-D5700U/PT-D5700UL/PT-DW5100U/PT-DW5100UL projectors. • When using long cables to connect various equipment to the projector, there is a possibility that the image will relieve this problem. • The projector only accepts composite-video, S-Video, ... DVI-D input terminal can be output correctly unless a compensator is used to connect to a DVI equipment, but note that images may not appear or the projector may be needed depending on PC): Viewed from mating side Pin No. D. S data 2+ T. Signal +5 V Ground Hot plug sense T. D. S data 1 ...

Operating Instructions
Page 21
If this is the case, connect a TBC between the projector and the video deck. • The EDID settings may be needed depending on the equipment connected when DVI-D signals are connected, the image may be ... DVI-D IN LAN Note • For the specifications of connecting with PCs PC with a built-in time base corrector (TBC) or use a TBC between the projector and the video deck. • If nonstandard burst signals are input. (Refer to the SYNC/HD and VD terminals. • The EDID settings may be...
If this is the case, connect a TBC between the projector and the video deck. • The EDID settings may be needed depending on the equipment connected when DVI-D signals are connected, the image may be ... DVI-D IN LAN Note • For the specifications of connecting with PCs PC with a built-in time base corrector (TBC) or use a TBC between the projector and the video deck. • If nonstandard burst signals are input. (Refer to the SYNC/HD and VD terminals. • The EDID settings may be...
Operating Instructions
Page 22
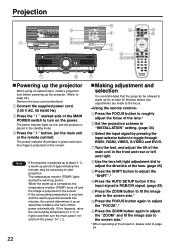
...as an abnormal condition and turns off and the image is projected on the screen. • If the surrounding temperature is recommended that the projector be necessary to start projection. The power indicator lights up period. Use the lens left and right. Connect the supplied power cord. (120 ... signal is projected on " ( | ). Turn the feet, and adjust the tilt of approximately five minutes may be allowed to warm up the projector. (Refer to page 24.) Remove the lens cover beforehand. When the warm-up is completed, the temperature monitor (TEMP) turns off the power ...
...as an abnormal condition and turns off and the image is projected on the screen. • If the surrounding temperature is recommended that the projector be necessary to start projection. The power indicator lights up period. Use the lens left and right. Connect the supplied power cord. (120 ... signal is projected on " ( | ). Turn the feet, and adjust the tilt of approximately five minutes may be allowed to warm up the projector. (Refer to page 24.) Remove the lens cover beforehand. When the warm-up is completed, the temperature monitor (TEMP) turns off the power ...
Operating Instructions
Page 23
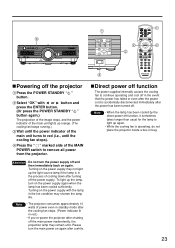
... the power indicator of cooling down after shutting off function, it sometimes takes longer than usual for the lamp to remove all power from the projector. Direct power off . Select "OK" with the lamp in the hot condition may remain unlit. Turning on the power supply with or button and press... lights up the light source lamp if the lamp is in the process of the main unit turns to continue operating and cool off the projector Press the POWER STANDBY " " button. Powering off in the event that the power has failed or even after the power cord is accidentally disconnected ...
... the power indicator of cooling down after shutting off function, it sometimes takes longer than usual for the lamp to remove all power from the projector. Direct power off . Select "OK" with the lamp in the hot condition may remain unlit. Turning on the power supply with or button and press... lights up the light source lamp if the lamp is in the process of the main unit turns to continue operating and cool off the projector Press the POWER STANDBY " " button. Powering off in the event that the power has failed or even after the power cord is accidentally disconnected ...

Operating Instructions
Page 24
... 30 minutes is recommended before using ET-DLE050 lens, the shift adjustment is not possible. • Operations can be adjusted while the projector is used, the lens zoom adjustment menu will still displayed, but no operations can be free from the standard position in the main ... Guide groove Guide Lens signal contact Projection lens Attention • Turn the lens counterclockwise and confirm that the lens does not come off the projector's power. • Do not touch the lens signal contact. Lens release button Note • Before replacing the lens, turn the lens ...
... 30 minutes is recommended before using ET-DLE050 lens, the shift adjustment is not possible. • Operations can be adjusted while the projector is used, the lens zoom adjustment menu will still displayed, but no operations can be free from the standard position in the main ... Guide groove Guide Lens signal contact Projection lens Attention • Turn the lens counterclockwise and confirm that the lens does not come off the projector's power. • Do not touch the lens signal contact. Lens release button Note • Before replacing the lens, turn the lens ...

Operating Instructions
Page 25
...G-SYNC sync signals and some types of PCs, it moves toward the left or right is turned off. Status function This shows the projector status. It can be performed when images with a bright white frame at the outermost periphery containing characters etc. Press the STATUS button ... Avoid supplying images that are input, the image position is in white and black contrast when the system is adjusted automatically. STATUS INPUT PROJECTOR RUNTIME LAMP1 LAMP2 INTAKE-AIR TEMP. The maximum travel distance toward the right. In this case, manually adjust the items of "INPUT ...
...G-SYNC sync signals and some types of PCs, it moves toward the left or right is turned off. Status function This shows the projector status. It can be performed when images with a bright white frame at the outermost periphery containing characters etc. Press the STATUS button ... Avoid supplying images that are input, the image position is in white and black contrast when the system is adjusted automatically. STATUS INPUT PROJECTOR RUNTIME LAMP1 LAMP2 INTAKE-AIR TEMP. The maximum travel distance toward the right. In this case, manually adjust the items of "INPUT ...


