

2.4 Ghz Dig.crdless.ans Sys.
Page 3
... wireless radio waves. Move away from the microwave oven and closer to your base unit. For Best Performance Battery Charge The handset is : Away from electrical appliances such In a HIGH and CENTRAL location as a TV, personal computer or another cordless phone's base unit, noise may...base unit location is powered by a rechargeable NickelMetal Hydride (Ni-MH) battery. cordless phone. Charge the battery for 6 hours before initial use the handset near another with no obstructions such as walls. Move away from the receiver or the speaker. Note: • If you use the...
... wireless radio waves. Move away from the microwave oven and closer to your base unit. For Best Performance Battery Charge The handset is : Away from electrical appliances such In a HIGH and CENTRAL location as a TV, personal computer or another cordless phone's base unit, noise may...base unit location is powered by a rechargeable NickelMetal Hydride (Ni-MH) battery. cordless phone. Charge the battery for 6 hours before initial use the handset near another with no obstructions such as walls. Move away from the receiver or the speaker. Note: • If you use the...

2.4 Ghz Dig.crdless.ans Sys.
Page 4
Contents Preparation Location of Controls 6 Installation 9 Connections 9 Installing the Battery in the Handset 10 Battery Charge 10 Programmable Settings . . . . 12 Programming Guidelines . 12 Function Menu Table . . . . 13 Date and Time 14 Display Language 15 Dialing Mode 15 Line... 20 Greeting Message 20 Caller's Recording Time . . 22 Number of Rings 23 Recording Mode 24 Message Alert 24 Telephone System Making Calls 25 Using the Handset 25 Using the Base Unit . . . . . 28 Answering Calls 29 Caller ID Service 30 Talking Caller ID 31 Using the Caller List 32 Viewing the ...
Contents Preparation Location of Controls 6 Installation 9 Connections 9 Installing the Battery in the Handset 10 Battery Charge 10 Programmable Settings . . . . 12 Programming Guidelines . 12 Function Menu Table . . . . 13 Date and Time 14 Display Language 15 Dialing Mode 15 Line... 20 Greeting Message 20 Caller's Recording Time . . 22 Number of Rings 23 Recording Mode 24 Message Alert 24 Telephone System Making Calls 25 Using the Handset 25 Using the Base Unit . . . . . 28 Answering Calls 29 Caller ID Service 30 Talking Caller ID 31 Using the Caller List 32 Viewing the ...
2.4 Ghz Dig.crdless.ans Sys.
Page 5
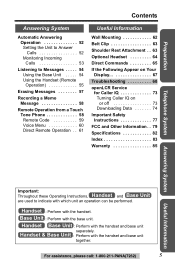
... 52 Monitoring Incoming Calls 53 Listening to Messages . . . . . 54 Using the Base Unit . . . . . 54 Using the Handset (Remote Operation 55 Erasing Messages 57 Recording a Memo Message 58 Remote Operation from a Touch Tone Phone 58 Remote Code 59 Voice Menu 60 Direct...82 Index 83 Warranty 85 Telephone System Answering System Useful Information Important: Throughout these Operating Instructions, Handset and Base Unit are used to indicate with the handset and base unit together. Handset & Base Unit : Perform with which unit an operation can be performed. Base Unit : Perform...
... 52 Monitoring Incoming Calls 53 Listening to Messages . . . . . 54 Using the Base Unit . . . . . 54 Using the Handset (Remote Operation 55 Erasing Messages 57 Recording a Memo Message 58 Remote Operation from a Touch Tone Phone 58 Remote Code 59 Voice Menu 60 Direct...82 Index 83 Warranty 85 Telephone System Answering System Useful Information Important: Throughout these Operating Instructions, Handset and Base Unit are used to indicate with the handset and base unit together. Handset & Base Unit : Perform with which unit an operation can be performed. Base Unit : Perform...
2.4 Ghz Dig.crdless.ans Sys.
Page 7
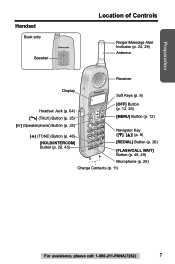
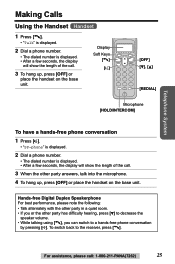
Preparation Handset Back side Speaker Location of Controls Ringer/Message Alert Indicator (p. 24, 29) Antenna Receiver Display Soft Keys (p. 8) Headset Jack (p. 64) [C] (TALK) Button (p. 25) [OFF] Button (p. 12, 25) [MENU] Button (p. 12) [s] (Speakerphone) Button (p. 25) [*] (TONE) Button (p. 48) [HOLD/INTERCOM] Button (p. 26, 43) Navigator Key ([d], [B]) (p. 8) [REDIAL] Button (p. 26) [FLASH/CALL WAIT] Button (p. 48, 49) Microphone (p. 25) Charge Contacts (p. 11) For assistance, please call: 1-800-211-PANA(7262) 7
Preparation Handset Back side Speaker Location of Controls Ringer/Message Alert Indicator (p. 24, 29) Antenna Receiver Display Soft Keys (p. 8) Headset Jack (p. 64) [C] (TALK) Button (p. 25) [OFF] Button (p. 12, 25) [MENU] Button (p. 12) [s] (Speakerphone) Button (p. 25) [*] (TONE) Button (p. 48) [HOLD/INTERCOM] Button (p. 26, 43) Navigator Key ([d], [B]) (p. 8) [REDIAL] Button (p. 26) [FLASH/CALL WAIT] Button (p. 48, 49) Microphone (p. 25) Charge Contacts (p. 11) For assistance, please call: 1-800-211-PANA(7262) 7

2.4 Ghz Dig.crdless.ans Sys.
Page 8
...5 O 1 " " indicates the base unit ringer is free. Off (invisible) The line is off (p. 18). Flashing A call is on hold on the handset or base unit or the Answering System is answering a call is being used to "Greeting only", " " will change depending on the state of use. the...power failure. If it is indicated by what is being received. • " IN USE " displays when a handset is set to select functions displayed directly above each key. Location of Controls Handset soft keys J 5 Talk 00-00-32 K(VE) MuteL Two soft keys are displayed above soft keys Pressing ...
...5 O 1 " " indicates the base unit ringer is free. Off (invisible) The line is off (p. 18). Flashing A call is on hold on the handset or base unit or the Answering System is answering a call is being used to "Greeting only", " " will change depending on the state of use. the...power failure. If it is indicated by what is being received. • " IN USE " displays when a handset is set to select functions displayed directly above each key. Location of Controls Handset soft keys J 5 Talk 00-00-32 K(VE) MuteL Two soft keys are displayed above soft keys Pressing ...

2.4 Ghz Dig.crdless.ans Sys.
Page 10
...lights, and "Charging" is displayed. • When the battery is fully charged, "Charge completed" is indicated by the icons shown in the Handset Insert the battery (1), and press it down until it as indicated by the arrow. Battery strength is displayed. Battery Charge Place the... handset on the handset display. Installation Installing the Battery in the chart to be recharged. 8 Discharged 10 Close the cover. 2 1 To replace the battery: Press the ...
...lights, and "Charging" is displayed. • When the battery is fully charged, "Charge completed" is indicated by the icons shown in the Handset Insert the battery (1), and press it down until it as indicated by the arrow. Battery strength is displayed. Battery Charge Place the... handset on the handset display. Installation Installing the Battery in the chart to be recharged. 8 Discharged 10 Close the cover. 2 1 To replace the battery: Press the ...

2.4 Ghz Dig.crdless.ans Sys.
Page 11
... more often if the unit is subject to recycle this battery. Battery replacement: If you want to keep your Panasonic battery is fully charged, you can actually talk on the handset will maximize the battery life. • If you cleaned the charge contacts and fully charged the battery, but after... to flash, or "Charge for 6h" and "8" are made). Please order a new Panasonic HHR-P104 battery at all times, place the handset on the base unit when the handset is not used. Battery information After your handset in Standby mode. • If the battery is fully charged, you have to place ...
... more often if the unit is subject to recycle this battery. Battery replacement: If you want to keep your Panasonic battery is fully charged, you can actually talk on the handset will maximize the battery life. • If you cleaned the charge contacts and fully charged the battery, but after... to flash, or "Charge for 6h" and "8" are made). Please order a new Panasonic HHR-P104 battery at all times, place the handset on the base unit when the handset is not used. Battery information After your handset in Standby mode. • If the battery is fully charged, you have to place ...
2.4 Ghz Dig.crdless.ans Sys.
Page 12
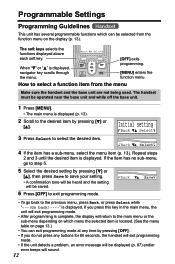
.... • After programming is complete, the display will return to select the desired item. If you do not press any buttons for 60 seconds, the handset will exit programming mode. • If the unit detects a problem, an error message will be displayed (p. 67) and/or error beeps will be selected from... the menu Make sure the handset and the base unit are not being used. Repeat steps 2 and 3 until the desired item is located. (See the menu table on the display (p. 13...
.... • After programming is complete, the display will return to select the desired item. If you do not press any buttons for 60 seconds, the handset will exit programming mode. • If the unit detects a problem, an error message will be displayed (p. 67) and/or error beeps will be selected from... the menu Make sure the handset and the base unit are not being used. Repeat steps 2 and 3 until the desired item is located. (See the menu table on the display (p. 13...

2.4 Ghz Dig.crdless.ans Sys.
Page 13
Preparation Programmable Settings Function Menu Table Handset You can also program menu items directly by pressing ([0] to [9], [*] and [#]) instead of rings (p. 23) Recording time (p. 22) Message alert (p. 24) LCD contrast (p. 19) Remote ...
Preparation Programmable Settings Function Menu Table Handset You can also program menu items directly by pressing ([0] to [9], [*] and [#]) instead of rings (p. 23) Recording time (p. 22) Message alert (p. 24) LCD contrast (p. 19) Remote ...
2.4 Ghz Dig.crdless.ans Sys.
Page 14
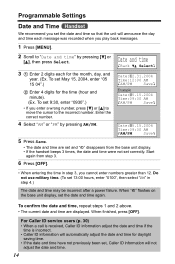
..." in step 3, you enter a wrong number, press [d] or [B] to move the cursor to "Date and time" by pressing AM/PM. Programmable Settings Date and Time Handset We recommend you set the date and time so that the unit will not adjust the date and time. 14 Start again from the base... unit display. • If the handset beeps 3 times, the date and time were not set correctly. To set 9:30, enter "0930".) • If you cannot enter numbers greater than 12. KBack...
..." in step 3, you enter a wrong number, press [d] or [B] to move the cursor to "Date and time" by pressing AM/PM. Programmable Settings Date and Time Handset We recommend you set the date and time so that the unit will not adjust the date and time. 14 Start again from the base... unit display. • If the handset beeps 3 times, the date and time were not set correctly. To set 9:30, enter "0930".) • If you cannot enter numbers greater than 12. KBack...
2.4 Ghz Dig.crdless.ans Sys.
Page 15
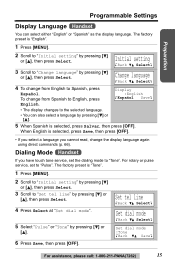
...by pressing [d] or [B]. 6 Press Save, then press [OFF]. KBack dB SelectL Change language 3 Scroll to "Pulse". Preparation Programmable Settings Display Language Handset You can also select a language by pressing [d] or [B], then press Select. Display :English KEspañol SaveL • The display changes to ...mode KBack dB SelectL Set dial mode :Tone KBack dB SaveL For assistance, please call: 1-800-211-PANA(7262) 15 Dialing Mode Handset If you cannot read, change the display language again using direct commands (p. 66). When English is "English". 1 Press [MENU]. The...
...by pressing [d] or [B]. 6 Press Save, then press [OFF]. KBack dB SelectL Change language 3 Scroll to "Pulse". Preparation Programmable Settings Display Language Handset You can also select a language by pressing [d] or [B], then press Select. Display :English KEspañol SaveL • The display changes to ...mode KBack dB SelectL Set dial mode :Tone KBack dB SaveL For assistance, please call: 1-800-211-PANA(7262) 15 Dialing Mode Handset If you cannot read, change the display language again using direct commands (p. 66). When English is "English". 1 Press [MENU]. The...
2.4 Ghz Dig.crdless.ans Sys.
Page 16
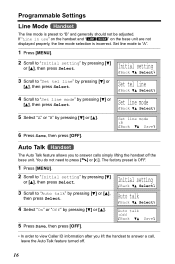
... [d] or [B], then press Select. 4 Select "On" or "Off" by pressing [d] or [B]. 6 Press Save, then press [OFF]. Programmable Settings Line Mode Handset The line mode is incorrect. You do not need to "B" and generally should not be adjusted. The factory preset is OFF. 1 Press [MENU]. 2 Scroll to... "Initial setting" by pressing [d] or [B], then press Select. 3 Scroll to answer calls simply lifting the handset off . 16 If "Line in use" on the handset and " LINE IN USE " on the base unit are not displayed properly, the line mode selection is preset to press [C] or...
... [d] or [B], then press Select. 4 Select "On" or "Off" by pressing [d] or [B]. 6 Press Save, then press [OFF]. Programmable Settings Line Mode Handset The line mode is incorrect. You do not need to "B" and generally should not be adjusted. The factory preset is OFF. 1 Press [MENU]. 2 Scroll to... "Initial setting" by pressing [d] or [B], then press Select. 3 Scroll to answer calls simply lifting the handset off . 16 If "Line in use" on the handset and " LINE IN USE " on the base unit are not displayed properly, the line mode selection is preset to press [C] or...

2.4 Ghz Dig.crdless.ans Sys.
Page 17
...base unit will not be displayed while not in use. High Ringer volume Low High KBack dB SaveL • If the handset ringer is turned on (p. 31, 32). The handset will be announced even if the Talking Caller ID feature is turned off, "Ringer off , press [d] repeatedly until "...Caller names will ring at "Ringer volume". 4 Select the desired volume level by pressing [OFF]. Preparation Programmable Settings Ringer Volume You can select the handset or base unit ringer volumes to "Ringer setting" by pressing [d] or [B], then press Select. 3 Press Select at the low level for intercom ...
...base unit will not be displayed while not in use. High Ringer volume Low High KBack dB SaveL • If the handset ringer is turned on (p. 31, 32). The handset will be announced even if the Talking Caller ID feature is turned off, "Ringer off , press [d] repeatedly until "...Caller names will ring at "Ringer volume". 4 Select the desired volume level by pressing [OFF]. Preparation Programmable Settings Ringer Volume You can select the handset or base unit ringer volumes to "Ringer setting" by pressing [d] or [B], then press Select. 3 Press Select at the low level for intercom ...

2.4 Ghz Dig.crdless.ans Sys.
Page 18
To set the ringer volume to high (preset), medium, or low, press VOLUME []. • To increase volume, press VOLUME [>]. To decrease volume, press VOLUME [ Programmable Settings Base unit ringer volume Base Unit Make sure the base unit is not being used.
To set the ringer volume to high (preset), medium, or low, press VOLUME []. • To increase volume, press VOLUME [>]. To decrease volume, press VOLUME [ Programmable Settings Base unit ringer volume Base Unit Make sure the base unit is not being used.

2.4 Ghz Dig.crdless.ans Sys.
Page 19
...tone by pressing [1] to [7]. [1] to [3] : Bell ringer patterns [4] to [7] : Melody patterns • After pressing VOLUME [], the base unit will ring using the Handset 1 Press [MENU]. 2 Scroll to "Initial setting" by pressing [d] or [B], then press Select. 3 Scroll to "LCD contrast" by pressing [d] or [B], then press ...the base unit ringer volume has been turned off, the base unit will ring. Preparation Programmable Settings Base unit ringer tone (use either the handset or the base unit) Base Unit Make sure the base unit is "level 3". 1 Press [MENU]. 2 Scroll to "Initial setting" by...
...tone by pressing [1] to [7]. [1] to [3] : Bell ringer patterns [4] to [7] : Melody patterns • After pressing VOLUME [], the base unit will ring using the Handset 1 Press [MENU]. 2 Scroll to "Initial setting" by pressing [d] or [B], then press Select. 3 Scroll to "LCD contrast" by pressing [d] or [B], then press ...the base unit ringer volume has been turned off, the base unit will ring. Preparation Programmable Settings Base unit ringer tone (use either the handset or the base unit) Base Unit Make sure the base unit is "level 3". 1 Press [MENU]. 2 Scroll to "Initial setting" by...

2.4 Ghz Dig.crdless.ans Sys.
Page 22
... by pressing [1], [2], [3] or [0] (Greeting only). 6 Press Save, then press [OFF]. The unit will not record any incoming messages. Preparing the Answering System Caller's Recording Time Handset You can also select the recording time by pressing [d] or [B]. • You can select "1 minute", "2 minutes", "3 minutes" or "Greeting only" for the caller's recording time...
... by pressing [1], [2], [3] or [0] (Greeting only). 6 Press Save, then press [OFF]. The unit will not record any incoming messages. Preparing the Answering System Caller's Recording Time Handset You can also select the recording time by pressing [d] or [B]. • You can select "1 minute", "2 minutes", "3 minutes" or "Greeting only" for the caller's recording time...
2.4 Ghz Dig.crdless.ans Sys.
Page 23
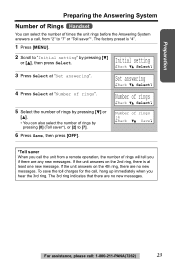
... you if there are no new messages. The 3rd ring indicates that there are any new messages. Preparation Preparing the Answering System Number of Rings Handset You can also select the number of rings by pressing [0] (Toll saver*), or [2] to [7]. 6 Press Save, then press [OFF].
... you if there are no new messages. The 3rd ring indicates that there are any new messages. Preparation Preparing the Answering System Number of Rings Handset You can also select the number of rings by pressing [0] (Toll saver*), or [2] to [7]. 6 Press Save, then press [OFF].
2.4 Ghz Dig.crdless.ans Sys.
Page 24
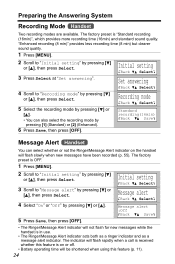
...KBack dB SelectL Message alert :Off KBack dB SaveL • The Ringer/Message Alert indicator will not flash for new messages while the handset is "Standard recording (16min)", which provides more recording time (16min) and standard sound quality. The indicator will flash rapidly when a... indicator on or off. • Battery operating time will flash slowly when new messages have been recorded (p. 55). The factory preset is on the handset will be shortened when using this feature (p. 11). 24 "Enhanced recording (8 min)" provides less recording time (8 min) but clearer sound quality. 1...
...KBack dB SelectL Message alert :Off KBack dB SaveL • The Ringer/Message Alert indicator will not flash for new messages while the handset is "Standard recording (16min)", which provides more recording time (16min) and standard sound quality. The indicator will flash rapidly when a... indicator on or off. • Battery operating time will flash slowly when new messages have been recorded (p. 55). The factory preset is on the handset will be shortened when using this feature (p. 11). 24 "Enhanced recording (8 min)" provides less recording time (8 min) but clearer sound quality. 1...
2.4 Ghz Dig.crdless.ans Sys.
Page 25
... the base unit. For assistance, please call . 3 To hang up , press [OFF] or place the handset on the base unit. Telephone System Making Calls Using the Handset Handset 1 Press [C]. • "Talk" is displayed. 2 Dial a phone number. • The dialed number is displayed. • After a few seconds, the display will show the length of...
... the base unit. For assistance, please call . 3 To hang up , press [OFF] or place the handset on the base unit. Telephone System Making Calls Using the Handset Handset 1 Press [C]. • "Talk" is displayed. 2 Dial a phone number. • The dialed number is displayed. • After a few seconds, the display will show the length of...

2.4 Ghz Dig.crdless.ans Sys.
Page 26
... dialing, press Pause where needed (p. 49). • To cancel, press [OFF]. 2 Press [C] or [s]. 3 To hang up, press [OFF] or place the handset on hold ." Making Calls To dial after confirming the entered number 1 Enter a phone number. 3334444| KClear PauseL • If you try to increase/decrease volume... when it is at the maximum/ minimum level, the handset will beep 3 times. After 4 additional minutes on the base unit. To put a call will start to sound and the Ringer/Message Alert ...
... dialing, press Pause where needed (p. 49). • To cancel, press [OFF]. 2 Press [C] or [s]. 3 To hang up, press [OFF] or place the handset on hold ." Making Calls To dial after confirming the entered number 1 Enter a phone number. 3334444| KClear PauseL • If you try to increase/decrease volume... when it is at the maximum/ minimum level, the handset will beep 3 times. After 4 additional minutes on the base unit. To put a call will start to sound and the Ringer/Message Alert ...


