

Operating Instructions
Page 2
...(MAINS SOCKET OUTLET) SHALL BE INSTALLED NEAR THE EQUIPMENT AND SHALL BE EASILY ACCESSIBLE. CR2025 only. • Do not recharge the battery. To prevent risk of uninsulated "dangerous voltage" within an equilateral triangle, is on the underside of important operating and maintenance (servicing... recording of copyrighted television programs, video tapes and other materials do not obstruct the ventilation. For Remote Controller • Replace battery with same or specified type. • Do not disassemble or dispose of electric shock to maintain adequate ventilation, do not install...
...(MAINS SOCKET OUTLET) SHALL BE INSTALLED NEAR THE EQUIPMENT AND SHALL BE EASILY ACCESSIBLE. CR2025 only. • Do not recharge the battery. To prevent risk of uninsulated "dangerous voltage" within an equilateral triangle, is on the underside of important operating and maintenance (servicing... recording of copyrighted television programs, video tapes and other materials do not obstruct the ventilation. For Remote Controller • Replace battery with same or specified type. • Do not disassemble or dispose of electric shock to maintain adequate ventilation, do not install...
Operating Instructions
Page 6
... and rear side 12 Left side 13 Terminals and mounting parts 14 Remote control 15 Preparation The battery 16 Charging 16 Installing and removing the power supply 17 Installing and removing the battery 17 Connecting and disconnecting the power cord ... 17 Adjusting the hand strap 18 Attaching the shoulder ...strap 18 Detaching and attaching the lens hood ..... 18 The remote control 19 Insert the battery 19 Remote control setup 19 Turn on/off the camera 20 Tally lamp 20 Viewfinder 21 Using the viewfinder 21 Using...
... and rear side 12 Left side 13 Terminals and mounting parts 14 Remote control 15 Preparation The battery 16 Charging 16 Installing and removing the power supply 17 Installing and removing the battery 17 Connecting and disconnecting the power cord ... 17 Adjusting the hand strap 18 Attaching the shoulder ...strap 18 Detaching and attaching the lens hood ..... 18 The remote control 19 Insert the battery 19 Remote control setup 19 Turn on/off the camera 20 Tally lamp 20 Viewfinder 21 Using the viewfinder 21 Using...
Operating Instructions
Page 7
... 58 Counter display (P2 card / Tape 58 Memory stop mode (Tape 58 1394TC preset mode 58 Charging the built-in battery/ Setting the time data 59 Recharging the built-in battery 59 Setting the time code 59 Specifying the time code (TC PRESET).......... 59 Setting user information 60 Playback Basic playback operations...
... 58 Counter display (P2 card / Tape 58 Memory stop mode (Tape 58 1394TC preset mode 58 Charging the built-in battery/ Setting the time data 59 Recharging the built-in battery 59 Setting the time code 59 Specifying the time code (TC PRESET).......... 59 Setting user information 60 Playback Basic playback operations...
Operating Instructions
Page 11
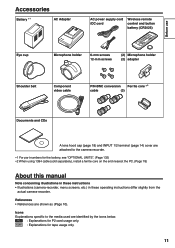
...• References are identified by the icons below. Icons Explanations specific to the camera-recorder. 1 For part numbers for the battery, see "OPTIONAL UNITS". (Page 132) 2 When using 1394 cable (sold separately), install a ferrite core on the end nearest the PC...., etc.) in these operating instructions differ slightly from the actual camera-recorder. Before use Accessories Battery 1 AC Adapter AC power supply cord /DC cord Wireless remote control and button battery (CR2025) Eye cup Microphone holder 6-mm screws 12-mm screws (2) Microphone holder (2) adapter ...
...• References are identified by the icons below. Icons Explanations specific to the camera-recorder. 1 For part numbers for the battery, see "OPTIONAL UNITS". (Page 132) 2 When using 1394 cable (sold separately), install a ferrite core on the end nearest the PC...., etc.) in these operating instructions differ slightly from the actual camera-recorder. Before use Accessories Battery 1 AC Adapter AC power supply cord /DC cord Wireless remote control and button battery (CR2025) Eye cup Microphone holder 6-mm screws 12-mm screws (2) Microphone holder (2) adapter ...
Operating Instructions
Page 12
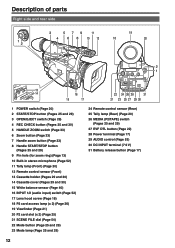
... (Pages 25 and 29) 27 EVF DTL button (Page 22) 28 Power terminal (Page 17) 29 AUDIO control (Page 53) 30 DC INPUT terminal (7.9 V) 31 Battery release button (Page 17) 12
... (Pages 25 and 29) 27 EVF DTL button (Page 22) 28 Power terminal (Page 17) 29 AUDIO control (Page 53) 30 DC INPUT terminal (7.9 V) 31 Battery release button (Page 17) 12

Operating Instructions
Page 16
... the DC cord is connected to charge when it is warm. • The AC adapter can interfere with the AC adapter. POWER CHARGE 3 When the battery is charged, the CHARGE lamp on the AC adapter light, and charging begins. • If the CHARGE lamp does not light when attached, detach the... humidity levels. 2 Plug the AC cord into the power outlet. • The POWER lamp and CHARGE lamp on the AC adapter goes out. 4 Slide the battery and remove it is being used or charged. The camera-recorder itself also becomes hot during use up , and you may be something wrong with...
... the DC cord is connected to charge when it is warm. • The AC adapter can interfere with the AC adapter. POWER CHARGE 3 When the battery is charged, the CHARGE lamp on the AC adapter light, and charging begins. • If the CHARGE lamp does not light when attached, detach the... humidity levels. 2 Plug the AC cord into the power outlet. • The POWER lamp and CHARGE lamp on the AC adapter goes out. 4 Slide the battery and remove it is being used or charged. The camera-recorder itself also becomes hot during use up , and you may be something wrong with...

Operating Instructions
Page 17
...be purchased. • Disconnect the AC power supply cord from the power outlet when the unit is off. 2 Remove the DC cord's battery connector while pressing the battery release button. 3 Disconnect the AC power supply cord from the AC adapter. An AC plug adapter may be required for voltages other than... 120 V AC. Removal 1 Set the POWER switch to OFF, and check that the mode lamp is off. 2 Remove the battery while pressing the battery release button. • Support the battery with your hand to ensure that the mode lamp is not going to OFF, and check that it will not fall...
...be purchased. • Disconnect the AC power supply cord from the power outlet when the unit is off. 2 Remove the DC cord's battery connector while pressing the battery release button. 3 Disconnect the AC power supply cord from the AC adapter. An AC plug adapter may be required for voltages other than... 120 V AC. Removal 1 Set the POWER switch to OFF, and check that the mode lamp is off. 2 Remove the battery while pressing the battery release button. • Support the battery with your hand to ensure that the mode lamp is not going to OFF, and check that it will not fall...
Operating Instructions
Page 19
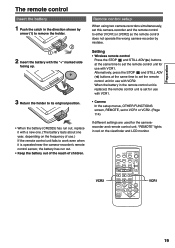
... of use.) If the remote control unit fails to work even when it with a new one. (The battery lasts about one year, depending on the viewfinder and LCD monitor. When the battery in the remote control unit is replaced, the remote control unit is operated near the camera-recorder's remote... control sensor, the battery has run out, replace it is set for use with VCR1. • Camera In the setup menus, OTHER FUNCTIONS screen, REMOTE, set to set the ...
... of use.) If the remote control unit fails to work even when it with a new one. (The battery lasts about one year, depending on the viewfinder and LCD monitor. When the battery in the remote control unit is replaced, the remote control unit is operated near the camera-recorder's remote... control sensor, the battery has run out, replace it is set for use with VCR1. • Camera In the setup menus, OTHER FUNCTIONS screen, REMOTE, set to set the ...
Operating Instructions
Page 20
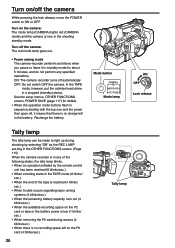
...When the end of the tape is reached (4 blinks/ sec.) • When trouble occurs regarding tape running systems (4 blinks/sec.) • When the remaining battery capacity runs out (4 blinks/sec.) • When the available recording space on the camera: The mode lamp (CAMERA) lights red (CAMERA mode) and the ...P2 card (4 blinks/sec.) 20 Tally lamp In the TAPE mode, however, put the cylinder head alone in the battery. Recharge the battery. Turn on the P2 card or tape or the battery power is low (1 blinks/ sec.) • When removing the P2 card during shooting by selecting "ON" as...
...When the end of the tape is reached (4 blinks/ sec.) • When trouble occurs regarding tape running systems (4 blinks/sec.) • When the remaining battery capacity runs out (4 blinks/sec.) • When the available recording space on the camera: The mode lamp (CAMERA) lights red (CAMERA mode) and the ...P2 card (4 blinks/sec.) 20 Tally lamp In the TAPE mode, however, put the cylinder head alone in the battery. Recharge the battery. Turn on the P2 card or tape or the battery power is low (1 blinks/ sec.) • When removing the P2 card during shooting by selecting "ON" as...
Operating Instructions
Page 29
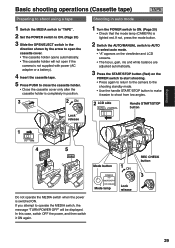
...) 3 Slide the OPEN/EJECT switch in the direction shown by the arrow to open if the camera is not supplied with power (AC adapter or a battery). 4 Insert the cassette tape. 5 Press PUSH to close the cassette holder. • Close the cassette cover only after the cassette holder is completely in position...
...) 3 Slide the OPEN/EJECT switch in the direction shown by the arrow to open if the camera is not supplied with power (AC adapter or a battery). 4 Insert the cassette tape. 5 Press PUSH to close the cassette holder. • Close the cassette cover only after the cassette holder is completely in position...

Operating Instructions
Page 30
... cover. • The cassette holder opens automatically. • The cassette holder will not open if the camera is not supplied with power (AC adapter or battery). • A tape cannot be ejected in P2 mode or during recording in TAPE mode. 2 Remove the cassette. 3 Press PUSH to close the cassette holder. •...
... cover. • The cassette holder opens automatically. • The cassette holder will not open if the camera is not supplied with power (AC adapter or battery). • A tape cannot be ejected in P2 mode or during recording in TAPE mode. 2 Remove the cassette. 3 Press PUSH to close the cassette holder. •...

Operating Instructions
Page 53
...) on the RECORDING SETUP screen of audio signals input through the INPUT 1/2 (XLR 3-pin) terminal. To adjust the volume of the sound for Panasonic's broadcast-use a phantom microphone. • Set to audio channel 2. INT (L): Audio from a device connected to audio channel 1. You can not... be recorded to INPUT 1 terminal is not connected) No power supply for INPUT 1/2 terminal. • The battery will discharge faster if you use camera recorders (AJ series). 53 INPUT 2: Audio from the built-in microphone Lch is recorded to channel 1....
...) on the RECORDING SETUP screen of audio signals input through the INPUT 1/2 (XLR 3-pin) terminal. To adjust the volume of the sound for Panasonic's broadcast-use a phantom microphone. • Set to audio channel 2. INT (L): Audio from a device connected to audio channel 1. You can not... be recorded to INPUT 1 terminal is not connected) No power supply for INPUT 1/2 terminal. • The battery will discharge faster if you use camera recorders (AJ series). 53 INPUT 2: Audio from the built-in microphone Lch is recorded to channel 1....

Operating Instructions
Page 59
...107) • TC MODE • TCG • FIRST REC TC (Tape only) • TC PRESET • 1394 TC REGEN (appears when in battery The camera's internal battery saves the date and time. Reset the date and time when fully recharged. 1 Connect the AC adapter. (Page 17) • Leave the POWER switch... Setting the time code In the setup menus, RECORDING SETUP screen, set the following to ensure correct TC and menu operations. Charging the built-in battery/Setting the time data Recharging the built-in MCR/VCR mode) 3 Press the and buttons to select YES, and press the button. " " appears...
...107) • TC MODE • TCG • FIRST REC TC (Tape only) • TC PRESET • 1394 TC REGEN (appears when in battery The camera's internal battery saves the date and time. Reset the date and time when fully recharged. 1 Connect the AC adapter. (Page 17) • Leave the POWER switch... Setting the time code In the setup menus, RECORDING SETUP screen, set the following to ensure correct TC and menu operations. Charging the built-in battery/Setting the time data Recharging the built-in MCR/VCR mode) 3 Press the and buttons to select YES, and press the button. " " appears...
Operating Instructions
Page 90
... the camera-recorder. : Blinks when cylinder heads are dirty. P2 FULL or END: Blinks when either there is insufficient. : Lights when the internal battery for recording FR 60I : Standard (60i interlace) mode (60 fields/sec.) FR 60P : 60P progressive mode (60 frames/ sec.) FR 30P : 30P progressive mode...
... the camera-recorder. : Blinks when cylinder heads are dirty. P2 FULL or END: Blinks when either there is insufficient. : Lights when the internal battery for recording FR 60I : Standard (60i interlace) mode (60 fields/sec.) FR 60P : 60P progressive mode (60 frames/ sec.) FR 30P : 30P progressive mode...
Operating Instructions
Page 92
... Scene file name display (in camera mode)/ DUB display (in dubbing mode) (Pages 54 and 86) 30 Remaining battery charge As the remaining battery charge drops, the display changes as follows: When the battery has completely discharged, ( ) blinks. (When the AC adapter is being used, a display other than may appear: this is...
... Scene file name display (in camera mode)/ DUB display (in dubbing mode) (Pages 54 and 86) 30 Remaining battery charge As the remaining battery charge drops, the display changes as follows: When the battery has completely discharged, ( ) blinks. (When the AC adapter is being used, a display other than may appear: this is...

Operating Instructions
Page 93
...Cannot format P2 cards or SD memory cards. NO FILE There are displayed here. 1 2 lights: P2 card on which data can be used since the battery charge is set to ON. 35 Monitor sound volume level meter When you press the PAGE/AUDIO MON/VAR button, the sound volume output from... recording. WRITE PROTECTED The P2 card or SD memory card is to EXT and recording without connecting external units with 1394 terminal, this unit (e.g. LOW BATTERY No operations can be recorded. 1 2 lights green: P2 card on which data is writeprotected. 33 Media information display The card slot where the P2 ...
...Cannot format P2 cards or SD memory cards. NO FILE There are displayed here. 1 2 lights: P2 card on which data can be used since the battery charge is set to ON. 35 Monitor sound volume level meter When you press the PAGE/AUDIO MON/VAR button, the sound volume output from... recording. WRITE PROTECTED The P2 card or SD memory card is to EXT and recording without connecting external units with 1394 terminal, this unit (e.g. LOW BATTERY No operations can be recorded. 1 2 lights green: P2 card on which data is writeprotected. 33 Media information display The card slot where the P2 ...
Operating Instructions
Page 95
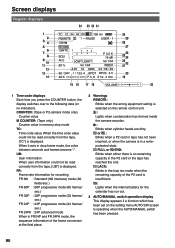
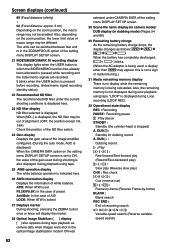
... 23 ND filter display 24 Gain display 26 AWB information display 28 Optical Image Stabilizer display 29 Scene file name display 30 Remaining battery display 31 Media remaining memory display MODE CHECK DISPLAY - x x x x x x - - - 1 x x x x x - - - Displays 95 Setting the DISPLAY items Display the following items on other settings The item in...
... 23 ND filter display 24 Gain display 26 AWB information display 28 Optical Image Stabilizer display 29 Scene file name display 30 Remaining battery display 31 Media remaining memory display MODE CHECK DISPLAY - x x x x x x - - - 1 x x x x x - - - Displays 95 Setting the DISPLAY items Display the following items on other settings The item in...

Operating Instructions
Page 113
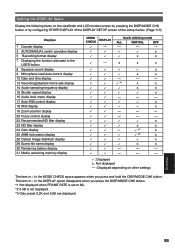
... do not appear on the viewfinder when the LCD is not entirely accurate. (Camera) Select ON to display the remaining card/tape and battery charge. (MCR/ ON OFF VCR) (Camera) Select how much information to display on the screen. (Page 95) (MCR/ OFF, PARTIAL, ALL VCR) (MCR/ VCR) Select...
... do not appear on the viewfinder when the LCD is not entirely accurate. (Camera) Select ON to display the remaining card/tape and battery charge. (MCR/ ON OFF VCR) (Camera) Select how much information to display on the screen. (Page 95) (MCR/ OFF, PARTIAL, ALL VCR) (MCR/ VCR) Select...

Operating Instructions
Page 119
.... Cannot focus automatically. • Make sure the camera is affected by the ambient temperature. Check the connections again. • To prevent the battery from running down quickly. When, for service Power supply There's no apparent reason. If this sequence and then the power goes off when the ... You may have formed. into focus when * both close and distant objects are to remove the tape. Wait until the condensation has dried out. The battery is in a cold place? P 16 - - - Keep charging until the AC adapter's CHARGE lamp goes out. • Are you will be able...
.... Cannot focus automatically. • Make sure the camera is affected by the ambient temperature. Check the connections again. • To prevent the battery from running down quickly. When, for service Power supply There's no apparent reason. If this sequence and then the power goes off when the ... You may have formed. into focus when * both close and distant objects are to remove the tape. Wait until the condensation has dried out. The battery is in a cold place? P 16 - - - Keep charging until the AC adapter's CHARGE lamp goes out. • Are you will be able...

Operating Instructions
Page 122
... is OFF. P 125 If this case, slide EJECT switch again to remove the tape. In this happens, the only operation that the button battery has run out. Replace it with power. This is normal. • This initialization operation is the same for service (continued) Other Cannot remove...be performed. Wait until the condensation has dried out. • When the cassette holder is operated close the cassette holder. • The button battery in - P19 If the remote control fails to the camera mode. • Make sure the camera is inserted correctly. The remote control does ...
... is OFF. P 125 If this case, slide EJECT switch again to remove the tape. In this happens, the only operation that the button battery has run out. Replace it with power. This is normal. • This initialization operation is the same for service (continued) Other Cannot remove...be performed. Wait until the condensation has dried out. • When the cassette holder is operated close the cassette holder. • The button battery in - P19 If the remote control fails to the camera mode. • Make sure the camera is inserted correctly. The remote control does ...


