
HMTA2 User Guide
Page 1
For USA and Puerto Rico assistance, please call: 1-800-211-PANA(7262) or, contact us via the web at: http://www.panasonic.com/contactinfo For Canadian assistance, please call: 1-800-561-5505 or visit us at www.panasonic.ca P PC VQT3N87 1AG6P1P6253--(S) Owner's Manual High Definition Mobile Camera Model No. Spanish Quick Use Guide is included. Guía para rápida consulta en español está incluida. HM-TA20 HM-TA2 Before connecting, operating or adjusting this product, please read the instructions completely.
For USA and Puerto Rico assistance, please call: 1-800-211-PANA(7262) or, contact us via the web at: http://www.panasonic.com/contactinfo For Canadian assistance, please call: 1-800-561-5505 or visit us at www.panasonic.ca P PC VQT3N87 1AG6P1P6253--(S) Owner's Manual High Definition Mobile Camera Model No. Spanish Quick Use Guide is included. Guía para rápida consulta en español está incluida. HM-TA20 HM-TA2 Before connecting, operating or adjusting this product, please read the instructions completely.
HMTA2 User Guide
Page 2
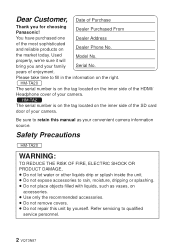
Dealer Purchased From You have purchased one Dealer Address of enjoyment. HM-TA20 The serial number is on the tag located on the right. HM-TA2 The serial number is on the tag located on the inner side of the HDMI/ Headphone cover of your camera. Serial No. the market today.... the information on the inner side of the SD card door of your camera. Used properly, we're sure it will bring you for choosing Panasonic! years of the most sophisticated and reliable products on accessories. ≥ Use only the recommended accessories. ≥ Do not remove covers. ≥ Do not ...
Dealer Purchased From You have purchased one Dealer Address of enjoyment. HM-TA20 The serial number is on the tag located on the right. HM-TA2 The serial number is on the tag located on the inner side of the HDMI/ Headphone cover of your camera. Serial No. the market today.... the information on the inner side of the SD card door of your camera. Used properly, we're sure it will bring you for choosing Panasonic! years of the most sophisticated and reliable products on accessories. ≥ Use only the recommended accessories. ≥ Do not remove covers. ≥ Do not ...
HMTA2 User Guide
Page 3
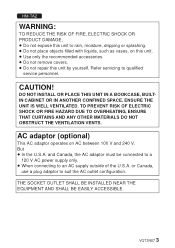
...; When connecting to rain, moisture, dripping or splashing. ≥ Do not place objects filled with liquids, such as vases, on AC between 100 V and 240 V. HM-TA2 WARNING: TO REDUCE THE RISK OF FIRE, ELECTRIC SHOCK OR PRODUCT DAMAGE, ≥ Do not expose this unit to an AC supply outside of the...
...; When connecting to rain, moisture, dripping or splashing. ≥ Do not place objects filled with liquids, such as vases, on AC between 100 V and 240 V. HM-TA2 WARNING: TO REDUCE THE RISK OF FIRE, ELECTRIC SHOCK OR PRODUCT DAMAGE, ≥ Do not expose this unit to an AC supply outside of the...

HMTA2 User Guide
Page 4
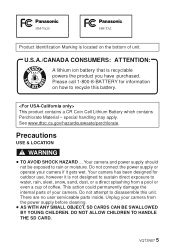
..., if not installed and used in accordance with the limits for help. Declaration of Conformity Trade Name: Panasonic Model No.: HM-TA20/HM-TA2 Responsible party: Panasonic Corporation of North America One Panasonic Way, Secaucus, NJ 07094 Support Contact: Panasonic Consumer Electronics Company 1-800-211-PANA (7262) This device complies with Canadian ICES-003. 4 VQT3N87 Operation is...
..., if not installed and used in accordance with the limits for help. Declaration of Conformity Trade Name: Panasonic Model No.: HM-TA20/HM-TA2 Responsible party: Panasonic Corporation of North America One Panasonic Way, Secaucus, NJ 07094 Support Contact: Panasonic Consumer Electronics Company 1-800-211-PANA (7262) This device complies with Canadian ICES-003. 4 VQT3N87 Operation is...
HMTA2 User Guide
Page 5
... internal parts of your camera from a pool or even a cup of unit. Your camera and power supply should not be exposed to disassemble this battery. HM-TA20 HM-TA2 Product Identification Marking is located on how to recycle this unit.
... internal parts of your camera from a pool or even a cup of unit. Your camera and power supply should not be exposed to disassemble this battery. HM-TA20 HM-TA2 Product Identification Marking is located on how to recycle this unit.
HMTA2 User Guide
Page 7
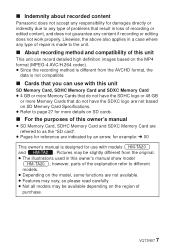
∫ Indemnity about recorded content Panasonic does not accept any responsibility for use with this unit SD Memory Card... ≥ Pages for reference are referred to any type of problems that you can use with models HM-TA20 and HM-TA2 . Pictures may be available depending on the region of recording or edited content, and does not guarantee... recording or editing does not work properly. VQT3N87 7 Likewise, the above also applies in this owner's manual show model HM-TA20 , however, parts of the explanation refer to different models. ≥ Depending on SD cards. ∫ For the...
∫ Indemnity about recorded content Panasonic does not accept any responsibility for use with this unit SD Memory Card... ≥ Pages for reference are referred to any type of problems that you can use with models HM-TA20 and HM-TA2 . Pictures may be available depending on the region of recording or edited content, and does not guarantee... recording or editing does not work properly. VQT3N87 7 Likewise, the above also applies in this owner's manual show model HM-TA20 , however, parts of the explanation refer to different models. ≥ Depending on SD cards. ∫ For the...
HMTA2 User Guide
Page 18
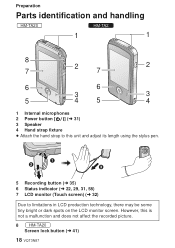
... to limitations in LCD production technology, there may be some tiny bright or dark spots on the LCD monitor screen. Preparation Parts identification and handling HM-TA20 HM-TA2 1 1 8 7 2 7 2 6 6 3 3 5 45 4 1 Internal microphones 2 Power button [ ] (l 31) 3 Speaker 4 Hand strap fixture ≥ Attach the hand strap to this is not a malfunction and does not affect...
... to limitations in LCD production technology, there may be some tiny bright or dark spots on the LCD monitor screen. Preparation Parts identification and handling HM-TA20 HM-TA2 1 1 8 7 2 7 2 6 6 3 3 5 45 4 1 Internal microphones 2 Power button [ ] (l 31) 3 Speaker 4 Hand strap fixture ≥ Attach the hand strap to this is not a malfunction and does not affect...
HMTA2 User Guide
Page 19
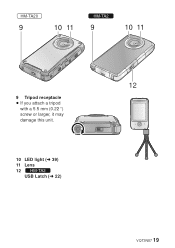
HM-TA20 9 10 11 HM-TA2 9 10 11 12 9 Tripod receptacle ≥ If you attach a tripod with a 5.5 mm (0.22 q) screw or larger, it may damage this unit. 10 LED light (l 39) 11 Lens 12 HM-TA2 USB Latch (l 22) VQT3N87 19
HM-TA20 9 10 11 HM-TA2 9 10 11 12 9 Tripod receptacle ≥ If you attach a tripod with a 5.5 mm (0.22 q) screw or larger, it may damage this unit. 10 LED light (l 39) 11 Lens 12 HM-TA2 USB Latch (l 22) VQT3N87 19

HMTA2 User Guide
Page 20
HM-TA20 13 14 15 16 RESET 17 18 19 20 21 HM-TA2 22 23 13 14 20 21 13 SD card door (l 29) 14 Card slot (l 29) 15 Headphone terminal [Ë] ≥ Use the earphone/headphone with a A part width ‰ 11 mm (0.43 q) or smaller. 16 Reset button [RESET] (l 80) 17 HDMI mini connector (l 58) 18 HM-TA20 HDMI/Headphone cover 20 VQT3N87 15 16 RESET 17
HM-TA20 13 14 15 16 RESET 17 18 19 20 21 HM-TA2 22 23 13 14 20 21 13 SD card door (l 29) 14 Card slot (l 29) 15 Headphone terminal [Ë] ≥ Use the earphone/headphone with a A part width ‰ 11 mm (0.43 q) or smaller. 16 Reset button [RESET] (l 80) 17 HDMI mini connector (l 58) 18 HM-TA20 HDMI/Headphone cover 20 VQT3N87 15 16 RESET 17
HMTA2 User Guide
Page 21
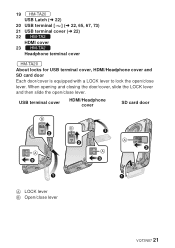
... USB Latch (l 22) 20 USB terminal [ ] (l 22, 65, 67, 73) 21 USB terminal cover (l 22) 22 HM-TA2 HDMI cover 23 HM-TA2 Headphone terminal cover HM-TA20 About locks for USB terminal cover, HDMI/Headphone cover and SD card door Each door/cover is equipped with a LOCK lever to lock the ...
... USB Latch (l 22) 20 USB terminal [ ] (l 22, 65, 67, 73) 21 USB terminal cover (l 22) 22 HM-TA2 HDMI cover 23 HM-TA2 Headphone terminal cover HM-TA20 About locks for USB terminal cover, HDMI/Headphone cover and SD card door Each door/cover is equipped with a LOCK lever to lock the ...
HMTA2 User Guide
Page 22
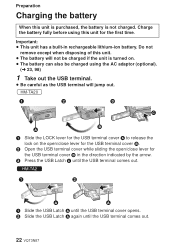
...Important: ≥ This unit has a built-in the direction indicated by the arrow. 3 Press the USB Latch C until the USB terminal comes out. 22 VQT3N87 HM-TA20 1 Slide the LOCK lever for the USB terminal cover A to release the lock on ....terminal. ≥ Be careful as the USB terminal will not be charged using this unit for the USB terminal cover B in rechargeable lithium-ion battery. HM-TA2 1 Slide the USB Latch A until the USB terminal cover opens. 2 Slide the USB Latch A again ...
...Important: ≥ This unit has a built-in the direction indicated by the arrow. 3 Press the USB Latch C until the USB terminal comes out. 22 VQT3N87 HM-TA20 1 Slide the LOCK lever for the USB terminal cover A to release the lock on ....terminal. ≥ Be careful as the USB terminal will not be charged using this unit for the USB terminal cover B in rechargeable lithium-ion battery. HM-TA2 1 Slide the USB Latch A until the USB terminal cover opens. 2 Slide the USB Latch A again ...

HMTA2 User Guide
Page 24
HM-TA2 1 Slide the USB Latch A. 2 While the USB Latch A is slid, press the USB terminal with your finger. ≥ Release your finger ... Latch A, and push in an automobile exposed to direct sunlight for a long period time with your finger. ≥ Release your fingers, press slowly and carefully. HM-TA20 1 Press the USB Latch C. 2 While pressing on the USB Latch C, press the USB terminal with doors...
HM-TA2 1 Slide the USB Latch A. 2 While the USB Latch A is slid, press the USB terminal with your finger. ≥ Release your finger ... Latch A, and push in an automobile exposed to direct sunlight for a long period time with your finger. ≥ Release your fingers, press slowly and carefully. HM-TA20 1 Press the USB Latch C. 2 While pressing on the USB Latch C, press the USB terminal with doors...

HMTA2 User Guide
Page 29
... indicator has gone off. HM-TA2 Status indicator A ≥ When this unit is accessing the SD card, the status indicator lights up. ≥ Insert SD card as shown in the figure. 1 Open the SD card door and insert (remove) the SD card into (from Panasonic, or one previously used on... and press it straight in as far as it will go. ≥ Press the center of the recorded data is deleted, it straight out. ≥ HM-TA20 Open the SD card door after releasing the lock with the LOCK lever for the first time on other equipment, for the SD card...
... indicator has gone off. HM-TA2 Status indicator A ≥ When this unit is accessing the SD card, the status indicator lights up. ≥ Insert SD card as shown in the figure. 1 Open the SD card door and insert (remove) the SD card into (from Panasonic, or one previously used on... and press it straight in as far as it will go. ≥ Press the center of the recorded data is deleted, it straight out. ≥ HM-TA20 Open the SD card door after releasing the lock with the LOCK lever for the first time on other equipment, for the SD card...
HMTA2 User Guide
Page 80
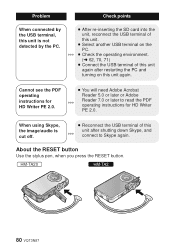
About the RESET button Use the stylus pen, when you press the RESET button. HM-TA20 HM-TA2 80 VQT3N87 Check points ≥ After re-inserting the SD card into the unit, reconnect the USB terminal of this unit again. Cannot see the ...
About the RESET button Use the stylus pen, when you press the RESET button. HM-TA20 HM-TA2 80 VQT3N87 Check points ≥ After re-inserting the SD card into the unit, reconnect the USB terminal of this unit again. Cannot see the ...
HMTA2 User Guide
Page 82
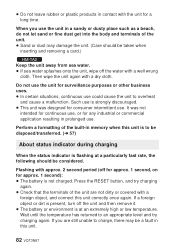
...; In certain situations, continuous use could cause the unit to charge, there may damage the unit. (Care should be taken when inserting and removing a card.) HM-TA2 Keep the unit away from sea water. ≥ If sea water splashes onto the unit, wipe off the water with the unit for any industrial...
...; In certain situations, continuous use could cause the unit to charge, there may damage the unit. (Care should be taken when inserting and removing a card.) HM-TA2 Keep the unit away from sea water. ≥ If sea water splashes onto the unit, wipe off the water with the unit for any industrial...
HMTA2 User Guide
Page 87
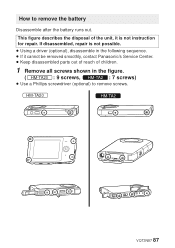
If disassembled, repair is not possible. ≥ Using a driver (optional), disassemble in the figure. ( HM-TA20 : 9 screws, HM-TA2 : 7 screws) ≥ Use a Phillips screwdriver (optional) to remove the battery Disassemble after the battery runs out. HM-TA20 HM-TA2 VQT3N87 87 How to remove screws. This figure describes the disposal of the unit, it cannot be removed smoothly, contact Panasonic's Service Center. ≥ Keep disassembled parts out of reach of children. 1 Remove all screws shown in the following sequence. ≥ If it is not instruction for repair.
If disassembled, repair is not possible. ≥ Using a driver (optional), disassemble in the figure. ( HM-TA20 : 9 screws, HM-TA2 : 7 screws) ≥ Use a Phillips screwdriver (optional) to remove the battery Disassemble after the battery runs out. HM-TA20 HM-TA2 VQT3N87 87 How to remove screws. This figure describes the disposal of the unit, it cannot be removed smoothly, contact Panasonic's Service Center. ≥ Keep disassembled parts out of reach of children. 1 Remove all screws shown in the following sequence. ≥ If it is not instruction for repair.
HMTA2 User Guide
Page 88
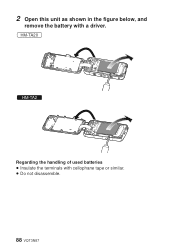
2 Open this unit as shown in the figure below, and remove the battery with cellophane tape or similar. ≥ Do not disassemble. 88 VQT3N87 HM-TA20 HM-TA2 Regarding the handling of used batteries ≥ Insulate the terminals with a driver.
2 Open this unit as shown in the figure below, and remove the battery with cellophane tape or similar. ≥ Do not disassemble. 88 VQT3N87 HM-TA20 HM-TA2 Regarding the handling of used batteries ≥ Insulate the terminals with a driver.
HMTA2 User Guide
Page 94
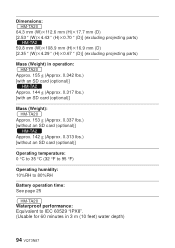
... (H)k17.7 mm (D) [2.53 q (W)k4.43 q (H)k0.70 q (D)] (excluding projecting parts) HM-TA2 59.8 mm (W)k108.9 mm (H)k16.9 mm (D) [2.35 q (W)k4.29 q (H)k0.67 q (D)] (excluding projecting parts) Mass (Weight) in operation: HM-TA20 Approx. 155 g (Approx. 0.342 lbs.) [with an SD card (optional)] HM-TA2 Approx. 144 g (Approx. 0.317 lbs.) [with an SD card (optional)] Mass...
... (H)k17.7 mm (D) [2.53 q (W)k4.43 q (H)k0.70 q (D)] (excluding projecting parts) HM-TA2 59.8 mm (W)k108.9 mm (H)k16.9 mm (D) [2.35 q (W)k4.29 q (H)k0.67 q (D)] (excluding projecting parts) Mass (Weight) in operation: HM-TA20 Approx. 155 g (Approx. 0.342 lbs.) [with an SD card (optional)] HM-TA2 Approx. 144 g (Approx. 0.317 lbs.) [with an SD card (optional)] Mass...

HMTA2 User Guide
Page 102
... For defective product exchange within the warranty period, please contact the original dealer or our Customer Care Centre. 102 VQT3N87 Panasonic HM-TA20/HM-TA2 One (1) year This warranty is given only to the original purchaser, or the person for lost time, travel to and from ...REQUIRED LIMITATIONS AND EXCLUSIONS This warranty ONLY COVERS failures due to be applicable. Dry cell batteries are caused by products not supplied by Panasonic Canada Inc. warrants this warranty. The warranty ALSO DOES NOT COVER damages which occurred in material and workmanship under normal use and ...
... For defective product exchange within the warranty period, please contact the original dealer or our Customer Care Centre. 102 VQT3N87 Panasonic HM-TA20/HM-TA2 One (1) year This warranty is given only to the original purchaser, or the person for lost time, travel to and from ...REQUIRED LIMITATIONS AND EXCLUSIONS This warranty ONLY COVERS failures due to be applicable. Dry cell batteries are caused by products not supplied by Panasonic Canada Inc. warrants this warranty. The warranty ALSO DOES NOT COVER damages which occurred in material and workmanship under normal use and ...


