
HMTA2 User Guide
Page 22
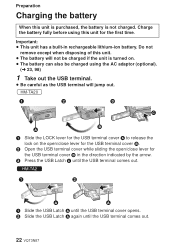
HM-TA20 1 Slide the LOCK lever for the USB terminal cover A to release the lock on . ≥ The battery can also be charged using this unit is purchased, the battery is not charged. Important: ≥ This unit ... the open/close lever for the first time. Preparation Charging the battery When this unit for the USB terminal cover B in rechargeable lithium-ion battery. HM-TA2 1 Slide the USB Latch A until the USB terminal cover opens. 2 Slide the USB Latch A again until the USB...
HM-TA20 1 Slide the LOCK lever for the USB terminal cover A to release the lock on . ≥ The battery can also be charged using this unit is purchased, the battery is not charged. Important: ≥ This unit ... the open/close lever for the first time. Preparation Charging the battery When this unit for the USB terminal cover B in rechargeable lithium-ion battery. HM-TA2 1 Slide the USB Latch A until the USB terminal cover opens. 2 Slide the USB Latch A again until the USB...

HMTA2 User Guide
Page 24
... the direction of the arrow. 5 Slide the LOCK lever for the USB terminal cover A to lock the open/ close lever for the USB terminal cover B. HM-TA20 1 Press the USB Latch C. 2 While pressing on the USB Latch C, press the USB ... slowly and carefully. ∫ To return the USB terminal to its original position ≥ When pressing the USB terminal with your finger. ≥ Release your finger from the USB Latch A, and push in the USB terminal until it is locked. 3 Close the USB terminal cover. ≥ Please ...
... the direction of the arrow. 5 Slide the LOCK lever for the USB terminal cover A to lock the open/ close lever for the USB terminal cover B. HM-TA20 1 Press the USB Latch C. 2 While pressing on the USB Latch C, press the USB ... slowly and carefully. ∫ To return the USB terminal to its original position ≥ When pressing the USB terminal with your finger. ≥ Release your finger from the USB Latch A, and push in the USB terminal until it is locked. 3 Close the USB terminal cover. ≥ Please ...

HMTA2 User Guide
Page 29
... Status indicator A ≥ When this unit is deleted, it straight out. ≥ HM-TA20 Open the SD card door after releasing the lock with the LOCK lever for the first time on other equipment, for the SD card door. 2 Securely close the SD card door. Once ... direction shown in the illustration and press it straight in the figure. 1 Open the SD card door and insert (remove) the SD card into (from Panasonic, or one previously used on this unit, format the SD card. (l 57) When the SD card is formatted, all of the SD card and then...
... Status indicator A ≥ When this unit is deleted, it straight out. ≥ HM-TA20 Open the SD card door after releasing the lock with the LOCK lever for the first time on other equipment, for the SD card door. 2 Securely close the SD card door. Once ... direction shown in the illustration and press it straight in the figure. 1 Open the SD card door and insert (remove) the SD card into (from Panasonic, or one previously used on this unit, format the SD card. (l 57) When the SD card is formatted, all of the SD card and then...

HMTA2 User Guide
Page 41
... lock button until the precaution message appears. ≥ You cannot perform touch operations. ≥ While setting [MENU] or [MODE], it cannot be released. ≥ The setting will be normal when you have the following limitations. j The zoom magnification will be k1. ≥ To use the screen... lock mode, you turn on the LED light setting, and then set to screen lock mode. (l 39) VQT3N87 41 For underwater recording [HM-TA20] This unit can record motion pictures/still pictures under water to a depth 3 m (10 feet). 1 Press and hold the screen lock button again....
... lock button until the precaution message appears. ≥ You cannot perform touch operations. ≥ While setting [MENU] or [MODE], it cannot be released. ≥ The setting will be normal when you have the following limitations. j The zoom magnification will be k1. ≥ To use the screen... lock mode, you turn on the LED light setting, and then set to screen lock mode. (l 39) VQT3N87 41 For underwater recording [HM-TA20] This unit can record motion pictures/still pictures under water to a depth 3 m (10 feet). 1 Press and hold the screen lock button again....


