HMTA1 User Guide
Page 4
... then consult a doctor. Product Identification Marking is recyclable powers the product you have purchased. Warning Risk of unit. HM-TA1 Battery pack (Lithium ion battery pack) ≥ Use the specified unit to recycle this battery. If any electrolyte should come into contact with your hands or clothes, wash it off thoroughly with your eyes...
... then consult a doctor. Product Identification Marking is recyclable powers the product you have purchased. Warning Risk of unit. HM-TA1 Battery pack (Lithium ion battery pack) ≥ Use the specified unit to recycle this battery. If any electrolyte should come into contact with your hands or clothes, wash it off thoroughly with your eyes...
HMTA1 User Guide
Page 7
... can do with a PC..... 38 Parts identification and Operating environment 40 handling 9 Installation 44 Battery supply 11 Connecting to a PC 46 Inserting/removing the About the PC display 47 battery 12 Starting HD Writer PE 1.0 ........ 48 Charging the battery 13 Reading the operating Charging and recording time... 14 instructions of the software Approximate...
... can do with a PC..... 38 Parts identification and Operating environment 40 handling 9 Installation 44 Battery supply 11 Connecting to a PC 46 Inserting/removing the About the PC display 47 battery 12 Starting HD Writer PE 1.0 ........ 48 Charging the battery 13 Reading the operating Charging and recording time... 14 instructions of the software Approximate...
HMTA1 User Guide
Page 8
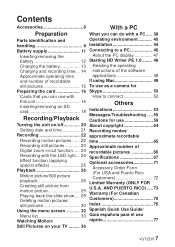
Battery pack VW-VBJ10 AV cable VFA0530 Hand strap VFC4627 USB extension cord K2KYYYY00064 ≥ The unit comes with built-in HD Writer PE 1.0 video editing software. 8 VQT2Z95 Accessories Check the accessories before using this unit. Keep the accessories out of reach of July 2010. Product numbers correct as of children to change. These may be subject to prevent swallowing.
Battery pack VW-VBJ10 AV cable VFA0530 Hand strap VFC4627 USB extension cord K2KYYYY00064 ≥ The unit comes with built-in HD Writer PE 1.0 video editing software. 8 VQT2Z95 Accessories Check the accessories before using this unit. Keep the accessories out of reach of July 2010. Product numbers correct as of children to change. These may be subject to prevent swallowing.

HMTA1 User Guide
Page 10
13 A/V 14 15 16 13 Audio-video output terminal [A/V] (l 36) ≥ Use the AV cable (only the supplied cable). 14 Speaker 15 USB terminal [ ] (l 13, 44, 46, 52) 16 USB terminal cover (l 13) 17 18 19 20 21 22 23 24 17 LED light (l 24) 18 Lens 19 Internal microphones 20 Card/battery door (l 12, 18) 21 Battery slot (l 12) 22 Card slot (l 18) 23 Battery release lever [BATT] (l 12) 24 Tripod receptacle 10 VQT2Z95
13 A/V 14 15 16 13 Audio-video output terminal [A/V] (l 36) ≥ Use the AV cable (only the supplied cable). 14 Speaker 15 USB terminal [ ] (l 13, 44, 46, 52) 16 USB terminal cover (l 13) 17 18 19 20 21 22 23 24 17 LED light (l 24) 18 Lens 19 Internal microphones 20 Card/battery door (l 12, 18) 21 Battery slot (l 12) 22 Card slot (l 18) 23 Battery release lever [BATT] (l 12) 24 Tripod receptacle 10 VQT2Z95

HMTA1 User Guide
Page 11
... that a genuine Panasonic battery pack is VW-VBJ10. Some of these battery packs may lead to fire or explosion. To ensure that safe products are used we are not liable for any accident or failure occurring as a result of use with this unit The battery that can be advised that counterfeit battery packs which look... this unit is used with internal protection to purchase in some markets. Please be used . It has been found that we would recommend that these battery packs are made available to meet the requirements of appropriate safety standards. Preparation...
... that a genuine Panasonic battery pack is VW-VBJ10. Some of these battery packs may lead to fire or explosion. To ensure that safe products are used we are not liable for any accident or failure occurring as a result of use with this unit The battery that can be advised that counterfeit battery packs which look... this unit is used with internal protection to purchase in some markets. Please be used . It has been found that we would recommend that these battery packs are made available to meet the requirements of appropriate safety standards. Preparation...

HMTA1 User Guide
Page 12
... to prevent it "clicks" and locks. 2 Close the card/battery door. ∫ Removing the battery Move the battery release lever in the direction of the # until it from dropping. Then remove the battery while supporting the unit to the manufacturer's instructions. 12 VQT2Z95 Replace...incorrectly replaced. Dispose of explosion if battery is turned off. Inserting/removing the battery 1 Open the card/battery door and insert the battery in the direction shown in the figure. ≥ Push the center of the battery in the direction indicated by the ...
... to prevent it "clicks" and locks. 2 Close the card/battery door. ∫ Removing the battery Move the battery release lever in the direction of the # until it from dropping. Then remove the battery while supporting the unit to the manufacturer's instructions. 12 VQT2Z95 Replace...incorrectly replaced. Dispose of explosion if battery is turned off. Inserting/removing the battery 1 Open the card/battery door and insert the battery in the direction shown in the figure. ≥ Push the center of the battery in the direction indicated by the ...
HMTA1 User Guide
Page 13
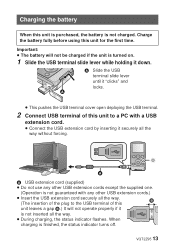
... finished, the status indicator turns off. When charging is not charged. Important: ≥ The battery will not operate properly if it is turned on. 1 Slide the USB terminal slide lever while holding it securely all the way without forcing. A .... ≥ This pushes the USB terminal cover open deploying the USB terminal. 2 Connect USB terminal of this unit for the first time. Charge the battery fully before using this unit to a PC with a USB extension cord. ≥ Connect the USB extension cord by inserting it down.
... finished, the status indicator turns off. When charging is not charged. Important: ≥ The battery will not operate properly if it is turned on. 1 Slide the USB terminal slide lever while holding it securely all the way without forcing. A .... ≥ This pushes the USB terminal cover open deploying the USB terminal. 2 Connect USB terminal of this unit for the first time. Charge the battery fully before using this unit to a PC with a USB extension cord. ≥ Connect the USB extension cord by inserting it down.

HMTA1 User Guide
Page 14
...period of this product. ≥ Do not heat or expose to flame. ≥ Do not leave the battery(ies) in an automobile exposed to direct sunlight for when the battery has been discharged completely. ∫ To return the USB terminal slide lever to its original position While holding... down the USB terminal slide lever, slide it from the PC. ≥ We recommend using Panasonic batteries (l 8, 71). ≥ If you use other batteries, we cannot guarantee the quality of time with the power button. Charging time and recordable time vary depending on with...
...period of this product. ≥ Do not heat or expose to flame. ≥ Do not leave the battery(ies) in an automobile exposed to direct sunlight for when the battery has been discharged completely. ∫ To return the USB terminal slide lever to its original position While holding... down the USB terminal slide lever, slide it from the PC. ≥ We recommend using Panasonic batteries (l 8, 71). ≥ If you use other batteries, we cannot guarantee the quality of time with the power button. Charging time and recordable time vary depending on with...
HMTA1 User Guide
Page 15
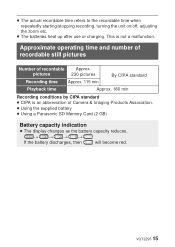
...; The actual recordable time refers to the recordable time when repeatedly starting/stopping recording, turning the unit on/off, adjusting the zoom etc. ≥ The batteries heat up after use or charging. Approximate operating time and number of recordable still pictures Number of Camera & Imaging Products Association. ≥ Using the supplied...
...; The actual recordable time refers to the recordable time when repeatedly starting/stopping recording, turning the unit on/off, adjusting the zoom etc. ≥ The batteries heat up after use or charging. Approximate operating time and number of recordable still pictures Number of Camera & Imaging Products Association. ≥ Using the supplied...

HMTA1 User Guide
Page 18
... data/SD card or this unit. ≥ Do not expose the terminals of the recorded data is deleted, it straight out. 2 Securely close the card/battery door. ≥ Do not touch the terminals on the back of the SD card. ≥ Do not apply strong shocks, bend, or drop the SD...; Status indicator A ≥ When this unit is accessing the SD card, the status indicator lights up. 1 Open the card/battery door and insert (remove) the SD card into (from Panasonic, or one previously used on other equipment, for the first time on this unit, format the SD card. (l 35) When the...
... data/SD card or this unit. ≥ Do not expose the terminals of the recorded data is deleted, it straight out. 2 Securely close the card/battery door. ≥ Do not touch the terminals on the back of the SD card. ≥ Do not apply strong shocks, bend, or drop the SD...; Status indicator A ≥ When this unit is accessing the SD card, the status indicator lights up. 1 Open the card/battery door and insert (remove) the SD card into (from Panasonic, or one previously used on other equipment, for the first time on this unit, format the SD card. (l 35) When the...
HMTA1 User Guide
Page 20
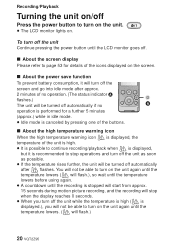
... while the temperature is high ( is displayed.), you will not be able to turn on the screen. ∫ About the power save function To prevent battery consumption, it will turn off the screen and go into idle mode after approx. 2 minutes of the icons displayed on the unit again until the...
... while the temperature is high ( is displayed.), you will not be able to turn on the screen. ∫ About the power save function To prevent battery consumption, it will turn off the screen and go into idle mode after approx. 2 minutes of the icons displayed on the unit again until the...
HMTA1 User Guide
Page 21
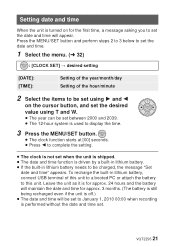
... and time function is performed without the date and time set. VQT2Z95 21 Leave the unit as it is for approx. 24 hours and the battery will maintain the date and time for the first time, a message asking you to set the date and time. 1 Select the menu. (l 32) : [CLOCK SET...] # desired setting [DATE]: [TIME]: Setting of the year/month/day Setting of this unit to a booted PC or attach the battery to this unit. To recharge the built-in lithium battery, connect USB terminal of the hour/minute 2 Select the items to be set using 1 and 2 on for approx. 3 months. (The...
... and time function is performed without the date and time set. VQT2Z95 21 Leave the unit as it is for approx. 24 hours and the battery will maintain the date and time for the first time, a message asking you to set the date and time. 1 Select the menu. (l 32) : [CLOCK SET...] # desired setting [DATE]: [TIME]: Setting of the year/month/day Setting of this unit to a booted PC or attach the battery to this unit. To recharge the built-in lithium battery, connect USB terminal of the hour/minute 2 Select the items to be set using 1 and 2 on for approx. 3 months. (The...

HMTA1 User Guide
Page 24
... using a light is prohibited. ≥ Do not look directly at least 1 m (3.3 feet) when recording babies. ≥ Do not use , the recordable time when using the battery is shortened. ≥ The subject should be canceled when you turn off the unit or press the playback button. ≥ When the LED light is...
... using a light is prohibited. ≥ Do not look directly at least 1 m (3.3 feet) when recording babies. ≥ Do not use , the recordable time when using the battery is shortened. ≥ The subject should be canceled when you turn off the unit or press the playback button. ≥ When the LED light is...
HMTA1 User Guide
Page 33
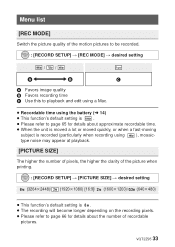
...] # [REC MODE] # desired setting // C A Favors image quality B Favors recording time C Use this to playback and edit using a Mac. ≥ Recordable time using the battery (l 14) ≥ This function's default setting is . ≥ Please refer to page 65 for details about the number of the picture when printing. : [RECORD SETUP...
...] # [REC MODE] # desired setting // C A Favors image quality B Favors recording time C Use this to playback and edit using a Mac. ≥ Recordable time using the battery (l 14) ≥ This function's default setting is . ≥ Please refer to page 65 for details about the number of the picture when printing. : [RECORD SETUP...
HMTA1 User Guide
Page 53
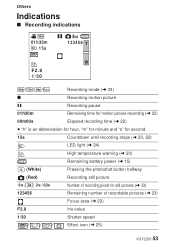
...; "h" is an abbreviation for hour, "m" for minute and "s" for second. 15s Countdown until recording stops (l 20, 22) LED light (l 24) High temperature warning (l 20) Remaining battery power (l 15) (White) Pressing the photoshot button halfway (Red) Recording still picture /// Number of recording pixels for still pictures (l 33) 123456 Remaining number of recordable...
...; "h" is an abbreviation for hour, "m" for minute and "s" for second. 15s Countdown until recording stops (l 20, 22) LED light (l 24) High temperature warning (l 20) Remaining battery power (l 15) (White) Pressing the photoshot button halfway (Red) Recording still picture /// Number of recording pixels for still pictures (l 33) 123456 Remaining number of recordable...
HMTA1 User Guide
Page 55
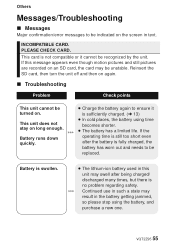
...Check points This unit cannot be unstable. If this unit may result in text. Continued use in such a state may swell after the battery is no problem regarding safety. If the operating time is still too short even after being charged/ discharged many times, but there is fully... charged, the battery has worn out and needs to be replaced. Others Messages/Troubleshooting ∫ Messages Major confirmation/error messages to be indicated on the screen...
...Check points This unit cannot be unstable. If this unit may result in text. Continued use in such a state may swell after the battery is no problem regarding safety. If the operating time is still too short even after being charged/ discharged many times, but there is fully... charged, the battery has worn out and needs to be replaced. Others Messages/Troubleshooting ∫ Messages Major confirmation/error messages to be indicated on the screen...
HMTA1 User Guide
Page 56
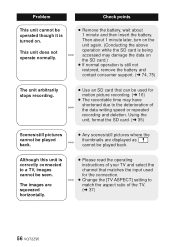
... operation is correctly connected to a TV, images cannot be seen. Then about 1 minute and then insert the battery. Scenes/still pictures cannot be played back. Although this unit is still not restored, remove the battery and contact consumer support. (l 74, 75) ≥ Use an SD card that matches the input used for... while the SD card is being accessed may have shortened due to the deterioration of the TV. (l 37) 56 VQT2Z95 Check points ≥ Remove the battery, wait about 1 minute later, turn on . This unit does not operate normally.
... operation is correctly connected to a TV, images cannot be seen. Then about 1 minute and then insert the battery. Scenes/still pictures cannot be played back. Although this unit is still not restored, remove the battery and contact consumer support. (l 74, 75) ≥ Use an SD card that matches the input used for... while the SD card is being accessed may have shortened due to the deterioration of the TV. (l 37) 56 VQT2Z95 Check points ≥ Remove the battery, wait about 1 minute later, turn on . This unit does not operate normally.
HMTA1 User Guide
Page 58
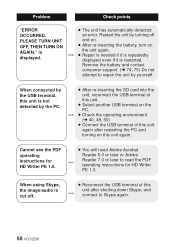
... the unit again. ≥ Repair is needed if it is repeatedly displayed even if it is cut off and on. ≥ After re-inserting the battery, turn on this unit again. ≥ You will need Adobe Acrobat Reader 5.0 or later or Adobe Reader 7.0 or later to repair the unit by the...
... the unit again. ≥ Repair is needed if it is repeatedly displayed even if it is cut off and on. ≥ After re-inserting the battery, turn on this unit again. ≥ You will need Adobe Acrobat Reader 5.0 or later or Adobe Reader 7.0 or later to repair the unit by the...

HMTA1 User Guide
Page 59
... away as possible from electromagnetic equipment (such as microwave ovens, TVs, video games etc.). ≥ If you use this unit off and remove the battery. Then reinsert the battery and turn this unit on top of or near a TV, the pictures and/or sound on . VQT2Z95 59 While being stored, that item...
... away as possible from electromagnetic equipment (such as microwave ovens, TVs, video games etc.). ≥ If you use this unit off and remove the battery. Then reinsert the battery and turn this unit on top of or near a TV, the pictures and/or sound on . VQT2Z95 59 While being stored, that item...
HMTA1 User Guide
Page 60
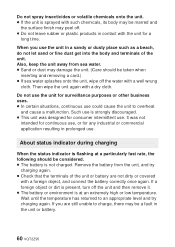
... in a sandy or dusty place such as a beach, do not let sand or fine dust get into the body and terminals of the unit or battery are still unable to charge, there may be a fault in prolonged use . If you use could cause the unit to an appropriate level and try... charging again. ≥ Check that the terminals of the unit. Remove the battery from sea water. ≥ Sand or dust may damage the unit. (Care should be considered. ≥ The battery is not charged. Such use is strongly discouraged. ≥ This unit was not intended for continuous...
... in a sandy or dusty place such as a beach, do not let sand or fine dust get into the body and terminals of the unit or battery are still unable to charge, there may be a fault in prolonged use . If you use could cause the unit to an appropriate level and try... charging again. ≥ Check that the terminals of the unit. Remove the battery from sea water. ≥ Sand or dust may damage the unit. (Care should be considered. ≥ The battery is not charged. Such use is strongly discouraged. ≥ This unit was not intended for continuous...


