HDCSD40P User Guide
Page 1
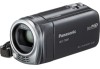
Owner's Manual High Definition Video Camera Model No.HDC-SD40P/PC HDC-TM40P/PC HDC-TM41P/PC Before connecting, operating or adjusting this product, please read the instructions completely. For USA and Puerto Rico assistance, please call: 1-800-211-PANA(7262) or, contact us via the web at: http://www.panasonic.com/contactinfo For Canadian assistance, please call: 1-800-561-5505 or visit us at www.panasonic.ca VQT3J95
Owner's Manual High Definition Video Camera Model No.HDC-SD40P/PC HDC-TM40P/PC HDC-TM41P/PC Before connecting, operating or adjusting this product, please read the instructions completely. For USA and Puerto Rico assistance, please call: 1-800-211-PANA(7262) or, contact us via the web at: http://www.panasonic.com/contactinfo For Canadian assistance, please call: 1-800-561-5505 or visit us at www.panasonic.ca VQT3J95

HDCSD40P User Guide
Page 5
... batteries according to recycle this battery. Please call 1-800-8-BATTERY for information on how to the manufacturer's instructions. ∫ Product Identification Marking Product High Definition Video Camera AC adaptor Battery holder Bottom Location U.S.A./CANADA CONSUMERS: ATTENTION: A lithium ion/polymer battery that is incorrectly replaced.
... batteries according to recycle this battery. Please call 1-800-8-BATTERY for information on how to the manufacturer's instructions. ∫ Product Identification Marking Product High Definition Video Camera AC adaptor Battery holder Bottom Location U.S.A./CANADA CONSUMERS: ATTENTION: A lithium ion/polymer battery that is incorrectly replaced.

HDCSD40P User Guide
Page 10
.../HDC-TM41 30 Recording motion pictures 31 Recording still pictures 33 Intelligent Auto Mode 34 Motion picture/Still picture playback 36 Using the menu screen 39 Using the Setup Menu 40 Zoom in/out function 47 Optical image stabilizer function .......... 48 Recording with the video light 48... scenes/still pictures 69 Dividing a scene (AVCHD 71 Dividing a scene to partially delete (iFrame 72 Protecting scenes/still pictures ......... 73 Watching Video/ Pictures on your TV 74 Connecting with a HDMI mini cable 77 Connecting with the AV multi cable 77 Playback using VIERA Link 78 10...
.../HDC-TM41 30 Recording motion pictures 31 Recording still pictures 33 Intelligent Auto Mode 34 Motion picture/Still picture playback 36 Using the menu screen 39 Using the Setup Menu 40 Zoom in/out function 47 Optical image stabilizer function .......... 48 Recording with the video light 48... scenes/still pictures 69 Dividing a scene (AVCHD 71 Dividing a scene to partially delete (iFrame 72 Protecting scenes/still pictures ......... 73 Watching Video/ Pictures on your TV 74 Connecting with a HDMI mini cable 77 Connecting with the AV multi cable 77 Playback using VIERA Link 78 10...

HDCSD40P User Guide
Page 11
Copy/Dubbing Copying from Built-in Memory to SD card [HDC-TM40/HDC-TM41 80 Dubbing with a Blu-ray disc recorder, video devices, etc 82 With a PC What you can do with a PC 86 End User License Agreement 88 Operating environment 89 Installation 92 Connecting to a PC ...
Copy/Dubbing Copying from Built-in Memory to SD card [HDC-TM40/HDC-TM41 80 Dubbing with a Blu-ray disc recorder, video devices, etc 82 With a PC What you can do with a PC 86 End User License Agreement 88 Operating environment 89 Installation 92 Connecting to a PC ...

HDCSD40P User Guide
Page 15
...the mode to . 2) Select the play back, then press the ENTER button. ≥ Press the MENU button. ∫ Selecting a media to record [HDC-TM40/HDC-TM41] 1) Change the mode to . 2) Select the menu. : [MEDIA SELECT] 3) Select the media to record motion pictures or still pictures using ...3/4/2 and press the ENTER button. 3) Select the [VIDEO/PICTURE] you wish to play back, then press the ENTER button. / Select the [MEDIA] and [VIDEO/ ...
...the mode to . 2) Select the play back, then press the ENTER button. ≥ Press the MENU button. ∫ Selecting a media to record [HDC-TM40/HDC-TM41] 1) Change the mode to . 2) Select the menu. : [MEDIA SELECT] 3) Select the media to record motion pictures or still pictures using ...3/4/2 and press the ENTER button. 3) Select the [VIDEO/PICTURE] you wish to play back, then press the ENTER button. / Select the [MEDIA] and [VIDEO/ ...

HDCSD40P User Guide
Page 17
Preparation Parts identification and handling 1 2 34 5 AV MULTI 7 89 6 10 11 12 1 Power button [ ] (l 26) 2 Delete/Video light button [ /LIGHT] (l 48, 69) 3 Intelligent auto/Manual button [iA/MANUAL] (l 34, 59) 4 Optical image stabilizer button [ O.I.S.] (l 48) 5 Recording start/stop button (l 31) 6 Battery holder (l ... 15 ≥ Slide the opening/closing switch to open/ close the cover. 16 15 Lens cover 16 Lens 17 17 Internal stereo microphones 18 18 Video light (l 48) 17 VQT3J95
Preparation Parts identification and handling 1 2 34 5 AV MULTI 7 89 6 10 11 12 1 Power button [ ] (l 26) 2 Delete/Video light button [ /LIGHT] (l 48, 69) 3 Intelligent auto/Manual button [iA/MANUAL] (l 34, 59) 4 Optical image stabilizer button [ O.I.S.] (l 48) 5 Recording start/stop button (l 31) 6 Battery holder (l ... 15 ≥ Slide the opening/closing switch to open/ close the cover. 16 15 Lens cover 16 Lens 17 17 Internal stereo microphones 18 18 Video light (l 48) 17 VQT3J95
HDCSD40P User Guide
Page 30
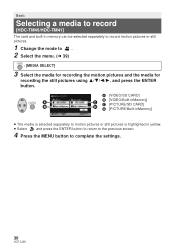
Basic Selecting a media to record [HDC-TM40/HDC-TM41] The card and built-in yellow. ≥ Select and press the ENTER button to return to the previous screen. 4 Press the MENU button to . 2 ...] 3 Select the media for recording the motion pictures and the media for recording the still pictures using 3/4/2/1, and press the ENTER button. A [VIDEO/SD CARD] B [VIDEO/Built-inMemory] C [PICTURE/SD CARD] D [PICTURE/Built-inMemory] ≥ The media is selected separately to motion pictures or still pictures is highlighted...
Basic Selecting a media to record [HDC-TM40/HDC-TM41] The card and built-in yellow. ≥ Select and press the ENTER button to return to the previous screen. 4 Press the MENU button to . 2 ...] 3 Select the media for recording the motion pictures and the media for recording the still pictures using 3/4/2/1, and press the ENTER button. A [VIDEO/SD CARD] B [VIDEO/Built-inMemory] C [PICTURE/SD CARD] D [PICTURE/Built-inMemory] ≥ The media is selected separately to motion pictures or still pictures is highlighted...

HDCSD40P User Guide
Page 36
... mode to . 2 Select the play mode select icon A using 3/4/2 and press the ENTER button. 3 Select the [VIDEO/PICTURE] you wish to play back, then press the ENTER button. / Select the [MEDIA] and [VIDEO/PICTURE] you select / and press the ENTER button, the next (previous) page is selected in step 3. ≥ When...
... mode to . 2 Select the play mode select icon A using 3/4/2 and press the ENTER button. 3 Select the [VIDEO/PICTURE] you wish to play back, then press the ENTER button. / Select the [MEDIA] and [VIDEO/PICTURE] you select / and press the ENTER button, the next (previous) page is selected in step 3. ≥ When...

HDCSD40P User Guide
Page 38
Motion picture compatibility ≥ This unit is based on AVCHD format/MPEG-4 AVC file format. ≥ Video signal for the AVCHD that can be played back with this unit is 1920k1080/60i. ≥ Video signal for Camera File system) established by JEITA (Japan Electronics and Information Technology Industries Association). ≥ The file format...
Motion picture compatibility ≥ This unit is based on AVCHD format/MPEG-4 AVC file format. ≥ Video signal for the AVCHD that can be played back with this unit is 1920k1080/60i. ≥ Video signal for Camera File system) established by JEITA (Japan Electronics and Information Technology Industries Association). ≥ The file format...

HDCSD40P User Guide
Page 48
... button Setting of the video light switches every time the button is pressed while in recording mode. (On) # setting canceled ≥ When the video light is shortened. ≥ The subject should be possible under strong shaking conditions. Optical image stabilizer button Press the button... to turn the optical image stabilizer on. ≥ When recording with the video light The video light enables brightening of the unit. ≥ Using the Color Night Rec Function at the same time will make conditions even brighter...
... button Setting of the video light switches every time the button is pressed while in recording mode. (On) # setting canceled ≥ When the video light is shortened. ≥ The subject should be possible under strong shaking conditions. Optical image stabilizer button Press the button... to turn the optical image stabilizer on. ≥ When recording with the video light The video light enables brightening of the unit. ≥ Using the Color Night Rec Function at the same time will make conditions even brighter...

HDCSD40P User Guide
Page 51
... focus on the subject at a distance of approx. 50 cm (20q). ≥ If you set the tele macro function when the zoom is set to [VIDEO/SD CARD] j If you press the MENU button j If you turn the unit off the background. ≥ The unit can be obtained by focusing on...
... focus on the subject at a distance of approx. 50 cm (20q). ≥ If you set the tele macro function when the zoom is set to [VIDEO/SD CARD] j If you press the MENU button j If you turn the unit off the background. ≥ The unit can be obtained by focusing on...

HDCSD40P User Guide
Page 60
.... Icon AWB Mode/Recording conditions Auto white balance adjustment Sunny mode: Outdoors under a clear sky Cloudy mode: Outdoors under cloudy sky Indoor mode 1: Incandescent light, video lights like in gymnasiums etc. In this case, use other White balance modes. ≥ If you turn on the screen when AWB is being set .
.... Icon AWB Mode/Recording conditions Auto white balance adjustment Sunny mode: Outdoors under a clear sky Cloudy mode: Outdoors under cloudy sky Indoor mode 1: Incandescent light, video lights like in gymnasiums etc. In this case, use other White balance modes. ≥ If you turn on the screen when AWB is being set .

HDCSD40P User Guide
Page 64
Recording mode Aspect ratio Picture size after playback of the last scene finishes. : [VIDEO SETUP] # [REPEAT PLAY] # [ON] The indication appears on the full screen views. ≥ All the scenes are played back repeatedly.) 64 VQT3J95 Repeat playback Playback ...
Recording mode Aspect ratio Picture size after playback of the last scene finishes. : [VIDEO SETUP] # [REPEAT PLAY] # [ON] The indication appears on the full screen views. ≥ All the scenes are played back repeatedly.) 64 VQT3J95 Repeat playback Playback ...

HDCSD40P User Guide
Page 65
... picture Move the zoom lever to side to zoom out. (k4 # k2 # k1) 65 VQT3J95 Resuming the previous playback If playback of a scene was stopped. : [VIDEO SETUP] # [RESUME PLAY] # [ON] If playback of a motion picture is enlarged, the more picture is stopped, scene. appears on the thumbnail view of the stopped...
... picture Move the zoom lever to side to zoom out. (k4 # k2 # k1) 65 VQT3J95 Resuming the previous playback If playback of a scene was stopped. : [VIDEO SETUP] # [RESUME PLAY] # [ON] If playback of a motion picture is enlarged, the more picture is stopped, scene. appears on the thumbnail view of the stopped...

HDCSD40P User Guide
Page 71
... the menu. : [EDIT SCENE] # [DIVIDE] # [SET] 2 Select the scene you wish to divide using the cursor button and press the ENTER button. 3 Select to set [VIDEO/PICTURE] of a given date exceeds 99. ≥ It may not be possible to divide scenes with a short recording time. ≥ Data that has been recorded...
... the menu. : [EDIT SCENE] # [DIVIDE] # [SET] 2 Select the scene you wish to divide using the cursor button and press the ENTER button. 3 Select to set [VIDEO/PICTURE] of a given date exceeds 99. ≥ It may not be possible to divide scenes with a short recording time. ≥ Data that has been recorded...

HDCSD40P User Guide
Page 72
... the point where you want to divide the scene. (l 63) ≥ Set to at least 2 seconds for the portions to be possible to , and set [VIDEO/PICTURE] of the play back) the part for deletion. ≥ A confirmation message appears when [NO] is selected. Proceed to partially delete (iFrame) Divide the iFrame...
... the point where you want to divide the scene. (l 63) ≥ Set to at least 2 seconds for the portions to be possible to , and set [VIDEO/PICTURE] of the play back) the part for deletion. ≥ A confirmation message appears when [NO] is selected. Proceed to partially delete (iFrame) Divide the iFrame...

HDCSD40P User Guide
Page 73
SETUP] # [SCENE PROTECT] 2 Select the scene/still picture to . 1 Select the menu. : [VIDEO SETUP] or [PICT. Protecting scenes/still pictures Scenes/still pictures can be protected so that they are not deleted by mistake. (Even if you protect ...
SETUP] # [SCENE PROTECT] 2 Select the scene/still picture to . 1 Select the menu. : [VIDEO SETUP] or [PICT. Protecting scenes/still pictures Scenes/still pictures can be protected so that they are not deleted by mistake. (Even if you protect ...

HDCSD40P User Guide
Page 74
...back the recorded high definition images, you can enjoy them in high resolution with the connected terminals. A High quality 1 HDMI terminal 2 Component terminal 3 Video terminal ≥ Use the AV multi cable (supplied) or HDMI mini cable (optional) and check the output settings. (l 77) ≥ HDMI is... to component terminal compatible with 1080i Standard images when connecting to component terminal compatible with the terminals. Advanced (Playback) Watching Video/Pictures on your TV Confirm the terminals on your TV and use a cable compatible with 480i 3 Standard images when connecting to...
...back the recorded high definition images, you can enjoy them in high resolution with the connected terminals. A High quality 1 HDMI terminal 2 Component terminal 3 Video terminal ≥ Use the AV multi cable (supplied) or HDMI mini cable (optional) and check the output settings. (l 77) ≥ HDMI is... to component terminal compatible with 1080i Standard images when connecting to component terminal compatible with the terminals. Advanced (Playback) Watching Video/Pictures on your TV Confirm the terminals on your TV and use a cable compatible with 480i 3 Standard images when connecting to...

HDCSD40P User Guide
Page 75
...connecting to the AV terminal of the TV, do not connect the component terminal plug of the AV multi cable. Select the [Component] or [Video 2] channel with an AV multi cable. (The name of the channel may not display when the component terminal plug is connected simultaneously. 2 Select ...with the PRE-REC setting on, images will not be displayed on the TV during recording mode. 75 VQT3J95 optional). ≥ Do not use a genuine Panasonic HDMI mini cable (RP-CDHM15, RP-CDHM30; Image may differ depending on the connected TV.) ≥ Check the input setting (input switch) and the...
...connecting to the AV terminal of the TV, do not connect the component terminal plug of the AV multi cable. Select the [Component] or [Video 2] channel with an AV multi cable. (The name of the channel may not display when the component terminal plug is connected simultaneously. 2 Select ...with the PRE-REC setting on, images will not be displayed on the TV during recording mode. 75 VQT3J95 optional). ≥ Do not use a genuine Panasonic HDMI mini cable (RP-CDHM15, RP-CDHM30; Image may differ depending on the connected TV.) ≥ Check the input setting (input switch) and the...
HDCSD40P User Guide
Page 77
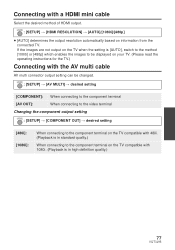
... multi connector output setting can be changed. : [SETUP] # [AV MULTI] # desired setting [COMPONENT]: When connecting to the component terminal [AV OUT]: When connecting to the video terminal Changing the component output setting : [SETUP] # [COMPONENT OUT] # desired setting [480i]: [1080i]: When connecting to the component terminal on the TV compatible with 1080i...
... multi connector output setting can be changed. : [SETUP] # [AV MULTI] # desired setting [COMPONENT]: When connecting to the component terminal [AV OUT]: When connecting to the video terminal Changing the component output setting : [SETUP] # [COMPONENT OUT] # desired setting [480i]: [1080i]: When connecting to the component terminal on the TV compatible with 1080i...


