

Owners Manual
Page 3
... turning the equipment off and on a circuit different from that interference will not occur in a residential installation. Declaration of Conformity Trade Name: Panasonic Model No.: HDC-SD40P/HDC-TM40P/HDC-TM41P Responsible party: Panasonic Corporation of North America One Panasonic Way, Secaucus, NJ 07094 Support Contact: Panasonic Consumer Electronics Company 1-800-211-PANA (7262) This device complies with the limits for help. Operation...
... turning the equipment off and on a circuit different from that interference will not occur in a residential installation. Declaration of Conformity Trade Name: Panasonic Model No.: HDC-SD40P/HDC-TM40P/HDC-TM41P Responsible party: Panasonic Corporation of North America One Panasonic Way, Secaucus, NJ 07094 Support Contact: Panasonic Consumer Electronics Company 1-800-211-PANA (7262) This device complies with the limits for help. Operation...

Owners Manual
Page 8
... cards. 8 VQT3J95 ∫ About the recording format for recording motion pictures You can select from either AVCHD or iFrame recording formats to record motion pictures using this component, pay attention to the following operations when the lamp illuminates. In order to avoid erasing data due to static electricity, electromagnetic waves, breakage, and failures, back up data periodically. j Turn the unit off (remove the battery) j Insert and remove the USB cable...
... cards. 8 VQT3J95 ∫ About the recording format for recording motion pictures You can select from either AVCHD or iFrame recording formats to record motion pictures using this component, pay attention to the following operations when the lamp illuminates. In order to avoid erasing data due to static electricity, electromagnetic waves, breakage, and failures, back up data periodically. j Turn the unit off (remove the battery) j Insert and remove the USB cable...

Owners Manual
Page 10
...a mode 27 Setting date and time 28 Basic Before recording 29 Selecting a media to record [HDC-TM40/HDC-TM41 30 Recording motion pictures 31 Recording still pictures 33 Intelligent Auto Mode 34 Motion picture/Still picture playback 36 Using the menu screen 39 Using the Setup Menu 40 Zoom in/out function 47 Optical image stabilizer function .......... 48 Recording with the video light 48 Recording functions of operation icons 49 Operation icons 49 Recording functions of menus 53 Manual recording 59 White balance 59 Manual shutter speed/ iris adjustment 61 Recording with Manual...
...a mode 27 Setting date and time 28 Basic Before recording 29 Selecting a media to record [HDC-TM40/HDC-TM41 30 Recording motion pictures 31 Recording still pictures 33 Intelligent Auto Mode 34 Motion picture/Still picture playback 36 Using the menu screen 39 Using the Setup Menu 40 Zoom in/out function 47 Optical image stabilizer function .......... 48 Recording with the video light 48 Recording functions of operation icons 49 Operation icons 49 Recording functions of menus 53 Manual recording 59 White balance 59 Manual shutter speed/ iris adjustment 61 Recording with Manual...
Owners Manual
Page 11
Copy/Dubbing Copying from Built-in Memory to SD card [HDC-TM40/HDC-TM41 80 Dubbing with a Blu-ray disc recorder, video devices, etc 82 With a PC What you can do with a PC 86 End User License Agreement 88 Operating environment 89 Installation 92 Connecting to a PC 94 About the PC display 96 Starting HD Writer LE 1.0 97 Reading the operating instructions of the software applications 97 If using Mac 98...
Copy/Dubbing Copying from Built-in Memory to SD card [HDC-TM40/HDC-TM41 80 Dubbing with a Blu-ray disc recorder, video devices, etc 82 With a PC What you can do with a PC 86 End User License Agreement 88 Operating environment 89 Installation 92 Connecting to a PC 94 About the PC display 96 Starting HD Writer LE 1.0 97 Reading the operating instructions of the software applications 97 If using Mac 98...

Owners Manual
Page 15
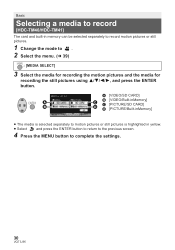
... record [HDC-TM40/HDC-TM41] 1) Change the mode to . 2) Select the menu. : [MEDIA SELECT] 3) Select the media to record motion pictures or still pictures using 3/4/2 and press the ENTER button. 3) Select the [VIDEO/PICTURE] you wish to play back, then press the ENTER button. / Select the [MEDIA] and [VIDEO/ PICTURE] you begin recording, ; A When you wish to play mode select icon A using 3/4/2/1, and press the ENTER button. ≥ Select [VIDEO/SD CARD] or [PICTURE/ SD CARD] to record...
... record [HDC-TM40/HDC-TM41] 1) Change the mode to . 2) Select the menu. : [MEDIA SELECT] 3) Select the media to record motion pictures or still pictures using 3/4/2 and press the ENTER button. 3) Select the [VIDEO/PICTURE] you wish to play back, then press the ENTER button. / Select the [MEDIA] and [VIDEO/ PICTURE] you begin recording, ; A When you wish to play mode select icon A using 3/4/2/1, and press the ENTER button. ≥ Select [VIDEO/SD CARD] or [PICTURE/ SD CARD] to record...
Owners Manual
Page 30
... record motion pictures or still pictures. 1 Change the mode to complete the settings. 30 VQT3J95 Basic Selecting a media to record [HDC-TM40/HDC-TM41] The card and built-in yellow. ≥ Select and press the ENTER button to return to the previous screen. 4 Press the MENU button to . 2 Select the menu. (l 39) : [MEDIA SELECT] 3 Select the media for recording the motion pictures and the media for recording the still pictures using...
... record motion pictures or still pictures. 1 Change the mode to complete the settings. 30 VQT3J95 Basic Selecting a media to record [HDC-TM40/HDC-TM41] The card and built-in yellow. ≥ Select and press the ENTER button to return to the previous screen. 4 Press the MENU button to . 2 Select the menu. (l 39) : [MEDIA SELECT] 3 Select the media for recording the motion pictures and the media for recording the still pictures using...

Owners Manual
Page 43
... recordable time with the battery will be shorter. [LCD SET] It adjusts brightness and color density on the LCD monitor. ≥ These settings will not affect the images actually recorded. 1 Select [LCD SET] and press the ENTER button. 2 Select the item using 3/4, and press the ENTER button to set. [BRIGHTNESS]: Brightness of the LCD monitor [COLOR]: Color level of the LCD monitor 3 Press 2/1 to adjust, and press the ENTER button. ≥ Press the MENU button...
... recordable time with the battery will be shorter. [LCD SET] It adjusts brightness and color density on the LCD monitor. ≥ These settings will not affect the images actually recorded. 1 Select [LCD SET] and press the ENTER button. 2 Select the item using 3/4, and press the ENTER button to set. [BRIGHTNESS]: Brightness of the LCD monitor [COLOR]: Color level of the LCD monitor 3 Press 2/1 to adjust, and press the ENTER button. ≥ Press the MENU button...
Owners Manual
Page 56
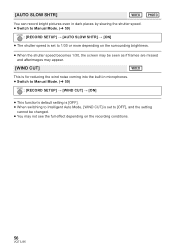
...can record bright pictures even in dark places by slowing the shutter speed. ≥ Switch to Manual Mode. (l 59) : [RECORD SETUP] # [AUTO SLOW SHTR] # [ON] ≥ The shutter speed is set to 1/30 or more depending on the surrounding brightness. ≥ When the shutter speed becomes 1/30, the screen ...Switch to Manual Mode. (l 59) : [RECORD SETUP] # [WIND CUT] # [ON] ≥ This function's default setting is [OFF]. ≥ When switching to Intelligent Auto Mode, [WIND CUT] is set to [OFF], and the setting cannot be changed. ≥ You may not see the full effect depending on the recording ...
...can record bright pictures even in dark places by slowing the shutter speed. ≥ Switch to Manual Mode. (l 59) : [RECORD SETUP] # [AUTO SLOW SHTR] # [ON] ≥ The shutter speed is set to 1/30 or more depending on the surrounding brightness. ≥ When the shutter speed becomes 1/30, the screen ...Switch to Manual Mode. (l 59) : [RECORD SETUP] # [WIND CUT] # [ON] ≥ This function's default setting is [OFF]. ≥ When switching to Intelligent Auto Mode, [WIND CUT] is set to [OFF], and the setting cannot be changed. ≥ You may not see the full effect depending on the recording ...
Owners Manual
Page 57
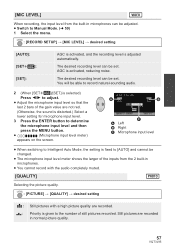
...; Switch to Manual Mode. (l 59) 1 Select the menu. : [RECORD SETUP] # [MIC LEVEL] # desired setting [AUTO]: [SETr ]: [SET]: AGC is activated, and the recording level is given to [AUTO] and cannot be changed. ≥ The microphone input level meter shows the larger of the gain value are recorded. : Priority is adjusted automatically. A Left B Right C Microphone input level ≥ When switching to Intelligent Auto Mode, the setting is fixed to the number...
...; Switch to Manual Mode. (l 59) 1 Select the menu. : [RECORD SETUP] # [MIC LEVEL] # desired setting [AUTO]: [SETr ]: [SET]: AGC is activated, and the recording level is given to [AUTO] and cannot be changed. ≥ The microphone input level meter shows the larger of the gain value are recorded. : Priority is adjusted automatically. A Left B Right C Microphone input level ≥ When switching to Intelligent Auto Mode, the setting is fixed to the number...

Owners Manual
Page 58
... MENU button. ≥ Setting the self-timer to [2 SECONDS] is a good way to prevent image shake when the button is pressed while using a tripod etc. ≥ [SELF TIMER] is recorded after 2 seconds ≥ When the button is pressed, a still picture is canceled in the following cases. j If you change the mode j If you turn the unit off j If you start recording motion picture [SHTR SOUND] You can add a shutter sound when recording still pictures. : [PICTURE...
... MENU button. ≥ Setting the self-timer to [2 SECONDS] is a good way to prevent image shake when the button is pressed while using a tripod etc. ≥ [SELF TIMER] is recorded after 2 seconds ≥ When the button is pressed, a still picture is canceled in the following cases. j If you change the mode j If you turn the unit off j If you start recording motion picture [SHTR SOUND] You can add a shutter sound when recording still pictures. : [PICTURE...

Owners Manual
Page 76
... the operating instructions for playing back your pictures. http://panasonic.net/ ≥ Scenes recorded in [iFrame] cannot be played back on a TV. ≥ For details on how to the following support site for information about Panasonic TVs with a [16:9] aspect ratio on a regular TV (4:3) [TV ASPECT] setting [16:9] [4:3] ≥ If a wide-screen TV is connected, adjust the aspect setting on the screen Change the menu setting to display the images...
... the operating instructions for playing back your pictures. http://panasonic.net/ ≥ Scenes recorded in [iFrame] cannot be played back on a TV. ≥ For details on how to the following support site for information about Panasonic TVs with a [16:9] aspect ratio on a regular TV (4:3) [TV ASPECT] setting [16:9] [4:3] ≥ If a wide-screen TV is connected, adjust the aspect setting on the screen Change the menu setting to display the images...
Owners Manual
Page 77
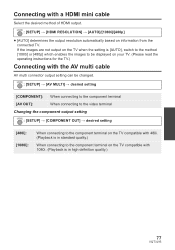
... the setting is [AUTO], switch to the method [1080i] or [480p] which enables the images to be displayed on your TV. (Please read the operating instructions for the TV.) Connecting with the AV multi cable AV multi connector output setting can be changed. : [SETUP] # [AV MULTI] # desired setting [COMPONENT]: When connecting to the component terminal [AV OUT]: When connecting to the video terminal Changing the component output setting : [SETUP...
... the setting is [AUTO], switch to the method [1080i] or [480p] which enables the images to be displayed on your TV. (Please read the operating instructions for the TV.) Connecting with the AV multi cable AV multi connector output setting can be changed. : [SETUP] # [AV MULTI] # desired setting [COMPONENT]: When connecting to the component terminal [AV OUT]: When connecting to the video terminal Changing the component output setting : [SETUP...

Owners Manual
Page 79
j Green: Switching the number of scenes/still pictures in thumbnail display (9 thumbnails # 20 thumbnails # 9 thumbnails...) Zoom in on still picture j Yellow: Deleting scenes/still pictures j Red: Zoom out from still picture ≥ To change the media for playback and [VIDEO/PICTURE], change the play mode selection using are compatible with VIERA Link, read the operating instructions for the TV's [Power on link] setting). ≥ Depending on the HDMI terminal on the remote control. Automatic input switching: If you are...
j Green: Switching the number of scenes/still pictures in thumbnail display (9 thumbnails # 20 thumbnails # 9 thumbnails...) Zoom in on still picture j Yellow: Deleting scenes/still pictures j Red: Zoom out from still picture ≥ To change the media for playback and [VIDEO/PICTURE], change the play mode selection using are compatible with VIERA Link, read the operating instructions for the TV's [Power on link] setting). ≥ Depending on the HDMI terminal on the remote control. Automatic input switching: If you are...

Owners Manual
Page 85
... recording on the recorder. ≥ If the date and time display and function indication are not wanted, cancel them before dubbing. (l 41) If the dubbed images are played back on the terminal to which the unit is connected to a video device using a video device You can dub by connecting an AV multi cable. ≥ Images are connecting to or read the operating instructions of the wide-screen TV and set...
... recording on the recorder. ≥ If the date and time display and function indication are not wanted, cancel them before dubbing. (l 41) If the dubbed images are played back on the terminal to which the unit is connected to a video device using a video device You can dub by connecting an AV multi cable. ≥ Images are connecting to or read the operating instructions of the wide-screen TV and set...
Owners Manual
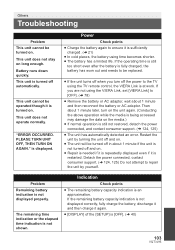
Page 103
... time indication is displayed. Indication Check points ≥ The remaining battery capacity indication is not displayed properly. Battery runs down quickly. Problem Remaining battery indication is an approximation. Power Check points ≥ Charge the battery again to the TV using the TV remote control, the VIERA Link is restarted. This unit does not stay on . ≥ Repair is needed if it is repeatedly displayed even if it again. ≥ [DISPLAY] of the [SETUP] is turned...
... time indication is displayed. Indication Check points ≥ The remaining battery capacity indication is not displayed properly. Battery runs down quickly. Problem Remaining battery indication is an approximation. Power Check points ≥ Charge the battery again to the TV using the TV remote control, the VIERA Link is restarted. This unit does not stay on . ≥ Repair is needed if it is repeatedly displayed even if it again. ≥ [DISPLAY] of the [SETUP] is turned...

Owners Manual
Page 104
..., or 1/100 in Auto Focus Mode, use the Manual Focus Mode to (Indoor mode 2). Problem The unit arbitrarily stops recording. Playback Check points ≥ Any scenes/still pictures where the thumbnails are trying to record a scene which is hard to bring into focus in areas of the data writing speed or repeated recording and deletion. Object seems to be played back. 104 VQT3J95 Color or brightness of the image changes, or you may...
..., or 1/100 in Auto Focus Mode, use the Manual Focus Mode to (Indoor mode 2). Problem The unit arbitrarily stops recording. Playback Check points ≥ Any scenes/still pictures where the thumbnails are trying to record a scene which is hard to bring into focus in areas of the data writing speed or repeated recording and deletion. Object seems to be played back. 104 VQT3J95 Color or brightness of the image changes, or you may...

Owners Manual
Page 105
..., it is connected to the operating instructions of the connected device. 105 VQT3J95 When connected by the USB cable, this unit) ≥ Connect with the capacity or type of the unit. VIERA Link does not work. Back up important data on the screen of SD card (SD Memory Card/SDHC Memory Card/ SDXC Memory Card) that you inserted. Problem Video or audio is not output even though it is set. Check on...
..., it is connected to the operating instructions of the connected device. 105 VQT3J95 When connected by the USB cable, this unit) ≥ Connect with the capacity or type of the unit. VIERA Link does not work. Back up important data on the screen of SD card (SD Memory Card/SDHC Memory Card/ SDXC Memory Card) that you inserted. Problem Video or audio is not output even though it is set. Check on...

Owners Manual
Page 114
... A Favors image quality B Favors recording time Recording mode Picture size 4 GB SD card 16 GB 64 GB 2h [iFrame] 960k540 19 min 1 h 20 min 5 h 20 min 2 h 40 min 4 h 10 min Built-in memory 16 GB 1 h 20 min ≥ If recording for long periods, prepare batteries for 3 or 4 times the period you wish to record for. (l 22) ≥ The default setting is [HG] Mode. ≥ Maximum continuously recordable time for...
... A Favors image quality B Favors recording time Recording mode Picture size 4 GB SD card 16 GB 64 GB 2h [iFrame] 960k540 19 min 1 h 20 min 5 h 20 min 2 h 40 min 4 h 10 min Built-in memory 16 GB 1 h 20 min ≥ If recording for long periods, prepare batteries for 3 or 4 times the period you wish to record for. (l 22) ≥ The default setting is [HG] Mode. ≥ Maximum continuously recordable time for...

Owners Manual
Page 115
... capacity for copyright protection and management and the capacity which can be used on whether and are only mentioned with their main memory size. Others Approximate number of recordable pictures ≥ SD cards are used together and on the subject being recorded. ≥ The memory capacity indicated on the label of an SD card is set to ) Picture size Aspect ratio 4 GB SD card 16 GB 64...
... capacity for copyright protection and management and the capacity which can be used on whether and are only mentioned with their main memory size. Others Approximate number of recordable pictures ≥ SD cards are used together and on the subject being recorded. ≥ The memory capacity indicated on the label of an SD card is set to ) Picture size Aspect ratio 4 GB SD card 16 GB 64...

Owners Manual
Page 126
... Approximate number of recordable pictures 115 Auto focus 35 Auto Ground-Directional Standby (AGS 55 Auto slow shutter 56 Automatic face framing 55 Automatic white balance 35 AV multi connector 17, 74, 85 AV multi connector output 77 AVCHD 8 ∫B Backlight compensation 50 Battery 20, 109 Battery capacity indication 23 Built-in memory 8 ∫C Card 24 Card status 45 Changing the display style 41 Charging time 22 Cleaning 108 Color night rec function...
... Approximate number of recordable pictures 115 Auto focus 35 Auto Ground-Directional Standby (AGS 55 Auto slow shutter 56 Automatic face framing 55 Automatic white balance 35 AV multi connector 17, 74, 85 AV multi connector output 77 AVCHD 8 ∫B Backlight compensation 50 Battery 20, 109 Battery capacity indication 23 Built-in memory 8 ∫C Card 24 Card status 45 Changing the display style 41 Charging time 22 Cleaning 108 Color night rec function...


