
HDCHS900P/PC User Guide
Page 1
For USA and Puerto Rico assistance, please call: 1-800-211-PANA(7262) or, contact us via the web at: http://www.panasonic.com/contactinfo For Canadian assistance, please call: 1-800-561-5505 or visit us at www.panasonic.ca VQT3K69 Owner's Manual High Definition Video Camera Model No.HDC-TM900P/PC HDC-HS900P/PC Before connecting, operating or adjusting this product, please read the instructions completely.
For USA and Puerto Rico assistance, please call: 1-800-211-PANA(7262) or, contact us via the web at: http://www.panasonic.com/contactinfo For Canadian assistance, please call: 1-800-561-5505 or visit us at www.panasonic.ca VQT3K69 Owner's Manual High Definition Video Camera Model No.HDC-TM900P/PC HDC-HS900P/PC Before connecting, operating or adjusting this product, please read the instructions completely.

HDCHS900P/PC User Guide
Page 5
... equivalent type recommended by the manufacturer. Please call 1-800-8-BATTERY for information on how to the manufacturer's instructions. ∫ Product Identification Marking Product High Definition Video Camera AC adaptor Battery holder Bottom Location U.S.A./CANADA CONSUMERS: ATTENTION: A lithium ion/polymer battery that is incorrectly replaced. See www.dtsc.ca.gov/hazardouswaste/perchlorate...
... equivalent type recommended by the manufacturer. Please call 1-800-8-BATTERY for information on how to the manufacturer's instructions. ∫ Product Identification Marking Product High Definition Video Camera AC adaptor Battery holder Bottom Location U.S.A./CANADA CONSUMERS: ATTENTION: A lithium ion/polymer battery that is incorrectly replaced. See www.dtsc.ca.gov/hazardouswaste/perchlorate...

HDCHS900P/PC User Guide
Page 10
... 61 Recording functions of menus 66 Manual recording 82 White balance 83 Manual shutter speed/iris adjustment 84 Recording with Manual focus 85 Recording 3D video 86 Functions not available during 3D recording 88 Basic Advanced (Playback) Before recording 32 Selecting a media to record 34 Recording motion pictures 35 Recording still...
... 61 Recording functions of menus 66 Manual recording 82 White balance 83 Manual shutter speed/iris adjustment 84 Recording with Manual focus 85 Recording 3D video 86 Functions not available during 3D recording 88 Basic Advanced (Playback) Before recording 32 Selecting a media to record 34 Recording motion pictures 35 Recording still...
HDCHS900P/PC User Guide
Page 11
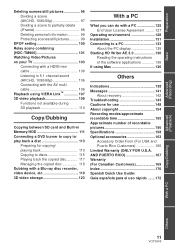
... scene to partially delete (iFrame 98 Deleting personal information 99 Protecting scenes/still pictures.......... 99 DPOF setting 100 Relay scene combining [HDC-TM900 101 Watching Video/Pictures on your TV 103 Connecting with a HDMI mini cable 106 Listening in 5.1 channel sound (AVCHD, 1080/60p 106 Connecting ... to discs 115 Playing back the copied disc........... 117 Managing the copied disc 118 Dubbing with a Blu-ray disc recorder, video device, etc 119 3D video storage 123 With a PC What you can do with a PC 125 End User License Agreement ......... 127 Operating environment 128 ...
... scene to partially delete (iFrame 98 Deleting personal information 99 Protecting scenes/still pictures.......... 99 DPOF setting 100 Relay scene combining [HDC-TM900 101 Watching Video/Pictures on your TV 103 Connecting with a HDMI mini cable 106 Listening in 5.1 channel sound (AVCHD, 1080/60p 106 Connecting ... to discs 115 Playing back the copied disc........... 117 Managing the copied disc 118 Dubbing with a Blu-ray disc recorder, video device, etc 119 3D video storage 123 With a PC What you can do with a PC 125 End User License Agreement ......... 127 Operating environment 128 ...

HDCHS900P/PC User Guide
Page 15
... Change the mode to display the Touch Menu. MENU : [MEDIA SELECT] 3) Touch the media to record motion pictures or still pictures. ≥ Touch [VIDEO/SD CARD] or [PICTURE/ SD CARD] to record to start recording. Touch (left side)/ (right side) of on the Touch Menu to switch the .... 3) Press the button fully to motion pictures or still pictures is highlighted in memory. HDC-TM900 Touch [VIDEO/Built-inMemory] or [PICTURE/Built-inMemory] to record to the built-in yellow. 4) Touch [ENTER]. HDC-HS900 Touch [VIDEO/HDD] or [PICTURE/HDD] to record to the HDD. ≥ The media is ...
... Change the mode to display the Touch Menu. MENU : [MEDIA SELECT] 3) Touch the media to record motion pictures or still pictures. ≥ Touch [VIDEO/SD CARD] or [PICTURE/ SD CARD] to record to start recording. Touch (left side)/ (right side) of on the Touch Menu to switch the .... 3) Press the button fully to motion pictures or still pictures is highlighted in memory. HDC-TM900 Touch [VIDEO/Built-inMemory] or [PICTURE/Built-inMemory] to record to the built-in yellow. 4) Touch [ENTER]. HDC-HS900 Touch [VIDEO/HDD] or [PICTURE/HDD] to record to the HDD. ≥ The media is ...

HDCHS900P/PC User Guide
Page 16
ALL 3) Select the [MEDIA] and [VIDEO/ PICTURE] you wish to be played back. for a specific period of the still pictures in step 3. ≥ To display the next (previous) page: j Slide ...
ALL 3) Select the [MEDIA] and [VIDEO/ PICTURE] you wish to be played back. for a specific period of the still pictures in step 3. ≥ To display the next (previous) page: j Slide ...

HDCHS900P/PC User Guide
Page 34
...-inMemory] C [PICTURE/SD CARD] D [PICTURE/Built-inMemory] HDC-HS900 E [VIDEO/SD CARD] F [VIDEO/HDD] G [PICTURE/SD CARD] H [PICTURE/HDD] ≥ The media is selected separately to motion pictures or still pictures is highlighted in memory and HDD media ...
...-inMemory] C [PICTURE/SD CARD] D [PICTURE/Built-inMemory] HDC-HS900 E [VIDEO/SD CARD] F [VIDEO/HDD] G [PICTURE/SD CARD] H [PICTURE/HDD] ≥ The media is selected separately to motion pictures or still pictures is highlighted in memory and HDD media ...

HDCHS900P/PC User Guide
Page 41
... Motion picture/Still picture playback 1 Change the mode to . 2 Touch the play mode select icon A. (l 30) 3 Select the [MEDIA] and [VIDEO/PICTURE] you wish to be played back. B is displayed when [1080/60p] is touched, is ALL displayed when [AVCHD] is touched or...displayed when [iFrame] is touched in step 3. ≥ To display the next (previous) page: j Slide the thumbnail display upward (downward) while touching it. HDC-TM900 ALL HDC-HS900 4 Touch the scene or the still picture to play back. ≥ Touch [ENTER]. j Switch the Touch Menu, and then touch (up)/ (down)...
... Motion picture/Still picture playback 1 Change the mode to . 2 Touch the play mode select icon A. (l 30) 3 Select the [MEDIA] and [VIDEO/PICTURE] you wish to be played back. B is displayed when [1080/60p] is touched, is ALL displayed when [AVCHD] is touched or...displayed when [iFrame] is touched in step 3. ≥ To display the next (previous) page: j Slide the thumbnail display upward (downward) while touching it. HDC-TM900 ALL HDC-HS900 4 Touch the scene or the still picture to play back. ≥ Touch [ENTER]. j Switch the Touch Menu, and then touch (up)/ (down)...

HDCHS900P/PC User Guide
Page 43
... volume lever or the zoom buttons to page 57 about 1080/60p. ≥ This unit is based on AVCHD format/MPEG-4 AVC file format. ≥ Video signals for the AVCHD that can be played back with this unit are 1920k1080/60i, 1920k1080/24p and 1440k1080/60i. ≥...; Video signals for the iFrame that can be played back with this unit are 960k540/30p. ≥ This unit may degrade or not play back motion ...
... volume lever or the zoom buttons to page 57 about 1080/60p. ≥ This unit is based on AVCHD format/MPEG-4 AVC file format. ≥ Video signals for the AVCHD that can be played back with this unit are 1920k1080/60i, 1920k1080/24p and 1440k1080/60i. ≥...; Video signals for the iFrame that can be played back with this unit are 960k540/30p. ≥ This unit may degrade or not play back motion ...

HDCHS900P/PC User Guide
Page 62
... dark or bright parts or the brightness is insufficient, the effect may not be recorded clearly. ≥ If there are in shadow and difficult to [VIDEO/SD CARD] j If you touch [MENU] or [Q.MENU] j If you press 1080/60p button j If you turn the unit off j If you start recording j After...
... dark or bright parts or the brightness is insufficient, the effect may not be recorded clearly. ≥ If there are in shadow and difficult to [VIDEO/SD CARD] j If you touch [MENU] or [Q.MENU] j If you press 1080/60p button j If you turn the unit off j If you start recording j After...

HDCHS900P/PC User Guide
Page 65
...Change the mode to 12k. ≥ Tele Macro function is recommended. ≥ In darker areas, Auto Focus may focus a bit slower. Then set [VIDEO/ PICTURE] to estimate the balance of approx. 70 cm (28q). ≥ When the Tele macro is set with the zoom magnification less than 12k.... use) : Increase the volume : Decrease the volume ≥ Actual volume to be used to [1080/60p], [AVCHD] or [iFrame]. (l 41) MENU : [VIDEO SETUP] # [GUIDE LINES] # desired setting ≥ To cancel the Guideline function during playback, set while in Still Picture Playback Mode. The function can also be...
...Change the mode to 12k. ≥ Tele Macro function is recommended. ≥ In darker areas, Auto Focus may focus a bit slower. Then set [VIDEO/ PICTURE] to estimate the balance of approx. 70 cm (28q). ≥ When the Tele macro is set with the zoom magnification less than 12k.... use) : Increase the volume : Decrease the volume ≥ Actual volume to be used to [1080/60p], [AVCHD] or [iFrame]. (l 41) MENU : [VIDEO SETUP] # [GUIDE LINES] # desired setting ≥ To cancel the Guideline function during playback, set while in Still Picture Playback Mode. The function can also be...
HDCHS900P/PC User Guide
Page 83
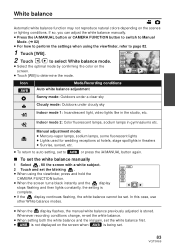
... . Icon AWB Mode/Recording conditions Auto white balance adjustment Sunny mode: Outdoors under a clear sky Cloudy mode: Outdoors under cloudy sky Indoor mode 1: Incandescent light, video lights like in gymnasiums etc. Manual adjustment mode: ≥ Mercury-vapor lamps, sodium lamps, some fluorescent lights ≥ Lights used for wedding receptions at hotels...
... . Icon AWB Mode/Recording conditions Auto white balance adjustment Sunny mode: Outdoors under a clear sky Cloudy mode: Outdoors under cloudy sky Indoor mode 1: Incandescent light, video lights like in gymnasiums etc. Manual adjustment mode: ≥ Mercury-vapor lamps, sodium lamps, some fluorescent lights ≥ Lights used for wedding receptions at hotels...

HDCHS900P/PC User Guide
Page 86
... using the viewfinder. 86 VQT3K69 LENS SETUP]) ≥ If the unit is not of high definition picture quality. ∫ Recording 3D video For details on how to attach and how to adjust the attachment position of the 3D Conversion Lens, please read the operating instructions for ... using for the 3D Conversion Lens. To view 3D video, a television that supports 3D is required. 3D video The image is an illustration. ≥ In the unit, the recordable 3D videos are side-by-side format (2-screen structure). ≥ Since the 3D video is recorded in side-by-side format, the recorded ...
... using the viewfinder. 86 VQT3K69 LENS SETUP]) ≥ If the unit is not of high definition picture quality. ∫ Recording 3D video For details on how to attach and how to adjust the attachment position of the 3D Conversion Lens, please read the operating instructions for ... using for the 3D Conversion Lens. To view 3D video, a television that supports 3D is required. 3D video The image is an illustration. ≥ In the unit, the recordable 3D videos are side-by-side format (2-screen structure). ≥ Since the 3D video is recorded in side-by-side format, the recorded ...

HDCHS900P/PC User Guide
Page 87
... with the lens cap attached in the shade etc., the screen may appear to normal. 87 VQT3K69 The gray frame will be recorded in the video. To ensure that you perform the adjustment again. 3D 0h00m00s HG R 1h20m A 3D appears. 5 Press the recording start/stop button to start recording.... ≥ Start recording after an impact etc., it is recommended that the 3D video can be safely viewed, pay attention to the following points when recording. ≥ Where possible, record with the unit in a horizontal state. ≥ Do...
... with the lens cap attached in the shade etc., the screen may appear to normal. 87 VQT3K69 The gray frame will be recorded in the video. To ensure that you perform the adjustment again. 3D 0h00m00s HG R 1h20m A 3D appears. 5 Press the recording start/stop button to start recording.... ≥ Start recording after an impact etc., it is recommended that the 3D video can be safely viewed, pay attention to the following points when recording. ≥ Where possible, record with the unit in a horizontal state. ≥ Do...
HDCHS900P/PC User Guide
Page 88
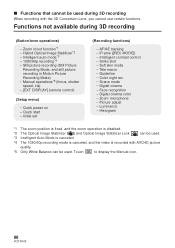
... Optical Image Stabilizer and Optical Image Stabilizer Lock can be used . *3 Intelligent Auto Mode is canceled. *4 The 1080/60p recording mode is canceled, and the video is recorded with the 3D Conversion Lens, you cannot use certain functions.
... Optical Image Stabilizer and Optical Image Stabilizer Lock can be used . *3 Intelligent Auto Mode is canceled. *4 The 1080/60p recording mode is canceled, and the video is recorded with the 3D Conversion Lens, you cannot use certain functions.

HDCHS900P/PC User Guide
Page 91
MENU : [VIDEO SETUP] # [REPEAT PLAY] # [ON] The indication appears on the full screen views. ≥ All the scenes are played back repeatedly.) Resuming the previous playback If ... can zoom in by touching a still picture during still picture playback. ≥ The still picture is zoomed in the following order: k1 # k2 # k4. MENU : [VIDEO SETUP] # [RESUME PLAY] # [ON] If playback of a motion picture is stopped, appears on the thumbnail view of the stopped scene. ≥ The memorized resume position...
MENU : [VIDEO SETUP] # [REPEAT PLAY] # [ON] The indication appears on the full screen views. ≥ All the scenes are played back repeatedly.) Resuming the previous playback If ... can zoom in by touching a still picture during still picture playback. ≥ The still picture is zoomed in the following order: k1 # k2 # k4. MENU : [VIDEO SETUP] # [RESUME PLAY] # [ON] If playback of a motion picture is stopped, appears on the thumbnail view of the stopped scene. ≥ The memorized resume position...

HDCHS900P/PC User Guide
Page 97
... still pictures recorded on other scenes, touch [NO] and repeat steps 2-3. 4 Touch [Return] to complete dividing. ≥ Unwanted parts can be divided. 3 Touch to set [VIDEO/ PICTURE] to [1080/60p] or [AVCHD]. (l 41) 1 Select the menu. MENU : [EDIT SCENE] # [DIVIDE] # [SET] 2 Touch the scene to be deleted after dividing. ≥ Change...
... still pictures recorded on other scenes, touch [NO] and repeat steps 2-3. 4 Touch [Return] to complete dividing. ≥ Unwanted parts can be divided. 3 Touch to set [VIDEO/ PICTURE] to [1080/60p] or [AVCHD]. (l 41) 1 Select the menu. MENU : [EDIT SCENE] # [DIVIDE] # [SET] 2 Touch the scene to be deleted after dividing. ≥ Change...

HDCHS900P/PC User Guide
Page 98
... delete all the divided points MENU : [EDIT SCENE] # [DIVIDE] # [CANCEL ALL] ≥ The scenes that were deleted after division cannot be divided. 3 Touch to set [VIDEO/ PICTURE] to partially delete (iFrame) Divide the iFrame scene, and delete unnecessary parts. The scenes that were deleted after division cannot be recovered. ≥ You...
... delete all the divided points MENU : [EDIT SCENE] # [DIVIDE] # [CANCEL ALL] ≥ The scenes that were deleted after division cannot be divided. 3 Touch to set [VIDEO/ PICTURE] to partially delete (iFrame) Divide the iFrame scene, and delete unnecessary parts. The scenes that were deleted after division cannot be recovered. ≥ You...

HDCHS900P/PC User Guide
Page 99
...Delete]. ≥ To continuously delete other personal information, repeat steps 2-3. ≥ Touch [Return] to and touch the play mode select icon. MENU : [VIDEO SETUP] or [PICT. SETUP] # [SCENE PROTECT] 2 Touch the scene/still picture to [1080/60p] or [AVCHD]. (l 41) ≥ Personal ...information is selected and the indication appears on the thumbnail. Then set [VIDEO/ PICTURE] to be protected. 99 VQT3K69 MENU : [VIDEO SETUP] # [DELETE PERSONAL INFO] 2 Touch the desired scenes with personal information to . 1 Select the menu. Touch...
...Delete]. ≥ To continuously delete other personal information, repeat steps 2-3. ≥ Touch [Return] to and touch the play mode select icon. MENU : [VIDEO SETUP] or [PICT. SETUP] # [SCENE PROTECT] 2 Touch the scene/still picture to [1080/60p] or [AVCHD]. (l 41) ≥ Personal ...information is selected and the indication appears on the thumbnail. Then set [VIDEO/ PICTURE] to be protected. 99 VQT3K69 MENU : [VIDEO SETUP] # [DELETE PERSONAL INFO] 2 Touch the desired scenes with personal information to . 1 Select the menu. Touch...
HDCHS900P/PC User Guide
Page 100
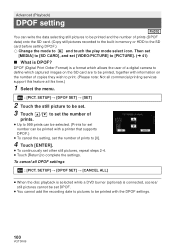
... icon. SETUP] # [DPOF SET] # [CANCEL ALL] ≥ When the disc playback is selected while a DVD burner (optional) is connected, scenes/ still pictures cannot be set [VIDEO/PICTURE] to be printed, together with the DPOF settings. 100 VQT3K69 Then set [MEDIA] to [SD CARD], and set DPOF. ≥ You cannot add the...
... icon. SETUP] # [DPOF SET] # [CANCEL ALL] ≥ When the disc playback is selected while a DVD burner (optional) is connected, scenes/ still pictures cannot be set [VIDEO/PICTURE] to be printed, together with the DPOF settings. 100 VQT3K69 Then set [MEDIA] to [SD CARD], and set DPOF. ≥ You cannot add the...


