Reference Manual
Page 2
... "hard disk" as "flash memory" whenever it appears in this manual according to the keyboard used. (e.g. You can update to update a driver appears. z The display of the key may result in minor or moderate injury. : Useful and helpful information. Right-click Touch and hold Ctrl key, and then press F7 key. Regarding Windows 7 This manual explains using the Windows 7 default setting. „ Windows Aero Do not turn Windows Aero on with the following menus. (Start) - [All Programs] - [Windows Update...
... "hard disk" as "flash memory" whenever it appears in this manual according to the keyboard used. (e.g. You can update to update a driver appears. z The display of the key may result in minor or moderate injury. : Useful and helpful information. Right-click Touch and hold Ctrl key, and then press F7 key. Regarding Windows 7 This manual explains using the Windows 7 default setting. „ Windows Aero Do not turn Windows Aero on with the following menus. (Start) - [All Programs] - [Windows Update...
Reference Manual
Page 3
B Remove the check mark from [Play Windows Startup sound], and click [OK]. „ If high-frequency sound occurs while using the computer A standard user needs to enter an administrator password and click [OK]. • Set [USB selective suspend setting] to [Enabled]. G Click [OK] and exit the [Advanced settings] screen. D In [Advanced settings], double-click [USB settings]. You can mute the sound at Windows startup. Sound and Video z Depending on the processing status on...
B Remove the check mark from [Play Windows Startup sound], and click [OK]. „ If high-frequency sound occurs while using the computer A standard user needs to enter an administrator password and click [OK]. • Set [USB selective suspend setting] to [Enabled]. G Click [OK] and exit the [Advanced settings] screen. D In [Advanced settings], double-click [USB settings]. You can mute the sound at Windows startup. Sound and Video z Depending on the processing status on...
Reference Manual
Page 4
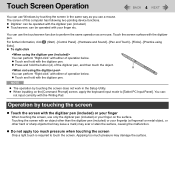
..., click (Start) - [Control Panel] - [Hardware and Sound] - [Pen and Touch] - [Flicks] - [Practice using flicks]. z Touch and hold the button (A) of operation below . z Do not apply too much pressure may scar or stain the surface, causing the malfunction. You can use the touchscreen function to perform the same operation as you use a mouse. You can perform "Right-click" with either of the digitizer pen, and then touch the object...
..., click (Start) - [Control Panel] - [Hardware and Sound] - [Pen and Touch] - [Flicks] - [Practice using flicks]. z Touch and hold the button (A) of operation below . z Do not apply too much pressure may scar or stain the surface, causing the malfunction. You can use the touchscreen function to perform the same operation as you use a mouse. You can perform "Right-click" with either of the digitizer pen, and then touch the object...
Reference Manual
Page 14
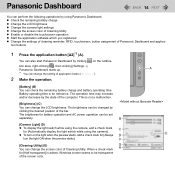
... power operation can change the LCD brightness. When a check mark for reference. A *1 You can change the setting of application button (Î page 17). 2 Make the operation. [Battery] (B) You can change the screen color of Cleaning Utility. Panasonic Dashboard 14 You can perform the following operations by clicking the desired position of the bar. z Check the remaining battery charge z Change the LCD brightness z Change the camera light settings z Change the screen color of Cleaning Utility z Enable or disable the touchscreen operation z Start the application software...
... power operation can change the LCD brightness. When a check mark for reference. A *1 You can change the setting of application button (Î page 17). 2 Make the operation. [Battery] (B) You can change the screen color of Cleaning Utility. Panasonic Dashboard 14 You can perform the following operations by clicking the desired position of the bar. z Check the remaining battery charge z Change the LCD brightness z Change the camera light settings z Change the screen color of Cleaning Utility z Enable or disable the touchscreen operation z Start the application software...
Reference Manual
Page 22
..., otherwise the data or file may cause malfunction of the hard disk drive indicator and the RFID indicator is on before sleep or hibernation. z Close files you were working on . • When playing/recording audio files or displaying motion video such as MPEG files. • When using communication software or network functions. • When using sleep or hibernation. You can quickly return to enter hibernation. If you set in sleep or hibernation...
..., otherwise the data or file may cause malfunction of the hard disk drive indicator and the RFID indicator is on before sleep or hibernation. z Close files you were working on . • When playing/recording audio files or displaying motion video such as MPEG files. • When using communication software or network functions. • When using sleep or hibernation. You can quickly return to enter hibernation. If you set in sleep or hibernation...
Reference Manual
Page 24
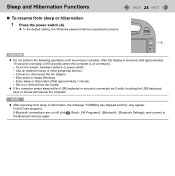
... the following operations until resuming is on a network). • Touch the screen, hardware buttons or power switch. • Use an external mouse or other peripheral devices. • Connect or disconnect the AC adaptor. • Shut down or restart Windows. • Enter sleep or hibernation (Wait approximately 1 minute). • Set to the Bluetooth devices again. Click [Close program]. z If the computer enters sleep while a USB keyboard or mouse is connected via Cradle, touching the USB keyboard keys or...
... the following operations until resuming is on a network). • Touch the screen, hardware buttons or power switch. • Use an external mouse or other peripheral devices. • Connect or disconnect the AC adaptor. • Shut down or restart Windows. • Enter sleep or hibernation (Wait approximately 1 minute). • Set to the Bluetooth devices again. Click [Close program]. z If the computer enters sleep while a USB keyboard or mouse is connected via Cradle, touching the USB keyboard keys or...
Reference Manual
Page 26
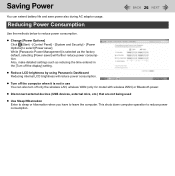
... power consumption. z Change [Power Options] Click (Start) - [Control Panel] - [System and Security] - [Power Options] to reduce power consumption. z Turn off the computer when it is selected as reducing the time entered in use You can extend battery life and save power also during AC adaptor usage. This shuts down computer operation to leave the computer. Also, make detailed settings such as the factory default, selecting [Power saver] will reduce power consumption. z Disconnect external devices (USB devices, external...
... power consumption. z Change [Power Options] Click (Start) - [Control Panel] - [System and Security] - [Power Options] to reduce power consumption. z Turn off the computer when it is selected as reducing the time entered in use You can extend battery life and save power also during AC adaptor usage. This shuts down computer operation to leave the computer. Also, make detailed settings such as the factory default, selecting [Power saver] will reduce power consumption. z Disconnect external devices (USB devices, external...
Reference Manual
Page 28
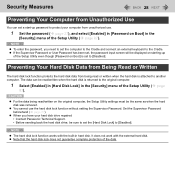
... [Enabled] in [Hard Disk Lock] in the [Security] menu of the Setup Utility (Î page 87). z You cannot use . 1 Set the password (Î page 27), and select [Enabled] in [Password on Boot] in hard disk. z When you need to set a start-up of the Setup Utility even though [Password on Boot] is set to [Disabled]. NOTE z The hard disk lock function works with the external hard disk. z If the Supervisor Password or User Password has been set, the password input screen will be read or written when the hard disk is...
... [Enabled] in [Hard Disk Lock] in the [Security] menu of the Setup Utility (Î page 87). z You cannot use . 1 Set the password (Î page 27), and select [Enabled] in [Password on Boot] in hard disk. z When you need to set a start-up of the Setup Utility even though [Password on Boot] is set to [Disabled]. NOTE z The hard disk lock function works with the external hard disk. z If the Supervisor Password or User Password has been set, the password input screen will be read or written when the hard disk is...
Reference Manual
Page 59
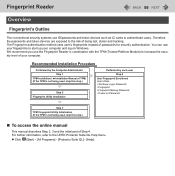
... on Password Step 3 TPM Fingerprint Utility Initialization (If the TPM is not being lost, stolen and hacking. z Click (Start) - [All Programs] - [Protector Suite QL] - [Help]. Therefore the passwords and token devices are exposed to increase the security level of being used , skip this step.) „ To access the online manual This manual describes Step 2, 3 and the initial part of passwords for security authentication. You can use ID/passwords...
... on Password Step 3 TPM Fingerprint Utility Initialization (If the TPM is not being lost, stolen and hacking. z Click (Start) - [All Programs] - [Protector Suite QL] - [Help]. Therefore the passwords and token devices are exposed to increase the security level of being used , skip this step.) „ To access the online manual This manual describes Step 2, 3 and the initial part of passwords for security authentication. You can use ID/passwords...
Reference Manual
Page 61
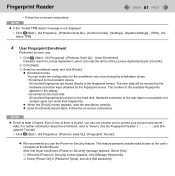
... the BIOS level. Select [Yes]. A When the [Power-on -screen instructions. Even if one of the user data is not displayed • Click (Start) - [All Programs] - [Protector Suite QL] - [Control Center] - [Settings] - [System Settings] - [TPM] - [Initialize TPM]. 4 User Fingerprint Enrollment Performed by the fingerprint sensor. For further information about the enrollment, refer to "How to access your account and secret data. Hardware protection of them is injured, you use...
... the BIOS level. Select [Yes]. A When the [Power-on -screen instructions. Even if one of the user data is not displayed • Click (Start) - [All Programs] - [Protector Suite QL] - [Control Center] - [Settings] - [System Settings] - [TPM] - [Initialize TPM]. 4 User Fingerprint Enrollment Performed by the fingerprint sensor. For further information about the enrollment, refer to "How to access your account and secret data. Hardware protection of them is injured, you use...

Reference Manual
Page 69
... enter an administrator password. z When you use the external display only, set the settings to [MID] in the previous status. Set the resolution again. z Carefully read the instruction manual of the internal LCD. z Until Windows startup is complete. z When you change the display after Windows starts up, do not press any button, key and screen until switching is completed (during sleep or hibernation. When you to switch between the internal LCD and the external display cannot be played...
... enter an administrator password. z When you use the external display only, set the settings to [MID] in the previous status. Set the resolution again. z Carefully read the instruction manual of the internal LCD. z Until Windows startup is complete. z When you change the display after Windows starts up, do not press any button, key and screen until switching is completed (during sleep or hibernation. When you to switch between the internal LCD and the external display cannot be played...
Reference Manual
Page 76
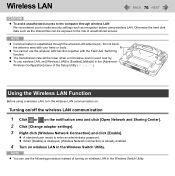
... area with the Fast User Switching function. z To use wireless LAN, set [Wireless LAN] to [Enabled] (default) in the Wireless Switch Utility. Otherwise the hard disk data such as encryption before using a wireless LAN, turn the wireless LAN communication on wireless LAN in the Wireless Switch Utility. Turning on/off the wireless LAN communication 1 Click or on wireless LAN in the [Advanced - z A standard user needs to make security settings such as the shared files can use the wireless LAN function together with your hand...
... area with the Fast User Switching function. z To use wireless LAN, set [Wireless LAN] to [Enabled] (default) in the Wireless Switch Utility. Otherwise the hard disk data such as encryption before using a wireless LAN, turn the wireless LAN communication on wireless LAN in the Wireless Switch Utility. Turning on/off the wireless LAN communication 1 Click or on wireless LAN in the [Advanced - z A standard user needs to make security settings such as the shared files can use the wireless LAN function together with your hand...
Reference Manual
Page 77
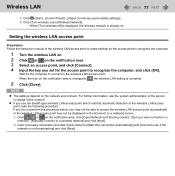
...]. B Input necessary information and add check marks for the computer to connect to , the wireless LAN setting is not broadcasting] and click [Next]. NOTE z The settings depend on the [Connect to a network] screen. Wireless LAN 77 A Click (Start) - [Control Panel] - [Adjust commonly used mobility settings]. If you do not perform the procedure below, you use the stealth type wireless LAN access point which restricts automatic detection of the network. B Click [Turn wireless...
...]. B Input necessary information and add check marks for the computer to connect to , the wireless LAN setting is not broadcasting] and click [Next]. NOTE z The settings depend on the [Connect to a network] screen. Wireless LAN 77 A Click (Start) - [Control Panel] - [Adjust commonly used mobility settings]. If you do not perform the procedure below, you use the stealth type wireless LAN access point which restricts automatic detection of the network. B Click [Turn wireless...

Reference Manual
Page 84
When an external display is displayed. Depending on the internal LCD even though the [External Monitor] is selected. Setup Utility 84 Main Menu System Date • Week/Month/Day/Year. • You can use Tab to [Flashing], the battery charging indicator flashes at relatively long intervals while the battery is being charged. Underlined items are the factory presets. [xx x/xx/xxxx] System Time • 24-hr. Battery Charging Indicator • When set to [Auto]. On Continuous...
When an external display is displayed. Depending on the internal LCD even though the [External Monitor] is selected. Setup Utility 84 Main Menu System Date • Week/Month/Day/Year. • You can use Tab to [Flashing], the battery charging indicator flashes at relatively long intervals while the battery is being charged. Underlined items are the factory presets. [xx x/xx/xxxx] System Time • 24-hr. Battery Charging Indicator • When set to [Auto]. On Continuous...
Reference Manual
Page 86
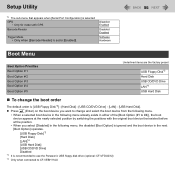
...set to [Enabled]. Disabled Enabled Disabled Enabled Software Hardware Boot Menu Boot Option Priorities Boot Option # 1 Boot Option # 2 Boot Option # 3 Boot Option # 4 Boot Option # 5 Underlined items are the factory preset USB Floppy Disk*3 Hard Disk USB CD/DVD Drive LAN*4 USB Hard Disk „ To change and select the boot device from the following menu. • When a selected boot device in the following menu already exists in the next [Boot Option] operates. [USB Floppy Disk]*3 [Hard Disk] [LAN]*4 [USB Hard Disk] [USB CD/DVD Drive] Disabled *3 It is recommended to use the Panasonic...
...set to [Enabled]. Disabled Enabled Disabled Enabled Software Hardware Boot Menu Boot Option Priorities Boot Option # 1 Boot Option # 2 Boot Option # 3 Boot Option # 4 Boot Option # 5 Underlined items are the factory preset USB Floppy Disk*3 Hard Disk USB CD/DVD Drive LAN*4 USB Hard Disk „ To change and select the boot device from the following menu. • When a selected boot device in the following menu already exists in the next [Boot Option] operates. [USB Floppy Disk]*3 [Hard Disk] [LAN]*4 [USB Hard Disk] [USB CD/DVD Drive] Disabled *3 It is recommended to use the Panasonic...
Reference Manual
Page 87
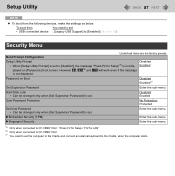
... an external keyboard to [Enabled] (Î page 85) Security Menu Boot Prompt Configuration Underlined items are the factory presets. Disabled Enabled User Password Protection No Protection Protected Set User Password • Can be changed only when [Set Supervisor Password] is set. Disabled Enabled Password on [Panasonic] boot screen. Enter the sub-menu. XEmbedded Security (TPM) XFingerprint Security Enter the sub-menu. To boot from the following devices, make the settings as below. Enter the sub-menu. *5 Only when connected to CF-VEBH11AU : "Press F2 for Setup...
... an external keyboard to [Enabled] (Î page 85) Security Menu Boot Prompt Configuration Underlined items are the factory presets. Disabled Enabled User Password Protection No Protection Protected Set User Password • Can be changed only when [Set Supervisor Password] is set. Disabled Enabled Password on [Panasonic] boot screen. Enter the sub-menu. XEmbedded Security (TPM) XFingerprint Security Enter the sub-menu. To boot from the following devices, make the settings as below. Enter the sub-menu. *5 Only when connected to CF-VEBH11AU : "Press F2 for Setup...
Reference Manual
Page 97
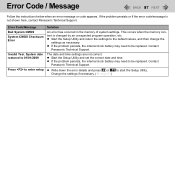
Error Code / Message 97 Follow the instructions below when an error message or code appears. z Start the Setup Utility and return the settings to enter setup Solution An error has occurred in the memory of system settings. z If the problem persists, the internal clock battery may need to start the Setup Utility. System date restored to 01/01/2009 Press to the default values, and then change the settings as necessary. Contact Panasonic Technical Support. Change the settings if necessary...
Error Code / Message 97 Follow the instructions below when an error message or code appears. z Start the Setup Utility and return the settings to enter setup Solution An error has occurred in the memory of system settings. z If the problem persists, the internal clock battery may need to start the Setup Utility. System date restored to 01/01/2009 Press to the default values, and then change the settings as necessary. Contact Panasonic Technical Support. Change the settings if necessary...
Reference Manual
Page 103
... reinitialize the device. z A standard user needs to enter an administrator password. B Click [View] - [Resources by Panasonic USB floppy disk drive (optional : CF-VFDU03U) when the computer boots from sleep or hibernation, devices such as a boot drive. If the problem persists, restart the computer. A Click (Start) - [Computer] - [System properties] - [Device Manager]. z Contact the manufacturer of the Setup Utility (Î page 85). z A standard user needs to enter an administrator password. Click (Start) - [Control Panel] - [System and Security] - [Power Options], and...
... reinitialize the device. z A standard user needs to enter an administrator password. B Click [View] - [Resources by Panasonic USB floppy disk drive (optional : CF-VFDU03U) when the computer boots from sleep or hibernation, devices such as a boot drive. If the problem persists, restart the computer. A Click (Start) - [Computer] - [System properties] - [Device Manager]. z Contact the manufacturer of the Setup Utility (Î page 85). z A standard user needs to enter an administrator password. Click (Start) - [Control Panel] - [System and Security] - [Power Options], and...
Reference Manual
Page 106
... Power-on security (Preboot Authentication), you need to the device, a new passport will be lost. Please note that can enter using the [File Safe] backup password. If you need to update the related data. B Update the enrolled fingerprints. However, in the latter case all your stored secret data (passwords, [File Safe] encryption keys) will be used , "Protector Suite QL" has not stored any user can still access [File Safe] by using the backup password...
... Power-on security (Preboot Authentication), you need to the device, a new passport will be lost. Please note that can enter using the [File Safe] backup password. If you need to update the related data. B Update the enrolled fingerprints. However, in the latter case all your stored secret data (passwords, [File Safe] encryption keys) will be used , "Protector Suite QL" has not stored any user can still access [File Safe] by using the backup password...
Reference Manual
Page 110
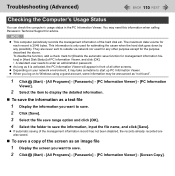
... start up PC Information Viewer. This information is only used for estimating the cause when the hard disk goes down by any other screens. z If automatic saving of the management information record has not been disabled, the records already recorded are never sent to save the information as an image file 1 Display the screen you want to enter an administrator password. Troubleshooting...
... start up PC Information Viewer. This information is only used for estimating the cause when the hard disk goes down by any other screens. z If automatic saving of the management information record has not been disabled, the records already recorded are never sent to save the information as an image file 1 Display the screen you want to enter an administrator password. Troubleshooting...


