Memory Card Camera Recorder
Page 8
Contents Read this first 2 Before using Features of Memory Card Camera Recorder 14 Accessories 17 Parts identification and handling ....... 18 Using the LCD monitor 24 Using the finder 24 Using the remote control 25 ... outlet 32 Selecting a mode (Turning the unit on/off 33 Inserting/removing an SD card 34 How to use the cursor button 35 Using the menu screen 39 Setting date and time 41 Adjusting LCD monitor/finder 42 Recording Recording motion pictures 44 Recording modes/recordable time available for the motion...
Contents Read this first 2 Before using Features of Memory Card Camera Recorder 14 Accessories 17 Parts identification and handling ....... 18 Using the LCD monitor 24 Using the finder 24 Using the remote control 25 ... outlet 32 Selecting a mode (Turning the unit on/off 33 Inserting/removing an SD card 34 How to use the cursor button 35 Using the menu screen 39 Setting date and time 41 Adjusting LCD monitor/finder 42 Recording Recording motion pictures 44 Recording modes/recordable time available for the motion...
Memory Card Camera Recorder
Page 9
... 98 Verifying the unit is correctly recognized by the computer 98 Using HD Writer Ver2.5 99 If using Macintosh 101 Others Menus and Indications 102 Menu list 102 Menus related to [ADVANCED] and [SETUP 104 Indications 105 Messages 107 Functions that cannot be used simultaneously 110 Troubleshooting 111 Explanation of terms...
... 98 Verifying the unit is correctly recognized by the computer 98 Using HD Writer Ver2.5 99 If using Macintosh 101 Others Menus and Indications 102 Menu list 102 Menus related to [ADVANCED] and [SETUP 104 Indications 105 Messages 107 Functions that cannot be used simultaneously 110 Troubleshooting 111 Explanation of terms...
Memory Card Camera Recorder
Page 19
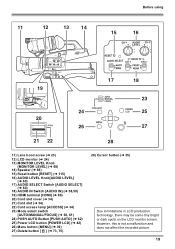
...) 23) Mode select switch [AUTO/MANUAL/FOCUS] (l 38, 61) 24) PUSH AUTO Button [PUSH AUTO] (l 62) 25) Power LCD button [POWER LCD] (l 42) 26) Menu button [MENU] (l 39) 27) Delete button [ ] (l 73, 75) 28) Cursor button (l 35) Due to limitations in LCD production technology, there may be some tiny bright or dark...
...) 23) Mode select switch [AUTO/MANUAL/FOCUS] (l 38, 61) 24) PUSH AUTO Button [PUSH AUTO] (l 62) 25) Power LCD button [POWER LCD] (l 42) 26) Menu button [MENU] (l 39) 27) Delete button [ ] (l 73, 75) 28) Cursor button (l 35) Due to limitations in LCD production technology, there may be some tiny bright or dark...

Memory Card Camera Recorder
Page 25
.... 1 While pressing the stopper A, pull out the battery holder. Use of in the same manner as the corresponding buttons on the main unit. 9) Menu button [MENU]* (l 40) 10) Enter button [ENTER] (l 40) * means that these buttons function in fire. 25 Keep away from children. A 2 Set ...the button-type battery with Panasonic PART NO. Dispose of fire or explosion. Replace battery with its (i) mark facing upward and then put the battery holder back in ...
.... 1 While pressing the stopper A, pull out the battery holder. Use of in the same manner as the corresponding buttons on the main unit. 9) Menu button [MENU]* (l 40) 10) Enter button [ENTER] (l 40) * means that these buttons function in fire. 25 Keep away from children. A 2 Set ...the button-type battery with Panasonic PART NO. Dispose of fire or explosion. Replace battery with its (i) mark facing upward and then put the battery holder back in ...

Memory Card Camera Recorder
Page 35
... of the cursor button to select . 1 Press the center of the cursor button ≥Menu screen operations (l 39) 35 B Operating the operation icons and menu screens that are displayed Basic operations The following describes operations on the menu screen and selection of the cursor button is pressed again. ≥The indication changes each...
... of the cursor button to select . 1 Press the center of the cursor button ≥Menu screen operations (l 39) 35 B Operating the operation icons and menu screens that are displayed Basic operations The following describes operations on the menu screen and selection of the cursor button is pressed again. ≥The indication changes each...

Memory Card Camera Recorder
Page 39
... press the center of the cursor button. 3 Press the right button of the cursor button or press the center of the cursor button. C ≥The menu displayed differs depending on the position of the mode dial. ≥Do not switch the mode dial when the... menu is displayed. 39 Setup Using the menu screen Refer to "Menu list" (l 102) for information about the menus. 1 While stopped, press the MENU button. 4 Select the Sub Menu by pressing the up or down button of the cursor button. 7 Press the...
... press the center of the cursor button. 3 Press the right button of the cursor button or press the center of the cursor button. C ≥The menu displayed differs depending on the position of the mode dial. ≥Do not switch the mode dial when the... menu is displayed. 39 Setup Using the menu screen Refer to "Menu list" (l 102) for information about the menus. 1 While stopped, press the MENU button. 4 Select the Sub Menu by pressing the up or down button of the cursor button. 7 Press the...

Memory Card Camera Recorder
Page 40
...To get back to exit the menu screen. MENU ENTER ≥Use the direction buttons (3,4,2,1) and ENTER button in place of the cursor button. You cannot start other operations while the menu screen appears. 2 Select a menu item. Operating with remote control The menu screen transition is the same ...as when the buttons on the main unit. 3 Press the MENU button to the previous screen Press the left button of...
...To get back to exit the menu screen. MENU ENTER ≥Use the direction buttons (3,4,2,1) and ENTER button in place of the cursor button. You cannot start other operations while the menu screen appears. 2 Select a menu item. Operating with remote control The menu screen transition is the same ...as when the buttons on the main unit. 3 Press the MENU button to the previous screen Press the left button of...

Memory Card Camera Recorder
Page 41
... up or down . DEC 15 2008 03 30 PM ≥The year will change as it . ¬ Rotate the mode dial to select . 1 Press the MENU button, then select [BASIC] # [CLOCK SET] # [YES] and press the center of the cursor button. ≥You can also show or change the date and... 12-hour system is used to display the time. 3 Press the center of the cursor button. Changing the date and time display style Press the MENU button, then select [SETUP] # [DATE/TIME] # desired display style and press the center of the cursor button. ≥The clock function starts at [00] seconds...
... up or down . DEC 15 2008 03 30 PM ≥The year will change as it . ¬ Rotate the mode dial to select . 1 Press the MENU button, then select [BASIC] # [CLOCK SET] # [YES] and press the center of the cursor button. ≥You can also show or change the date and... 12-hour system is used to display the time. 3 Press the center of the cursor button. Changing the date and time display style Press the MENU button, then select [SETUP] # [DATE/TIME] # desired display style and press the center of the cursor button. ≥The clock function starts at [00] seconds...

Memory Card Camera Recorder
Page 42
... the mode dial is set to OFF.) Adjusting LCD monitor/finder Adjusting the brightness and the color level of the LCD monitor/ finder 1 Press the MENU button, then select [SETUP] # [LCD SET] or [EVF SET]# [YES] and press the center of the cursor button. [LCD SET] items: [BRIGHTNESS]: Brightness of ...moves. ≥After adjustments are made if no operations are performed for "LCD Adjustment" are bright and the LCD monitor is difficult to exit the menu screen. Make any further adjustments by pushing the right or left button of the cursor button, and then press the center of the entire LCD...
... the mode dial is set to OFF.) Adjusting LCD monitor/finder Adjusting the brightness and the color level of the LCD monitor/ finder 1 Press the MENU button, then select [SETUP] # [LCD SET] or [EVF SET]# [YES] and press the center of the cursor button. [LCD SET] items: [BRIGHTNESS]: Brightness of ...moves. ≥After adjustments are made if no operations are performed for "LCD Adjustment" are bright and the LCD monitor is difficult to exit the menu screen. Make any further adjustments by pushing the right or left button of the cursor button, and then press the center of the entire LCD...

Memory Card Camera Recorder
Page 46
... MENU button, then select [VIDEO] # [REC MODE] # desired item and press the center of the motion pictures to be recorded with the high definition picture quality. ≥This unit records in CBR in HN / HE mode. Approximate recording times of motion pictures per SD card made by Panasonic SD card memory 256... may appear on a playback image in the following cases. ≥When there is a complicated pattern in the background ≥When the unit is available memory on PC, format the SD card. Mosaic-pattern noise may no longer be used for recording. (l 28) ≥If an SD card is recorded ...
... MENU button, then select [VIDEO] # [REC MODE] # desired item and press the center of the motion pictures to be recorded with the high definition picture quality. ≥This unit records in CBR in HN / HE mode. Approximate recording times of motion pictures per SD card made by Panasonic SD card memory 256... may appear on a playback image in the following cases. ≥When there is a complicated pattern in the background ≥When the unit is available memory on PC, format the SD card. Mosaic-pattern noise may no longer be used for recording. (l 28) ≥If an SD card is recorded ...
Memory Card Camera Recorder
Page 49
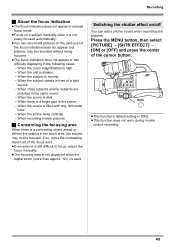
... front of the cursor button. ≥This function's default setting is [ON]. ≥This function does not work during motion picture recording. 49 Press the MENU button, then select [PICTURE] # [SHTR EFFECT] # [ON] or [OFF] and press the center of a light source. - If so, move the contrasting object out of the...
... front of the cursor button. ≥This function's default setting is [ON]. ≥This function does not work during motion picture recording. 49 Press the MENU button, then select [PICTURE] # [SHTR EFFECT] # [ON] or [OFF] and press the center of a light source. - If so, move the contrasting object out of the...
Memory Card Camera Recorder
Page 51
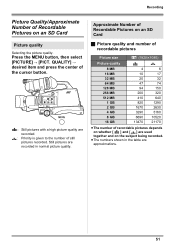
... pictures recorded. Recording Picture Quality/Approximate Number of Recordable Pictures on the subject being recorded. ≥The numbers shown in normal picture quality. Press the MENU button, then select [PICTURE] # [PICT.
... pictures recorded. Recording Picture Quality/Approximate Number of Recordable Pictures on the subject being recorded. ≥The numbers shown in normal picture quality. Press the MENU button, then select [PICTURE] # [PICT.
Memory Card Camera Recorder
Page 53
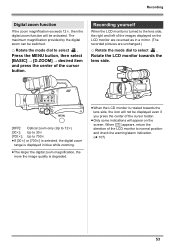
... yourself When the LCD monitor is rotated towards the lens side, the icon will be switched. ¬ Rotate the mode dial to select . Press the MENU button, then select [BASIC] # [D.ZOOM] # desired item and press the center of the images displayed on the screen. The maximum magnification provided by the digital...
... yourself When the LCD monitor is rotated towards the lens side, the icon will be switched. ¬ Rotate the mode dial to select . Press the MENU button, then select [BASIC] # [D.ZOOM] # desired item and press the center of the images displayed on the screen. The maximum magnification provided by the digital...
Memory Card Camera Recorder
Page 55
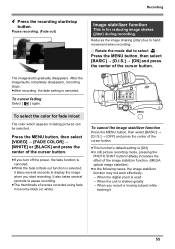
... image stabilizer) ≥In the following cases, the image stabilizer function may not work effectively. - To cancel fading Select [ ] again. Press the MENU button, then select [VIDEO] # [FADE COLOR] # [WHITE] or [BLACK] and press the center of the cursor button. ≥If you turn... the image/audio completely disappears, recording stops. ≥After recording, the fade setting is shaken greatly - To cancel the image stabilizer function Press the MENU button, then select [BASIC] # [O.I .S.] # [ON] and press the center of scenes recorded using fade in fading pictures can be selected....
... image stabilizer) ≥In the following cases, the image stabilizer function may not work effectively. - To cancel fading Select [ ] again. Press the MENU button, then select [VIDEO] # [FADE COLOR] # [WHITE] or [BLACK] and press the center of the cursor button. ≥If you turn... the image/audio completely disappears, recording stops. ≥After recording, the fade setting is shaken greatly - To cancel the image stabilizer function Press the MENU button, then select [BASIC] # [O.I .S.] # [ON] and press the center of scenes recorded using fade in fading pictures can be selected....

Memory Card Camera Recorder
Page 56
... if you manually adjust the shutter speed or brightness (iris/gain) (l 64). A [HORIZONTAL] B [GRID] C [4:3] To cancel the guide line function Press the MENU button, then select [BASIC] or [PLAY SETUP] # [GUIDE LINES] # [OFF] and press the center of the cursor button. It is for framing balance and...diagonal lines (zebra pattern). ¬ Rotate the mode dial to confirm whether the displayed images are too bright. To cancel the zebra display Press the MENU button, then select [ADVANCED] # [ZEBRA] # [OFF] and press the center of the cursor button. ≥The zebra pattern does not appear...
... if you manually adjust the shutter speed or brightness (iris/gain) (l 64). A [HORIZONTAL] B [GRID] C [4:3] To cancel the guide line function Press the MENU button, then select [BASIC] or [PLAY SETUP] # [GUIDE LINES] # [OFF] and press the center of the cursor button. It is for framing balance and...diagonal lines (zebra pattern). ¬ Rotate the mode dial to confirm whether the displayed images are too bright. To cancel the zebra display Press the MENU button, then select [ADVANCED] # [ZEBRA] # [OFF] and press the center of the cursor button. ≥The zebra pattern does not appear...

Memory Card Camera Recorder
Page 57
To cancel the color bar Press the MENU button, then select [ADVANCED] # [COLOR BAR] # [OFF] and press the center of the cursor button. ≥This function is canceled when the power is turned ... press the center of the cursor button. This unit displays a 7 color bar which is useful for displaying a color bar to select . Recording 57 Press the MENU button, then select [ADVANCED] # [COLOR BAR]# [ON] and press the center of the cursor button. Color bar This is for adjusting the picture quality of...
To cancel the color bar Press the MENU button, then select [ADVANCED] # [COLOR BAR] # [OFF] and press the center of the cursor button. ≥This function is canceled when the power is turned ... press the center of the cursor button. This unit displays a 7 color bar which is useful for displaying a color bar to select . Recording 57 Press the MENU button, then select [ADVANCED] # [COLOR BAR]# [ON] and press the center of the cursor button. Color bar This is for adjusting the picture quality of...

Memory Card Camera Recorder
Page 60
... is automatically adjusted when the audio input is disabled. CH1 CH2 To select whether to display or not display the audio level meter Press the MENU button, then select [VIDEO] # [LEVEL METER] # desired item and press the center of the LCD monitor or viewfinder. 2 1 1 Set the AUDIO SELECT switch to the...
... is automatically adjusted when the audio input is disabled. CH1 CH2 To select whether to display or not display the audio level meter Press the MENU button, then select [VIDEO] # [LEVEL METER] # desired item and press the center of the LCD monitor or viewfinder. 2 1 1 Set the AUDIO SELECT switch to the...
Memory Card Camera Recorder
Page 61
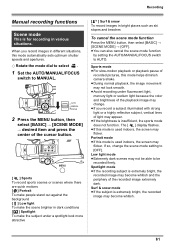
... Spotlight mode ≥If the recording subject is insufficient, the sports mode does not function. The [5] display flashes. ≥If this mode is for recording in various situations. AUTO MANUAL FOCUS 2 Press the MENU button, then select [BASIC] # [SCENE MODE] # desired item and press the center of the recorded .... If so, change . ≥If you record images in bright places such as ski slopes and beaches To cancel the scene mode function Press the MENU button, then select [BASIC] # [SCENE MODE] # [OFF]. ≥You can also cancel the scene mode function by setting the AUTO/MANUAL/FOCUS ...
... Spotlight mode ≥If the recording subject is insufficient, the sports mode does not function. The [5] display flashes. ≥If this mode is for recording in various situations. AUTO MANUAL FOCUS 2 Press the MENU button, then select [BASIC] # [SCENE MODE] # desired item and press the center of the recorded .... If so, change . ≥If you record images in bright places such as ski slopes and beaches To cancel the scene mode function Press the MENU button, then select [BASIC] # [SCENE MODE] # [OFF]. ≥You can also cancel the scene mode function by setting the AUTO/MANUAL/FOCUS ...

Memory Card Camera Recorder
Page 62
... difficult due to the conditions, then manual focusing is available. ¬ Rotate the mode dial to select . 1 (When MF assist function is used) Press the MENU button, then select [ADVANCED] # [MF ASSIST] # [ON] and press the center of the cursor button. ≥The default setting is [ON]. 2 Set the AUTO/MANUAL...
... difficult due to the conditions, then manual focusing is available. ¬ Rotate the mode dial to select . 1 (When MF assist function is used) Press the MENU button, then select [ADVANCED] # [MF ASSIST] # [ON] and press the center of the cursor button. ≥The default setting is [ON]. 2 Set the AUTO/MANUAL...

Memory Card Camera Recorder
Page 69
When the number of the cursor button. To return to playing back all the scenes Press the MENU button, then select [PLAY SETUP] # [PLAY MODE] # [VIEW ALL] and press the center of the cursor button. ≥When [PLAY MODE] is set to [BY ... of scenes exceeds 99 - Scenes recorded on this unit. Playback Playing back motion pictures by date Recorded scenes are grouped separately in succession. 1 Press the MENU button, then select [PLAY SETUP] # [PLAY MODE] # [BY DATE] and press the center of the cursor button.
When the number of the cursor button. To return to playing back all the scenes Press the MENU button, then select [PLAY SETUP] # [PLAY MODE] # [VIEW ALL] and press the center of the cursor button. ≥When [PLAY MODE] is set to [BY ... of scenes exceeds 99 - Scenes recorded on this unit. Playback Playing back motion pictures by date Recorded scenes are grouped separately in succession. 1 Press the MENU button, then select [PLAY SETUP] # [PLAY MODE] # [BY DATE] and press the center of the cursor button.


