

Brochure
Page 2
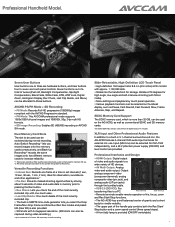
Slide-Retractable LCD Touch Panel This versatile LCD serves as a high-definition, 1,152,000 dot monitor and menu-setting touch panel. It also rotates 270 degrees vertically for both multifunctional versatility and easy operation. Highly Functional Controls The control panel offers both safety and ...
Slide-Retractable LCD Touch Panel This versatile LCD serves as a high-definition, 1,152,000 dot monitor and menu-setting touch panel. It also rotates 270 degrees vertically for both multifunctional versatility and easy operation. Highly Functional Controls The control panel offers both safety and ...

Brochure
Page 4
It goes from 29.8 mm (35 mm equivalent) wide-angle to a variety of shooting situations. Panasonic's unique Nano Surface Coating minimizes ghosts and flaring, and the high-speed F1.5 (at a glance. • Auto Slow Shutter: Allows the shutter to automatically... function while in Red) button shows when your subject is equipped with the Focus Assist press of ATW/3200K/5600K and two manual settings (A/B). • iA Mode: The AG-AC90 detects the shooting conditions and automatically switches to the optimal iA mode (Portrait, Landscape, Spotlight, Low Light, Normal). This powerful image ...
It goes from 29.8 mm (35 mm equivalent) wide-angle to a variety of shooting situations. Panasonic's unique Nano Surface Coating minimizes ghosts and flaring, and the high-speed F1.5 (at a glance. • Auto Slow Shutter: Allows the shutter to automatically... function while in Red) button shows when your subject is equipped with the Focus Assist press of ATW/3200K/5600K and two manual settings (A/B). • iA Mode: The AG-AC90 detects the shooting conditions and automatically switches to the optimal iA mode (Portrait, Landscape, Spotlight, Low Light, Normal). This powerful image ...
Brochure
Page 5
... recording. Rear terminal Side terminal • Remote terminals enable remote operation of iris, focus, zoom and Rec Start/Stop functions. • The AG-AC90 has a well balanced center of the handle grip contains both the Rec Start/ Stop button and a zoom speed control (three speed steps). •... the Rec button. • Rec Check: Lets you check the end of the most recently recorded clip with Mirror mode). • Menu settings and playback by storing about 3 seconds of HD devices. • AV Multi Output: Analog video and audio output. Versatile Recording Functions •...
... recording. Rear terminal Side terminal • Remote terminals enable remote operation of iris, focus, zoom and Rec Start/Stop functions. • The AG-AC90 has a well balanced center of the handle grip contains both the Rec Start/ Stop button and a zoom speed control (three speed steps). •... the Rec button. • Rec Check: Lets you check the end of the most recently recorded clip with Mirror mode). • Menu settings and playback by storing about 3 seconds of HD devices. • AV Multi Output: Analog video and audio output. Versatile Recording Functions •...
Operating Instructions Basic
Page 4
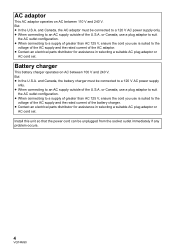
...and the rated current of the AC adaptor. ≥ Contact an electrical parts distributor for assistance in selecting a suitable AC plug adaptor or AC cord set . But ≥ In the U.S.A. Battery charger This battery charger operates on AC between 100 V and 240 V. But ≥ In the U.S.A. or... current of the battery charger. ≥ Contact an electrical parts distributor for assistance in selecting a suitable AC plug adaptor or AC cord set . and Canada, the AC adaptor must be unplugged from the socket outlet immediately if any problem occurs. 4 VQT4M90 Install this unit so...
...and the rated current of the AC adaptor. ≥ Contact an electrical parts distributor for assistance in selecting a suitable AC plug adaptor or AC cord set . But ≥ In the U.S.A. Battery charger This battery charger operates on AC between 100 V and 240 V. But ≥ In the U.S.A. or... current of the battery charger. ≥ Contact an electrical parts distributor for assistance in selecting a suitable AC plug adaptor or AC cord set . and Canada, the AC adaptor must be unplugged from the socket outlet immediately if any problem occurs. 4 VQT4M90 Install this unit so...
Operating Instructions Basic
Page 11
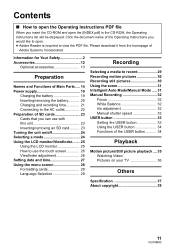
...Intelligent Auto Mode/Manual Mode ..... 31 Manual Recording 32 Focus 32 White Balance 32 Iris adjustment 32 Manual shutter speed 33 USER button 33 Setting the USER button 33 Using the USER button 34 Functions of the USER button .......... 34 Playback Motion picture/Still picture playback .... 35 Watching ... a mode 24 Using the LCD monitor/Viewfinder........25 Using the LCD monitor 25 How to use the touch screen 26 Viewfinder adjustment 26 Setting date and time 27 Using the menu screen 28 Formatting cards 29 Language Selection 29 Recording Selecting a media to view the PDF file....
...Intelligent Auto Mode/Manual Mode ..... 31 Manual Recording 32 Focus 32 White Balance 32 Iris adjustment 32 Manual shutter speed 33 USER button 33 Setting the USER button 33 Using the USER button 34 Functions of the USER button .......... 34 Playback Motion picture/Still picture playback .... 35 Watching ... a mode 24 Using the LCD monitor/Viewfinder........25 Using the LCD monitor 25 How to use the touch screen 26 Viewfinder adjustment 26 Setting date and time 27 Using the menu screen 28 Formatting cards 29 Language Selection 29 Recording Selecting a media to view the PDF file....
Operating Instructions Basic
Page 20
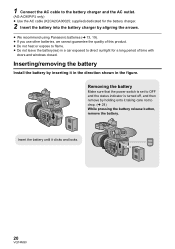
... is turned off, and then remove by inserting it in the direction shown in a car exposed to the battery charger and the AC outlet. (AG-AC90P/PJ only) ≥ Use the AC cable (K2CA2CA00025; Inserting/removing the battery Install the battery by holding onto it clicks and locks. 20...the AC cable to direct sunlight for the battery charger. 2 Insert the battery into the battery charger by aligning the arrows. ≥ We recommend using Panasonic batteries (l 13, 19). ≥ If you use other batteries, we cannot guarantee the quality of time with doors and windows closed. Insert the ...
... is turned off, and then remove by inserting it in the direction shown in a car exposed to the battery charger and the AC outlet. (AG-AC90P/PJ only) ≥ Use the AC cable (K2CA2CA00025; Inserting/removing the battery Install the battery by holding onto it clicks and locks. 20...the AC cable to direct sunlight for the battery charger. 2 Insert the battery into the battery charger by aligning the arrows. ≥ We recommend using Panasonic batteries (l 13, 19). ≥ If you use other batteries, we cannot guarantee the quality of time with doors and windows closed. Insert the ...

Operating Instructions Basic
Page 22
Connecting to the AC adaptor and the AC outlet. (AG-AC90P/PJ only) ≥ Use the AC cable (K2CB2CB00022; Important: ≥ Use the supplied AC adaptor...Insert the plugs as far as the AC adaptor is connected to OFF and the status indicator is connected. supplied) dedicated for this unit. (AG-AC90P/PJ) (AG-AC90PX) A AC cable (K2CB2CB00022; B AC cable (K2CA2YY00129; The primary... to the DC input terminal [DC IN]. ∫ Removing the AC adaptor ≥ Make sure to set the power switch to an electrical outlet.
Connecting to the AC adaptor and the AC outlet. (AG-AC90P/PJ only) ≥ Use the AC cable (K2CB2CB00022; Important: ≥ Use the supplied AC adaptor...Insert the plugs as far as the AC adaptor is connected to OFF and the status indicator is connected. supplied) dedicated for this unit. (AG-AC90P/PJ) (AG-AC90PX) A AC cable (K2CB2CB00022; B AC cable (K2CA2YY00129; The primary... to the DC input terminal [DC IN]. ∫ Removing the AC adaptor ≥ Make sure to set the power switch to an electrical outlet.
Operating Instructions Basic
Page 24
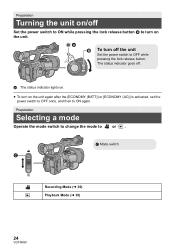
...; To turn on the unit again after the [ECONOMY (BATT)] or [ECONOMY (AC)] is activated, set the power switch to OFF once, and then to ON again. Preparation Turning the unit on/off Set the power switch to ON while pressing the lock release button B to turn off . Preparation Selecting a mode... Operate the mode switch to change the mode to or . The status indicator goes off the unit Set the power switch to OFF while pressing the...
...; To turn on the unit again after the [ECONOMY (BATT)] or [ECONOMY (AC)] is activated, set the power switch to OFF once, and then to ON again. Preparation Turning the unit on/off Set the power switch to ON while pressing the lock release button B to turn off . Preparation Selecting a mode... Operate the mode switch to change the mode to or . The status indicator goes off the unit Set the power switch to OFF while pressing the...

Operating Instructions Basic
Page 26
...the focus by directly touching the LCD monitor (touch screen) with hard pointed tips, such as ball point pens. Viewfinder adjustment ≥ These settings will not operate while you can see the display images clearly. ≥ Be careful not to trap your fingers when moving the viewfinder. ≥...; ≥ Retract the LCD monitor and turn on the touch screen. ∫ About the operation icons ///: Touch when changing a page or performing settings. : Touch to return to the previous screen. ≥ Do not touch the LCD monitor with your finger. ∫ Touch Touch and release the...
...the focus by directly touching the LCD monitor (touch screen) with hard pointed tips, such as ball point pens. Viewfinder adjustment ≥ These settings will not operate while you can see the display images clearly. ≥ Be careful not to trap your fingers when moving the viewfinder. ≥...; ≥ Retract the LCD monitor and turn on the touch screen. ∫ About the operation icons ///: Touch when changing a page or performing settings. : Touch to return to the previous screen. ≥ Do not touch the LCD monitor with your finger. ∫ Touch Touch and release the...
Operating Instructions Basic
Page 27
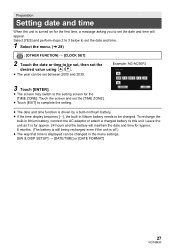
Example: AG-AC90PJ 3 Touch [ENTER]. ≥ The screen may switch to this unit. Touch the screen and set the date and time will maintain the date and time for approx. 6 months. (The battery is still being recharged even if the unit is off.) &#... built-in lithium battery needs to be charged. To recharge the built-in lithium battery, connect the AC adaptor or attach a charged battery to the setting screen for the [TIME ZONE]. Leave the unit as it is for approx. 24 hours and the battery will appear. Preparation...
Example: AG-AC90PJ 3 Touch [ENTER]. ≥ The screen may switch to this unit. Touch the screen and set the date and time will maintain the date and time for approx. 6 months. (The battery is still being recharged even if the unit is off.) &#... built-in lithium battery needs to be charged. To recharge the built-in lithium battery, connect the AC adaptor or attach a charged battery to the setting screen for the [TIME ZONE]. Leave the unit as it is for approx. 24 hours and the battery will appear. Preparation...
Operating Instructions Basic
Page 28
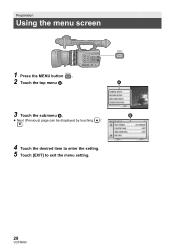
Preparation Using the menu screen MENU 1 MENU Press the MENU button . 2 Touch the top menu A. 3 Touch the submenu B. ≥ Next (Previous) page can be displayed by touching / . 4 Touch the desired item to enter the setting. 5 Touch [EXIT] to exit the menu setting. 28 VQT4M90
Preparation Using the menu screen MENU 1 MENU Press the MENU button . 2 Touch the top menu A. 3 Touch the submenu B. ≥ Next (Previous) page can be displayed by touching / . 4 Touch the desired item to enter the setting. 5 Touch [EXIT] to exit the menu setting. 28 VQT4M90
Operating Instructions Basic
Page 29
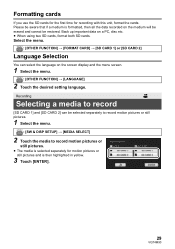
... first time for motion pictures or still pictures and is then highlighted in yellow. 3 Touch [ENTER]. 29 VQT4M90 MENU : [OTHER FUNCTION] # [LANGUAGE] 2 Touch the desired setting language.
... first time for motion pictures or still pictures and is then highlighted in yellow. 3 Touch [ENTER]. 29 VQT4M90 MENU : [OTHER FUNCTION] # [LANGUAGE] 2 Touch the desired setting language.

Operating Instructions Basic
Page 31
... switch to change the Intelligent Auto Mode/Manual Mode. ≥ MNL is displayed in the Manual Mode. ≥ The modes appropriate for the condition are set to [ON]. ≥ Zoom magnification can zoom up recording (zoom in) W side: Wide-angle recording (zoom out) Ring Zoom Zoom by pointing the unit to... larger when zoomed in the Intelligent Auto Mode. 31 VQT4M90 T W T W A B Zoom lever/Sub zoom lever T side: Close-up to 25k when the [i.Zoom] is set just by rotating the ring.
... switch to change the Intelligent Auto Mode/Manual Mode. ≥ MNL is displayed in the Manual Mode. ≥ The modes appropriate for the condition are set to [ON]. ≥ Zoom magnification can zoom up recording (zoom in) W side: Wide-angle recording (zoom out) Ring Zoom Zoom by pointing the unit to... larger when zoomed in the Intelligent Auto Mode. 31 VQT4M90 T W T W A B Zoom lever/Sub zoom lever T side: Close-up to 25k when the [i.Zoom] is set just by rotating the ring.

Operating Instructions Basic
Page 33
...12 available functions. ≥ There are three USER buttons (USER1 to USER3) on the main body and four USER button icons (USER4 to complete the setting. 33 VQT4M90 A USER1 button B USER2 button C USER3 button D USER4 button E USER5... button F USER6 button G USER7 button ≥ The USER button number and currently set function name are displayed. (For example, a display of 1. [P.AF] means that Push AF has been assigned to USER1 button.) 3 Touch the item to...
...12 available functions. ≥ There are three USER buttons (USER1 to USER3) on the main body and four USER button icons (USER4 to complete the setting. 33 VQT4M90 A USER1 button B USER2 button C USER3 button D USER4 button E USER5... button F USER6 button G USER7 button ≥ The USER button number and currently set function name are displayed. (For example, a display of 1. [P.AF] means that Push AF has been assigned to USER1 button.) 3 Touch the item to...

Operating Instructions Basic
Page 34
Using the USER button To use the set USER button, press USER1 to USER3 button or touch the USER4 to USER7 button icon displayed when you touch the LCD monitor. (When you use ...
Using the USER button To use the set USER button, press USER1 to USER3 button or touch the USER4 to USER7 button icon displayed when you touch the LCD monitor. (When you use ...

Operating Instructions Basic
Page 36
Cables not conforming to a TV. AV MULTI 36 VQT4M90 Part No.: RP-CHES15 (1.5 m) (4.9 feet) ≥ Do not use "High Speed HDMI Cables" that have the HDMI logo (as shown on your TV Connect this unit to the HDMI standard will not work. Panasonic HDMI cable is recommended. Watching Video/Pictures on the cover). A HDMI connector B AV multi connector ≥ Please use any other AV multi cables except the supplied one. ≥ Use the AV multi cable (supplied) or HDMI cable (optional) and check the output settings.
Cables not conforming to a TV. AV MULTI 36 VQT4M90 Part No.: RP-CHES15 (1.5 m) (4.9 feet) ≥ Do not use "High Speed HDMI Cables" that have the HDMI logo (as shown on your TV Connect this unit to the HDMI standard will not work. Panasonic HDMI cable is recommended. Watching Video/Pictures on the cover). A HDMI connector B AV multi connector ≥ Please use any other AV multi cables except the supplied one. ≥ Use the AV multi cable (supplied) or HDMI cable (optional) and check the output settings.
Operating Instructions Basic
Page 37
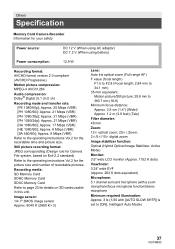
... K dots equivalent) Microphone: 5.1 channel surround microphone (with a zoom microphone/focus microphone function)/stereo microphone Minimum required illumination: Approx. 3 lx (1/30 with [AUTO SLOW SHTR] is set to 383.7 mm (16:9) Minimum focus distance; Others Specification Memory Card Camera-Recorder Information for the recordable time and picture size. Approx. 21 Mbps (VBR...
... K dots equivalent) Microphone: 5.1 channel surround microphone (with a zoom microphone/focus microphone function)/stereo microphone Minimum required illumination: Approx. 3 lx (1/30 with [AUTO SLOW SHTR] is set to 383.7 mm (16:9) Minimum focus distance; Others Specification Memory Card Camera-Recorder Information for the recordable time and picture size. Approx. 21 Mbps (VBR...
Operating Instructions Advanced
Page 3
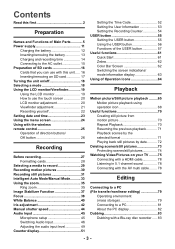
...Viewfinder 19 Using the LCD monitor 19 How to use the touch screen 20 LCD monitor adjustment 20 Viewfinder adjustment 21 Recording yourself 22 Setting date and time 23 Using the menu screen 24 Using with the wireless remote control 25 Operation of direction buttons/ OK button 26 ... Microphone setup 45 Switching Audio Input 46 Adjusting the audio input level 49 Counter display 51 Setting the Time Code 52 Setting the User Information 53 Setting the Recording Counter 54 USER button 55 Setting the USER button 55 Using the USER button 56 Functions of the USER button 57 Useful...
...Viewfinder 19 Using the LCD monitor 19 How to use the touch screen 20 LCD monitor adjustment 20 Viewfinder adjustment 21 Recording yourself 22 Setting date and time 23 Using the menu screen 24 Using with the wireless remote control 25 Operation of direction buttons/ OK button 26 ... Microphone setup 45 Switching Audio Input 46 Adjusting the audio input level 49 Counter display 51 Setting the Time Code 52 Setting the User Information 53 Setting the Recording Counter 54 USER button 55 Setting the USER button 55 Using the USER button 56 Functions of the USER button 57 Useful...

Operating Instructions Advanced
Page 4
Menu Using the Menu 84 Camera Setup 84 Recording Setup 89 Switch and display setting 95 Other Functions 100 Video Setup 104 Picture Setup 104 Display Indications 105 Messages 107 Others Troubleshooting 107 About recovery 111 Updating the firmware incorporated into the unit 111 Cautions for use 112 About copyright 116 Recording modes/ approximate recordable time 117 Approximate number of recordable pictures 118 - 4 -
Menu Using the Menu 84 Camera Setup 84 Recording Setup 89 Switch and display setting 95 Other Functions 100 Video Setup 104 Picture Setup 104 Display Indications 105 Messages 107 Others Troubleshooting 107 About recovery 111 Updating the firmware incorporated into the unit 111 Cautions for use 112 About copyright 116 Recording modes/ approximate recordable time 117 Approximate number of recordable pictures 118 - 4 -

Operating Instructions Advanced
Page 9
...; When wiring the microphone cable, use the supplied microphone holder and microphone holder adaptor. ≥ The microphone holder is set up so that are tripod mounting holes that a 21 mm (0.83 q) external microphone (AG-MC200G: optional) can be attached. ≥ When attaching the microphone holder and the microphone holder adaptor, be attached...
...; When wiring the microphone cable, use the supplied microphone holder and microphone holder adaptor. ≥ The microphone holder is set up so that are tripod mounting holes that a 21 mm (0.83 q) external microphone (AG-MC200G: optional) can be attached. ≥ When attaching the microphone holder and the microphone holder adaptor, be attached...


