

Brochure
Page 2
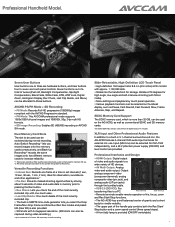
... Triple Manual Rings. Frequently used functions have large, distinct buttons in PH mode. It also rotates 270 degrees vertically for extra mobility and safety. Large audio level dials are positioned on the lens barrel. Triple Manual Rings Focus, zoom and iris rings are also designed for both multifunctional versatility and easy... highangle, low-angle and self-interview shooting. Slide-Retractable LCD Touch Panel This versatile LCD serves as a high-definition, 1,152,000 dot monitor and menu-setting touch panel.
... Triple Manual Rings. Frequently used functions have large, distinct buttons in PH mode. It also rotates 270 degrees vertically for extra mobility and safety. Large audio level dials are positioned on the lens barrel. Triple Manual Rings Focus, zoom and iris rings are also designed for both multifunctional versatility and easy... highangle, low-angle and self-interview shooting. Slide-Retractable LCD Touch Panel This versatile LCD serves as a high-definition, 1,152,000 dot monitor and menu-setting touch panel.

Brochure
Page 4
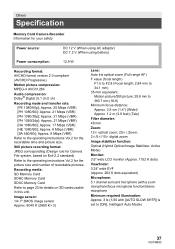
...1080 Nano surface coating lens 1920 hTalhf-epgixreelebnoMthOvSersteicnaslloyraisndshhifotreizdobnytaally. 1920 × 2 Three Manual Rings - Panasonic's unique Nano Surface Coating minimizes ghosts and flaring, and the high-speed F1.5 (at...BARS Button: Outputs a color bar image and test tone audio. • DISP/MODE CHK Button: Shows mode settings at the widest angle) enables extremely clear image rendering. ... combines the advantages of ATW/3200K/5600K and two manual settings (A/B). • iA Mode: The AG-AC90 detects the shooting conditions and automatically switches to a variety of...
...1080 Nano surface coating lens 1920 hTalhf-epgixreelebnoMthOvSersteicnaslloyraisndshhifotreizdobnytaally. 1920 × 2 Three Manual Rings - Panasonic's unique Nano Surface Coating minimizes ghosts and flaring, and the high-speed F1.5 (at...BARS Button: Outputs a color bar image and test tone audio. • DISP/MODE CHK Button: Shows mode settings at the widest angle) enables extremely clear image rendering. ... combines the advantages of ATW/3200K/5600K and two manual settings (A/B). • iA Mode: The AG-AC90 detects the shooting conditions and automatically switches to a variety of...
Brochure
Page 5
...270 degrees for high-angle, low-angle and self-interview shooting (with Mirror mode). • Menu settings and playback by touch panel operation. • Various playback functions can be selected on the AG-AC90, as well as Pause, Fast Rewind, Fast Forward, Slow, Frame Advance, Skip, and Repeat....frame at a time in 5.1-channel surround sound mic, the AG-AC90 features 2-channel XLR audio input terminals for nimble mobility. • The upper part of gravity and a short body for external mic use. Dual Memory Card Slots The slot to a built-in set intervals (1 sec, 10 sec, 30 sec, 1 min...
...270 degrees for high-angle, low-angle and self-interview shooting (with Mirror mode). • Menu settings and playback by touch panel operation. • Various playback functions can be selected on the AG-AC90, as well as Pause, Fast Rewind, Fast Forward, Slow, Frame Advance, Skip, and Repeat....frame at a time in 5.1-channel surround sound mic, the AG-AC90 features 2-channel XLR audio input terminals for nimble mobility. • The upper part of gravity and a short body for external mic use. Dual Memory Card Slots The slot to a built-in set intervals (1 sec, 10 sec, 30 sec, 1 min...
Operating Instructions Basic
Page 37
...surround microphone (with a zoom microphone/focus microphone function)/stereo microphone Minimum required illumination: Approx. 3 lx (1/30 with [AUTO SLOW SHTR] is set to 383.7 mm (16:9) Minimum focus distance; Approx. 6 Mbps (VBR) [SA 480/60i]; Approx. 21 Mbps (VBR) [PH ...When using battery) Power consumption: 12.9 W Recording format: AVCHD format version 2.0 compliant (AVCHD Progressive) Motion picture compression: MPEG-4 AVC/H.264 Audio compression: Dolby® Digital (5.1 ch/2 ch) Recording mode and transfer rate: [PS 1080/60p]; Still picture recording format: JPEG corresponding (...
...surround microphone (with a zoom microphone/focus microphone function)/stereo microphone Minimum required illumination: Approx. 3 lx (1/30 with [AUTO SLOW SHTR] is set to 383.7 mm (16:9) Minimum focus distance; Approx. 6 Mbps (VBR) [SA 480/60i]; Approx. 21 Mbps (VBR) [PH ...When using battery) Power consumption: 12.9 W Recording format: AVCHD format version 2.0 compliant (AVCHD Progressive) Motion picture compression: MPEG-4 AVC/H.264 Audio compression: Dolby® Digital (5.1 ch/2 ch) Recording mode and transfer rate: [PS 1080/60p]; Still picture recording format: JPEG corresponding (...
Operating Instructions Advanced
Page 3
... 19 Using the LCD monitor 19 How to use the touch screen 20 LCD monitor adjustment 20 Viewfinder adjustment 21 Recording yourself 22 Setting date and time 23 Using the menu screen 24 Using with the wireless remote control 25 Operation of direction buttons/ OK button 26...40 Iris adjustment 42 Manual shutter speed 44 Audio Input 45 Microphone setup 45 Switching Audio Input 46 Adjusting the audio input level 49 Counter display 51 Setting the Time Code 52 Setting the User Information 53 Setting the Recording Counter 54 USER button 55 Setting the USER button 55 Using the USER ...
... 19 Using the LCD monitor 19 How to use the touch screen 20 LCD monitor adjustment 20 Viewfinder adjustment 21 Recording yourself 22 Setting date and time 23 Using the menu screen 24 Using with the wireless remote control 25 Operation of direction buttons/ OK button 26...40 Iris adjustment 42 Manual shutter speed 44 Audio Input 45 Microphone setup 45 Switching Audio Input 46 Adjusting the audio input level 49 Counter display 51 Setting the Time Code 52 Setting the User Information 53 Setting the Recording Counter 54 USER button 55 Setting the USER button 55 Using the USER ...

Operating Instructions Advanced
Page 45
...more clearly by forward-facing stereo microphones. ≥ If you zoom out (wide angle). Microphone setup Recording setting of the audio level meter will change depending on the settings. (l 106) - 45 - Sounds near the front of the unit are recorded more clearly if you zoom...2 ch, it is possible to switch between built-in microphone, external microphone, or connected audio equipment for instance recording a music recital, we recommend setting [MIC SETUP] to [SURROUND]. ≥ When the [BASS SETTING] is set to anything other than [0dB], it becomes impossible to select [FOCUS MIC]. (l 94...
...more clearly by forward-facing stereo microphones. ≥ If you zoom out (wide angle). Microphone setup Recording setting of the audio level meter will change depending on the settings. (l 106) - 45 - Sounds near the front of the unit are recorded more clearly if you zoom...2 ch, it is possible to switch between built-in microphone, external microphone, or connected audio equipment for instance recording a music recital, we recommend setting [MIC SETUP] to [SURROUND]. ≥ When the [BASS SETTING] is set to anything other than [0dB], it becomes impossible to select [FOCUS MIC]. (l 94...

Operating Instructions Advanced
Page 46
Switching Audio Input INPUT1 LINE MIC +48V OFF ON INPUT2 LINE MIC +48V OFF ON CH1 INT(L) INPUT1 INPUT2 CH2 INT(R) INPUT2 A CH1 switch B CH2 switch C INPUT1, 2 (+48V) switches D INPUT1, 2 (LINE/MIC) switches ∫ Using the built-in microphone Audio is recorded with the built-in microphone (5.1 ch) when the [MIC SETUP] is set to INT(R). - 46 - When [MIC SETUP] is set to [2ch], audio is recorded with the built-in microphone (2 ch) when the CH1 switch is set to INT(L) and the CH2 switch is set to anything other than [2ch].
Switching Audio Input INPUT1 LINE MIC +48V OFF ON INPUT2 LINE MIC +48V OFF ON CH1 INT(L) INPUT1 INPUT2 CH2 INT(R) INPUT2 A CH1 switch B CH2 switch C INPUT1, 2 (+48V) switches D INPUT1, 2 (LINE/MIC) switches ∫ Using the built-in microphone Audio is recorded with the built-in microphone (5.1 ch) when the [MIC SETUP] is set to INT(R). - 46 - When [MIC SETUP] is set to [2ch], audio is recorded with the built-in microphone (2 ch) when the CH1 switch is set to INT(L) and the CH2 switch is set to anything other than [2ch].

Operating Instructions Advanced
Page 47
... the phantom microphone (which requires A AUDIO INPUT2 terminal (XLR 3 pin) B AUDIO INPUT1 terminal (XLR 3 pin) +48 V power supply)) Set the INPUT1, 2 (+48V) switches to audio input terminals 1, 2 (XLR 3 pin). INPUT2: Audio from a device connected to audio input terminal 2 (XLR 3 pin) is recorded to audio channel 2. ∫ Using an external microphone or audio equipment ≥ Set [MIC SETUP] to [2ch...
... the phantom microphone (which requires A AUDIO INPUT2 terminal (XLR 3 pin) B AUDIO INPUT1 terminal (XLR 3 pin) +48 V power supply)) Set the INPUT1, 2 (+48V) switches to audio input terminals 1, 2 (XLR 3 pin). INPUT2: Audio from a device connected to audio input terminal 2 (XLR 3 pin) is recorded to audio channel 2. ∫ Using an external microphone or audio equipment ≥ Set [MIC SETUP] to [2ch...

Operating Instructions Advanced
Page 48
... if you use a phantom microphone. ≥ When inputting the external microphone signal to audio channels 1 and 2, connect the external microphone to audio input terminal 2 (XLR 3 pin) and switch both CH1 and CH2 switches to INPUT2. - 48 - A PUSH section ≥ Set INPUT1, 2 (+48V) switches to INT (L) or INT (R) after removing the external microphone. You...
... if you use a phantom microphone. ≥ When inputting the external microphone signal to audio channels 1 and 2, connect the external microphone to audio input terminal 2 (XLR 3 pin) and switch both CH1 and CH2 switches to INPUT2. - 48 - A PUSH section ≥ Set INPUT1, 2 (+48V) switches to INT (L) or INT (R) after removing the external microphone. You...

Operating Instructions Advanced
Page 49
... yellow and the amount of sound distortion can be set the microphone input level and then touch [EXIT]. ≥ is displayed on the recording screen when the ALC is turned on the zoom rate. ≥ You cannot record with the audio completely muted. - 49 - A Center B Front...depending on . When ALC is disactivated, natural recording can be reduced. Adjusting the audio input level ∫ Adjusting the input level of the built-in microphone (5.1 ch) ≥ Set the [MIC SETUP] to set . 2 (When [SET]/[SETr ] is selected) Touch / to adjust the microphone input level. ≥...
... yellow and the amount of sound distortion can be set the microphone input level and then touch [EXIT]. ≥ is displayed on the recording screen when the ALC is turned on the zoom rate. ≥ You cannot record with the audio completely muted. - 49 - A Center B Front...depending on . When ALC is disactivated, natural recording can be reduced. Adjusting the audio input level ∫ Adjusting the input level of the built-in microphone (5.1 ch) ≥ Set the [MIC SETUP] to set . 2 (When [SET]/[SETr ] is selected) Touch / to adjust the microphone input level. ≥...

Operating Instructions Advanced
Page 50
...] to anything other than [2ch]. (l 45) ≥ Set [5.1ch MIC LEVEL] to [SET]/[SETr ]. (l 49) 1 Display the operation icons and touch . (l 64) 2 Touch / to adjust settings. 3 Touch to complete the setting. ∫ Adjusting the input level of the built-in microphone (2 ch), external microphone or audio device ≥ Set [MIC SETUP] to [2ch]. (l 45) Adjust the...
...] to anything other than [2ch]. (l 45) ≥ Set [5.1ch MIC LEVEL] to [SET]/[SETr ]. (l 49) 1 Display the operation icons and touch . (l 64) 2 Touch / to adjust settings. 3 Touch to complete the setting. ∫ Adjusting the input level of the built-in microphone (2 ch), external microphone or audio device ≥ Set [MIC SETUP] to [2ch]. (l 45) Adjust the...
Operating Instructions Advanced
Page 58
.... White Fade Fade in/fade out effect (white) can be added to the video and audio that is possible to press the recording start / stop button during the fade in /fade out effect (black) can be set for spotlight. It is started . ATW The White Balance can be added to the video... and audio that is set to ATW. (l 40) ≥ This cannot be changed to ATW Lock. - 58 - It is being recorded...
.... White Fade Fade in/fade out effect (white) can be added to the video and audio that is possible to press the recording start / stop button during the fade in /fade out effect (black) can be set for spotlight. It is started . ATW The White Balance can be added to the video... and audio that is set to ATW. (l 40) ≥ This cannot be changed to ATW Lock. - 58 - It is being recorded...

Operating Instructions Advanced
Page 76
Image may differ depending on the connected TV.) ≥ Check the input setting (input switch) and the audio input setting on the TV. (For more information, please read the operating instructions for the TV.) 3 Change the mode to to the AV terminal of the TV, ... (l 78) ≥ This unit is connected simultaneously. 2 Select the video input on the TV. ≥ Example: Select the [HDMI] channel with the VIERA Link. - 76 - Panasonic HDMI cable is not required. ≥ When connecting to play back.
Image may differ depending on the connected TV.) ≥ Check the input setting (input switch) and the audio input setting on the TV. (For more information, please read the operating instructions for the TV.) 3 Change the mode to to the AV terminal of the TV, ... (l 78) ≥ This unit is connected simultaneously. 2 Select the video input on the TV. ≥ Example: Select the [HDMI] channel with the VIERA Link. - 76 - Panasonic HDMI cable is not required. ≥ When connecting to play back.

Operating Instructions Advanced
Page 78
... back as when changing between scenes. Listening in 5.1 channel sound The audio recorded with the AV multi cable AV multi connector output setting can be changed. MENU : [OTHER FUNCTION] # [AV MULTI] # desired setting [COMPONENT]: When connecting to the component terminal [AV OUT]: When connecting...determines the output resolution automatically based on your TV. (Please read the operating instructions for several seconds in some cases, such as 5.1 ch audio by connecting this unit with 1080i. (Playback is [AUTO], switch to the method [1080p], [1080i] or [480p] which enables the ...
... back as when changing between scenes. Listening in 5.1 channel sound The audio recorded with the AV multi cable AV multi connector output setting can be changed. MENU : [OTHER FUNCTION] # [AV MULTI] # desired setting [COMPONENT]: When connecting to the component terminal [AV OUT]: When connecting...determines the output resolution automatically based on your TV. (Please read the operating instructions for several seconds in some cases, such as 5.1 ch audio by connecting this unit with 1080i. (Playback is [AUTO], switch to the method [1080p], [1080i] or [480p] which enables the ...

Operating Instructions Advanced
Page 91
...]: Change the recording interval. ≥ appears on the screen. ≥ After recording, the setting of time is recorded frame by frame with an interval, and is set to [HA], and the setting cannot be adjusted automatically depending on the screen. ≥ Aim the unit at the subject beforehand...setting the PRE-REC and switching to pressing the recording start/stop button when [PRE-REC] is touched. ≥ PRE-REC appears on light sources or scenes. One frame is recorded every recording interval that moves slowly for long period of interval recording is canceled. ≥ Audio...
...]: Change the recording interval. ≥ appears on the screen. ≥ After recording, the setting of time is recorded frame by frame with an interval, and is set to [HA], and the setting cannot be adjusted automatically depending on the screen. ≥ Aim the unit at the subject beforehand...setting the PRE-REC and switching to pressing the recording start/stop button when [PRE-REC] is touched. ≥ PRE-REC appears on light sources or scenes. One frame is recorded every recording interval that moves slowly for long period of interval recording is canceled. ≥ Audio...

Operating Instructions Advanced
Page 94
...] or [+6dB] to get strong power feeling at bass level. [2ch MIC ALC] [ON]/[OFF] ≥ Set [MIC SETUP] to [2ch]. (l 45) Distortion of the external microphone connected to the audio input terminal 2 (XLR 3 pin). - 94 - [BASS SETTING] Change the lower setting of the built-in microphone (2 ch) or external microphone is used by...
...] or [+6dB] to get strong power feeling at bass level. [2ch MIC ALC] [ON]/[OFF] ≥ Set [MIC SETUP] to [2ch]. (l 45) Distortion of the external microphone connected to the audio input terminal 2 (XLR 3 pin). - 94 - [BASS SETTING] Change the lower setting of the built-in microphone (2 ch) or external microphone is used by...

Operating Instructions Advanced
Page 97
Then, set [VIDEO/PICTURE] to [VIDEO]. (l 65) Select to display the audio level meter. [LENS STATUS] [ON]/[OFF] Display relating to lens can be switched. (Zoom Display, Optical Image Stabilizer, Focus Display, White Balance, Iris, Gain, Auto ...] [ON]/[OFF] Display which remains displayed even when [USER BUTTON DISPLAY], [GUIDE LINES], [SAFETY ZONE], [DATE/TIME], [LEVEL METER], [LENS STATUS] and [CARD&BATTERY] are set to and touch the play mode select icon. [VIDEO OUT OSD] [ON]/[OFF] The information displayed on the screen (operation icon and counter display etc...
Then, set [VIDEO/PICTURE] to [VIDEO]. (l 65) Select to display the audio level meter. [LENS STATUS] [ON]/[OFF] Display relating to lens can be switched. (Zoom Display, Optical Image Stabilizer, Focus Display, White Balance, Iris, Gain, Auto ...] [ON]/[OFF] Display which remains displayed even when [USER BUTTON DISPLAY], [GUIDE LINES], [SAFETY ZONE], [DATE/TIME], [LEVEL METER], [LENS STATUS] and [CARD&BATTERY] are set to and touch the play mode select icon. [VIDEO OUT OSD] [ON]/[OFF] The information displayed on the screen (operation icon and counter display etc...

Operating Instructions Advanced
Page 103
... the firmware of this device is displayed. [UPDATE] The firmware of this device is updated. (l 111) [OPERATION TIME] The accumulated operating time of the [RECORDING] setting is output even if this device is displayed. [H/PHONE MODE] Selects the sound heard through the headphones. [LIVE]: [RECORDING]: The sound which is to be... recorded (the sound synchronized with the images) is output. ≥ When this unit is connected to a TV using the HDMI cable (optional), audio at the time of this setting is .
... the firmware of this device is displayed. [UPDATE] The firmware of this device is updated. (l 111) [OPERATION TIME] The accumulated operating time of the [RECORDING] setting is output even if this device is displayed. [H/PHONE MODE] Selects the sound heard through the headphones. [LIVE]: [RECORDING]: The sound which is to be... recorded (the sound synchronized with the images) is output. ≥ When this unit is connected to a TV using the HDMI cable (optional), audio at the time of this setting is .


