
Datasheet
Page 2
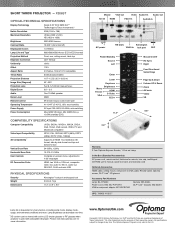
...:10 compatible Throw Ratio 0.626 (distance/width) Projection Distance 1.67ʹ-12.52ʹ (0.51-3.82 m) Image Size (Diagonal) 40ʺ-300ʺ Projection Lens F=2.8, f=7.26 mm manual focus Digital Zoom 0.8 ~ 2.0 Audio One 10-Watt speaker Noise Level 30dB Remote Control IR remote mouse control with laser Operating Temperature 41-104°F (5-40°C), 85% max humidity Power Supply AC input 100-240V, 50-60Hz, auto-switching Power Consumption Max 328W (Normal), Min 236W...
...:10 compatible Throw Ratio 0.626 (distance/width) Projection Distance 1.67ʹ-12.52ʹ (0.51-3.82 m) Image Size (Diagonal) 40ʺ-300ʺ Projection Lens F=2.8, f=7.26 mm manual focus Digital Zoom 0.8 ~ 2.0 Audio One 10-Watt speaker Noise Level 30dB Remote Control IR remote mouse control with laser Operating Temperature 41-104°F (5-40°C), 85% max humidity Power Supply AC input 100-240V, 50-60Hz, auto-switching Power Consumption Max 328W (Normal), Min 236W...

Protocol Functions
Page 4
... B model only...30) ~ 10 (a=31 30) ~XX82 1 7E 30 30 38 32 20 31 0D Logo Default ~XX82 3 7E 30 30 38 32 20 33 0D Neutral ~XX88 0 7E 30 30 38...30 30 31 30 30 20 33 0D Next Source ~XX101 1 7E 30 30 31 30 31 20 31 0D High Altitude On ~XX101 0 7E 30 30 31 30...Color Blue ~XX104 2 7E 30 30 31 30 34 20 32 0D Black ~XX104 3 7E 30 30 31 30 34 20 33 0D Red ~XX104 4 7E 30 30 31 30 34 20 34 0D Green ~XX104 5 7E 30 30 31 30 34 20 35 0D White...30 30 31 30 36 20 a 0D Auto Power Off (min) n = 0 (a=30) ~ 180 (a=31 38 30) ~XX107 n 7E 30 30 31 30 37 20 a 0D Sleep Timer (min) n = 0 (a=30) ~ ...
... B model only...30) ~ 10 (a=31 30) ~XX82 1 7E 30 30 38 32 20 31 0D Logo Default ~XX82 3 7E 30 30 38 32 20 33 0D Neutral ~XX88 0 7E 30 30 38...30 30 31 30 30 20 33 0D Next Source ~XX101 1 7E 30 30 31 30 31 20 31 0D High Altitude On ~XX101 0 7E 30 30 31 30...Color Blue ~XX104 2 7E 30 30 31 30 34 20 32 0D Black ~XX104 3 7E 30 30 31 30 34 20 33 0D Red ~XX104 4 7E 30 30 31 30 34 20 34 0D Green ~XX104 5 7E 30 30 31 30 34 20 35 0D White...30 30 31 30 36 20 a 0D Auto Power Off (min) n = 0 (a=30) ~ 180 (a=31 38 30) ~XX107 n 7E 30 30 31 30 37 20 a 0D Sleep Timer (min) n = 0 (a=30) ~ ...
Protocol Functions
Page 5
... fail/Fan Lock/Over Temperature/ Lamp Hours Running Out READ from projector automatically 232 ASCII Code HEX Code Function Projector Return Description S--y-s--te--m---s-t-a-t-u--s I-N--F--O--n n--:--0-/-1--/-2-/-3--/4--/-6-/-7--/8---=--S--t-a-n-d--b-y--/-W--a--r-m--i-n-g--/-C--o-o--l-in--g-/-O--u--t--o-f--R--a-n--g-e--/------- Appendices SEND from projector (telnet supported) 232 ASCII Code HEX Code Function Projector Return Description ~XX121 1 7E 30 30 31 32 31 20 31 0D Input Source OKn (Type A model) n : 0/1/2/3/4/5 = None/VGA1/VGA2/S-Video/Video/HDMI...
... fail/Fan Lock/Over Temperature/ Lamp Hours Running Out READ from projector automatically 232 ASCII Code HEX Code Function Projector Return Description S--y-s--te--m---s-t-a-t-u--s I-N--F--O--n n--:--0-/-1--/-2-/-3--/4--/-6-/-7--/8---=--S--t-a-n-d--b-y--/-W--a--r-m--i-n-g--/-C--o-o--l-in--g-/-O--u--t--o-f--R--a-n--g-e--/------- Appendices SEND from projector (telnet supported) 232 ASCII Code HEX Code Function Projector Return Description ~XX121 1 7E 30 30 31 32 31 20 31 0D Input Source OKn (Type A model) n : 0/1/2/3/4/5 = None/VGA1/VGA2/S-Video/Video/HDMI...

User's Manual
Page 1
... Projection Image Size......... 19 User Controls 21 Control Panel & Remote Control.......21 Control Panel 21 Remote Control 22 On-screen Display Menus 27 How to operate 27 Menu Tree 28 IMAGE 30 IMAGE | Advanced 32 IMAGE | Advanced | Signal (RGB) .... 34 DISPLAY 35 DISPLAY | 3D 38 SETUP 39 SETUP | Security 41 SETUP | Audio Settings 43 SETUP | Advanced 44 SETUP | LAN 45 OPTIONS 50 OPTIONS | Advanced 52 OPTIONS | Lamp Settings 53 OPTIONS | Optional Filter Settings.... 54 Appendices 55 Troubleshooting 55 Replacing the lamp 60 Compatibility Modes 62 Computer/Video/HDMI/Mac...
... Projection Image Size......... 19 User Controls 21 Control Panel & Remote Control.......21 Control Panel 21 Remote Control 22 On-screen Display Menus 27 How to operate 27 Menu Tree 28 IMAGE 30 IMAGE | Advanced 32 IMAGE | Advanced | Signal (RGB) .... 34 DISPLAY 35 DISPLAY | 3D 38 SETUP 39 SETUP | Security 41 SETUP | Audio Settings 43 SETUP | Advanced 44 SETUP | LAN 45 OPTIONS 50 OPTIONS | Advanced 52 OPTIONS | Lamp Settings 53 OPTIONS | Optional Filter Settings.... 54 Appendices 55 Troubleshooting 55 Replacing the lamp 60 Compatibility Modes 62 Computer/Video/HDMI/Mac...

User's Manual
Page 3
... remote control into the projector's lens when the lamp is on the screen. projector to page 53). ▀■ Warning- will not turn back on -screen display "OPTIONS | Lamp Settings" menu after replacing the lamp module (refer to cool down . Do not use lens cap when projector is approaching the end of the lamp itself. When the lamp is in this projector to cool down . This projector will detect the life of its life, the pro...
... remote control into the projector's lens when the lamp is on the screen. projector to page 53). ▀■ Warning- will not turn back on -screen display "OPTIONS | Lamp Settings" menu after replacing the lamp module (refer to cool down . Do not use lens cap when projector is approaching the end of the lamp itself. When the lamp is in this projector to cool down . This projector will detect the life of its life, the pro...

User's Manual
Page 16
When connected, the POWER/STANDBY LED will turn Amber. 3. Remove the lens cap. (optional) 2. Turn on the lamp by pressing " " button either on the top of When Power mode (Standby) is set to Eco ( Installation Powering the projector On / Off Powering On the Projector 1. Securely connect the power cord and signal cable.
When connected, the POWER/STANDBY LED will turn Amber. 3. Remove the lens cap. (optional) 2. Turn on the lamp by pressing " " button either on the top of When Power mode (Standby) is set to Eco ( Installation Powering the projector On / Off Powering On the Projector 1. Securely connect the power cord and signal cable.

User's Manual
Page 17
..." indicator flashes amber. Once in standby mode, simply press " " button to turn on . "TEMP" LED indicator flashes red and if "POWER/STAND- Installation Powering off the projector. When you must wait until the projector has completed the cooling cycle and has entered standby mode. Unplug the power cord from the electrical outlet and the projector. 4. Press the " " button on the remote control or on , the projector will shut down. 2. This indicates the projector has overheated. If the warning indicator light up...
..." indicator flashes amber. Once in standby mode, simply press " " button to turn on . "TEMP" LED indicator flashes red and if "POWER/STAND- Installation Powering off the projector. When you must wait until the projector has completed the cooling cycle and has entered standby mode. Unplug the power cord from the electrical outlet and the projector. 4. Press the " " button on the remote control or on , the projector will shut down. 2. This indicates the projector has overheated. If the warning indicator light up...

User's Manual
Page 22
... Confirm your selection. Automatically synchronizes the projector to select an input signal. English 22 Source Re-Sync Four Directional Select Keys Press "Source" to the input source. User Controls Remote Control Menu Menu The interface is subject to turn the 3D OSD menu on/off. Page - Use this button to your item selection. Brightness 3D Menu HDMI Adjust the brightness of USB mouse via USB when you press "Switch" button. Press the "3D" to model's specifications.
... Confirm your selection. Automatically synchronizes the projector to select an input signal. English 22 Source Re-Sync Four Directional Select Keys Press "Source" to the input source. User Controls Remote Control Menu Menu The interface is subject to turn the 3D OSD menu on/off. Page - Use this button to your item selection. Brightness 3D Menu HDMI Adjust the brightness of USB mouse via USB when you press "Switch" button. Press the "3D" to model's specifications.

User's Manual
Page 28
User Controls Menu Tree Main Menu Image Sub Menu Display Mode Brightness Contrast Sharpness #1 Color #1 Tint Advanced Display Reset Format Edge Mask Zoom Image Shift V Keystone #5 Auto Keystone 3D Setup Language Projection Menu Location #7 Screen Type Security English 28 Settings Gamma BrilliantColor™ Color Temp. Invert Exit #4 4:3 / 16:9 / Native / AUTO #5 4:3 / 16:9 or 16:10 / LBX / Native / AUTO 0~10 -5~25 (80%~200%) -100~100 -100~100 -40~40 On / Off Off / DLP-Link / IR Auto / SBS / Top and Bottom / Frame Sequential...
User Controls Menu Tree Main Menu Image Sub Menu Display Mode Brightness Contrast Sharpness #1 Color #1 Tint Advanced Display Reset Format Edge Mask Zoom Image Shift V Keystone #5 Auto Keystone 3D Setup Language Projection Menu Location #7 Screen Type Security English 28 Settings Gamma BrilliantColor™ Color Temp. Invert Exit #4 4:3 / 16:9 / Native / AUTO #5 4:3 / 16:9 or 16:10 / LBX / Native / AUTO 0~10 -5~25 (80%~200%) -100~100 -100~100 -40~40 On / Off Off / DLP-Link / IR Auto / SBS / Top and Bottom / Frame Sequential...

User's Manual
Page 29
... User Controls Main Menu Setup Options Sub Menu Projector ID Audio Settings Advanced #5 LAN Settings Input Source Source Lock High Altitude Information Hide Keypad Lock Test Pattern Background Color Advanced Lamp Settings Optional Filter Settings Reset Settings #5 Internal Speaker Mute #5 Audio Input #5 Volume Audio Mic #4 Volume Logo Closed Captioning Exit LAN State DHCP IP Address Subnet mask Gateway DNS Apply Exit Direct Power On Auto Power Off (min.) Sleep Timer (min.) Quick Resume Power Mode (Standby) Exit Lamp Hours Lamp Reminder Brightness Mode Lamp Reset Exit...
... User Controls Main Menu Setup Options Sub Menu Projector ID Audio Settings Advanced #5 LAN Settings Input Source Source Lock High Altitude Information Hide Keypad Lock Test Pattern Background Color Advanced Lamp Settings Optional Filter Settings Reset Settings #5 Internal Speaker Mute #5 Audio Input #5 Volume Audio Mic #4 Volume Logo Closed Captioning Exit LAN State DHCP IP Address Subnet mask Gateway DNS Apply Exit Direct Power On Auto Power Off (min.) Sleep Timer (min.) Quick Resume Power Mode (Standby) Exit Lamp Hours Lamp Reminder Brightness Mode Lamp Reset Exit...

User's Manual
Page 41
... password. 2. Press " " to be 4 digits. 3. Enter new password again and press " " to set the password. 2. Security Timer Use this time has elapsed you will be used. Press " " to switch on the remote, then press " " to enter your password again. Security On: Choose "On" to use security verification when the turning on the remote to enter your password. Change Password: 1. User Controls SETUP | Security Password default value is "1234" (first time). Use number button on the projector...
... password. 2. Press " " to be 4 digits. 3. Enter new password again and press " " to set the password. 2. Security Timer Use this time has elapsed you will be used. Press " " to switch on the remote, then press " " to enter your password again. Security On: Choose "On" to use security verification when the turning on the remote to enter your password. Change Password: 1. User Controls SETUP | Security Password default value is "1234" (first time). Use number button on the projector...
User's Manual
Page 48
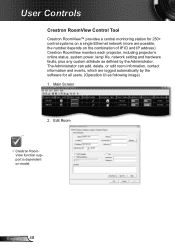
... support is dependent on model. User Controls Crestron RoomView Control Tool Crestron RoomView™ provides a central monitoring station for 250+ control systems on a single Ethernet network (more are logged automatically by the software for all users. (Operation UI as defined by the Administrator. Crestron RoomView monitors each projector, including projector's online status, system power, lamp life, network setting and hardware faults, plus any custom attribute as following image) 1. Main Screen...
... support is dependent on model. User Controls Crestron RoomView Control Tool Crestron RoomView™ provides a central monitoring station for 250+ control systems on a single Ethernet network (more are logged automatically by the software for all users. (Operation UI as defined by the Administrator. Crestron RoomView monitors each projector, including projector's online status, system power, lamp life, network setting and hardware faults, plus any custom attribute as following image) 1. Main Screen...

User's Manual
Page 52
User Controls OPTIONS | Advanced Direct Power On Choose "On" to Eco ( The projector will automatically power on when AC power is supplied, without pressing the " " key on the projector control panel or on the remote control. When Power mode (Standby) is set to activate Direct Power mode.
User Controls OPTIONS | Advanced Direct Power On Choose "On" to Eco ( The projector will automatically power on when AC power is supplied, without pressing the " " key on the projector control panel or on the remote control. When Power mode (Standby) is set to activate Direct Power mode.

User's Manual
Page 53
User Controls OPTIONS | Lamp Settings Lamp Hours Display the projection time. Lamp Reset Reset the lamp hour counter after replacing the lamp. 53 English Brightness Mode BRIGHT: Choose "BRIGHT" to hide the warning message when the changing lamp message is automatically detected to significantly reduced lamp power consumption (up to Eco automatically. The message will appear 30 hours before suggested replacement of lamp. When ambient temperature is over 40°C in operating, the projector will lower power consumption and extend the lamp life. ...
User Controls OPTIONS | Lamp Settings Lamp Hours Display the projection time. Lamp Reset Reset the lamp hour counter after replacing the lamp. 53 English Brightness Mode BRIGHT: Choose "BRIGHT" to hide the warning message when the changing lamp message is automatically detected to significantly reduced lamp power consumption (up to Eco automatically. The message will appear 30 hours before suggested replacement of lamp. When ambient temperature is over 40°C in operating, the projector will lower power consumption and extend the lamp life. ...

User's Manual
Page 55
... to change the monitor display you are using . If a problem persists, please contact your display resolution setting is switched on -screen Ensure all the cables and power connections are correctly and securely connected as described in the "Installation" section. Ensure all the pins of connectors are not bent or broken. Check if the projection lamp has been securely installed. Open the "My Computer" icon, the "Control Panel" folder...
... to change the monitor display you are using . If a problem persists, please contact your display resolution setting is switched on -screen Ensure all the cables and power connections are correctly and securely connected as described in the "Installation" section. Ensure all the pins of connectors are not bent or broken. Check if the projection lamp has been securely installed. Open the "My Computer" icon, the "Control Panel" folder...

User's Manual
Page 57
... to 4:3 in the projector OSD. If the image is reversed Select "SETUP Projection" from the screen. Press "Menu" button on the remote control, go to "Display Format" and try the different settings. Use of Keystone is horizontally centered on the screen and below the bottom of focus Make sure the lens cap (optional) is removed. Adjust the Focus Ring on your...
... to 4:3 in the projector OSD. If the image is reversed Select "SETUP Projection" from the screen. Press "Menu" button on the remote control, go to "Display Format" and try the different settings. Use of Keystone is horizontally centered on the screen and below the bottom of focus Make sure the lens cap (optional) is removed. Adjust the Focus Ring on your...

User's Manual
Page 58
To replace the lamp, follow the procedures in the "Replacing the Lamp" section on pages 60-61. English 58 LED lighting message Message POWER/STANDBY LED (Green/Amber) Standby State (Input power cord) Amber Power on (Warming) Flashing Green Temp-LED (Red) Lamp-LED (Red) Lamp lighting Green Steady light No light Power off the projector, then unplug the power cord and wait at least 60 seconds before reconnecting power. Check that "Keypad Lock" is not activated by trying to control the projector with the remote control. If this...
To replace the lamp, follow the procedures in the "Replacing the Lamp" section on pages 60-61. English 58 LED lighting message Message POWER/STANDBY LED (Green/Amber) Standby State (Input power cord) Amber Power on (Warming) Flashing Green Temp-LED (Red) Lamp-LED (Red) Lamp lighting Green Steady light No light Power off the projector, then unplug the power cord and wait at least 60 seconds before reconnecting power. Check that "Keypad Lock" is not activated by trying to control the projector with the remote control. If this...

User's Manual
Page 59
... Screen Messages Temperature warning: Fan failed: Lamp warning: Out of display range: Filter warning: If the remote control does not work Check the operating angle of the remote control is within 7 m (±0°) of the IR receivers on the projector. Make sure there are exhausted. 59 English Move to within ±15° both horizontally and vertically of one of the projector...
... Screen Messages Temperature warning: Fan failed: Lamp warning: Out of display range: Filter warning: If the remote control does not work Check the operating angle of the remote control is within 7 m (±0°) of the IR receivers on the projector. Make sure there are exhausted. 59 English Move to within ±15° both horizontally and vertically of one of the projector...

User's Manual
Page 61
... lamp cover has not been placed back on the projector and reset the lamp timer. Hand oil can cause the lamp to clean the lamp module if it was accidentally touched. Use a dry cloth to shatter. Allow the projector to the projector by pressing the " " button. 2. Switch off the power to cool down for at least 30 minutes. 3. Disconnect the power cord. 4. Lift up and remove the cover. 2 6. Appendices 3 2 5 1 Lamp Replacement...
... lamp cover has not been placed back on the projector and reset the lamp timer. Hand oil can cause the lamp to clean the lamp module if it was accidentally touched. Use a dry cloth to shatter. Allow the projector to the projector by pressing the " " button. 2. Switch off the power to cool down for at least 30 minutes. 3. Disconnect the power cord. 4. Lift up and remove the cover. 2 6. Appendices 3 2 5 1 Lamp Replacement...

User's Manual
Page 67
... B model only...30) ~ 10 (a=31 30) ~XX82 1 7E 30 30 38 32 20 31 0D Logo Default ~XX82 3 7E 30 30 38 32 20 33 0D Neutral ~XX88 0 7E 30 30 38...30 30 31 30 30 20 33 0D Next Source ~XX101 1 7E 30 30 31 30 31 20 31 0D High Altitude On ~XX101 0 7E 30 30 31 30...Color Blue ~XX104 2 7E 30 30 31 30 34 20 32 0D Black ~XX104 3 7E 30 30 31 30 34 20 33 0D Red ~XX104 4 7E 30 30 31 30 34 20 34 0D Green ~XX104 5 7E 30 30 31 30 34 20 35 0D White...30 30 31 30 36 20 a 0D Auto Power Off (min) n = 0 (a=30) ~ 180 (a=31 38 30) ~XX107 n 7E 30 30 31 30 37 20 a 0D Sleep Timer (min) n = 0 (a=30) ~ ...
... B model only...30) ~ 10 (a=31 30) ~XX82 1 7E 30 30 38 32 20 31 0D Logo Default ~XX82 3 7E 30 30 38 32 20 33 0D Neutral ~XX88 0 7E 30 30 38...30 30 31 30 30 20 33 0D Next Source ~XX101 1 7E 30 30 31 30 31 20 31 0D High Altitude On ~XX101 0 7E 30 30 31 30...Color Blue ~XX104 2 7E 30 30 31 30 34 20 32 0D Black ~XX104 3 7E 30 30 31 30 34 20 33 0D Red ~XX104 4 7E 30 30 31 30 34 20 34 0D Green ~XX104 5 7E 30 30 31 30 34 20 35 0D White...30 30 31 30 36 20 a 0D Auto Power Off (min) n = 0 (a=30) ~ 180 (a=31 38 30) ~XX107 n 7E 30 30 31 30 37 20 a 0D Sleep Timer (min) n = 0 (a=30) ~ ...


