
Protocol Functions
Page 1
... Protocol Function List Baud Rate : 9600 Data Bits: 8 Parity: None Stop Bits: 1 Flow Control : None UART16550 FIFO: Disable Projector Return (Pass): P Projector Return (Fail): F XX=01-99, projector's ID, XX=00 is for all projectors Note „ There is a after all ASCII commands. „ 0D is the HEX code for backward compatible) HDMI (ES551...~ 50 (a=35 30) n = -50 (a=2D 35 30) ~ 50 (a=35 30) n = -50 (a=2D 35 30) ~ 50 (a=35 30) n = 0 (a=30) ~ 10 (a=31 30) EN-40 SEND to projector 232 ASCII Code HEX Code Function ~XX00 1 7E 30 30 30 30 20 31 0D Power ON ~XX00 0 7E 30 30 30 30 20 30...
... Protocol Function List Baud Rate : 9600 Data Bits: 8 Parity: None Stop Bits: 1 Flow Control : None UART16550 FIFO: Disable Projector Return (Pass): P Projector Return (Fail): F XX=01-99, projector's ID, XX=00 is for all projectors Note „ There is a after all ASCII commands. „ 0D is the HEX code for backward compatible) HDMI (ES551...~ 50 (a=35 30) n = -50 (a=2D 35 30) ~ 50 (a=35 30) n = -50 (a=2D 35 30) ~ 50 (a=35 30) n = 0 (a=30) ~ 10 (a=31 30) EN-40 SEND to projector 232 ASCII Code HEX Code Function ~XX00 1 7E 30 30 30 30 20 31 0D Power ON ~XX00 0 7E 30 30 30 30 20 30...

Protocol Functions
Page 3
... 32 36 0D ~XX140 27 7E 30 30 31 34 30 20 32 37 0D SEND from projector automatically 232 ASCII Code HEX Code Function when Standby/Warming/Cooling/Out of Range/Lamp fail/ Fan ...Lock/Over Temperature/Lamp Hours Running Out/Cover Open READ from projector 232 ASCII Code HEX Code ~XX121 1 7E 30 30 31 32 31 20 31 0D Function Input Source ...31 0D 7E 30 30 31 30 38 20 31 0D Model name Lamp Hours Cumulative Lamp Hours Projector Return INFOn Projector Return OKn OKdddd OKn OKn OKn OKn OKn OKn OKn OKabbbbccdddde OKn OKbbbb OKbbbbb Up/Page + ...
... 32 36 0D ~XX140 27 7E 30 30 31 34 30 20 32 37 0D SEND from projector automatically 232 ASCII Code HEX Code Function when Standby/Warming/Cooling/Out of Range/Lamp fail/ Fan ...Lock/Over Temperature/Lamp Hours Running Out/Cover Open READ from projector 232 ASCII Code HEX Code ~XX121 1 7E 30 30 31 32 31 20 31 0D Function Input Source ...31 0D 7E 30 30 31 30 38 20 31 0D Model name Lamp Hours Cumulative Lamp Hours Projector Return INFOn Projector Return OKn OKdddd OKn OKn OKn OKn OKn OKn OKn OKabbbbccdddde OKn OKbbbb OKbbbbb Up/Page + ...

User's Manual
Page 1
...Connecting a computer or monitor 16 Connecting Video source devices 17 Operation 21 Powering On/Off the Projector 21 Adjusting the Projector Height 22 Adjusting the Projector Zoom and Focus 22 Adjusting Projection Image Size 23 Menu Operation ...24 Appendix 33 Replacing the ...Lamp ...33 Ceiling mount installation ...35 Compatibility Modes ...36 RS232 Commands and Protocol Function List 39 Troubleshooting ...43 Optoma Global ...
...Connecting a computer or monitor 16 Connecting Video source devices 17 Operation 21 Powering On/Off the Projector 21 Adjusting the Projector Height 22 Adjusting the Projector Zoom and Focus 22 Adjusting Projection Image Size 23 Menu Operation ...24 Appendix 33 Replacing the ...Lamp ...33 Ceiling mount installation ...35 Compatibility Modes ...36 RS232 Commands and Protocol Function List 39 Troubleshooting ...43 Optoma Global ...

User's Manual
Page 2
...(intake) and ventilation holes (exhaust). Accessories Do not place this projector yourself. Keep the plastic packing materials (from the wall socket before you operate your projector and save for cleaning the projector housing. Read instructions All the safety and operating instructions should be ...be adhered to. 3. Servicing Do not attempt to service this product on an unstable cart, stand, or table. Ventilation The projector is operated. 2. Usage Notice Safety Instructions Read all servicing to qualified service personnel. Power sources Check that the operating voltage ...
...(intake) and ventilation holes (exhaust). Accessories Do not place this projector yourself. Keep the plastic packing materials (from the wall socket before you operate your projector and save for cleaning the projector housing. Read instructions All the safety and operating instructions should be ...be adhered to. 3. Servicing Do not attempt to service this product on an unstable cart, stand, or table. Ventilation The projector is operated. 2. Usage Notice Safety Instructions Read all servicing to qualified service personnel. Power sources Check that the operating voltage ...

User's Manual
Page 3
... and the crucial internal parts. Replacement parts When replacement parts are required, be sure that the replacement parts are specified by the manufacture. When the projector is an extreme or sudden change in temperature, moisture may result in temperature. Moisture Condensation Never operate this...
... and the crucial internal parts. Replacement parts When replacement parts are required, be sure that the replacement parts are specified by the manufacture. When the projector is an extreme or sudden change in temperature, moisture may result in temperature. Moisture Condensation Never operate this...

User's Manual
Page 4
... AC line plug. Notes on the AC Power Cord AC Power Cord must meet the requirement of this projector. Ground Ground For Australia and Mainland China Ground For Continental Europe For the U.S.A. EN-4 This projector is used. and Canada Ground For the U.K. Please ensure that the proper AC Power Cord is equipped...
... AC line plug. Notes on the AC Power Cord AC Power Cord must meet the requirement of this projector. Ground Ground For Australia and Mainland China Ground For Continental Europe For the U.S.A. EN-4 This projector is used. and Canada Ground For the U.K. Please ensure that the proper AC Power Cord is equipped...

User's Manual
Page 5
EN-5 friendly design to change without express written consent. Introduction Projector Features The projector integrates high-performance optical engine projection and a user - The projector offers the following features: „ Single chip 0.55" Texas Instruments DLP® technology „ SVGA (800 x 600 pixels) „ XGA (1024 x 768 pixels) „ Compatibility ...
EN-5 friendly design to change without express written consent. Introduction Projector Features The projector integrates high-performance optical engine projection and a user - The projector offers the following features: „ Single chip 0.55" Texas Instruments DLP® technology „ SVGA (800 x 600 pixels) „ XGA (1024 x 768 pixels) „ Compatibility ...

User's Manual
Page 6
... if the unit does not work. „ Save the original shipping carton and Packing material; for each country, some regions may have all these components: Projector AC Power Cord Remote Control (IR) & batteries (AAA *2 PCS) VGA Cable (D-SUB to D- Package Contents When you unpack the...
... if the unit does not work. „ Save the original shipping carton and Packing material; for each country, some regions may have all these components: Projector AC Power Cord Remote Control (IR) & batteries (AAA *2 PCS) VGA Cable (D-SUB to D- Package Contents When you unpack the...

User's Manual
Page 7
Projector Overview Front View 9 87 6 12 3 45 1 Front IR remote control sensor 2 Elevator foot 3 Projection lens 4 Speaker 5 Ventilation holes 6 Control panel 7 Zoom ring 8 Focus ring 9 Lamp cover EN-7
Projector Overview Front View 9 87 6 12 3 45 1 Front IR remote control sensor 2 Elevator foot 3 Projection lens 4 Speaker 5 Ventilation holes 6 Control panel 7 Zoom ring 8 Focus ring 9 Lamp cover EN-7

User's Manual
Page 8
EN-8 Rear View 12 3 1 AC power socket 2 Connection ports (HDMI is not included in the package. „ Contact your dealer for information to mount the projector on certain models) 23 Kensington lock Bottom View 3 1 2 1 Security bar 2 Ceiling mount holes 3 Ventilation holes Note „ This projector can be used with a ceiling mount for support. The ceiling mount is only on a ceiling.
EN-8 Rear View 12 3 1 AC power socket 2 Connection ports (HDMI is not included in the package. „ Contact your dealer for information to mount the projector on certain models) 23 Kensington lock Bottom View 3 1 2 1 Security bar 2 Ceiling mount holes 3 Ventilation holes Note „ This projector can be used with a ceiling mount for support. The ceiling mount is only on a ceiling.

User's Manual
Page 9
Using the Product Control Panel 1 2 345 6 7 8 4 1 Power Turn the projector on or off. 2 SOURCE Switch between input signals. 3 MENU/EXIT Display or exit the on-screen display menus. 4 Keystone ( / ) Manually correct distorted images resulting from an angled projection. 5 Four directional buttons Use four directional buttons to select items or make adjustments to your selection. 6 Re-SYNC Automatically synchronize the projector to the input source. 7 POWER (Power LED indicator) Refer to "LED Indicator Messages". 8 TEMP/LAMP (Temp/Lamp LED indicator) Refer to "LED Indicator Messages". EN-9
Using the Product Control Panel 1 2 345 6 7 8 4 1 Power Turn the projector on or off. 2 SOURCE Switch between input signals. 3 MENU/EXIT Display or exit the on-screen display menus. 4 Keystone ( / ) Manually correct distorted images resulting from an angled projection. 5 Four directional buttons Use four directional buttons to select items or make adjustments to your selection. 6 Re-SYNC Automatically synchronize the projector to the input source. 7 POWER (Power LED indicator) Refer to "LED Indicator Messages". 8 TEMP/LAMP (Temp/Lamp LED indicator) Refer to "LED Indicator Messages". EN-9

User's Manual
Page 10
... from video equipment to this jack. 4 VGA1-IN/YPbPr Connect image input signal (analog RGB or component) to this jack. 5 RS-232 When operating the projector via a computer, connect this to the controlling computer's RS-232C port. 6 Service/Mouse This connector is for firmware update and mouse function support. 7 VGA OUT...
... from video equipment to this jack. 4 VGA1-IN/YPbPr Connect image input signal (analog RGB or component) to this jack. 5 RS-232 When operating the projector via a computer, connect this to the controlling computer's RS-232C port. 6 Service/Mouse This connector is for firmware update and mouse function support. 7 VGA OUT...

User's Manual
Page 11
... S-Video signal. 10 Page+ Perform page up function when mouse mode is activated. 11 3D Turn on or off 3D function. 12 Power Turn the projector on or off. 13 Re-SYNC Automatically synchronize the...
... S-Video signal. 10 Page+ Perform page up function when mouse mode is activated. 11 3D Turn on or off 3D function. 12 Power Turn the projector on or off. 13 Re-SYNC Automatically synchronize the...

User's Manual
Page 12
...-click, press R. „ To return to mouse mode when the on the remote control to switch to the normal mode, press Switch again. Connect the projector to Adjust the volume level. An Cut off the AV Mute temporarily. If mode. any other buttons are close. VGA2 by sequence. 22 Page- Set...
...-click, press R. „ To return to mouse mode when the on the remote control to switch to the normal mode, press Switch again. Connect the projector to Adjust the volume level. An Cut off the AV Mute temporarily. If mode. any other buttons are close. VGA2 by sequence. 22 Page- Set...

User's Manual
Page 14
Remote Control Operation Point the remote control at the infrared remote sensor and press a button. „ Operating the projector from the front 15 15 5m 8m 7m Note „ The remote control may not operate when there is sunlight or other strong light such ...
Remote Control Operation Point the remote control at the infrared remote sensor and press a button. „ Operating the projector from the front 15 15 5m 8m 7m Note „ The remote control may not operate when there is sunlight or other strong light such ...
User's Manual
Page 15
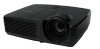
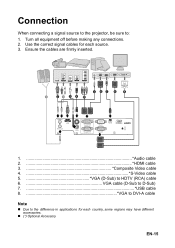
Use the correct signal cables for each source. 3. Ensure the cables are firmly inserted. 1 67 6 8 1 21 3 4 5 1 Audio cable 2 HDMI cable 3 Composite Video cable 4 S-Video cable 5 VGA (D-Sub) to HDTV (RCA) cable 6 VGA cable (D-Sub to D-Sub) 7 USB cable 8 VGA to DVI-A cable Note „ Due to : 1. Turn all equipment off before making any connections. 2. Connection When connecting a signal source to the projector, be sure to the difference in applications for each country, some regions may have different accessories. „ (*) Optional Accessory EN-15
Use the correct signal cables for each source. 3. Ensure the cables are firmly inserted. 1 67 6 8 1 21 3 4 5 1 Audio cable 2 HDMI cable 3 Composite Video cable 4 S-Video cable 5 VGA (D-Sub) to HDTV (RCA) cable 6 VGA cable (D-Sub to D-Sub) 7 USB cable 8 VGA to DVI-A cable Note „ Due to : 1. Turn all equipment off before making any connections. 2. Connection When connecting a signal source to the projector, be sure to the difference in applications for each country, some regions may have different accessories. „ (*) Optional Accessory EN-15

User's Manual
Page 16
...to the D-Sub input socket of the video monitor. Important „ Many notebooks do not turn on page 16. 2. EN-16 Connect the projector to a computer as on the screen, you to connect them to both IBM® compatibles and Macintosh® computers. Or if your monitor is... to find your presentation close-up on a monitor as well as described in "Connecting a computer" on their external video ports when connected to a projector. Connect the other end of the computer. 2. Connecting a monitor If you want to view your notebook's key combination. Connect the other end of the...
...to the D-Sub input socket of the video monitor. Important „ Many notebooks do not turn on page 16. 2. EN-16 Connect the projector to a computer as on the screen, you to connect them to both IBM® compatibles and Macintosh® computers. Or if your monitor is... to find your presentation close-up on a monitor as well as described in "Connecting a computer" on their external video ports when connected to a projector. Connect the other end of the computer. 2. Connecting a monitor If you want to view your notebook's key combination. Connect the other end of the...

User's Manual
Page 17
... connecting EN-17 The method you choose will most likely depend upon the availability of matching terminals on both the projector and the Video source device as described below: Terminal name HDMI Component Video S-Video Video Terminal appearance Reference Picture quality HDMI "...on page 19 VIDEO "Connecting a Normal composite Video source device" on page 20 Note „ Not all models have HDMI input jack, please check your projector to various Video source devices that provide any one of the following output sockets: „ HDMI „ Component Video „ S-Video „ Video ...
... connecting EN-17 The method you choose will most likely depend upon the availability of matching terminals on both the projector and the Video source device as described below: Terminal name HDMI Component Video S-Video Video Terminal appearance Reference Picture quality HDMI "...on page 19 VIDEO "Connecting a Normal composite Video source device" on page 20 Note „ Not all models have HDMI input jack, please check your projector to various Video source devices that provide any one of the following output sockets: „ HDMI „ Component Video „ S-Video „ Video ...

User's Manual
Page 18
... connect one end to a Component Video source device: 1. To connect the projector to the HDMI output jack of the HDMI source device. 2. green to green, blue to blue, and red to the HDMI jack on the projector. Important „ If the selected video image is not displayed after the... projector is turned on the projector. Connecting a Component Video source device Examine your Video source device to determine if it has a set...
... connect one end to a Component Video source device: 1. To connect the projector to the HDMI output jack of the HDMI source device. 2. green to green, blue to blue, and red to the HDMI jack on the projector. Important „ If the selected video image is not displayed after the... projector is turned on the projector. Connecting a Component Video source device Examine your Video source device to determine if it has a set...

User's Manual
Page 19
...Connect the other end of the Video source device. 2. EN-19 Important „ If the selected video image is not displayed after the projector is turned on and the correct video source has been selected, check that the signal cables have been connected correctly. „ If you... have already made a Component Video connection between the projector and this S-Video source device using an S-Video connection as this device using Component Video connections, you need to reassess which method you will...
...Connect the other end of the Video source device. 2. EN-19 Important „ If the selected video image is not displayed after the projector is turned on and the correct video source has been selected, check that the signal cables have been connected correctly. „ If you... have already made a Component Video connection between the projector and this S-Video source device using an S-Video connection as this device using Component Video connections, you need to reassess which method you will...


