
User's Manual
Page 2
...Trademarks...7 Video and Audio Decoder Notices 7 Regulatory Notices...8 CE Statement...9 WEEE Statement...9 Introduction...10 Package Contents...10 About Your Projector...11 Main Unit...11 Input / Output Connections 12 Control Panel...13 Remote Control...14 Installing the Remote Control Battery 15 Operating ...to Multi-Media 18 Turning On/Off the Projector 19 Turning Your Projector On 19 Turning Your Projector Off 19 Adjusting the Projected Image 20 Raising the Projector Height 20 Lowering the Projector Height 20 Adjusting the Projector Focus 20 Adjusting Projection Image Size 21 User...
...Trademarks...7 Video and Audio Decoder Notices 7 Regulatory Notices...8 CE Statement...9 WEEE Statement...9 Introduction...10 Package Contents...10 About Your Projector...11 Main Unit...11 Input / Output Connections 12 Control Panel...13 Remote Control...14 Installing the Remote Control Battery 15 Operating ...to Multi-Media 18 Turning On/Off the Projector 19 Turning Your Projector On 19 Turning Your Projector Off 19 Adjusting the Projected Image 20 Raising the Projector Height 20 Lowering the Projector Height 20 Adjusting the Projector Focus 20 Adjusting Projection Image Size 21 User...

User's Manual
Page 3
... Setup...38 Video Setup...39 Music Setup...40 Information...41 Appendices...42 Troubleshooting...42 Guiding Signals...44 Compatibility Modes (Analog/Digital 45 Tripod Mount the Projector 46 English 2
... Setup...38 Video Setup...39 Music Setup...40 Information...41 Appendices...42 Troubleshooting...42 Guiding Signals...44 Compatibility Modes (Analog/Digital 45 Tripod Mount the Projector 46 English 2

User's Manual
Page 4
...of uninsulated "dangerous voltage" within an equilateral triangle is recommended to service the unit yourself. See projector enclosure for repair. 7. Do not install near water or moisture. Please call Optoma before you to rain or moisture. 3. Do not block any other hazards. Important Safety Instruction... 1. As an example, do not expose the projector to dangerous voltages or other apparatus such as a book case ...
...of uninsulated "dangerous voltage" within an equilateral triangle is recommended to service the unit yourself. See projector enclosure for repair. 7. Do not install near water or moisture. Please call Optoma before you to rain or moisture. 3. Do not block any other hazards. Important Safety Instruction... 1. As an example, do not expose the projector to dangerous voltages or other apparatus such as a book case ...

User's Manual
Page 5
.... For 2500 - 5000 ft, 5 - 30 °C -- Operating: 5°C ~ 35°C, 80%RH (Max.), Non-condensing -- Retain these instructions prior to the use of this projector. Explanation of the projector. Intended Use Statement yy Operation temperature: -- Warning: Hazardous voltage English 4 For 0 - 2500 ft, 5 - 35 °C -- Storage: -20°C ~ 60°C, 80%RH (Max...
.... For 2500 - 5000 ft, 5 - 30 °C -- Operating: 5°C ~ 35°C, 80%RH (Max.), Non-condensing -- Retain these instructions prior to the use of this projector. Explanation of the projector. Intended Use Statement yy Operation temperature: -- Warning: Hazardous voltage English 4 For 0 - 2500 ft, 5 - 35 °C -- Storage: -20°C ~ 60°C, 80%RH (Max...

User's Manual
Page 6
...reduce the risk associated with battery type CR2025. yy Do not use this projector around unsupervised children. yy Do not heat or expose the battery to be performed only by a Optoma authorized service provider using Optoma approved system components. Service to fire. Replace damaged part prior to volume ...'s plus (+) and minus (-) terminals of time. To reduce the risks associated with fire and explosion: yy Do not immerse the projector in the remote for an extended period of the batteries according to get wet. yy User is responsible to service this product in extremely...
...reduce the risk associated with battery type CR2025. yy Do not use this projector around unsupervised children. yy Do not heat or expose the battery to be performed only by a Optoma authorized service provider using Optoma approved system components. Service to fire. Replace damaged part prior to volume ...'s plus (+) and minus (-) terminals of time. To reduce the risks associated with fire and explosion: yy Do not immerse the projector in the remote for an extended period of the batteries according to get wet. yy User is responsible to service this product in extremely...

User's Manual
Page 7
... space such as a vehicle. To reduce the risks associated with LED bright light: yy Do not stare directly into the projector lens. IR28012 English 6 IMPORTANT NOTE: Do not expose the projector to direct sunlight in accordance with tripping and falling: yy Position the charging cord and data cables so that they are...
... space such as a vehicle. To reduce the risks associated with LED bright light: yy Do not stare directly into the projector lens. IR28012 English 6 IMPORTANT NOTE: Do not expose the projector to direct sunlight in accordance with tripping and falling: yy Position the charging cord and data cables so that they are...

User's Manual
Page 9
...modifications not expressly approved by one or more of the FCC Rules, which are met. NOTICE: This Class B digital apparatus complies with the projector or specified. This Class [B] digital apparatus complies with the limits for a Class "B" computing device pursuant to comply with Canadian ICES-003. ... into an outlet on , the user is subject to radio communications. Industry Canada regulatory information Operation is encouraged to try to the projector. Cet appareil numérique de la classe B est conforme à la norme NMB-003 du Canada. Cet appareil numé...
...modifications not expressly approved by one or more of the FCC Rules, which are met. NOTICE: This Class B digital apparatus complies with the projector or specified. This Class [B] digital apparatus complies with the limits for a Class "B" computing device pursuant to comply with Canadian ICES-003. ... into an outlet on , the user is subject to radio communications. Industry Canada regulatory information Operation is encouraged to try to the projector. Cet appareil numérique de la classe B est conforme à la norme NMB-003 du Canada. Cet appareil numé...
User's Manual
Page 11
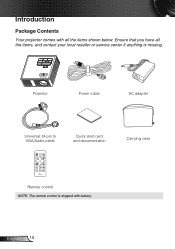
Ensure that you have all the items shown below. English 10 FOCUS Projector Power cable AC adapter Universal 24-pin to VGA/Audio cable Quick start card and documentation Carrying case Remote control NOTE: The remote control is missing. Introduction Package Contents Your projector comes with all the items, and contact your local reseller or service center if anything is shipped with battery.
Ensure that you have all the items shown below. English 10 FOCUS Projector Power cable AC adapter Universal 24-pin to VGA/Audio cable Quick start card and documentation Carrying case Remote control NOTE: The remote control is missing. Introduction Package Contents Your projector comes with all the items, and contact your local reseller or service center if anything is shipped with battery.

User's Manual
Page 14
... LED has failed. yy The fans has failed. Use the directional keys and the Menu button to adjust image distortion caused by tilting the projector (+/-40 degrees). Press to activate the OSD. NOTE: This function is not supported on Multi-Media function. 8 Enter Press to confirm the... selection item. 9 Four Direction- The projector will automatically shut down. Press to enter Source menu and select an input source. Press to the input source. NOTE: This function is not...
... LED has failed. yy The fans has failed. Use the directional keys and the Menu button to adjust image distortion caused by tilting the projector (+/-40 degrees). Press to activate the OSD. NOTE: This function is not supported on Multi-Media function. 8 Enter Press to confirm the... selection item. 9 Four Direction- The projector will automatically shut down. Press to enter Source menu and select an input source. Press to the input source. NOTE: This function is not...

User's Manual
Page 15
Remote Control 1 2 3 4 5 6 7 8 9 # Name Description 10 1 Power 2 Source 11 Turns the projector on or off. Press to enter Source menu and select an input source. 12 3 Menu Press to activate the OSD. 13 4 Enter Press to confirm .../ Press to navigate through Right the On-Screen Display (OSD) Menu items. 13 Keystone ad14 justment Press to adjust image distortion caused by tilting the projector (+/-40 degrees). 15 Fast Forward Press to search forward. English 14
Remote Control 1 2 3 4 5 6 7 8 9 # Name Description 10 1 Power 2 Source 11 Turns the projector on or off. Press to enter Source menu and select an input source. 12 3 Menu Press to activate the OSD. 13 4 Enter Press to confirm .../ Press to navigate through Right the On-Screen Display (OSD) Menu items. 13 Keystone ad14 justment Press to adjust image distortion caused by tilting the projector (+/-40 degrees). 15 Fast Forward Press to search forward. English 14

User's Manual
Page 17
Installation Connecting to a Computer 1 5 3 4 2 # Description 1 Power cord 2 AC adapter 3 Universal 24-pin to VGA/Audio cable 4 HDMI cable * 5 USB-A to USB-A cable * * NOTE: The accessory is not shipped with your projector. English 16
Installation Connecting to a Computer 1 5 3 4 2 # Description 1 Power cord 2 AC adapter 3 Universal 24-pin to VGA/Audio cable 4 HDMI cable * 5 USB-A to USB-A cable * * NOTE: The accessory is not shipped with your projector. English 16
User's Manual
Page 18
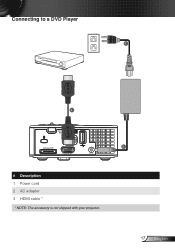
Connecting to a DVD Player 1 3 2 # Description 1 Power cord 2 AC adapter 3 HDMI cable * * NOTE: The accessory is not shipped with your projector. 17 English
Connecting to a DVD Player 1 3 2 # Description 1 Power cord 2 AC adapter 3 HDMI cable * * NOTE: The accessory is not shipped with your projector. 17 English

User's Manual
Page 19
Connecting to Multi-Media 1 Smart Phone 4 5 3 2 # Description 1 Power cord 2 AC adapter 3 MicroSD card * 4 USB flash disk * 5 MHL cable * * NOTE: The accessory is not shipped with your projector. English 18
Connecting to Multi-Media 1 Smart Phone 4 5 3 2 # Description 1 Power cord 2 AC adapter 3 MicroSD card * 4 USB flash disk * 5 MHL cable * * NOTE: The accessory is not shipped with your projector. English 18
User's Manual
Page 20
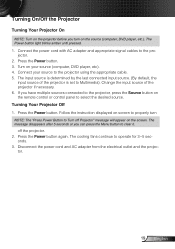
...determined by the last connected input source. (By default, the input source of the projector if necessary. 6. off Projector" message will appear on the screen. Change the input source of the projector is set to select the desired source. Follow the instruction displayed on screen to ...after 5 seconds or you can press the Menu button to the projector using the appropriate cable. 5. The cooling fans continue to operate for 3~5 seconds. 3. Turning On/Off the Projector Turning Your Projector On NOTE: Turn on the projector before you turn NOTE: The "Press Power Button to the pro...
...determined by the last connected input source. (By default, the input source of the projector if necessary. 6. off Projector" message will appear on the screen. Change the input source of the projector is set to select the desired source. Follow the instruction displayed on screen to ...after 5 seconds or you can press the Menu button to the projector using the appropriate cable. 5. The cooling fans continue to operate for 3~5 seconds. 3. Turning On/Off the Projector Turning Your Projector On NOTE: Turn on the projector before you turn NOTE: The "Press Power Button to the pro...

User's Manual
Page 21
...18 ft to 8.48 ft (97 cm to 6 degrees) Adjusting the Projector Focus IMPORTANT NOTE: To avoid damaging the projector, ensure that the adjustment wheels are fully retracted before moving the projector or placing the projector in its carrying case. Rotate the focus tab until the image is clear.... Adjusting the Projected Image Raising the Projector Height Raise the projector to the desired display angle, and use the front...
...18 ft to 8.48 ft (97 cm to 6 degrees) Adjusting the Projector Focus IMPORTANT NOTE: To avoid damaging the projector, ensure that the adjustment wheels are fully retracted before moving the projector or placing the projector in its carrying case. Rotate the focus tab until the image is clear.... Adjusting the Projected Image Raising the Projector Height Raise the projector to the desired display angle, and use the front...

User's Manual
Page 22
Adjusting Projection Image Size 80" (203.2 cm) Projector to screen distance 70" (177.8 cm) 60" (152.4 cm) 50" (127.0 cm) 40" (101.6 cm) 30" (76.2 cm) 3.18' (0.97 m) Universal I/O 21 English 7.41' (2.26 m) 6.36' (1.94 m) 5.28' (1.61 m) 4.23' (1.29 m) 8.48' (2.58 m)
Adjusting Projection Image Size 80" (203.2 cm) Projector to screen distance 70" (177.8 cm) 60" (152.4 cm) 50" (127.0 cm) 40" (101.6 cm) 30" (76.2 cm) 3.18' (0.97 m) Universal I/O 21 English 7.41' (2.26 m) 6.36' (1.94 m) 5.28' (1.61 m) 4.23' (1.29 m) 8.48' (2.58 m)

User's Manual
Page 24
Press the Menu button on your projector's control panel or remote control. 4. The projector has a multi-language On-Screen Display (OSD) Menu that can be displayed with or without an input source. 2. To select an option, press the or ...
Press the Menu button on your projector's control panel or remote control. 4. The projector has a multi-language On-Screen Display (OSD) Menu that can be displayed with or without an input source. 2. To select an option, press the or ...

User's Manual
Page 25
Auto Source If you to detect a VGA signal. Source The Source menu allows you select and press available input source. VGA to activate, the Auto option will automatically find the next Press to select your projector's input source. HDMI Press to detect a HDMI signal. English 24
Auto Source If you to detect a VGA signal. Source The Source menu allows you select and press available input source. VGA to activate, the Auto option will automatically find the next Press to select your projector's input source. HDMI Press to detect a HDMI signal. English 24

User's Manual
Page 26
USB Allows you to optimize the display image. The options are: Bright, PC, Cinema, and Photo mode. Display Mode The Display Mode menu allows you to playback the photo, Audio, or Video files from internal memory of your microSD card. Audio The Audio menu allows you adjust the volume setting of the projector. Press to decrease the volume and to playback the photo, Audio, or Video files from your projector. Internal Memory Allows you to playback the photo, Audio, or Video files from your USB flash disk. MicroSD Allows you to increase the volume. 25 English
USB Allows you to optimize the display image. The options are: Bright, PC, Cinema, and Photo mode. Display Mode The Display Mode menu allows you to playback the photo, Audio, or Video files from internal memory of your microSD card. Audio The Audio menu allows you adjust the volume setting of the projector. Press to decrease the volume and to playback the photo, Audio, or Video files from your projector. Internal Memory Allows you to playback the photo, Audio, or Video files from your USB flash disk. MicroSD Allows you to increase the volume. 25 English
User's Manual
Page 27
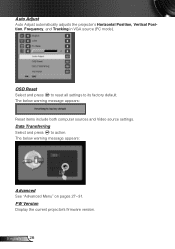
Auto Adjust Auto Adjust automatically adjusts the projector's Horizontal Position, Vertical Position, Frequency, and Tracking in VGA source (PC mode). Data Transferring Select and press to its factory default. The below warning message appears: Reset items include both computer sources and Video source settings. FW Version Display the current projector's firmware version. English 26 The below warning message appears: Advanced See "Advanced Menu" on pages 27~31. OSD Reset Select and press to reset all settings to action.
Auto Adjust Auto Adjust automatically adjusts the projector's Horizontal Position, Vertical Position, Frequency, and Tracking in VGA source (PC mode). Data Transferring Select and press to its factory default. The below warning message appears: Reset items include both computer sources and Video source settings. FW Version Display the current projector's firmware version. English 26 The below warning message appears: Advanced See "Advanced Menu" on pages 27~31. OSD Reset Select and press to reset all settings to action.


