

User Manual
Page 1
... the Projector 13 Powering Off the projector 14 Warning Indicator 14 Adjusting the Projected Image 15 Adjusting the Projector's Height 15 Adjusting the Projector's Zoom / Focus 16 Adjusting Projected Image Size 16 User Controls 17 Control Panel & Remote Control 17 On-screen Display Menus 20 How to operate ...20 Menu Tree...21 Image ...22 Display ...27 Setup...30 Options...32 Appendices 34 Troubleshooting 34 Image Problems 34 Intermission Problems 37 LED Problems ...37 Remote Control Problems 38 Replacing the Lamp 39 Compatibility Modes 40 Ceiling Mount Installation 41 Optoma...
... the Projector 13 Powering Off the projector 14 Warning Indicator 14 Adjusting the Projected Image 15 Adjusting the Projector's Height 15 Adjusting the Projector's Zoom / Focus 16 Adjusting Projected Image Size 16 User Controls 17 Control Panel & Remote Control 17 On-screen Display Menus 20 How to operate ...20 Menu Tree...21 Image ...22 Display ...27 Setup...30 Options...32 Appendices 34 Troubleshooting 34 Image Problems 34 Intermission Problems 37 LED Problems ...37 Remote Control Problems 38 Replacing the Lamp 39 Compatibility Modes 40 Ceiling Mount Installation 41 Optoma...

User Manual
Page 2
.... Install in any way: ▀■ Such as they may touch dangerous voltage points or short-out parts that may keep air from overheating, put the projector in a position and location that may expose you . 8. Refer all servicing to service this projector yourself. Please call Optoma to be adjusted or repaired by the manufacturer. 7. Do not let objects or liquids enter the projector -as power supply cord...
.... Install in any way: ▀■ Such as they may touch dangerous voltage points or short-out parts that may keep air from overheating, put the projector in a position and location that may expose you . 8. Refer all servicing to service this projector yourself. Please call Optoma to be adjusted or repaired by the manufacturer. 7. Do not let objects or liquids enter the projector -as power supply cord...

User Manual
Page 3
... projector will not turn back on until show on -screen display "Options|Lamp Settings" menu after replacing the lamp module (refer to cool down , and follow all replacement instructions. See page 39. ▀■ Warning- Reset the "Lamp Reset" function from the on the screen. When the lamp is approaching to change the lamp as soon as this user's guide. ▀■ Warning- the procedures listed under "Replacing the Lamp" section on . Do not use lens...
... projector will not turn back on until show on -screen display "Options|Lamp Settings" menu after replacing the lamp module (refer to cool down , and follow all replacement instructions. See page 39. ▀■ Warning- Reset the "Lamp Reset" function from the on the screen. When the lamp is approaching to change the lamp as soon as this user's guide. ▀■ Warning- the procedures listed under "Replacing the Lamp" section on . Do not use lens...

User Manual
Page 5
... the projector lamp. this is by ceiling-mounting rather than floor or table-mounting the projector. ▀■ When projector is recommended to avoid the need for the user to enter the beam. ▀■ Ensure that , when presenters look at the audience, they are located out of the line of sight from the screen to stare at all times...
... the projector lamp. this is by ceiling-mounting rather than floor or table-mounting the projector. ▀■ When projector is recommended to avoid the need for the user to enter the beam. ▀■ Ensure that , when presenters look at the audience, they are located out of the line of sight from the screen to stare at all times...

User Manual
Page 6
..., 576p, 720p, 1080i) Full function IR remote control with back light Advanced 2D digital keystone correction and high quality full screen image re-scaling User friendly control panel SXGA+, SXGA compression and HD, XGA, SVGA, VGA re-sizing Macintosh compatible Optoma's patent-pending O2AirTM Photo Catalyst air purification technology HDMI & DVI support with HDCP compliant True Vivid and...
..., 576p, 720p, 1080i) Full function IR remote control with back light Advanced 2D digital keystone correction and high quality full screen image re-scaling User friendly control panel SXGA+, SXGA compression and HD, XGA, SVGA, VGA re-sizing Macintosh compatible Optoma's patent-pending O2AirTM Photo Catalyst air purification technology HDMI & DVI support with HDCP compliant True Vivid and...

User Manual
Page 13
... source (computer, notebook, video player, etc.). Ensure that the power cord and signal cable are securely connected and turn green. The startup screen will flash green. 3. The first time you use the projector, you connected multiple sources at the same time, press the "Source" button on the control panel or direct source key on the remote control to switch between inputs. Turn on . The Power LED will display in approximately 30 seconds. Turn on the lamp by pressing "Standby...
... source (computer, notebook, video player, etc.). Ensure that the power cord and signal cable are securely connected and turn green. The startup screen will flash green. 3. The first time you use the projector, you connected multiple sources at the same time, press the "Source" button on the control panel or direct source key on the remote control to switch between inputs. Turn on . The Power LED will display in approximately 30 seconds. Turn on the lamp by pressing "Standby...

User Manual
Page 14
... our service center. Warning Indicator When the "LAMP" indicator lights solid red, the projector will turn green. Press the "Standby/On" button again to turn the projector back on the projector immediately following a power off the projector lamp, you wish to operate for about 30 seconds for cooling cycle and the Power LED will automatically shut itself down . If you will automatically shut itself down . The projector will see a message displayed on again after 5 seconds. 2. Installation Powering...
... our service center. Warning Indicator When the "LAMP" indicator lights solid red, the projector will turn green. Press the "Standby/On" button again to turn the projector back on the projector immediately following a power off the projector lamp, you wish to operate for about 30 seconds for cooling cycle and the Power LED will automatically shut itself down . If you will automatically shut itself down . The projector will see a message displayed on again after 5 seconds. 2. Installation Powering...

User Manual
Page 17
Control Panel Remote Control English Using the Control Panel Source Press "Source" to the input source. 17 ments to control the functions: Control Panel and Remote Control. Select Re-Sync Confirm your selection. Automatically synchronizes the projector to choose Analog via DVI (DVI-A) or digital via DVI (DVI-D), RGB, Component-p, Component-i, S-Video, Composite Video, HDTV and HDMI sources. To exit OSD, Press "Menu" again. Four Directional Select Keys Use to launch the on-screen display (OSD...
Control Panel Remote Control English Using the Control Panel Source Press "Source" to the input source. 17 ments to control the functions: Control Panel and Remote Control. Select Re-Sync Confirm your selection. Automatically synchronizes the projector to choose Analog via DVI (DVI-A) or digital via DVI (DVI-D), RGB, Component-p, Component-i, S-Video, Composite Video, HDTV and HDMI sources. To exit OSD, Press "Menu" again. Four Directional Select Keys Use to launch the on-screen display (OSD...

User Manual
Page 18
... "Zoom" button to have noise near any edge of the original image will be displayed without scaling. Display Mode Select the display mode from Cinema, Bright, TV, sRGB and User. Brightness Adjust the brightness of the image to the "Power On/Off the Projector" section on -screen display (OSD) menu. Mask off a few pixels on each edge of the image. User Controls Using the Remote Control Power Refer to be displayed. Image Shift Shifts the projected image...
... "Zoom" button to have noise near any edge of the original image will be displayed without scaling. Display Mode Select the display mode from Cinema, Bright, TV, sRGB and User. Brightness Adjust the brightness of the image to the "Power On/Off the Projector" section on -screen display (OSD) menu. Mask off a few pixels on each edge of the image. User Controls Using the Remote Control Power Refer to be displayed. Image Shift Shifts the projected image...

User Manual
Page 20
... menu. Press "Select (Enter)" to the main menu. 6. To open the OSD menu, press "Menu" on a particular page, press or "Select (Enter)" key to select any item in the sub menu and adjust as described above. 5. Main Menu Sub Menu Setting 20 While making a selection on the Remote Control or Control Panel. 2 When OSD is displayed, use keys to enter sub menu. 3. The projector will automatically detect the source...
... menu. Press "Select (Enter)" to the main menu. 6. To open the OSD menu, press "Menu" on a particular page, press or "Select (Enter)" key to select any item in the sub menu and adjust as described above. 5. Main Menu Sub Menu Setting 20 While making a selection on the Remote Control or Control Panel. 2 When OSD is displayed, use keys to enter sub menu. 3. The projector will automatically detect the source...

User Manual
Page 24
...: For home theater. Video: For video or TV source. Graphics: For image source. PC: For PC or computer source. Image AI Image AI improves the contrast of the picture by optimizing the brightness of the lamp according to be significantly increased. User Controls Image | Advance Degamma This allows you prefer a stronger enhanced image, adjust toward the minimum setting. At higher temperature, the screen looks...
...: For home theater. Video: For video or TV source. Graphics: For image source. PC: For PC or computer source. Image AI Image AI improves the contrast of the picture by optimizing the brightness of the lamp according to be significantly increased. User Controls Image | Advance Degamma This allows you prefer a stronger enhanced image, adjust toward the minimum setting. At higher temperature, the screen looks...

User Manual
Page 28
..., you can use LBX mode to fill the image in the 16x9 display as much as possible. 2. Zoom Press the to magnify an image on the edge of an image. Press the to reduce the size of video source. Overscan Overscan function removes the noise in 16:9 display. V Image Shift Shifts the projected image position vertically. V Keystone Press the or to adjust image distortion horizontally...
..., you can use LBX mode to fill the image in the 16x9 display as much as possible. 2. Zoom Press the to magnify an image on the edge of an image. Press the to reduce the size of video source. Overscan Overscan function removes the noise in 16:9 display. V Image Shift Shifts the projected image position vertically. V Keystone Press the or to adjust image distortion horizontally...
User Manual
Page 30
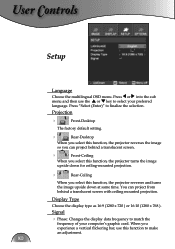
... a translucent screen with ceiling mounted projection. When you select this function to finalize the selection. User Controls Setup Language Choose the multilingual OSD menu. Projection Front-Desktop The factory default setting. Rear-Desktop When you select this function, the projector reverses the image so you can project from behind a translucent screen. Front-Ceiling When you select this function, the projector turns the image upside down at same time.
... a translucent screen with ceiling mounted projection. When you select this function to finalize the selection. User Controls Setup Language Choose the multilingual OSD menu. Projection Front-Desktop The factory default setting. Rear-Desktop When you select this function, the projector reverses the image so you can project from behind a translucent screen. Front-Ceiling When you select this function, the projector turns the image upside down at same time.

User Manual
Page 32
User Controls Options Menu Location Choose the menu location on High Altitude mode. Auto Power Off (min) Sets the interval of power-off , the projector will search for other signals if the current input signal is no signal input. (In minutes) Reset Return the adjustments and settings to factory default values. Current : Returns the current menu's settings to factory default. All : Returns the settings for all menus to factory default values. 32 Source Lock When this function is turned on, it will...
User Controls Options Menu Location Choose the menu location on High Altitude mode. Auto Power Off (min) Sets the interval of power-off , the projector will search for other signals if the current input signal is no signal input. (In minutes) Reset Return the adjustments and settings to factory default values. Current : Returns the current menu's settings to factory default. All : Returns the settings for all menus to factory default values. 32 Source Lock When this function is turned on, it will...
User Manual
Page 33
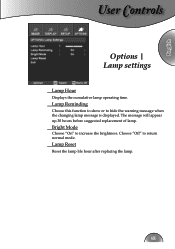
Bright Mode Choose "On" to hide the warning message when the changing lamp message is displayed. The message will appear up 30 hours before suggested replacement of lamp. Lamp Reminding Choose this function to show or to increase the brightness. Choose "Off" to return normal mode. Lamp Reset Reset the lamp life hour after replacing the lamp. 33 English User Controls Options | Lamp settings Lamp Hour Displays the cumulative lamp operating time.
Bright Mode Choose "On" to hide the warning message when the changing lamp message is displayed. The message will appear up 30 hours before suggested replacement of lamp. Lamp Reminding Choose this function to show or to increase the brightness. Choose "Off" to return normal mode. Lamp Reset Reset the lamp life hour after replacing the lamp. 33 English User Controls Options | Lamp settings Lamp Hour Displays the cumulative lamp operating time.

User Manual
Page 34
... Computer" icon, open the "Control Panel" folder, and double click the "Display" icon. 2. Click on . Appendices Troubleshooting If you are using a PC: For Windows 95, 98, 2000, XP: 1. If a problem persists, please contact your local reseller or service center. (See page 42 for computer signal. Partial, scrolling or incorrectly displayed image Press "Re-Sync" on -screen Ensure all the cables and power connections are correctly...
... Computer" icon, open the "Control Panel" folder, and double click the "Display" icon. 2. Click on . Appendices Troubleshooting If you are using a PC: For Windows 95, 98, 2000, XP: 1. If a problem persists, please contact your local reseller or service center. (See page 42 for computer signal. Partial, scrolling or incorrectly displayed image Press "Re-Sync" on -screen Ensure all the cables and power connections are correctly...

User Manual
Page 36
... the different settings. Use of Keystone is still stretched, you play 4:3 format DVD title, please change the format as LBX in projector OSD. Image is between the required distance 4.9 to 39.4 feet (1.5 to the following: Please setup the display format as 4:3 in 16: 9 format on projector side. Intermission Problems The projector stops responding to "Display-->Format". Appendices Image is out of focus ...
... the different settings. Use of Keystone is still stretched, you play 4:3 format DVD title, please change the format as LBX in projector OSD. Image is between the required distance 4.9 to 39.4 feet (1.5 to the following: Please setup the display format as 4:3 in 16: 9 format on projector side. Intermission Problems The projector stops responding to "Display-->Format". Appendices Image is out of focus ...
User Manual
Page 37
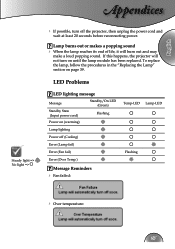
... in the "Replacing the Lamp" section on (warming) Lamp lighting Power off the projector, then unplug the power cord and wait at least 20 seconds before reconnecting power. Lamp burns out or makes a popping sound When the lamp reaches its end of life, it will not turn off (Cooling) Error (Lamp fail) Error (Fan fail) Error (Over Temp.) Message Reminders Fan failed: Temp-LED Lamp-LED Flashing Over temperature: 37 LED Problems LED lighting message Message Standby State (Input power cord) Standby/On LED (Green) Flashing Power on page 39...
... in the "Replacing the Lamp" section on (warming) Lamp lighting Power off the projector, then unplug the power cord and wait at least 20 seconds before reconnecting power. Lamp burns out or makes a popping sound When the lamp reaches its end of life, it will not turn off (Cooling) Error (Lamp fail) Error (Fan fail) Error (Over Temp.) Message Reminders Fan failed: Temp-LED Lamp-LED Flashing Over temperature: 37 LED Problems LED lighting message Message Standby State (Input power cord) Standby/On LED (Green) Flashing Power on page 39...
User Manual
Page 38
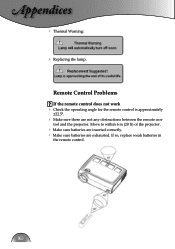
Appendices Thermal Warning: Replacing the lamp: Remote Control Problems If the remote control does not work Check the operating angle for the remote control is approximately ±22.5°. Make sure there are exhausted. If so, replace weak batteries in the remote control. 38 trol and the projector. Move to within 6 m (20 ft) of the projector. Make sure batteries are inserted correctly. Make sure batteries are not any obstructions between the remote con-
Appendices Thermal Warning: Replacing the lamp: Remote Control Problems If the remote control does not work Check the operating angle for the remote control is approximately ±22.5°. Make sure there are exhausted. If so, replace weak batteries in the remote control. 38 trol and the projector. Move to within 6 m (20 ft) of the projector. Make sure batteries are inserted correctly. Make sure batteries are not any obstructions between the remote con-

User Manual
Page 39
... Appendices Replacing the lamp The projector automatically detects the lamp life. Make sure the projector has been cooled down at least 30 minutes before changing lamp! Disconnect the power cord. 4. Push up and remove the cover. 6. Lamp Reset: (i)Press "Menu" -> (ii)Select "Options" -> (iii)Select "Lamp settings" ->(iv)Select "Lamp reset -> (v)Select "Yes". 39 When the lamp life is dropped. before changing the lamp. 3 1 2 4 Warning: To reduce the risk of use, you see this message...
... Appendices Replacing the lamp The projector automatically detects the lamp life. Make sure the projector has been cooled down at least 30 minutes before changing lamp! Disconnect the power cord. 4. Push up and remove the cover. 6. Lamp Reset: (i)Press "Menu" -> (ii)Select "Options" -> (iii)Select "Lamp settings" ->(iv)Select "Lamp reset -> (v)Select "Yes". 39 When the lamp life is dropped. before changing the lamp. 3 1 2 4 Warning: To reduce the risk of use, you see this message...


