

User manual
Page 1
DLP® Projector User manual
DLP® Projector User manual

User manual
Page 2
......8 Product Overview...9 Connections...10 Keypad...11 Remote control...12 SETUP AND INSTALLATION 13 Installing the projector...13 Connecting sources to the projector 14 Adjusting the projector image...15 Remote setup...16 USING THE PROJECTOR 18 Powering on / off the projector 18 Selecting an input source...20 Menu navigation and features 21 OSD Menu tree...22...
......8 Product Overview...9 Connections...10 Keypad...11 Remote control...12 SETUP AND INSTALLATION 13 Installing the projector...13 Connecting sources to the projector 14 Adjusting the projector image...15 Remote setup...16 USING THE PROJECTOR 18 Powering on / off the projector 18 Selecting an input source...20 Menu navigation and features 21 OSD Menu tree...22...

User manual
Page 3
Options menu...46 Options HDMI link settings menu 48 Options remote settings menu 50 3D Setup...53 maintenance 54 Replacing the lamp...54 Replacing the lamp (continued 55 Installing and cleaning the dust filter 56 additional information 57 Compatible resolutions...57 Image size and projection distance 58 Projector dimensions and ceiling mount installation 59 IR remote codes...60 Using the Help button...62 Troubleshooting...65 Warning indicators...67 Specifications...69 Optoma global offices...70 DARBEEVISION, INC...71 English 3
Options menu...46 Options HDMI link settings menu 48 Options remote settings menu 50 3D Setup...53 maintenance 54 Replacing the lamp...54 Replacing the lamp (continued 55 Installing and cleaning the dust filter 56 additional information 57 Compatible resolutions...57 Image size and projection distance 58 Projector dimensions and ceiling mount installation 59 IR remote codes...60 Using the Help button...62 Troubleshooting...65 Warning indicators...67 Specifications...69 Optoma global offices...70 DARBEEVISION, INC...71 English 3

User manual
Page 4
...fire and/or electric shock, do not place the projector on to the projector. ±± Projector has been exposed to rain or moisture. ±± Something has fallen in the literature accompanying the appliance. Please call Optoma before you to persons. Please follow all warnings, precautions... and maintenance as recommended in an enclosure such as a book case or a cabinet that emits heat. ‡‡ Do not let objects or liquids enter the projector. Opening or removing ...
...fire and/or electric shock, do not place the projector on to the projector. ±± Projector has been exposed to rain or moisture. ±± Something has fallen in the literature accompanying the appliance. Please call Optoma before you to persons. Please follow all warnings, precautions... and maintenance as recommended in an enclosure such as a book case or a cabinet that emits heat. ‡‡ Do not let objects or liquids enter the projector. Opening or removing ...

User manual
Page 5
... vision; (2) light-headedness; (3) dizziness; (4) involuntary movements such as eye or muscle twitching; (5) confusion; (6) nausea; (7) loss of the projector performance. ‡‡ Please follow all warnings and precautions as recommended before using the 3D function. ‡‡ Even those who are sleep ...an undiagnosed condition that can adversely affect the quality of awareness; (8) convulsions; (9) cramps; Do not use or store the projector in certain Projector pictures or video games. Please be present, as possible. ‡‡ Turn off , please ensure the cooling cycle ...
... vision; (2) light-headedness; (3) dizziness; (4) involuntary movements such as eye or muscle twitching; (5) confusion; (6) nausea; (7) loss of the projector performance. ‡‡ Please follow all warnings and precautions as recommended before using the 3D function. ‡‡ Even those who are sleep ...an undiagnosed condition that can adversely affect the quality of awareness; (8) convulsions; (9) cramps; Do not use or store the projector in certain Projector pictures or video games. Please be present, as possible. ‡‡ Turn off , please ensure the cooling cycle ...

User manual
Page 6
... the right to the contents hereof and specifically disclaims any particular purpose. If your eyesight. It is subject to you and may weaken your 3D PROJECTOR near open stairwells, cables, balconies, or other countries. Trademark Recognition Kensington is a trademark by Darbee Products, Inc. MHL, Mobile High-Definition Link and the MHL...
... the right to the contents hereof and specifically disclaims any particular purpose. If your eyesight. It is subject to you and may weaken your 3D PROJECTOR near open stairwells, cables, balconies, or other countries. Trademark Recognition Kensington is a trademark by Darbee Products, Inc. MHL, Mobile High-Definition Link and the MHL...

User manual
Page 7
Operation is subject to operate this projector. However, there is granted by the manufacturer could void the user's authority, which is no guarantee that may cause undesired operation. Caution Changes or modifications ...
Operation is subject to operate this projector. However, there is granted by the manufacturer could void the user's authority, which is no guarantee that may cause undesired operation. Caution Changes or modifications ...

User manual
Page 8
... User2 Contrast Brightness User3 Mode Aspect ratio Keystone Mute DB 3D Sleep Timer Volume Source Re-sync Menu Volume HDMI1 HDMI2 VGA1 VGA2 Video YPbPr Projector Remote control 2x AAA batteries Power lead CD User Manual Warranty Card* Basic User Manual Documentation Note: * For European warranty Information, please...
... User2 Contrast Brightness User3 Mode Aspect ratio Keystone Mute DB 3D Sleep Timer Volume Source Re-sync Menu Volume HDMI1 HDMI2 VGA1 VGA2 Video YPbPr Projector Remote control 2x AAA batteries Power lead CD User Manual Warranty Card* Basic User Manual Documentation Note: * For European warranty Information, please...

User manual
Page 9
Lens 2. Zoom Lever 9. Power Socket 6. Lamp Cover 11. No Item 1. Tilt-Adjustment Feet No Item 8. Focus Ring 10. KensingtonTM Lock Port 13. Keypad 4. IR Receiver 3. INTRODUCTION Product Overview 12 3 4 5 7 13 6 89 10 11 7 12 Note: Do not block projector inlet or outlet air vents. (*) optional accessory varies depending on model, specification, and region. Input / Output 5. Speaker 7. Ventilation (outlet) 12. Ventilation (inlet) English 9
Lens 2. Zoom Lever 9. Power Socket 6. Lamp Cover 11. No Item 1. Tilt-Adjustment Feet No Item 8. Focus Ring 10. KensingtonTM Lock Port 13. Keypad 4. IR Receiver 3. INTRODUCTION Product Overview 12 3 4 5 7 13 6 89 10 11 7 12 Note: Do not block projector inlet or outlet air vents. (*) optional accessory varies depending on model, specification, and region. Input / Output 5. Speaker 7. Ventilation (outlet) 12. Ventilation (inlet) English 9

User manual
Page 13
... screen size for a given screen size, please refer to distance table on page 58. For none standard installation advise please contact Optoma. The projector should be placed flat on a surface and 90 degrees / perpendicular to the to the screen. ‡‡ How to determine... power outlet, as well as the location and distance between the projector and the rest of the projector lamp or the projector itself. Any other that table top or ceiling mount. SETUP AND INSTALLATION Installing the projector Your projector is placed from the screen the projected image size increases and vertical...
... screen size for a given screen size, please refer to distance table on page 58. For none standard installation advise please contact Optoma. The projector should be placed flat on a surface and 90 degrees / perpendicular to the to the screen. ‡‡ How to determine... power outlet, as well as the location and distance between the projector and the rest of the projector lamp or the projector itself. Any other that table top or ceiling mount. SETUP AND INSTALLATION Installing the projector Your projector is placed from the screen the projected image size increases and vertical...

User manual
Page 14
Power Cord 5. HDMI Dongle 7. Audio Out Cable 9. 12V DC Jack 14 English USB Power Cable 8. SETUP AND INSTALLATION Connecting sources to the projector 1 2 3 6 9 7 8 5 4 MOLEX No Item 1. 3D Emitter Cable 2. MHL Cable 4. USB Cable (mouse control) No Item 6. HDMI Cable 3.
Power Cord 5. HDMI Dongle 7. Audio Out Cable 9. 12V DC Jack 14 English USB Power Cable 8. SETUP AND INSTALLATION Connecting sources to the projector 1 2 3 6 9 7 8 5 4 MOLEX No Item 1. 3D Emitter Cable 2. MHL Cable 4. USB Cable (mouse control) No Item 6. HDMI Cable 3.

User manual
Page 15
... focus at a distance of 1.5m to adjust on the underside of the projector. 2. English 15 Locate the adjustable foot you wish to 10m. SETUP AND INSTALLATION Adjusting the projector image Image height The projector is sharp and legible. Tilt-Adjustment Feet Tilt-Adjustment Ring Zoom and focus ‡‡ To adjust the image... increase or decrease the projected image size. ‡‡ To adjust the focus, turn the zoom lever clockwise or counterclockwise to raise or lower the projector.
... focus at a distance of 1.5m to adjust on the underside of the projector. 2. English 15 Locate the adjustable foot you wish to 10m. SETUP AND INSTALLATION Adjusting the projector image Image height The projector is sharp and legible. Tilt-Adjustment Feet Tilt-Adjustment Ring Zoom and focus ‡‡ To adjust the image... increase or decrease the projected image size. ‡‡ To adjust the focus, turn the zoom lever clockwise or counterclockwise to raise or lower the projector.
User manual
Page 16
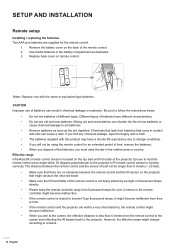
... lamps, it might change according to follow the instructions below. ‡‡ Do not mix batteries of the remote control is located on the projector that come in contact with skin can result in old batteries. ‡‡ Remove batteries as soon as the are supplied for over 2 meters... between the remote control and the IR sensor on the top side and front side of batteries have a shorter life expectancy due to the projector. Mixing old and new batteries can shorten the life of new batteries or cause chemical leakage in chemical leakage or explosion. Be sure to ...
... lamps, it might change according to follow the instructions below. ‡‡ Do not mix batteries of the remote control is located on the projector that come in contact with skin can result in old batteries. ‡‡ Remove batteries as soon as the are supplied for over 2 meters... between the remote control and the IR sensor on the top side and front side of batteries have a shorter life expectancy due to the projector. Mixing old and new batteries can shorten the life of new batteries or cause chemical leakage in chemical leakage or explosion. Be sure to ...

User manual
Page 18
...language, projection orientation, and other settings. 18 English When connected, the On/Standby LED will be flashing green or blue. Turn on the projector by pressing the " " either on , you will turn red. 2. Securely connect the power lead and signal/source cable. USING THE... PROJECTOR Powering on / off the projector ON or OFF User1 User2 Brightness Contrast User3 Mode Aspect ratio Keystone Mute DB 3D Sleep Timer Volume Source Re-sync Menu Volume HDMI1...
...language, projection orientation, and other settings. 18 English When connected, the On/Standby LED will be flashing green or blue. Turn on the projector by pressing the " " either on , you will turn red. 2. Securely connect the power lead and signal/source cable. USING THE... PROJECTOR Powering on / off the projector ON or OFF User1 User2 Brightness Contrast User3 Mode Aspect ratio Keystone Mute DB 3D Sleep Timer Volume Source Re-sync Menu Volume HDMI1...

User manual
Page 19
... " or " " button for the cooling cycle and the On/ Standby LED will shut down. 4. Note: It is not recommended that the projector is in standby mode, simply press the " " button again to confirm, otherwise the message will be displayed: Power Off? Turn off 1. The... cooling fans will continue to turn on the projector. 5. When the projector is turned on immediately, right after 15 seconds. English 19 USING THE PROJECTOR Powering off the projector by pressing the " " button on the projector keypad or the " " button on the remote control. 2. ...
... " or " " button for the cooling cycle and the On/ Standby LED will shut down. 4. Note: It is not recommended that the projector is in standby mode, simply press the " " button again to confirm, otherwise the message will be displayed: Power Off? Turn off 1. The... cooling fans will continue to turn on the projector. 5. When the projector is turned on immediately, right after 15 seconds. English 19 USING THE PROJECTOR Powering off the projector by pressing the " " button on the projector keypad or the " " button on the remote control. 2. ...

User manual
Page 20
If multiple sources are connected, push the Source button on the screen, such asAcspoecmt ratpiouter, notebook, video player, Keystone etc. DB 3D Mute Sleep Timer Volume or Source Re-sync Menu Volume HDMI1 HDMI2 VGA1 VGA2 Video YPbPr 20 English The projector will automatically detect the source. USING THE PROJECTOR ON OFF Selecting an input source User1 User2 Brightness Contrast User3 Mode Turn on the connected source that you want to display on the projector keypad or the remote control to select the desired input.
If multiple sources are connected, push the Source button on the screen, such asAcspoecmt ratpiouter, notebook, video player, Keystone etc. DB 3D Mute Sleep Timer Volume or Source Re-sync Menu Volume HDMI1 HDMI2 VGA1 VGA2 Video YPbPr 20 English The projector will automatically detect the source. USING THE PROJECTOR ON OFF Selecting an input source User1 User2 Brightness Contrast User3 Mode Turn on the connected source that you want to display on the projector keypad or the remote control to select the desired input.

User manual
Page 21
...or "Enter" key to enter sub menu. 3. The OSD menu will close and the projector will automatically detect the source. 1. To open the OSD menu, press "Menu" on the remote control or the projector keyboard. 2. To exit, press "Menu" again. When OSD is displayed, use keys to... or "Menu" to confirm, and the screen will return to make image adjustments and change a variety of settings. The projector will automatically save the new settings. USING THE PROJECTOR Menu navigation and features The projector has multilingual on-screen display menus that allow you to the main menu. 6.
...or "Enter" key to enter sub menu. 3. The OSD menu will close and the projector will automatically detect the source. 1. To open the OSD menu, press "Menu" on the remote control or the projector keyboard. 2. To exit, press "Menu" again. When OSD is displayed, use keys to... or "Menu" to confirm, and the screen will return to make image adjustments and change a variety of settings. The projector will automatically save the new settings. USING THE PROJECTOR Menu navigation and features The projector has multilingual on-screen display menus that allow you to the main menu. 6.

User manual
Page 22
USING THE PROJECTOR OSD Menu tree Main Menu Sub Menu Display Mode Brightness Contrast Sharpness Color Tint Image Advanced Sub Menu 2 Gamma BrilliantColorTM Dynamic Black Color Temp. Warm ...
USING THE PROJECTOR OSD Menu tree Main Menu Sub Menu Display Mode Brightness Contrast Sharpness Color Tint Image Advanced Sub Menu 2 Gamma BrilliantColorTM Dynamic Black Color Temp. Warm ...

User manual
Page 23
USING THE PROJECTOR Main Menu Sub Menu Image Advanced Display Reset Exit Format Edge Mask Zoom Image Shift H Keystone V Keystone Four Corner Four Corner Reset 3D Sub Menu 2 ...
USING THE PROJECTOR Main Menu Sub Menu Image Advanced Display Reset Exit Format Edge Mask Zoom Image Shift H Keystone V Keystone Four Corner Four Corner Reset 3D Sub Menu 2 ...

User manual
Page 24
USING THE PROJECTOR Main Menu Display Sub Menu 3D Exit Sub Menu 2 3D Sync. Invert Exit Language Setup Projection Sub Menu 3 Sub Menu 4 Values On Off [Default] English [Default] Deutsch Français Italiano Español Português Svenska Nederland Norsk Dansk Polski Suomi Magyar Čeština Türkçe Farsi Vietnamese Romanian Indonesian [Default] Menu Location [Default] 24 English
USING THE PROJECTOR Main Menu Display Sub Menu 3D Exit Sub Menu 2 3D Sync. Invert Exit Language Setup Projection Sub Menu 3 Sub Menu 4 Values On Off [Default] English [Default] Deutsch Français Italiano Español Português Svenska Nederland Norsk Dansk Polski Suomi Magyar Čeština Türkçe Farsi Vietnamese Romanian Indonesian [Default] Menu Location [Default] 24 English


