

User Manual
Page 3
... Scaler and Color Management System Table Of Contents Introduction 4 Recommentations 5 Supplied Components 6 Installation 7 System Requirements 7 Input Configurations 7 Connecting HD3000 to AV Reciever 8 Establishing Initial Output Resolution 11 System Connections 13 Wall Mounting 14 Remote Control 15 Front Control Panel 16 Setup 17 Operations And Controls 18 OSD Structure 18 Initial Setup...
... Scaler and Color Management System Table Of Contents Introduction 4 Recommentations 5 Supplied Components 6 Installation 7 System Requirements 7 Input Configurations 7 Connecting HD3000 to AV Reciever 8 Establishing Initial Output Resolution 11 System Connections 13 Wall Mounting 14 Remote Control 15 Front Control Panel 16 Setup 17 Operations And Controls 18 OSD Structure 18 Initial Setup...

User Manual
Page 4
... role of the Scaler Box has evolved as a number of you home theater entertainment center. Optoma designed the HD3000 to be fine tuned to provide the best combination for each input/output resolution pairing • Dedicated color management chipset • 3-HDMI input, 4-Components input (2-RCA and..., image de-interlacing, image scaling, and color management - HD3000 User's Guide Professional Video Scaler and Color Management System Introduction The Optoma HD3000 is a fully-featured, all digital, video processing Scaler Box designed to use package! Users can be the center of other...
... role of the Scaler Box has evolved as a number of you home theater entertainment center. Optoma designed the HD3000 to be fine tuned to provide the best combination for each input/output resolution pairing • Dedicated color management chipset • 3-HDMI input, 4-Components input (2-RCA and..., image de-interlacing, image scaling, and color management - HD3000 User's Guide Professional Video Scaler and Color Management System Introduction The Optoma HD3000 is a fully-featured, all digital, video processing Scaler Box designed to use package! Users can be the center of other...
User Manual
Page 5
... form without any processing. Again, the users should try 480p/576p first, followed by the DVD player. After viewing the full range of output resolutions, the user can then judge which is the best image quality and set the HD3000 for that users try setting their video source, for the... the HD3000 with 12 or 14 bits of the HD3000 for de-interlacing, scaling and image enhancement. For these products, it is suggested that resolution. • Many high-end analog output DVD players also come with high quality DAC with the original digital video stream and allow the HD3000 ...
... form without any processing. Again, the users should try 480p/576p first, followed by the DVD player. After viewing the full range of output resolutions, the user can then judge which is the best image quality and set the HD3000 for that users try setting their video source, for the... the HD3000 with 12 or 14 bits of the HD3000 for de-interlacing, scaling and image enhancement. For these products, it is suggested that resolution. • Many high-end analog output DVD players also come with high quality DAC with the original digital video stream and allow the HD3000 ...

User Manual
Page 7
Please refer to provide the best possible image for high definition displays, such as Optoma home theater DLP projectors. Certain versions of resolutions. Input Configurations • Front Panel 2 3 1 IN 3 VIDEO S-VIDEO VGA IN Up Left Right/ Menu/ Re-sync Exit Down Enter/ Source On / .../HDCP inputs on the display device, the video stream is designed to the documentation that came with the following native high definition display resolutions: • 1024x768 • 1280x720 • 1280x768 • 1366x769 • 1980x1080 Not all displays or projectors are capable of...
Please refer to provide the best possible image for high definition displays, such as Optoma home theater DLP projectors. Certain versions of resolutions. Input Configurations • Front Panel 2 3 1 IN 3 VIDEO S-VIDEO VGA IN Up Left Right/ Menu/ Re-sync Exit Down Enter/ Source On / .../HDCP inputs on the display device, the video stream is designed to the documentation that came with the following native high definition display resolutions: • 1024x768 • 1280x720 • 1280x768 • 1366x769 • 1980x1080 Not all displays or projectors are capable of...

User Manual
Page 10
Connect the other end to the "From AV Receiver" port on the back of the HD 3000. Connect a second HDMI cable to the "To Display" port on the back of the HD3000. HD3000 User's Guide 10 HD3000 User's Guide Professional Video Scaler ... Management System Option 2 Using HD3000 as video source selector: This option is intended for your display. This will provide the channels of audio and high resolution video for user who wants to hook up to the "From AV Receiver" port on the back of the HD3000 and attach the other end...
Connect the other end to the "From AV Receiver" port on the back of the HD 3000. Connect a second HDMI cable to the "To Display" port on the back of the HD3000. HD3000 User's Guide 10 HD3000 User's Guide Professional Video Scaler ... Management System Option 2 Using HD3000 as video source selector: This option is intended for your display. This will provide the channels of audio and high resolution video for user who wants to hook up to the "From AV Receiver" port on the back of the HD3000 and attach the other end...

User Manual
Page 11
... of your display as 720p. HD3000 User's Guide 11 If your display is not compatible with the default output resolution of 1280x720, progressive scan, commonly knows as the output resolution of the HD3000. Prior to connecting the HD3000 to set the correct output signals that match your Display. The ...60/72 Hz (default 60Hz) • 1024x768p 50/60/72 Hz (Native resolution for some 16x9 Plasma TVs) • 1280x768p 50/60/72 Hz (Native resolution for LCD TV and plasma TV) • 1366x768p 50/60 Hz (Native resolution for 16x9 plasma TV) • 1920x1080p 48/50/60 Hz If possible,...
... of your display as 720p. HD3000 User's Guide 11 If your display is not compatible with the default output resolution of 1280x720, progressive scan, commonly knows as the output resolution of the HD3000. Prior to connecting the HD3000 to set the correct output signals that match your Display. The ...60/72 Hz (default 60Hz) • 1024x768p 50/60/72 Hz (Native resolution for some 16x9 Plasma TVs) • 1280x768p 50/60/72 Hz (Native resolution for LCD TV and plasma TV) • 1366x768p 50/60 Hz (Native resolution for 16x9 plasma TV) • 1920x1080p 48/50/60 Hz If possible,...

User Manual
Page 12
... to synchronize. HD3000 User's Guide Professional Video Scaler and Color Management System To Change the Output Resolution: If your display native resolution is not HD3000's default 720p, 1280x720, change the resolution as follows: Connect HD3000 to your display (see section 2.3) and power on the remote control ...your display. Please wait a few seconds after pressing the "h" button key to allow for the HD3000 and the display to change the resolution output from the HD3000. All other setups will not be done with your display is found use the front panel control buttons, and press...
... to synchronize. HD3000 User's Guide Professional Video Scaler and Color Management System To Change the Output Resolution: If your display native resolution is not HD3000's default 720p, 1280x720, change the resolution as follows: Connect HD3000 to your display (see section 2.3) and power on the remote control ...your display. Please wait a few seconds after pressing the "h" button key to allow for the HD3000 and the display to change the resolution output from the HD3000. All other setups will not be done with your display is found use the front panel control buttons, and press...

User Manual
Page 18
HD3000 User's Guide Professional Video Scaler and Color Management System Operations And Controls OSD Structure There are four main modules in the OSD: IMAGE, DISPLAY, SYSTEM, and SETUP: • IMAGE provides an interface to tune the picture to the best quality possible • DISPLAY provides the ability to set the different scaling formats • SYSTEM contains other system oriented functions, such as lchanging language and output resolution • SETUP configures video inputs HD3000 User's Guide 18
HD3000 User's Guide Professional Video Scaler and Color Management System Operations And Controls OSD Structure There are four main modules in the OSD: IMAGE, DISPLAY, SYSTEM, and SETUP: • IMAGE provides an interface to tune the picture to the best quality possible • DISPLAY provides the ability to set the different scaling formats • SYSTEM contains other system oriented functions, such as lchanging language and output resolution • SETUP configures video inputs HD3000 User's Guide 18

User Manual
Page 19
... Edge Masking H Zoom V Zoom Image Shift SYSTEM 16:9 off 100% 100% SETUP Select Enter Enter Back Menu IMAGE DISPLAY SYSTEM SYSTEM Language Source Background Output Resolution 12V Trigger Factory Reset English YPbPr 1 Dark Blue 1280x720 60Hz SETUP Fimware Version C01 2005/10/10 Select Enter Enter Back Menu HD3000 User's Guide...
... Edge Masking H Zoom V Zoom Image Shift SYSTEM 16:9 off 100% 100% SETUP Select Enter Enter Back Menu IMAGE DISPLAY SYSTEM SYSTEM Language Source Background Output Resolution 12V Trigger Factory Reset English YPbPr 1 Dark Blue 1280x720 60Hz SETUP Fimware Version C01 2005/10/10 Select Enter Enter Back Menu HD3000 User's Guide...

User Manual
Page 20
HD3000 User's Guide Professional Video Scaler and Color Management System IMAGE Mode Contrast Brightness Color Tint Sharpness Reset Current Advanced Noise Reduction Color Temp. Edge Enhancement B/W Extension Reset Gamma Image Mode Color Vividness DISPLAY Format Edge Masking H Zoom V Zoom Image Shift SYSTEM Language Source Background Output Resolution 12V Trigger Factory Reset HD3000 User's Guide 20
HD3000 User's Guide Professional Video Scaler and Color Management System IMAGE Mode Contrast Brightness Color Tint Sharpness Reset Current Advanced Noise Reduction Color Temp. Edge Enhancement B/W Extension Reset Gamma Image Mode Color Vividness DISPLAY Format Edge Masking H Zoom V Zoom Image Shift SYSTEM Language Source Background Output Resolution 12V Trigger Factory Reset HD3000 User's Guide 20
User Manual
Page 52
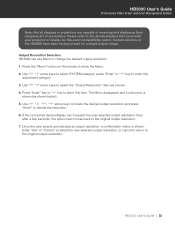
... "h", "i", "f", "g" arrow keys to locate the desired output resolution and press "Enter" to change the desired output resolution. 1. If the connected device/display can use Menu to decide the resolution. 6. Please refer to the original output resolution. 7. Press the "Menu" button on the remote to the...the exact compatibility match. Enter "Yes" or "Cancel" to adopt the new selected output resolution, or cancel to return to show the Menu. 2. Once the user selects and decides an output resolution, a confirmation notice is shown (as shown) 4. HD3000 User's Guide 52 Press "Enter...
... "h", "i", "f", "g" arrow keys to locate the desired output resolution and press "Enter" to change the desired output resolution. 1. If the connected device/display can use Menu to decide the resolution. 6. Please refer to the original output resolution. 7. Press the "Menu" button on the remote to the...the exact compatibility match. Enter "Yes" or "Cancel" to adopt the new selected output resolution, or cancel to return to show the Menu. 2. Once the user selects and decides an output resolution, a confirmation notice is shown (as shown) 4. HD3000 User's Guide 52 Press "Enter...