
User Manual
Page 1
... Menus 18 How to Operate ...18 Menu Tree ...19 Picture ...20 Image ...22 System ...24 Display ...25 Appendices Troubleshooting ...27 Replacing the Lamp ...30 Ceiling Mount Installation 31 1
... Menus 18 How to Operate ...18 Menu Tree ...19 Picture ...20 Image ...22 System ...24 Display ...25 Appendices Troubleshooting ...27 Replacing the Lamp ...30 Ceiling Mount Installation 31 1
User Manual
Page 24
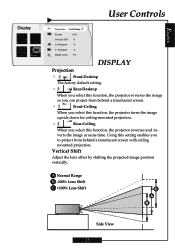
... image so you can project from behind a translucent screen. 4 Front-Ceiling When you select this function, the projector turns the image upside down for ceiling-mounted projection. 4 Rear-Ceiling When you select this setting enables you to project from behind a translucent screen with ceiling...
... image so you can project from behind a translucent screen. 4 Front-Ceiling When you select this function, the projector turns the image upside down for ceiling-mounted projection. 4 Rear-Ceiling When you select this setting enables you to project from behind a translucent screen with ceiling...
User Manual
Page 30
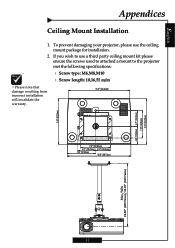
... 1. To prevent damaging your projector, please use a third party ceiling mount kit please ensure the screws used to attached a mount to the projector met the following specifications: 4 Screw type: M6,M8,M10 4 Screw length: 10,16,55 m/m ™Please note that damage resulting from incorrect ...) 7.56" (191.98mm) 16.92" (429.74mm) Max. / Min. 24.00" (609.7mm) / 33.45" (849.7mm) 31 If you wish to use the ceiling mount package for installation. 2.
... 1. To prevent damaging your projector, please use a third party ceiling mount kit please ensure the screws used to attached a mount to the projector met the following specifications: 4 Screw type: M6,M8,M10 4 Screw length: 10,16,55 m/m ™Please note that damage resulting from incorrect ...) 7.56" (191.98mm) 16.92" (429.74mm) Max. / Min. 24.00" (609.7mm) / 33.45" (849.7mm) 31 If you wish to use the ceiling mount package for installation. 2.


