
User's Manual
Page 2
...may block the ventilation openings. Refer all requirements of import operating and maintenance (servicing) instructions in the literature accompanying the appliance. Please call Optoma to be adjusted or repaired by the manufacturer. 7. See projector enclosure for future reference. 3. WARNING: TO REDUCE THE RISK OF FIRE... on a bed, sofa, carpet, or similar surface that may keep air from overheating, put it in an enclosure, such as power supply cord or plug is required when the projector has been damaged in a fire or electric shock. 9. The projector should not be referred to ...
...may block the ventilation openings. Refer all requirements of import operating and maintenance (servicing) instructions in the literature accompanying the appliance. Please call Optoma to be adjusted or repaired by the manufacturer. 7. See projector enclosure for future reference. 3. WARNING: TO REDUCE THE RISK OF FIRE... on a bed, sofa, carpet, or similar surface that may keep air from overheating, put it in an enclosure, such as power supply cord or plug is required when the projector has been damaged in a fire or electric shock. 9. The projector should not be referred to ...
User's Manual
Page 7
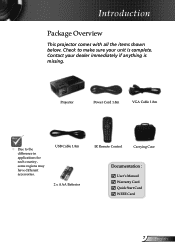
USB Cable 1.8m 2 x AAA Batteries IR Remote Control Carrying Case Documentation : User's Manaul Warranty Card Quick Start Card WEEE Card 7 English Projector Power Cord 1.8m VGA Cable 1.8m Due to make sure your dealer immediately if anything is complete. Contact your unit is missing. Introduction Package Overview This projector comes with all the items shown below. Check to the difference in applications for each country, some regions may have different accessories.
USB Cable 1.8m 2 x AAA Batteries IR Remote Control Carrying Case Documentation : User's Manaul Warranty Card Quick Start Card WEEE Card 7 English Projector Power Cord 1.8m VGA Cable 1.8m Due to make sure your dealer immediately if anything is complete. Contact your unit is missing. Introduction Package Overview This projector comes with all the items shown below. Check to the difference in applications for each country, some regions may have different accessories.
User's Manual
Page 12
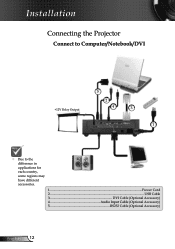
Installation Connecting the Projector Connect to Computer/Notebook/DVI +12V Relay Output 5 2 4 3 1 Due to the difference in applications for each country, some regions may have different accessories. 1...Power Cord 2...USB Cable 3 DVI Cable (Optional Accessory) 4 Audio Input Cable (Optional Accessory) 5 RS232 Cable (Optional Accessory) English 12
Installation Connecting the Projector Connect to Computer/Notebook/DVI +12V Relay Output 5 2 4 3 1 Due to the difference in applications for each country, some regions may have different accessories. 1...Power Cord 2...USB Cable 3 DVI Cable (Optional Accessory) 4 Audio Input Cable (Optional Accessory) 5 RS232 Cable (Optional Accessory) English 12

User's Manual
Page 13
Installation Connect to Computer/Notebook/VGA-In VGA1-In VGA2-In 4 2 +12V Relay Output 5 3 4 2 1 Due to the difference in applications for each country, some regions may have different accessories. 1...Power Cord 2...VGA Cable 3...USB Cable 4 Audio Input Cable (Optional Accessory) 5 RS232 Cable (Optional Accessory) 13 English
Installation Connect to Computer/Notebook/VGA-In VGA1-In VGA2-In 4 2 +12V Relay Output 5 3 4 2 1 Due to the difference in applications for each country, some regions may have different accessories. 1...Power Cord 2...VGA Cable 3...USB Cable 4 Audio Input Cable (Optional Accessory) 5 RS232 Cable (Optional Accessory) 13 English

User's Manual
Page 14
D-Sub to the difference in applications for HDTV/Component Cable (Optional Accessory) 3 Audio Input Cable (Optional Accessory) 4 Composite Video Cable (Optional Accessory) English 14 Installation Connect to Video/DVI, VGA2-In Video Output DVD Player, Set-top Box, HDTV receiver +12V Relay Output 4 3 1 2 3 Due to RCA Cable for each country, some regions may have different accessories. 1...Power Cord 2....
D-Sub to the difference in applications for HDTV/Component Cable (Optional Accessory) 3 Audio Input Cable (Optional Accessory) 4 Composite Video Cable (Optional Accessory) English 14 Installation Connect to Video/DVI, VGA2-In Video Output DVD Player, Set-top Box, HDTV receiver +12V Relay Output 4 3 1 2 3 Due to RCA Cable for each country, some regions may have different accessories. 1...Power Cord 2....

User's Manual
Page 15
Installation Connect to Video/VGA1-In/SCART S-Video Output 4 +12V Relay Output DVD Player, Set-top Box, HDTV receiver 5 3 2 1 4 3 5 Due to the difference in applications for each country, some regions may have different accessories. 1...Power Cord 2...VGA Cable 3 Audio Input Cable (Optional Accessory) 4 S-Video Cable (Optional Accessory) 5 SCART RGB/S-Video Adaptor (Optional Accessory) 15 English
Installation Connect to Video/VGA1-In/SCART S-Video Output 4 +12V Relay Output DVD Player, Set-top Box, HDTV receiver 5 3 2 1 4 3 5 Due to the difference in applications for each country, some regions may have different accessories. 1...Power Cord 2...VGA Cable 3 Audio Input Cable (Optional Accessory) 4 S-Video Cable (Optional Accessory) 5 SCART RGB/S-Video Adaptor (Optional Accessory) 15 English
User's Manual
Page 16
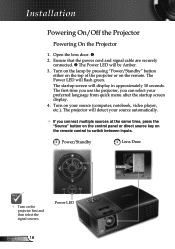
... seconds. The startup screen will flash green. The projector will be Amber. 3. Open the lens door. 2. Ensure that the power cord and signal cable are securely connected. The Power LED will detect your source automatically. If you can select your source (computer, notebook, video player, etc... time, press the "Source" button on the control panel or direct source key on the remote control to switch between inputs. 2 Power/Standby 1 Lens Door Turn on the projector first and then select the signal sources. Turn on the remote. Installation...
... seconds. The startup screen will flash green. The projector will be Amber. 3. Open the lens door. 2. Ensure that the power cord and signal cable are securely connected. The Power LED will detect your source automatically. If you can select your source (computer, notebook, video player, etc... time, press the "Source" button on the control panel or direct source key on the remote control to switch between inputs. 2 Power/Standby 1 Lens Door Turn on the projector first and then select the signal sources. Turn on the remote. Installation...

User's Manual
Page 17
... shut itself down . See pages 54-55. When the "LAMP" indicator flashes red, it indicates the projector has overheated. Installation Powering off procedure. The cooling fans continue to restart the projector. 4. Warning Indicator When the "LAMP" indicator lights red, the projector ...1. Please contact your local reseller or service center. If you should contact your local dealer or our service center. Disconnect the power cord from the electrical outlet and the projector. 5. If the problem persists, you wish to turn Amber, the projector has entered standby...
... shut itself down . See pages 54-55. When the "LAMP" indicator flashes red, it indicates the projector has overheated. Installation Powering off procedure. The cooling fans continue to restart the projector. 4. Warning Indicator When the "LAMP" indicator lights red, the projector ...1. Please contact your local reseller or service center. If you should contact your local dealer or our service center. Disconnect the power cord from the electrical outlet and the projector. 5. If the problem persists, you wish to turn Amber, the projector has entered standby...
User's Manual
Page 44
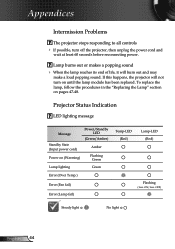
... When the lamp reaches its end of life, it will not turn off the projector, then unplug the power cord and wait at least 60 seconds before reconnecting power. If this happens, the projector will burn out and may make a loud popping sound. Projector Status Indication LED lighting... message Message Standby State (Input power cord) Power on pages 47-48. OFF) Steady light No light English 44 To replace the lamp, follow the procedures in the...
... When the lamp reaches its end of life, it will not turn off the projector, then unplug the power cord and wait at least 60 seconds before reconnecting power. If this happens, the projector will burn out and may make a loud popping sound. Projector Status Indication LED lighting... message Message Standby State (Input power cord) Power on pages 47-48. OFF) Steady light No light English 44 To replace the lamp, follow the procedures in the...
User's Manual
Page 48
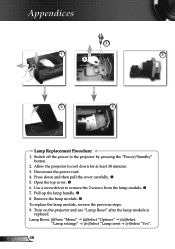
Allow the projector to cool down and then pull the cover carefully. 5. Disconnect the power cord. 4. Pull up the lamp handle. 8. Press down for at least 30 minutes. 3. Open the top cover. 6. English 48 Appendices 3 1 5 4 2 5 Lamp Replacement Procedure: 1. Lamp ... "Lamp Reset" after the lamp module is replaced. Remove the lamp module. To replace the lamp module, reverse the previous steps. 9. Switch off the power to remove the 2 screws from the lamp module. 7. Use a screwdriver to the projector by pressing the...
Allow the projector to cool down and then pull the cover carefully. 5. Disconnect the power cord. 4. Pull up the lamp handle. 8. Press down for at least 30 minutes. 3. Open the top cover. 6. English 48 Appendices 3 1 5 4 2 5 Lamp Replacement Procedure: 1. Lamp ... "Lamp Reset" after the lamp module is replaced. Remove the lamp module. To replace the lamp module, reverse the previous steps. 9. Switch off the power to remove the 2 screws from the lamp module. 7. Use a screwdriver to the projector by pressing the...

Datasheet
Page 1
... images that are essential functions in this series of -use factors that won't fade or degrade over time. EP761 Always Impressive, Always Bright...Always Better The Optoma EP761 digital projector delivers bright pictures and sharp images in Both Normal and Standby Modes) I/O Connectors DVI-D w/HDCP,... to 100 kHz Vertical Refresh Rate 47 to 85 Hz Power Supply AC Input 100-240V, Auto-Switching Power Consumption 305 Watts (Maximum), The EP761 features the extensive connectivity options and ease-of projectors form Optoma. And, with laser pointer Specifications Display Technology 0.55" DDR...
... images that are essential functions in this series of -use factors that won't fade or degrade over time. EP761 Always Impressive, Always Bright...Always Better The Optoma EP761 digital projector delivers bright pictures and sharp images in Both Normal and Standby Modes) I/O Connectors DVI-D w/HDCP,... to 100 kHz Vertical Refresh Rate 47 to 85 Hz Power Supply AC Input 100-240V, Auto-Switching Power Consumption 305 Watts (Maximum), The EP761 features the extensive connectivity options and ease-of projectors form Optoma. And, with laser pointer Specifications Display Technology 0.55" DDR...
Brochure
Page 2
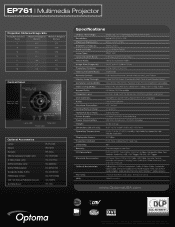
EP761 I Multimedia Projector Projection Distance/Image Size Projection Distance (Feet) Maximum Diagonal Minimum Diagonal (Inches) (Inches) 6 46.2 41.9 8 61.5 55... Remote Control: Monitor Loop Through: Computer Compatibility: Video Compatibility: Aspect Ratio: Projection Lens: User Controls: Audio: Keystone Correction: Vertical Refresh Rate: Horizontal Scan Rate: Power Supply: Power Consumption: Weight: Dimensions (W x H x D): Operating Temperature: Displayable Colors: Projection Method: Uniformity: Security: I/O Connectors: Standard Accessories: Optional Accessories: Warranty: UPC: ...
EP761 I Multimedia Projector Projection Distance/Image Size Projection Distance (Feet) Maximum Diagonal Minimum Diagonal (Inches) (Inches) 6 46.2 41.9 8 61.5 55... Remote Control: Monitor Loop Through: Computer Compatibility: Video Compatibility: Aspect Ratio: Projection Lens: User Controls: Audio: Keystone Correction: Vertical Refresh Rate: Horizontal Scan Rate: Power Supply: Power Consumption: Weight: Dimensions (W x H x D): Operating Temperature: Displayable Colors: Projection Method: Uniformity: Security: I/O Connectors: Standard Accessories: Optional Accessories: Warranty: UPC: ...

