

User Manual
Page 1
... Display Menus 18 How to operate ...18 Language ...19 Image-I ...20 Image-II (Computer Mode 22 Image-II (Video Mode 24 Audio ...26 Management ...27 Lamp Setting ...29 Appendices 30 Troubleshooting 30 Replacing the lamp 34 Compatibility Modes 35 Ceiling Mount Installation 36 1 ...
... Display Menus 18 How to operate ...18 Language ...19 Image-I ...20 Image-II (Computer Mode 22 Image-II (Video Mode 24 Audio ...26 Management ...27 Lamp Setting ...29 Appendices 30 Troubleshooting 30 Replacing the lamp 34 Compatibility Modes 35 Ceiling Mount Installation 36 1 ...

User Manual
Page 2
... shows warning messages. Usage Notice Precautions Follow all changing instructions. English ... 2 Warning- Do not look into the projector's lens when the lamp is in this user's guide to maximize the life of your eyes. To reduce the risk of its cooling cycle before disconnecting power. Please... be sure to page 29). Reset the "Lamp Reset" function from the On Screen Display "Lamp Setting" menu after replacing the lamp module (refer to change the lamp when it will burn out and may cause electric shock. Turn on . When the...
... shows warning messages. Usage Notice Precautions Follow all changing instructions. English ... 2 Warning- Do not look into the projector's lens when the lamp is in this user's guide to maximize the life of your eyes. To reduce the risk of its cooling cycle before disconnecting power. Please... be sure to page 29). Reset the "Lamp Reset" function from the On Screen Display "Lamp Setting" menu after replacing the lamp module (refer to change the lamp when it will burn out and may cause electric shock. Turn on . When the...

User Manual
Page 7
Four Directional Select Keys 9. English Menu (On/Off) 8. Keystone Correction 7 2 1 7 ... Power/Standby 5. Enter 10. Auto Image 7. Lamp Indicator LED 3. Power Indicator LED 4. Temp Indicator LED 2. Control Panel 10 Introduction 4 9 3 5 8 10 6 1. Source 6.
Four Directional Select Keys 9. English Menu (On/Off) 8. Keystone Correction 7 2 1 7 ... Power/Standby 5. Enter 10. Auto Image 7. Lamp Indicator LED 3. Power Indicator LED 4. Temp Indicator LED 2. Control Panel 10 Introduction 4 9 3 5 8 10 6 1. Source 6.

User Manual
Page 11
... the control panel.n And the Power LED will flash green. 3. The projector will detect your source (computer, notebook, video player, etc.). English Turn on the lamp by pressing "Power/Standby" button on the projector first and then the signal sources. 1 Power/Standby 11 ... Turn on your source automatically. ™ If the...
... the control panel.n And the Power LED will flash green. 3. The projector will detect your source (computer, notebook, video player, etc.). English Turn on the lamp by pressing "Power/Standby" button on the projector first and then the signal sources. 1 Power/Standby 11 ... Turn on your source automatically. ™ If the...

User Manual
Page 12
..." button again. 2. Disconnect the power cord from the electrical outlet and the projector. 4. The projector will automatically turn off the projector lamp, you will disappear after it indicates the projector has been overheated. Do not turn the projector back on again after 5 seconds. Please.... If you must wait until the projector has completed the cooling cycle and has entered standby mode. Warning Indicator ™ When the "LAMP" indicator lights solid red, the projector will be switched on , you wish to restart the projector. 3. Picture Mute" displayed on -...
..." button again. 2. Disconnect the power cord from the electrical outlet and the projector. 4. The projector will automatically turn off the projector lamp, you will disappear after it indicates the projector has been overheated. Do not turn the projector back on again after 5 seconds. Please.... If you must wait until the projector has completed the cooling cycle and has entered standby mode. Warning Indicator ™ When the "LAMP" indicator lights solid red, the projector will be switched on , you wish to restart the projector. 3. Picture Mute" displayed on -...

User Manual
Page 18
... Sub Menu Setting English ... 18 Press "Menu" to confirm, and the screen will automatically detect the source. To exit, press "Menu"again. Management Image-II Lamp Setting Audio PC Movie sRGB Game User Press Enter to select the desired item and adjust the settings by key. 4. The projector will return to...
... Sub Menu Setting English ... 18 Press "Menu" to confirm, and the screen will automatically detect the source. To exit, press "Menu"again. Management Image-II Lamp Setting Audio PC Movie sRGB Game User Press Enter to select the desired item and adjust the settings by key. 4. The projector will return to...
User Manual
Page 19
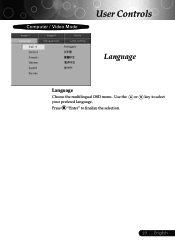
English Use the your prefered language. Press "Enter" to select 19 ... or key to finalize the selection. Computer / Video Mode Image-I Language Image-II Management Audio Lamp setting User Controls Language Language Choose the multilingual OSD menu .
English Use the your prefered language. Press "Enter" to select 19 ... or key to finalize the selection. Computer / Video Mode Image-I Language Image-II Management Audio Lamp setting User Controls Language Language Choose the multilingual OSD menu .

User Manual
Page 20
... to decrease the contrast. 4 Press the to Set Image-I Display Mode Brightness Contrast Keystone Color White Peaking Color Temp. Management Image-II PC Movie sRGB Lamp setting Audio Game User Press Enter to increase the contrast.
... to decrease the contrast. 4 Press the to Set Image-I Display Mode Brightness Contrast Keystone Color White Peaking Color Temp. Management Image-II PC Movie sRGB Lamp setting Audio Game User Press Enter to increase the contrast.
User Manual
Page 21
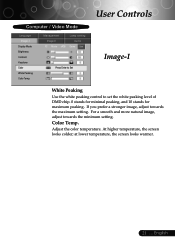
at lower temperature, the screen looks warmer. 21 ... Color Temp. Management Image-II PC Movie sRGB Lamp setting Audio Game User Press Enter to set the white peaking level of DMD chip. 0 stands for minimal peaking, and 10 stands for maximum peaking. ...
at lower temperature, the screen looks warmer. 21 ... Color Temp. Management Image-II PC Movie sRGB Lamp setting Audio Game User Press Enter to set the white peaking level of DMD chip. 0 stands for minimal peaking, and 10 stands for maximum peaking. ...
User Manual
Page 22
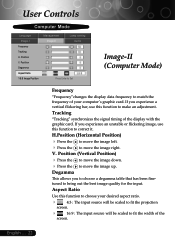
... bar, use this function to fit the width of the display with the graphic card. Position Degamma Aspect Ratio 16:9 Image Position Management Image-II Lamp setting Audio Press Enter to Set Image-II (Computer Mode) Frequency "Frequency"changes the display data frequency to move the image left. 4 Press the to...
... bar, use this function to fit the width of the display with the graphic card. Position Degamma Aspect Ratio 16:9 Image Position Management Image-II Lamp setting Audio Press Enter to Set Image-II (Computer Mode) Frequency "Frequency"changes the display data frequency to move the image left. 4 Press the to...
User Manual
Page 23
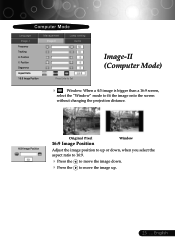
Position V. to move the image down. English Position Degamma Aspect Ratio 16:9 Image Position Management Image-II Lamp setting Audio Press Enter to Set Image-II (Computer Mode) 4 Window: When a 4:3 image is bigger than a 16:9 screen, select the "Window" mode to fit the ...
Position V. to move the image down. English Position Degamma Aspect Ratio 16:9 Image Position Management Image-II Lamp setting Audio Press Enter to Set Image-II (Computer Mode) 4 Window: When a 4:3 image is bigger than a 16:9 screen, select the "Window" mode to fit the ...

User Manual
Page 24
... the best image quality for the input. User Controls Video Mode Language Image-I Degamma Saturation Tint Sharpness Aspect Ratio 16:9 Image Position Management Image-II Lamp setting Audio Press Enter to decrease the amount of color in the image.
... the best image quality for the input. User Controls Video Mode Language Image-I Degamma Saturation Tint Sharpness Aspect Ratio 16:9 Image Position Management Image-II Lamp setting Audio Press Enter to decrease the amount of color in the image.
User Manual
Page 25
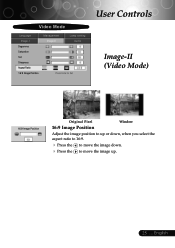
to move the image down , when you select the aspect ratio to 16:9. 4 Press the 4 Press the to move the image up or down . English Video Mode Language Image-I Degamma Saturation Tint Sharpness Aspect Ratio 16:9 Image Position Management Image-II Lamp setting Audio Press Enter to Set User Controls Image-II (Video Mode) 16:9 Image Position Original Pixel 16:9 Image Position Window Adjust the image position to up . 25 ...
to move the image down , when you select the aspect ratio to 16:9. 4 Press the 4 Press the to move the image up or down . English Video Mode Language Image-I Degamma Saturation Tint Sharpness Aspect Ratio 16:9 Image Position Management Image-II Lamp setting Audio Press Enter to Set User Controls Image-II (Video Mode) 16:9 Image Position Original Pixel 16:9 Image Position Window Adjust the image position to up . 25 ...

User Manual
Page 26
to increase the volume. 4 Choose the left icon to turn mute on. 4 Choose the right icon to decrease the volume. User Controls Computer/Video Mode Language Image-I Volume Mute Management Image-II Lamp setting Audio Audio Volume 4 Press the 4 Press the Mute to turn mute off. English ... 26
to increase the volume. 4 Choose the left icon to turn mute on. 4 Choose the right icon to decrease the volume. User Controls Computer/Video Mode Language Image-I Volume Mute Management Image-II Lamp setting Audio Audio Volume 4 Press the 4 Press the Mute to turn mute off. English ... 26

User Manual
Page 27
Computer / Video Mode Image-I Language Menu Location Projection Signal Type Source Lock High Altitude Reset Image-II Management Audio Lamp setting RGB On On Yes Video Off Off No User Controls Management Menu Location Choose the Menu location on , it will search for other signals ...
Computer / Video Mode Image-I Language Menu Location Projection Signal Type Source Lock High Altitude Reset Image-II Management Audio Lamp setting RGB On On Yes Video Off Off No User Controls Management Menu Location Choose the Menu location on , it will search for other signals ...

User Manual
Page 28
Operates the fans at full speed continuously to return the display parameters on High Altitude mode. User Controls Computer / Video Mode Image-I Language Menu Location Projection Signal Type Source Lock High Altitude Reset Image-II Management Audio Lamp setting RGB On On Yes Video Off Off No Management High Altitude Choose "ON" to turn on all menus to the factory default settings. English ... 28 Reset Choose "Yes" to allow for proper high altitude cooling of the projector.
Operates the fans at full speed continuously to return the display parameters on High Altitude mode. User Controls Computer / Video Mode Image-I Language Menu Location Projection Signal Type Source Lock High Altitude Reset Image-II Management Audio Lamp setting RGB On On Yes Video Off Off No Management High Altitude Choose "ON" to turn on all menus to the factory default settings. English ... 28 Reset Choose "Yes" to allow for proper high altitude cooling of the projector.
User Manual
Page 29
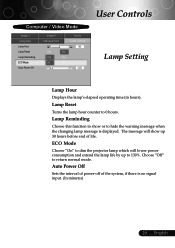
.... Computer / Video Mode Image-I Language Lamp Hour Lamp Reset Lamp Reminding ECO Mode Auto Power Off Image-II Management Audio Lamp setting Yes No Yes No On Off User Controls Lamp Setting Lamp Hour Displays the lamp's elapsed operating time (in hours). Lamp Reset Turns the lamp hour counter to return normal mode. Lamp Reminding Choose this function to show...
.... Computer / Video Mode Image-I Language Lamp Hour Lamp Reset Lamp Reminding ECO Mode Auto Power Off Image-II Management Audio Lamp setting Yes No Yes No On Off User Controls Lamp Setting Lamp Hour Displays the lamp's elapsed operating time (in hours). Lamp Reset Turns the lamp hour counter to return normal mode. Lamp Reminding Choose this function to show...

User Manual
Page 30
... trouble with the projector, refer to the following steps. 4. Follow the above steps 1-2. Click on the "Display" icon. 2. Please refer to the "Replacing the lamp" section. 4 Make sure you have removed the lens cap and the projector is switched on. 4 Ensure that the resolution setting is less than 800 x 600... need to reset the resolution. Problem: No image appears on the Control Panel. 4 If you are not crooked or broken. 4 Check if the projection lamp has been securely installed. For Windows 95,98,2000,XP: 1. Select the "Change" button under the "Monitor" tab .
... trouble with the projector, refer to the following steps. 4. Follow the above steps 1-2. Click on the "Display" icon. 2. Please refer to the "Replacing the lamp" section. 4 Make sure you have removed the lens cap and the projector is switched on. 4 Ensure that the resolution setting is less than 800 x 600... need to reset the resolution. Problem: No image appears on the Control Panel. 4 If you are not crooked or broken. 4 Check if the projection lamp has been securely installed. For Windows 95,98,2000,XP: 1. Select the "Change" button under the "Monitor" tab .
User Manual
Page 32
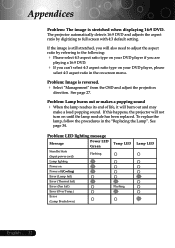
...ratio by digitizing to the following: 4 Please select 4:3 aspect ratio type on your DVD player, please select 4:3 aspect ratio in the "Replacing the Lamp". See page 34. The projector automatically detects 16:9 DVD and adjusts the aspect ratio by referring to full screen with 4:3 default setting. If the ... if you are playing a 16:9 DVD. 4 If you can't select 4:3 aspect ratio type on until the lamp module has been replaced. Problem: Lamp burns out or makes a popping sound 4 When the lamp reaches its end of life, it will burn out and may make a loud popping sound. Appendices Problem: The...
...ratio by digitizing to the following: 4 Please select 4:3 aspect ratio type on your DVD player, please select 4:3 aspect ratio in the "Replacing the Lamp". See page 34. The projector automatically detects 16:9 DVD and adjusts the aspect ratio by referring to full screen with 4:3 default setting. If the ... if you are playing a 16:9 DVD. 4 If you can't select 4:3 aspect ratio type on until the lamp module has been replaced. Problem: Lamp burns out or makes a popping sound 4 When the lamp reaches its end of life, it will burn out and may make a loud popping sound. Appendices Problem: The...

User Manual
Page 33
will be shown about 10 seconds, when lamp is out of order. 33 ... will be shown when the fan is nearing end of its useful life in full power operation. Appendices Problem: Message Reminders 4 "Lamp is too high. 4 "Fan fail. Lamp will automatically turn off soon." will be shown when the system temperature is approaching the end of life. 4 "Projector Overheated. English Lamp will automatically turn off soon." Replacement Suggested!"
will be shown about 10 seconds, when lamp is out of order. 33 ... will be shown when the fan is nearing end of its useful life in full power operation. Appendices Problem: Message Reminders 4 "Lamp is too high. 4 "Fan fail. Lamp will automatically turn off soon." will be shown when the system temperature is approaching the end of life. 4 "Projector Overheated. English Lamp will automatically turn off soon." Replacement Suggested!"


