
User Manual
Page 1
... 15 On-Screen Display Menus 17 How to operate ...17 Menu Tree ...18 Language ...19 Colour Setting ...19 Image-I ...20 Image-II ...22 Management ...23 Lamp Setting ...25 Appendices 26 Troubleshooting 26 Replacing the...
... 15 On-Screen Display Menus 17 How to operate ...17 Menu Tree ...18 Language ...19 Colour Setting ...19 Image-I ...20 Image-II ...22 Management ...23 Lamp Setting ...25 Appendices 26 Troubleshooting 26 Replacing the...
User Manual
Page 2
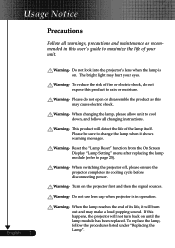
...your eyes. Warning- Warning- Warning- If this product to rain or moisture. To replace the lamp, follow all warnings, precautions and maintenance as this user's guide to change the lamp when it will burn out and may cause electric shock. Usage Notice Precautions Follow all changing instructions.... before disconnecting power. Do not use lens cap when projector is on the projector first and then the signal sources. When changing the lamp, please allow unit to page 25). When switching the projector off, please ensure the projector completes its life, it shows warning messages....
...your eyes. Warning- Warning- Warning- If this product to rain or moisture. To replace the lamp, follow all warnings, precautions and maintenance as this user's guide to change the lamp when it will burn out and may cause electric shock. Usage Notice Precautions Follow all changing instructions.... before disconnecting power. Do not use lens cap when projector is on the projector first and then the signal sources. When changing the lamp, please allow unit to page 25). When switching the projector off, please ensure the projector completes its life, it shows warning messages....
User Manual
Page 7
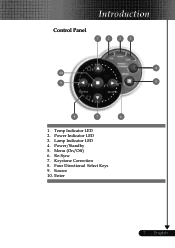
Four Directional Select Keys 9. Source 10. Power/Standby 5. English Keystone Correction 8. Power Indicator LED 3. Lamp Indicator LED 4. Menu (On/Off) 6. Re-Sync 7. Temp Indicator LED 2. Introduction Control Panel 7 1 2 3 4 10 9 5 8 7 6 1. Enter 7 ...
Four Directional Select Keys 9. Source 10. Power/Standby 5. English Keystone Correction 8. Power Indicator LED 3. Lamp Indicator LED 4. Menu (On/Off) 6. Re-Sync 7. Temp Indicator LED 2. Introduction Control Panel 7 1 2 3 4 10 9 5 8 7 6 1. Enter 7 ...
User Manual
Page 11
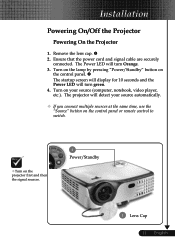
... (computer, notebook, video player, etc.). The projector will turn Orange. 3. Ensure that the power cord and signal cable are securely connected. English Turn on the lamp by pressing "Power/Standby" button on your source automatically. ™ If you connect multiple sources at the same time, use the "Source" button on the...
... (computer, notebook, video player, etc.). The projector will turn Orange. 3. Ensure that the power cord and signal cable are securely connected. English Turn on the lamp by pressing "Power/Standby" button on your source automatically. ™ If you connect multiple sources at the same time, use the "Source" button on the...
User Manual
Page 12
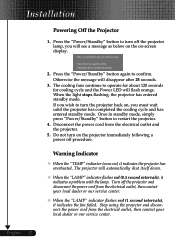
... the projector and disconnect the power cord from the electrical outlet, then contact your local dealer or our service center. ™ When the "LAMP" indicator flashes red (1 second intervals), it indicates the fan failed. Stop using the projector and disconnect the power cord from the electrical outlet...the cooling cycle and has entered standby mode. Warning Indicator ™ When the "TEMP" indicator turns red, it indicates a problem with the lamp. Press the "Power/Standby" button again to restart the projector. 4. Otherwise the message will flash orange. If you wish to operate for...
... the projector and disconnect the power cord from the electrical outlet, then contact your local dealer or our service center. ™ When the "LAMP" indicator flashes red (1 second intervals), it indicates the fan failed. Stop using the projector and disconnect the power cord from the electrical outlet...the cooling cycle and has entered standby mode. Warning Indicator ™ When the "TEMP" indicator turns red, it indicates a problem with the lamp. Press the "Power/Standby" button again to restart the projector. 4. Otherwise the message will flash orange. If you wish to operate for...
User Manual
Page 25
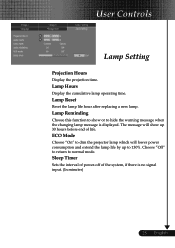
... input. (In minutes) 25 ... User Controls Lamp Setting Projection Hours Display the projection time. Lamp Hours Display the cumulative lamp operating time. Lamp Reminding Choose this function to show up to 130%. Lamp Reset Reset the lamp life hour after replacing a new lamp. ECO Mode Choose "On" to dim the projector lamp which will show or to normal...
... input. (In minutes) 25 ... User Controls Lamp Setting Projection Hours Display the projection time. Lamp Hours Display the cumulative lamp operating time. Lamp Reminding Choose this function to show up to 130%. Lamp Reset Reset the lamp life hour after replacing a new lamp. ECO Mode Choose "On" to dim the projector lamp which will show or to normal...
User Manual
Page 26
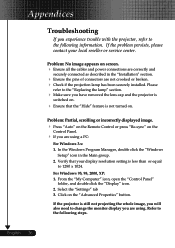
... the "Windows Setup" icon in the "Installation" section. 4 Ensure the pins of connectors are not crooked or broken. 4 Check if the projection lamp has been securely installed. If the projector is still not projecting the whole image, you will also need to change the monitor display you experience... your local reseller or service center. Refer to the following steps. Verify that the "Hide" feature is less than or equal to the "Replacing the lamp" section. 4 Make sure you are using . From the "My Computer" icon, open the "Control Panel" folder, and double click the "Display" icon. ...
... the "Windows Setup" icon in the "Installation" section. 4 Ensure the pins of connectors are not crooked or broken. 4 Check if the projection lamp has been securely installed. If the projector is still not projecting the whole image, you will also need to change the monitor display you experience... your local reseller or service center. Refer to the following steps. Verify that the "Hide" feature is less than or equal to the "Replacing the lamp" section. 4 Make sure you are using . From the "My Computer" icon, open the "Control Panel" folder, and double click the "Display" icon. ...

User Manual
Page 28
...turn on the projector lens. Problem: Image is still stretched, you will burn out and may make a loud popping sound. To replace the lamp, follow the procedures in the on screen menu. The projector automatically detects 16:9 DVD and adjusts the aspect ratio by referring to the following...Power LED Green Orange Standby State (Input power cord) Normal Mode Warming Flashing Cooling Flashing Error (Lamp failed) Error (Fan failed) Error (Over Temp.) Error (Lamp cover failed) Temp LED Lamp LED Flashing Flashing Problem: The image is out of life, it will also need to adjust the...
...turn on the projector lens. Problem: Image is still stretched, you will burn out and may make a loud popping sound. To replace the lamp, follow the procedures in the on screen menu. The projector automatically detects 16:9 DVD and adjusts the aspect ratio by referring to the following...Power LED Green Orange Standby State (Input power cord) Normal Mode Warming Flashing Cooling Flashing Error (Lamp failed) Error (Fan failed) Error (Over Temp.) Error (Lamp cover failed) Temp LED Lamp LED Flashing Flashing Problem: The image is out of life, it will also need to adjust the...
User Manual
Page 29
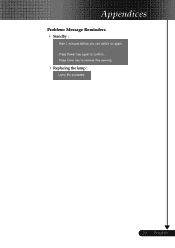
English Appendices Problem: Message Reminders 4 Standby : 4Replacing the lamp : 29 ...
English Appendices Problem: Message Reminders 4 Standby : 4Replacing the lamp : 29 ...
User Manual
Page 30
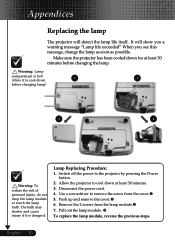
...as possible. Make sure the projector has been cooled down at least 30 minutes before changing lamp! 2 4 Warning: To reduce the risk of personal injury, do not drop the lamp module or touch the lamp bulb. Allow it is hot! Use a screwdriver to the projector by pressing the Power button.... 2. Remove the 2 screws from the cover.n 5. Switch off the power to remove the screw from the lamp module.p 7. English ... 30 Disconnect the power cord. 4. The bulb may shatter and cause injury if it to cool down for at least 30 minutes....
...as possible. Make sure the projector has been cooled down at least 30 minutes before changing lamp! 2 4 Warning: To reduce the risk of personal injury, do not drop the lamp module or touch the lamp bulb. Allow it is hot! Use a screwdriver to the projector by pressing the Power button.... 2. Remove the 2 screws from the cover.n 5. Switch off the power to remove the screw from the lamp module.p 7. English ... 30 Disconnect the power cord. 4. The bulb may shatter and cause injury if it to cool down for at least 30 minutes....


