
User Manual
Page 1
... Image 12 Adjusting the Projector Image Height 12 Adjusting the Projector Zoom / Focus 13 Adjusting Projected Image Size 13 User Controls 14 Control Panel & Remote Control 14 On-Screen Display Menus 16 How to Operate ...16 Menu Tree ...17 Language ...18 Image-I ...19 Image-II... (Computer Mode 21 Image-II (Video Mode 23 Audio ...25 Management ...26 Lamp Setting...27 Appendices 28 Troubleshooting 28 Replacing the Lamp 32 Compatibility Modes 33 Optoma...
... Image 12 Adjusting the Projector Image Height 12 Adjusting the Projector Zoom / Focus 13 Adjusting Projected Image Size 13 User Controls 14 Control Panel & Remote Control 14 On-Screen Display Menus 16 How to Operate ...16 Menu Tree ...17 Language ...18 Image-I ...19 Image-II... (Computer Mode 21 Image-II (Video Mode 23 Audio ...25 Management ...26 Lamp Setting...27 Appendices 28 Troubleshooting 28 Replacing the Lamp 32 Compatibility Modes 33 Optoma...

User Manual
Page 4
Introduction Product Features Congratulations and Thank You for choosing an EP7150 projector, an Optoma Product. This product is a XGA single chip 0.55" DLPTM projector. sizing Mac compatible English 4 Outstanding features include: True XGA...SECAM and HDTV compatible (480i/p, 576i/p, 720p, 1080i) Multi-Auto functions: Auto detection, Automatic saving of user adjustments IR remote control with laser pointer User friendly multilingual on screen menu Advanced digital keystone correction and high quality full screen image re-scaling ...
Introduction Product Features Congratulations and Thank You for choosing an EP7150 projector, an Optoma Product. This product is a XGA single chip 0.55" DLPTM projector. sizing Mac compatible English 4 Outstanding features include: True XGA...SECAM and HDTV compatible (480i/p, 576i/p, 720p, 1080i) Multi-Auto functions: Auto detection, Automatic saving of user adjustments IR remote control with laser pointer User friendly multilingual on screen menu Advanced digital keystone correction and high quality full screen image re-scaling ...
User Manual
Page 5
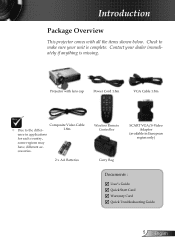
... Video Cable Due to make sure your dealer immediately if anything is complete. Projector with all the items shown below. cessories. 2 x AA Batteries Wireless Remote Controller Carry Bag SCART VGA/S-Video Adaptor (available in applications for each country, some regions may have different ac- Contact your unit is missing. Check to...
... Video Cable Due to make sure your dealer immediately if anything is complete. Projector with all the items shown below. cessories. 2 x AA Batteries Wireless Remote Controller Carry Bag SCART VGA/S-Video Adaptor (available in applications for each country, some regions may have different ac- Contact your unit is missing. Check to...
User Manual
Page 8
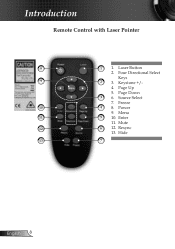
Freeze 10 4 8. Power 9. Menu 11 5 10. Hide 13 7 English 8 Keystone +/- 4. Page Up 5. Source Select 7. Enter 11. Four Directional Select Keys 9 2 3. Page Down 3 6. Introduction Remote Control with Laser Pointer 8 1 1. Laser Button 2. Mute 12 6 12. Resync 13.
Freeze 10 4 8. Power 9. Menu 11 5 10. Hide 13 7 English 8 Keystone +/- 4. Page Up 5. Source Select 7. Enter 11. Four Directional Select Keys 9 2 3. Page Down 3 6. Introduction Remote Control with Laser Pointer 8 1 1. Laser Button 2. Mute 12 6 12. Resync 13.
User Manual
Page 10
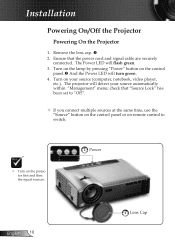
Installation Powering On/Off the Projector Powering On the Projector 1. Turn on the lamp by pressing "Power" button on the control panel. And the Power LED will flash green. 3. check that the power cord and signal cable are securely connected. The projector ... that "Source Lock" has been set to "Off". If you connect multiple sources at the same time, use the "Source" button on the control panel or on remote control to switch. Turn on your source automatically within "Management" menu; The Power LED will turn green. 4. Remove the lens cap. ...
Installation Powering On/Off the Projector Powering On the Projector 1. Turn on the lamp by pressing "Power" button on the control panel. And the Power LED will flash green. 3. check that the power cord and signal cable are securely connected. The projector ... that "Source Lock" has been set to "Off". If you connect multiple sources at the same time, use the "Source" button on the control panel or on remote control to switch. Turn on your source automatically within "Management" menu; The Power LED will turn green. 4. Remove the lens cap. ...
User Manual
Page 14
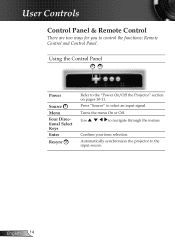
User Controls Control Panel & Remote Control There are two ways for you to navigate through the menus. Use to control the functions: Remote Control and Control Panel. Turns the menu On or Off. Using the Control Panel 12 Power Source 1 Menu Four Directional Select Keys Enter Resync 2 Refer to the input source. English 14 Automatically synchronizes the projector to the "Power On/Off the Projector" section on pages 10-11. Confirm your item selection. Press "Source" to select an input signal.
User Controls Control Panel & Remote Control There are two ways for you to navigate through the menus. Use to control the functions: Remote Control and Control Panel. Turns the menu On or Off. Using the Control Panel 12 Power Source 1 Menu Four Directional Select Keys Enter Resync 2 Refer to the input source. English 14 Automatically synchronizes the projector to the "Power On/Off the Projector" section on pages 10-11. Confirm your item selection. Press "Source" to select an input signal.
User Manual
Page 15
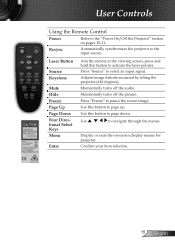
User Controls Using the Remote Control Power Refer to pause the screen image. Adjusts image distortion caused by tilting the projector (±16 degrees). Press "Freeze" to the "Power On/Off ... on -screen display menus for projector. Laser Button Source Keystone Mute Hide Freeze Page Up Page Down Four Directional Select Keys Menu Enter Aim the remote at the viewing screen, press and hold this button to activate the laser pointer. Display or exits the on pages 10-11. Use this button...
User Controls Using the Remote Control Power Refer to pause the screen image. Adjusts image distortion caused by tilting the projector (±16 degrees). Press "Freeze" to the "Power On/Off ... on -screen display menus for projector. Laser Button Source Keystone Mute Hide Freeze Page Up Page Down Four Directional Select Keys Menu Enter Aim the remote at the viewing screen, press and hold this button to activate the laser pointer. Display or exits the on pages 10-11. Use this button...
User Manual
Page 16
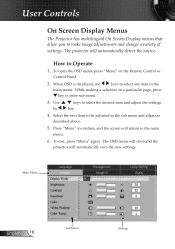
Press "Menu" to be adjusted in the main menu. While making a selection on the Remote Control or Control Panel. 2. Use by keys to enter sub menu. 3. To exit, press "Menu" again. Select the next item to confirm, and the screen will ... a particular page, press key to select the desired item and adjust the settings key. 4. When OSD is displayed, use keys to the main menu. 6. User Controls On Screen Display Menus The Projector has multilingual On Screen Display menus that allow you to Operate 1. The OSD menu will close and the projector...
Press "Menu" to be adjusted in the main menu. While making a selection on the Remote Control or Control Panel. 2. Use by keys to enter sub menu. 3. To exit, press "Menu" again. Select the next item to confirm, and the screen will ... a particular page, press key to select the desired item and adjust the settings key. 4. When OSD is displayed, use keys to the main menu. 6. User Controls On Screen Display Menus The Projector has multilingual On Screen Display menus that allow you to Operate 1. The OSD menu will close and the projector...
User Manual
Page 28
...Installation" section. Ensure the pins of the image is missing or the image is unstable or noisy Press "Resync" on the remote control or press " " on control panel. If you are using . Select the "Settings" tab. 3. Refer to the following information. From the "My Computer" icon,... open the "Control Panel" folder, and double click the "Display" icon. 2. If the problem persists, please contact your display resolution setting is less than or equal...
...Installation" section. Ensure the pins of the image is missing or the image is unstable or noisy Press "Resync" on the remote control or press " " on control panel. If you are using . Select the "Settings" tab. 3. Refer to the following information. From the "My Computer" icon,... open the "Control Panel" folder, and double click the "Display" icon. 2. If the problem persists, please contact your display resolution setting is less than or equal...


