
User Manual
Page 1
... ...7 Remote Control with Laser Pointer 8 Installation ...9 Connecting the Projector 9 Powering On/Off the Projector 10 Powering On the Projector 10 Powering Off the projector 11 Warning Indicator...11 Adjusting the Projected Image 12 Adjusting the Projector Image Height 12 Adjusting the Projector Zoom / Focus 13 Adjusting Projected Image Size 13 User Controls 14 Control Panel & Remote Control 14 On-Screen Display Menus 16 How to Operate ...16 Menu Tree ...17 Language ...18 Image-I ...19 Image-II (Computer Mode 21 Image-II (Video Mode 23 Audio ...25 Management ...26 Lamp Setting...
... ...7 Remote Control with Laser Pointer 8 Installation ...9 Connecting the Projector 9 Powering On/Off the Projector 10 Powering On the Projector 10 Powering Off the projector 11 Warning Indicator...11 Adjusting the Projected Image 12 Adjusting the Projector Image Height 12 Adjusting the Projector Zoom / Focus 13 Adjusting Projected Image Size 13 User Controls 14 Control Panel & Remote Control 14 On-Screen Display Menus 16 How to Operate ...16 Menu Tree ...17 Language ...18 Image-I ...19 Image-II (Computer Mode 21 Image-II (Video Mode 23 Audio ...25 Management ...26 Lamp Setting...
User Manual
Page 2
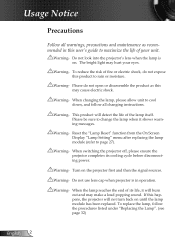
... use lens cap when projector is on. To reduce the risk of fire or electric shock, do not open or disassemble the product as recommended in operation. Please be sure to rain or moisture. Warning- The bright light may hurt your unit. When changing the lamp, please allow unit to page 27). Reset the "Lamp Reset" function from the On Screen Display "Lamp Setting" menu after replacing...
... use lens cap when projector is on. To reduce the risk of fire or electric shock, do not open or disassemble the product as recommended in operation. Please be sure to rain or moisture. Warning- The bright light may hurt your unit. When changing the lamp, please allow unit to page 27). Reset the "Lamp Reset" function from the On Screen Display "Lamp Setting" menu after replacing...

User Manual
Page 4
... compatible (480i/p, 576i/p, 720p, 1080i) Multi-Auto functions: Auto detection, Automatic saving of user adjustments IR remote control with laser pointer User friendly multilingual on screen menu Advanced digital keystone correction and high quality full screen image re-scaling User friendly control panel One built-in speaker UXGA, SXGA+, SXGA compression and SVGA, VGA re- This product is a XGA single chip 0.55" DLPTM projector.
... compatible (480i/p, 576i/p, 720p, 1080i) Multi-Auto functions: Auto detection, Automatic saving of user adjustments IR remote control with laser pointer User friendly multilingual on screen menu Advanced digital keystone correction and high quality full screen image re-scaling User friendly control panel One built-in speaker UXGA, SXGA+, SXGA compression and SVGA, VGA re- This product is a XGA single chip 0.55" DLPTM projector.
User Manual
Page 9
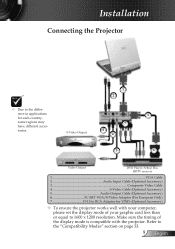
..., Settop Box, HDTV receiver 1...VGA Cable 2 Audio Input Cable (Optional Accessory) 3 Composite Video Cable 4 S-Video Cable (Optional Accessory) 5 Audio Output Cable (Optional Accessory) 6 SCART VGA/S-Video Adaptor (For European Only) 7 D-15 to RCA Adapter for YPbPr (Optional Accessory) To ensure the projector works well with the projector. Refer to 1600 x 1200 resolution. Make sure the timing of your computer, please set the display mode of the display mode is compatible with your graphic...
..., Settop Box, HDTV receiver 1...VGA Cable 2 Audio Input Cable (Optional Accessory) 3 Composite Video Cable 4 S-Video Cable (Optional Accessory) 5 Audio Output Cable (Optional Accessory) 6 SCART VGA/S-Video Adaptor (For European Only) 7 D-15 to RCA Adapter for YPbPr (Optional Accessory) To ensure the projector works well with the projector. Refer to 1600 x 1200 resolution. Make sure the timing of your computer, please set the display mode of the display mode is compatible with your graphic...
User Manual
Page 10
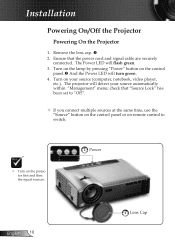
... same time, use the "Source" button on the control panel or on remote control to switch. Turn on the projector first and then the signal sources. 2 Power English 10 1 Lens Cap The Power LED will turn green. 4. The projector will detect your source (computer, notebook, video player, etc.). Turn on the control panel. And the Power LED will flash green. 3. Installation Powering On/Off the Projector Powering On the Projector 1. Turn on the lamp by pressing "Power" button on your source automatically within "Management" menu; check...
... same time, use the "Source" button on the control panel or on remote control to switch. Turn on the projector first and then the signal sources. 2 Power English 10 1 Lens Cap The Power LED will turn green. 4. The projector will detect your source (computer, notebook, video player, etc.). Turn on the control panel. And the Power LED will flash green. 3. Installation Powering On/Off the Projector Powering On the Projector 1. Turn on the lamp by pressing "Power" button on your source automatically within "Management" menu; check...
User Manual
Page 11
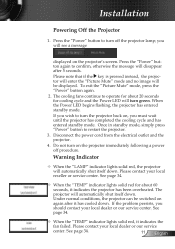
... image will automatically shut itself down . The cooling fans continue to turn green. If the problem persists, you must wait until the projector has completed the cooling cycle and has entered standby mode. Press the "Power" button to operate for cooling cycle and the Power LED will automatically shut itself down . Warning Indicator When the "LAMP" indicator lights solid red, the projector will turn off procedure. See page 34. When the "TEMP" indicator lights...
... image will automatically shut itself down . The cooling fans continue to turn green. If the problem persists, you must wait until the projector has completed the cooling cycle and has entered standby mode. Press the "Power" button to operate for cooling cycle and the Power LED will automatically shut itself down . Warning Indicator When the "LAMP" indicator lights solid red, the projector will turn off procedure. See page 34. When the "TEMP" indicator lights...
User Manual
Page 13
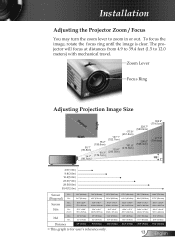
Zoom Lever Focus Ring Adjusting Projection Image Size Diagonal Width 38.1" (96.8cm) 34.7" (88.1cm...4cm) 6.2" (15.9cm) 11.4" (29.0cm) 10.4" (26.4cm) Distance 4.9' (1.5m) 9.8' (3.0m) 16.4' (5.0m) This graph is clear. To focus the image, rotate the focus ring until the image is for user's reference only. 177.9"(451.8cm) 161.8"(410.9cm) 142.3" x 106.7"....7cm) 25.0" (63.4cm) 39.4' (12.0m) English Installation Adjusting the Projector Zoom / Focus You may turn the zoom lever to 12.0 meters) with mechanical travel. The projector will focus at distances from 4.9 to 39.4 feet (1.5 to...
Zoom Lever Focus Ring Adjusting Projection Image Size Diagonal Width 38.1" (96.8cm) 34.7" (88.1cm...4cm) 6.2" (15.9cm) 11.4" (29.0cm) 10.4" (26.4cm) Distance 4.9' (1.5m) 9.8' (3.0m) 16.4' (5.0m) This graph is clear. To focus the image, rotate the focus ring until the image is for user's reference only. 177.9"(451.8cm) 161.8"(410.9cm) 142.3" x 106.7"....7cm) 25.0" (63.4cm) 39.4' (12.0m) English Installation Adjusting the Projector Zoom / Focus You may turn the zoom lever to 12.0 meters) with mechanical travel. The projector will focus at distances from 4.9 to 39.4 feet (1.5 to...
User Manual
Page 14
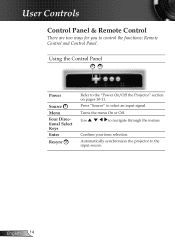
User Controls Control Panel & Remote Control There are two ways for you to navigate through the menus. Use to control the functions: Remote Control and Control Panel. English 14 Press "Source" to the input source. Confirm your item selection. Turns the menu On or Off. Automatically synchronizes the projector to select an input signal. Using the Control Panel 12 Power Source 1 Menu Four Directional Select Keys Enter Resync 2 Refer to the "Power On/Off the Projector" section on pages 10-11.
User Controls Control Panel & Remote Control There are two ways for you to navigate through the menus. Use to control the functions: Remote Control and Control Panel. English 14 Press "Source" to the input source. Confirm your item selection. Turns the menu On or Off. Automatically synchronizes the projector to select an input signal. Using the Control Panel 12 Power Source 1 Menu Four Directional Select Keys Enter Resync 2 Refer to the "Power On/Off the Projector" section on pages 10-11.
User Manual
Page 15
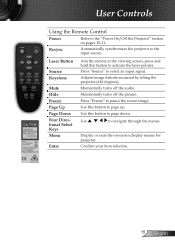
.... User Controls Using the Remote Control Power Refer to the "Power On/Off the Projector" section on -screen display menus for projector. Press "Source" to navigate through the menus. Momentarily turns off the audio. Laser Button Source Keystone Mute Hide Freeze Page Up Page Down Four Directional Select Keys Menu Enter Aim the remote at the viewing screen, press and hold this button to pause the screen image. Use to select an input signal. Momentarily turns off the picture. Display...
.... User Controls Using the Remote Control Power Refer to the "Power On/Off the Projector" section on -screen display menus for projector. Press "Source" to navigate through the menus. Momentarily turns off the audio. Laser Button Source Keystone Mute Hide Freeze Page Up Page Down Four Directional Select Keys Menu Enter Aim the remote at the viewing screen, press and hold this button to pause the screen image. Use to select an input signal. Momentarily turns off the picture. Display...
User Manual
Page 16
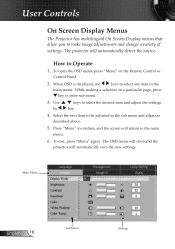
... adjust as described above. 5. Press "Menu" to enter sub menu. 3. Select the next item to select the desired item and adjust the settings key. 4. Use by keys to be adjusted in the main menu. The OSD menu will close and the projector will return to make image adjustments and change a variety of settings. The projector will automatically detect the source. User Controls On Screen Display Menus The Projector has multilingual On Screen Display...
... adjust as described above. 5. Press "Menu" to enter sub menu. 3. Select the next item to select the desired item and adjust the settings key. 4. Use by keys to be adjusted in the main menu. The OSD menu will close and the projector will return to make image adjustments and change a variety of settings. The projector will automatically detect the source. User Controls On Screen Display Menus The Projector has multilingual On Screen Display...
User Manual
Page 19
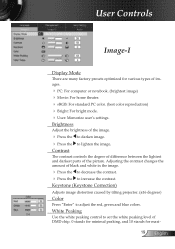
.... Press the to adjust the red, green and blue colors. Contrast The contrast controls the degree of difference between the lightest and darkest parts of images. PC: For computer or notebook. (brightest image) Movie: For home theater. sRGB: For standard PC color. (best color reproduction) Bright: For bright mode. User: Memorize user's settings. User Controls Image-I Display Mode There are many factory presets optimized for maxi...
.... Press the to adjust the red, green and blue colors. Contrast The contrast controls the degree of difference between the lightest and darkest parts of images. PC: For computer or notebook. (brightest image) Movie: For home theater. sRGB: For standard PC color. (best color reproduction) Bright: For bright mode. User: Memorize user's settings. User Controls Image-I Display Mode There are many factory presets optimized for maxi...
User Manual
Page 21
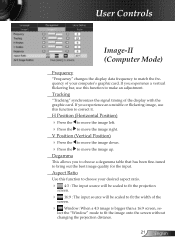
... (Vertical Position) Press the to move the image down. Press the to bring out the best image quality for the input. lect the "Window" mode to make an adjustment. Aspect Ratio Use this function to fit the image onto the screen without changing the projection distance. 21 English Tracking "Tracking" synchronizes the signal timing of the screen. Window: When a 4:3 image is bigger than a 16...
... (Vertical Position) Press the to move the image down. Press the to bring out the best image quality for the input. lect the "Window" mode to make an adjustment. Aspect Ratio Use this function to fit the image onto the screen without changing the projection distance. 21 English Tracking "Tracking" synchronizes the signal timing of the screen. Window: When a 4:3 image is bigger than a 16...
User Manual
Page 23
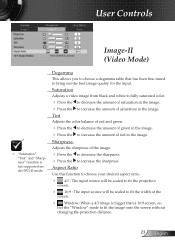
... ratio. 4:3 : The input source will be scaled to fit the projection screen. 16:9 : The input source will be scaled to increase the amount of the screen. Window: When a 4:3 image is not supported under DVI-D mode. User Controls Image-II (Video Mode) "Saturation", "Tint" and "Sharpness" function is bigger than a 16:9 screen, se- Saturation Adjusts a video image from black and white to fully saturated color. Press the to...
... ratio. 4:3 : The input source will be scaled to fit the projection screen. 16:9 : The input source will be scaled to increase the amount of the screen. Window: When a 4:3 image is not supported under DVI-D mode. User Controls Image-II (Video Mode) "Saturation", "Tint" and "Sharpness" function is bigger than a 16:9 screen, se- Saturation Adjusts a video image from black and white to fully saturated color. Press the to...
User Manual
Page 26
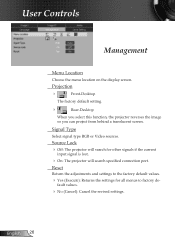
... factory default values. Yes (Execute): Returns the settings for other signals if the current input signal is lost. On: The projector will search specified connection port. English 26 Reset Return the adjustments and settings to factory de- fault values. No (Cancel): Cancel the revised settings. User Controls Management Menu Location Choose the menu location on the display screen. Signal Type Select signal type RGB or Video sources. Projection Front-Desktop The factory default setting...
... factory default values. Yes (Execute): Returns the settings for other signals if the current input signal is lost. On: The projector will search specified connection port. English 26 Reset Return the adjustments and settings to factory de- fault values. No (Cancel): Cancel the revised settings. User Controls Management Menu Location Choose the menu location on the display screen. Signal Type Select signal type RGB or Video sources. Projection Front-Desktop The factory default setting...
User Manual
Page 27
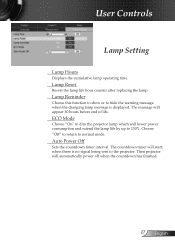
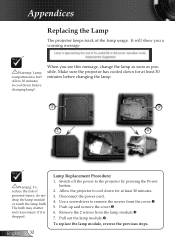
... hours before end of life. Choose "Off" to return to the projector. ECO Mode Choose "On" to 130%. Lamp Reminder Choose this function to show or to hide the warning message when the changing lamp message is no signal being sent to normal mode. Then projector will start, when there is displayed. User Controls Lamp Setting Lamp Hours Displays the cumulative lamp operating time. Auto Power Off Sets the countdown timer interval. Lamp Reset Resets the lamp life hour counter after replacing the lamp. The countdown timer will automatically power...
... hours before end of life. Choose "Off" to return to the projector. ECO Mode Choose "On" to 130%. Lamp Reminder Choose this function to show or to hide the warning message when the changing lamp message is no signal being sent to normal mode. Then projector will start, when there is displayed. User Controls Lamp Setting Lamp Hours Displays the cumulative lamp operating time. Auto Power Off Sets the countdown timer interval. Lamp Reset Resets the lamp life hour counter after replacing the lamp. The countdown timer will automatically power...
User Manual
Page 28
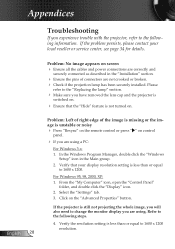
... the remote control or press " " on control panel. If you have removed the lens cap and the projector is switched on screen Ensure all the cables and power connections are correctly and securely connected as described in the Main group. 2. If the problem persists, please contact your display resolution setting is still not projecting the whole image, you are not crooked or broken. Check if the projection lamp has...
... the remote control or press " " on control panel. If you have removed the lens cap and the projector is switched on screen Ensure all the cables and power connections are correctly and securely connected as described in the Main group. 2. If the problem persists, please contact your display resolution setting is still not projecting the whole image, you are not crooked or broken. Check if the projection lamp has...
User Manual
Page 29
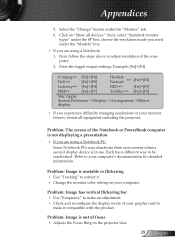
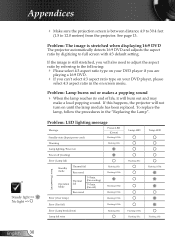
.... Refer to be reactivated. choose the resolution mode you are using a Notebook PC: Some Notebook PCs may deactivate their own screens when a second display device is unstable or flickering Use "Tracking" to correct it compatible with the product. Problem: The screen of focus Adjusts the Focus Ring on the projector lens. 29 English Problem: Image is out of the Notebook or PowerBook...
.... Refer to be reactivated. choose the resolution mode you are using a Notebook PC: Some Notebook PCs may deactivate their own screens when a second display device is unstable or flickering Use "Tracking" to correct it compatible with the product. Problem: The screen of focus Adjusts the Focus Ring on the projector lens. 29 English Problem: Image is out of the Notebook or PowerBook...
User Manual
Page 30
...To replace the lamp, follow the procedures in the on screen menu. Problem: LED lighting message Message Power-LED (Green) Standby state (Input power cord) Flashing 0.5Hz Warming Flashing 1Hz Lamp lighting/Power on Power off (Cooling) Error (Lamp fail) Error (Thermal fail) Standby mode Thermal fail Recovered Operation Mode Thermal fail T3min. (Fan off) Recovered Error (Over temp.) Flashing 1Hz Flashing 0.5Hz Flashing 0.5Hz Flashing 0.5Hz Flashing 0.5Hz Error (Fan fail) Flashing 0.5Hz Error (Lamp breakdown) Lamp fail retry Flashing 1Hz Lamp-LED Flashing 2Hz Flashing 0.5Hz...
...To replace the lamp, follow the procedures in the on screen menu. Problem: LED lighting message Message Power-LED (Green) Standby state (Input power cord) Flashing 0.5Hz Warming Flashing 1Hz Lamp lighting/Power on Power off (Cooling) Error (Lamp fail) Error (Thermal fail) Standby mode Thermal fail Recovered Operation Mode Thermal fail T3min. (Fan off) Recovered Error (Over temp.) Flashing 1Hz Flashing 0.5Hz Flashing 0.5Hz Flashing 0.5Hz Flashing 0.5Hz Error (Fan fail) Flashing 0.5Hz Error (Lamp breakdown) Lamp fail retry Flashing 1Hz Lamp-LED Flashing 2Hz Flashing 0.5Hz...
User Manual
Page 32
... changing lamp! Remove the 2 screws from the cover. 5. Appendices Replacing the Lamp The projector keeps track of personal injury, do not drop the lamp module or touch the lamp bulb. When you a warning message Warning: Lamp compartment is dropped. Make sure the projector has cooled down before changing the lamp. 1 3 2 4 Warning: To reduce the risk of the lamp usage. English 32 Lamp Replacement Procedure: 1. Switch off the power to remove the screws from the lamp module. 7. Use...
... changing lamp! Remove the 2 screws from the cover. 5. Appendices Replacing the Lamp The projector keeps track of personal injury, do not drop the lamp module or touch the lamp bulb. When you a warning message Warning: Lamp compartment is dropped. Make sure the projector has cooled down before changing the lamp. 1 3 2 4 Warning: To reduce the risk of the lamp usage. English 32 Lamp Replacement Procedure: 1. Switch off the power to remove the screws from the lamp module. 7. Use...
User Manual
Page 35
...television technician for a Class B digital device pursuant to which can radiate radio frequency energy and, if not installed and used in a residential installation. Notice: Shielded cables All connections to other computing devices must be determined by turning the device off and on, the user is encouraged to try to ...is no guarantee that to Part 15 of your Projector. FCC notice This device has been tested and found to comply with the limits for help. Caution Changes or modifications not expressly approved by the manufacturer could void the user's authority, which is granted ...
...television technician for a Class B digital device pursuant to which can radiate radio frequency energy and, if not installed and used in a residential installation. Notice: Shielded cables All connections to other computing devices must be determined by turning the device off and on, the user is encouraged to try to ...is no guarantee that to Part 15 of your Projector. FCC notice This device has been tested and found to comply with the limits for help. Caution Changes or modifications not expressly approved by the manufacturer could void the user's authority, which is granted ...


