
User Manual
Page 1
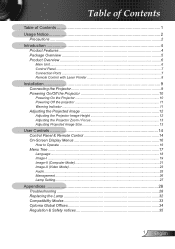
...Ports ...7 Remote Control with Laser Pointer 8 Installation ...9 Connecting the Projector 9 Powering On/Off the Projector 10 Powering On the Projector 10 Powering Off the projector 11 Warning Indicator...11 Adjusting the Projected Image 12 Adjusting the Projector Image Height 12 Adjusting the Projector Zoom / Focus 13 Adjusting Projected Image Size 13 User Controls 14... (Video Mode 23 Audio ...25 Management ...26 Lamp Setting...27 Appendices 28 Troubleshooting 28 Replacing the Lamp 32 Compatibility Modes 33 Optoma Global Offices 34 Regulation & Safety notices 35 1 English
...Ports ...7 Remote Control with Laser Pointer 8 Installation ...9 Connecting the Projector 9 Powering On/Off the Projector 10 Powering On the Projector 10 Powering Off the projector 11 Warning Indicator...11 Adjusting the Projected Image 12 Adjusting the Projector Image Height 12 Adjusting the Projector Zoom / Focus 13 Adjusting Projected Image Size 13 User Controls 14... (Video Mode 23 Audio ...25 Management ...26 Lamp Setting...27 Appendices 28 Troubleshooting 28 Replacing the Lamp 32 Compatibility Modes 33 Optoma Global Offices 34 Regulation & Safety notices 35 1 English
User Manual
Page 2
... not open or disassemble the product as recommended in operation. To replace the lamp, follow all warnings, precautions and maintenance as this happens, the projector will burn out and may make a loud popping sound. Warning- When changing the lamp, please allow unit to change the lamp when it will...power. Warning- Please do not expose this user's guide to maximize the life of the lamp itself. Turn on . Do not look into the projector's lens when the lamp is in this product to page 27). Warning- Warning- Reset the "Lamp Reset" function from the On Screen Display "Lamp...
... not open or disassemble the product as recommended in operation. To replace the lamp, follow all warnings, precautions and maintenance as this happens, the projector will burn out and may make a loud popping sound. Warning- When changing the lamp, please allow unit to change the lamp when it will...power. Warning- Please do not expose this user's guide to maximize the life of the lamp itself. Turn on . Do not look into the projector's lens when the lamp is in this product to page 27). Warning- Warning- Reset the "Lamp Reset" function from the On Screen Display "Lamp...

User Manual
Page 4
... built-in speaker UXGA, SXGA+, SXGA compression and SVGA, VGA re- sizing Mac compatible English 4 This product is a XGA single chip 0.55" DLPTM projector. Introduction Product Features Congratulations and Thank You for choosing an EP7150 projector, an Optoma Product.
... built-in speaker UXGA, SXGA+, SXGA compression and SVGA, VGA re- sizing Mac compatible English 4 This product is a XGA single chip 0.55" DLPTM projector. Introduction Product Features Congratulations and Thank You for choosing an EP7150 projector, an Optoma Product.
User Manual
Page 5
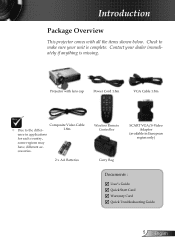
... VGA/S-Video Adaptor (available in applications for each country, some regions may have different ac- Contact your unit is missing. Projector with all the items shown below. Introduction Package Overview This projector comes with lens cap Power Cord 1.8m VGA Cable 1.8m Composite Video Cable Due to make sure your dealer...
... VGA/S-Video Adaptor (available in applications for each country, some regions may have different ac- Contact your unit is missing. Projector with all the items shown below. Introduction Package Overview This projector comes with lens cap Power Cord 1.8m VGA Cable 1.8m Composite Video Cable Due to make sure your dealer...
User Manual
Page 9
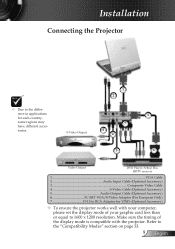
..., please set the display mode of your graphic card less than or equal to the "Compatibility Modes" section on page 33. 9 English Installation Connecting the Projector RGB Due to the difference in applications for each country, some regions may have different accessories. 1 2 S-Video Output 7 5 4 3 1 6 Video Output DVD Player, Settop Box... Accessory) 5 Audio Output Cable (Optional Accessory) 6 SCART VGA/S-Video Adaptor (For European Only) 7 D-15 to RCA Adapter for YPbPr (Optional Accessory) To ensure the projector works well with the...
..., please set the display mode of your graphic card less than or equal to the "Compatibility Modes" section on page 33. 9 English Installation Connecting the Projector RGB Due to the difference in applications for each country, some regions may have different accessories. 1 2 S-Video Output 7 5 4 3 1 6 Video Output DVD Player, Settop Box... Accessory) 5 Audio Output Cable (Optional Accessory) 6 SCART VGA/S-Video Adaptor (For European Only) 7 D-15 to RCA Adapter for YPbPr (Optional Accessory) To ensure the projector works well with the...
User Manual
Page 10
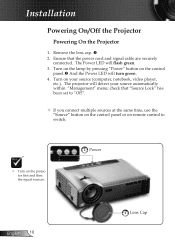
... by pressing "Power" button on the control panel. And the Power LED will flash green. 3. Installation Powering On/Off the Projector Powering On the Projector 1. Turn on the projector first and then the signal sources. 2 Power English 10 1 Lens Cap Ensure that "Source Lock" has been set to "Off". ... time, use the "Source" button on the control panel or on remote control to switch. Turn on your source automatically within "Management" menu; The projector will detect your source (computer, notebook, video player, etc.).
... by pressing "Power" button on the control panel. And the Power LED will flash green. 3. Installation Powering On/Off the Projector Powering On the Projector 1. Turn on the projector first and then the signal sources. 2 Power English 10 1 Lens Cap Ensure that "Source Lock" has been set to "Off". ... time, use the "Source" button on the control panel or on remote control to switch. Turn on your source automatically within "Management" menu; The projector will detect your source (computer, notebook, video player, etc.).
User Manual
Page 11
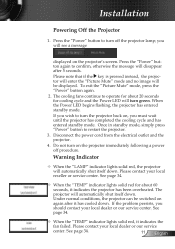
...service center. Disconnect the power cord from the electrical outlet and the projector. 4. Warning Indicator When the "LAMP" indicator lights solid red, the projector will be switched on , you must wait until the projector has completed the cooling cycle and has entered standby mode. Installation ... shut itself down . To exit the "Picture Mute" mode, press the "Power" button again. 2. If you wish to turn on the projector's screen. Please contact your local dealer or our service center. See page 34. When the "TEMP" indicator lights solid red, it...
...service center. Disconnect the power cord from the electrical outlet and the projector. 4. Warning Indicator When the "LAMP" indicator lights solid red, the projector will be switched on , you must wait until the projector has completed the cooling cycle and has entered standby mode. Installation ... shut itself down . To exit the "Picture Mute" mode, press the "Power" button again. 2. If you wish to turn on the projector's screen. Please contact your local dealer or our service center. See page 34. When the "TEMP" indicator lights solid red, it...
User Manual
Page 12
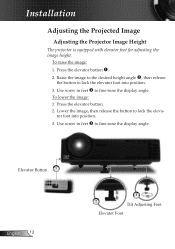
...; to fine-tune the display angle. Elevator Button 1 English 12 3 2 Tilt Adjusting Foot Elevator Foot Installation Adjusting the Projected Image Adjusting the Projector Image Height The projector is equipped with elevator foot for adjusting the image height. Raise the image to the desired height angle , then release the button to...
...; to fine-tune the display angle. Elevator Button 1 English 12 3 2 Tilt Adjusting Foot Elevator Foot Installation Adjusting the Projected Image Adjusting the Projector Image Height The projector is equipped with elevator foot for adjusting the image height. Raise the image to the desired height angle , then release the button to...
User Manual
Page 13
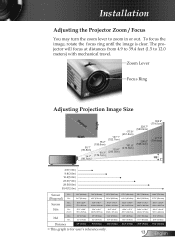
The projector will focus at distances from 4.9 to 39.4 feet (1.5 to zoom in or out. Min. 3.4" (8.7cm) 3.1" (7.9cm) 6.9" (17.4cm) 6.2" (15.9cm) 11.4" (29.0cm) 10.4" (26.... 61.0" x 45.7" 154.9 x 116.2cm 55.4" x 41.6" 140.9 x 105.7cm 101.7" x 76.3" 258.2 x 193.6cm 92.5" x69.4" 234.8 x 176.1cm Hd Max. Installation Adjusting the Projector Zoom / Focus You may turn the zoom lever to 12.0 meters) with mechanical travel.
The projector will focus at distances from 4.9 to 39.4 feet (1.5 to zoom in or out. Min. 3.4" (8.7cm) 3.1" (7.9cm) 6.9" (17.4cm) 6.2" (15.9cm) 11.4" (29.0cm) 10.4" (26.... 61.0" x 45.7" 154.9 x 116.2cm 55.4" x 41.6" 140.9 x 105.7cm 101.7" x 76.3" 258.2 x 193.6cm 92.5" x69.4" 234.8 x 176.1cm Hd Max. Installation Adjusting the Projector Zoom / Focus You may turn the zoom lever to 12.0 meters) with mechanical travel.
User Manual
Page 14
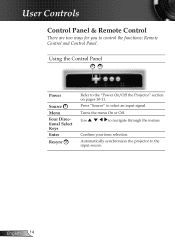
Turns the menu On or Off. English 14 Automatically synchronizes the projector to the "Power On/Off the Projector" section on pages 10-11. Using the Control Panel 12 Power Source 1 Menu Four Directional Select Keys Enter Resync 2 Refer to the input source. Confirm your item selection. Use to select an input signal. Press "Source" to navigate through the menus. User Controls Control Panel & Remote Control There are two ways for you to control the functions: Remote Control and Control Panel.
Turns the menu On or Off. English 14 Automatically synchronizes the projector to the "Power On/Off the Projector" section on pages 10-11. Using the Control Panel 12 Power Source 1 Menu Four Directional Select Keys Enter Resync 2 Refer to the input source. Confirm your item selection. Use to select an input signal. Press "Source" to navigate through the menus. User Controls Control Panel & Remote Control There are two ways for you to control the functions: Remote Control and Control Panel.
User Manual
Page 15
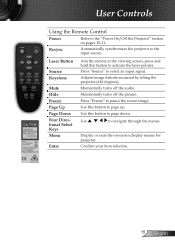
User Controls Using the Remote Control Power Refer to the "Power On/Off the Projector" section on -screen display menus for projector. Laser Button Source Keystone Mute Hide Freeze Page Up Page Down Four Directional Select Keys Menu Enter Aim the remote at the...Use this button to select an input signal. Use this button to pause the screen image. Resync Automatically synchronizes the projector to navigate through the menus. Adjusts image distortion caused by tilting the projector (±16 degrees). Use to the input source. Press "Source" to activate the laser pointer.
User Controls Using the Remote Control Power Refer to the "Power On/Off the Projector" section on -screen display menus for projector. Laser Button Source Keystone Mute Hide Freeze Page Up Page Down Four Directional Select Keys Menu Enter Aim the remote at the...Use this button to select an input signal. Use this button to pause the screen image. Resync Automatically synchronizes the projector to navigate through the menus. Adjusts image distortion caused by tilting the projector (±16 degrees). Use to the input source. Press "Source" to activate the laser pointer.
User Manual
Page 16
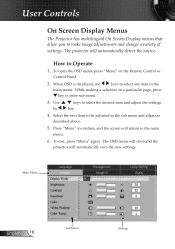
Use by keys to Operate 1. The OSD menu will close and the projector will return to enter sub menu. 3. Main Menu English 16 Sub Menu Setting While making a selection on the Remote Control or Control Panel. 2. To exit, ... screen will automatically save the new settings. How to select the desired item and adjust the settings key. 4. The projector will automatically detect the source. User Controls On Screen Display Menus The Projector has multilingual On Screen Display menus that allow you to select any item in the sub menu and adjust...
Use by keys to Operate 1. The OSD menu will close and the projector will return to enter sub menu. 3. Main Menu English 16 Sub Menu Setting While making a selection on the Remote Control or Control Panel. 2. To exit, ... screen will automatically save the new settings. How to select the desired item and adjust the settings key. 4. The projector will automatically detect the source. User Controls On Screen Display Menus The Projector has multilingual On Screen Display menus that allow you to select any item in the sub menu and adjust...
User Manual
Page 19
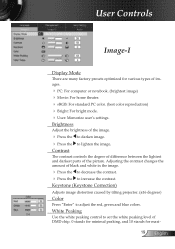
Adjusting the contrast changes the amount of the picture. Keystone (Keystone Correction) Adjusts image distortion caused by tilting projector. (±16 degrees) Color Press "Enter" to increase the contrast. White Peaking Use the white peaking control to set the white peaking level of DMD ...
Adjusting the contrast changes the amount of the picture. Keystone (Keystone Correction) Adjusts image distortion caused by tilting projector. (±16 degrees) Color Press "Enter" to increase the contrast. White Peaking Use the white peaking control to set the white peaking level of DMD ...
User Manual
Page 26
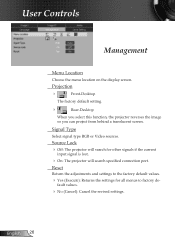
...default values. Yes (Execute): Returns the settings for other signals if the current input signal is lost. On: The projector will search specified connection port. fault values. No (Cancel): Cancel the revised settings. Signal Type Select signal type ... or Video sources. Projection Front-Desktop The factory default setting. Rear-Desktop When you select this function, the projector reverses the image so you can project from behind a translucent screen. User Controls Management Menu Location Choose the menu location on the ...
...default values. Yes (Execute): Returns the settings for other signals if the current input signal is lost. On: The projector will search specified connection port. fault values. No (Cancel): Cancel the revised settings. Signal Type Select signal type ... or Video sources. Projection Front-Desktop The factory default setting. Rear-Desktop When you select this function, the projector reverses the image so you can project from behind a translucent screen. User Controls Management Menu Location Choose the menu location on the ...
User Manual
Page 27
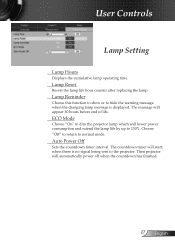
... 130%. User Controls Lamp Setting Lamp Hours Displays the cumulative lamp operating time. ECO Mode Choose "On" to dim the projector lamp which will start, when there is displayed. Then projector will appear 30 hours before end of life. Auto Power Off Sets the countdown timer interval. Lamp Reminder Choose this function... to show or to hide the warning message when the changing lamp message is no signal being sent to the projector. Lamp Reset Resets the lamp life hour counter after replacing the lamp.
... 130%. User Controls Lamp Setting Lamp Hours Displays the cumulative lamp operating time. ECO Mode Choose "On" to dim the projector lamp which will start, when there is displayed. Then projector will appear 30 hours before end of life. Auto Power Off Sets the countdown timer interval. Lamp Reminder Choose this function... to show or to hide the warning message when the changing lamp message is no signal being sent to the projector. Lamp Reset Resets the lamp life hour counter after replacing the lamp.
User Manual
Page 28
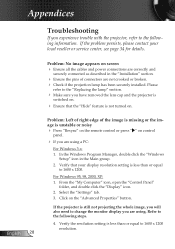
... . Ensure that your local reseller or service center, see page 34 for details. Appendices Troubleshooting If you experience trouble with the projector, refer to the following steps. 4. Click on screen Ensure all the cables and power connections are correctly and securely connected as ...PC: For Windows 3.x: 1. Select the "Settings" tab. 3. Please refer to change the monitor display you have removed the lens cap and the projector is switched on control panel. If you are using . In the Windows Program Manager, double click the "Windows Setup" icon in ...
... . Ensure that your local reseller or service center, see page 34 for details. Appendices Troubleshooting If you experience trouble with the projector, refer to the following steps. 4. Click on screen Ensure all the cables and power connections are correctly and securely connected as ...PC: For Windows 3.x: 1. Select the "Settings" tab. 3. Please refer to change the monitor display you have removed the lens cap and the projector is switched on control panel. If you are using . In the Windows Program Manager, double click the "Windows Setup" icon in ...
User Manual
Page 29
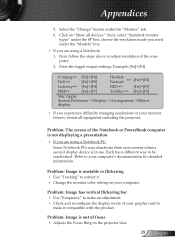
.... Check and reconfigure the display mode of focus Adjusts the Focus Ring on "Show all equipment including the projector. Select the "Change" button under the SP box; Problem: Image is in use. Problem: Image is not displaying a presentation ...display device is unstable or flickering Use "Tracking" to your monitor freezes, restart all devices." Appendices 5. Click on the projector lens. 29 English Problem: The screen of the Notebook or PowerBook computer is out of your graphic card to make it . Change...
.... Check and reconfigure the display mode of focus Adjusts the Focus Ring on "Show all equipment including the projector. Select the "Change" button under the SP box; Problem: Image is in use. Problem: Image is not displaying a presentation ...display device is unstable or flickering Use "Tracking" to your monitor freezes, restart all devices." Appendices 5. Click on the projector lens. 29 English Problem: The screen of the Notebook or PowerBook computer is out of your graphic card to make it . Change...
User Manual
Page 30
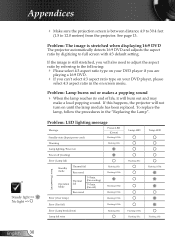
...image is still stretched, you will burn out and may make a loud popping sound. If the image is stretched when displaying 16:9 DVD The projector automatically detects 16:9 DVD and adjusts the aspect ratio by referring to the following: Please select 4:3 aspect ratio type on your DVD...; When the lamp reaches its end of life, it will also need to adjust the aspect ratio by digitizing to 12.0 meters) from the projector. Problem: LED lighting message Message Power-LED (Green) Standby state (Input power cord) Flashing 0.5Hz Warming Flashing 1Hz Lamp lighting/Power on until...
...image is still stretched, you will burn out and may make a loud popping sound. If the image is stretched when displaying 16:9 DVD The projector automatically detects 16:9 DVD and adjusts the aspect ratio by referring to the following: Please select 4:3 aspect ratio type on your DVD...; When the lamp reaches its end of life, it will also need to adjust the aspect ratio by digitizing to 12.0 meters) from the projector. Problem: LED lighting message Message Power-LED (Green) Standby state (Input power cord) Flashing 0.5Hz Warming Flashing 1Hz Lamp lighting/Power on until...
User Manual
Page 32
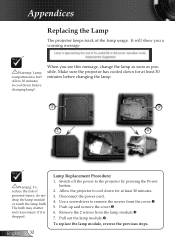
...Lamp Replacement Procedure: 1. Disconnect the power cord. 4. It will show you see this message, change the lamp as soon as possible. Allow the projector to the projector by pressing the Power button. 2. Use a screwdriver to cool down for at least 30 minutes. 3. Remove the 2 screws from the cover....: To reduce the risk of the lamp usage. The bulb may shatter and cause injury if it is hot! Appendices Replacing the Lamp The projector keeps track of personal injury, do not drop the lamp module or touch the lamp bulb. Pull out the lamp module. To replace the...
...Lamp Replacement Procedure: 1. Disconnect the power cord. 4. It will show you see this message, change the lamp as soon as possible. Allow the projector to the projector by pressing the Power button. 2. Use a screwdriver to cool down for at least 30 minutes. 3. Remove the 2 screws from the cover....: To reduce the risk of the lamp usage. The bulb may shatter and cause injury if it is hot! Appendices Replacing the Lamp The projector keeps track of personal injury, do not drop the lamp module or touch the lamp bulb. Pull out the lamp module. To replace the...
User Manual
Page 35
... this computer. 35 English If this device does cause harmful interference to radio or television reception, which is granted by one or more of your Projector. This device generates, uses, and can be made using shielded cables to correct the interference by the Federal Communications Commission, to comply with FCC regulations...
... this computer. 35 English If this device does cause harmful interference to radio or television reception, which is granted by one or more of your Projector. This device generates, uses, and can be made using shielded cables to correct the interference by the Federal Communications Commission, to comply with FCC regulations...


