
User Manual
Page 2
... ...28 How to Operate Projector Menu 28 Menu Tree for Projector ...29 Language ...30 Image-I ...31 Image-II...33 Display ...35 System ...37 Lamp setting...39 How to Operate WMA/MP3/JPEG Program 40 How to Operate DVD Menu...41 Menu Tree for DVD ...42 System Setup ...43 Language...49 Image Problems ...49 Projector Operation Problems...51 LED Problems...51 DVD Player Problems ...52 Sound Problems ...53 Remote Control Problems...54 Replacing the Lamp...55 Compatibility Modes...56 Ceiling Mount Installation ...57 Optoma Global Offices ...58 Regulation & safety notices ...59 2 * DVD Projector
... ...28 How to Operate Projector Menu 28 Menu Tree for Projector ...29 Language ...30 Image-I ...31 Image-II...33 Display ...35 System ...37 Lamp setting...39 How to Operate WMA/MP3/JPEG Program 40 How to Operate DVD Menu...41 Menu Tree for DVD ...42 System Setup ...43 Language...49 Image Problems ...49 Projector Operation Problems...51 LED Problems...51 DVD Player Problems ...52 Sound Problems ...53 Remote Control Problems...54 Replacing the Lamp...55 Compatibility Modes...56 Ceiling Mount Installation ...57 Optoma Global Offices ...58 Regulation & safety notices ...59 2 * DVD Projector

User Manual
Page 3
... shock, do not open or disassemble the product. ▀■ Please allow the unit to cool down before changing the lamp; carefully follow the lamp replacement instructions listed under "Replacing the Lamp". If this product to rain or moisture. ▀■ To prevent the risk of the...the signal sources. ▀■ Do not use lens cap when projector is about to replace the lamp when the warning message is displayed. ▀■ After installing a new lamp, reset the lamp life using the onscreen menu. ▀■ Before turning off the product, follow the procedures listed...
... shock, do not open or disassemble the product. ▀■ Please allow the unit to cool down before changing the lamp; carefully follow the lamp replacement instructions listed under "Replacing the Lamp". If this product to rain or moisture. ▀■ To prevent the risk of the...the signal sources. ▀■ Do not use lens cap when projector is about to replace the lamp when the warning message is displayed. ▀■ After installing a new lamp, reset the lamp life using the onscreen menu. ▀■ Before turning off the product, follow the procedures listed...

User Manual
Page 5
... way to achieve this ensures that projectors are asked to point out something on the screen. ▀■ In order to minimize the lamp power needed to project a visible presentation, use room blinds to stare at all times. ▀■ Minimize standing facing into the projector... beam at the projector lamp. this is by ceiling-mounting rather than floor or table-mounting the projector. ▀■ When projector is recommended. ▀■ ...
... way to achieve this ensures that projectors are asked to point out something on the screen. ▀■ In order to minimize the lamp power needed to project a visible presentation, use room blinds to stare at all times. ▀■ Minimize standing facing into the projector... beam at the projector lamp. this is by ceiling-mounting rather than floor or table-mounting the projector. ▀■ When projector is recommended. ▀■ ...

User Manual
Page 9
Stand by Button/Power LED 7. Stop 3. English INTRODUCTION Projector Panel 12 3 4 1. Menu 5. Volume - 8. PREV Button 7. Resync 6. Enter 10.Four Directional Select Keys 6 7 8 9 5 10 DVD Panel 1. DVD LED 4. Four Directional Select Keys 6. Eject Button 4 1 23 56 78 DVD Projector * 9 NEXT Button 8. Enter 5. Volume + 9. Play/Pause 2. Lamp LED 2. Temperture LED 3. Source 4.
Stand by Button/Power LED 7. Stop 3. English INTRODUCTION Projector Panel 12 3 4 1. Menu 5. Volume - 8. PREV Button 7. Resync 6. Enter 10.Four Directional Select Keys 6 7 8 9 5 10 DVD Panel 1. DVD LED 4. Four Directional Select Keys 6. Eject Button 4 1 23 56 78 DVD Projector * 9 NEXT Button 8. Enter 5. Volume + 9. Play/Pause 2. Lamp LED 2. Temperture LED 3. Source 4.
User Manual
Page 16
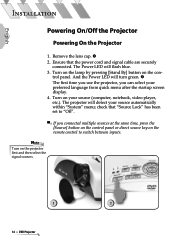
... securely connected. Turn on the con- Remove the lens cap. 2. English INSTALLATION Powering On/Off the Projector Powering On the Projector 1. Turn on the lamp by pressing [Stand By] button on your source automatically within "System" menu;
... securely connected. Turn on the con- Remove the lens cap. 2. English INSTALLATION Powering On/Off the Projector Powering On the Projector 1. Turn on the lamp by pressing [Stand By] button on your source automatically within "System" menu;

User Manual
Page 17
Ensure that the power cord and signal cable are securely connected. Turn on the lamp by pressing [Stand By] button on the projector's screen. If the DVD player load the disc, you will display on the unit. 1 Turn Off ...
Ensure that the power cord and signal cable are securely connected. Turn on the lamp by pressing [Stand By] button on the projector's screen. If the DVD player load the disc, you will display on the unit. 1 Turn Off ...
User Manual
Page 18
...disappear after 5 seconds. Press the [Power] or [Stand By] button again to restart the projector. 3. The cooling fans continue to turn off the projector lamp, you will be displayed. Disconnect the power cord from the electrical outlet and the projector. 18 * DVD Projector Please note that if the key is... pressed instead, the projector will enter the "Picture Mute" mode and no image will see a message "Power off the lamp? Press the [Power] or [Stand By] button to turn the projector back on the projector's screen. If you must wait until the projector has...
...disappear after 5 seconds. Press the [Power] or [Stand By] button again to restart the projector. 3. The cooling fans continue to turn off the projector lamp, you will be displayed. Disconnect the power cord from the electrical outlet and the projector. 18 * DVD Projector Please note that if the key is... pressed instead, the projector will enter the "Picture Mute" mode and no image will see a message "Power off the lamp? Press the [Power] or [Stand By] button to turn the projector back on the projector's screen. If you must wait until the projector has...
User Manual
Page 19
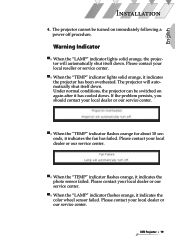
.... Please contact your local dealer or our service center. DVD Projector * 19 Please contact your local dealer or our service center. ▀■ When the "LAMP" indicator flashes orange, it indicates the color wheel sensor failed. The projector will automatically shut itself down . The projector cannot be switched on immediately...
.... Please contact your local dealer or our service center. DVD Projector * 19 Please contact your local dealer or our service center. ▀■ When the "LAMP" indicator flashes orange, it indicates the color wheel sensor failed. The projector will automatically shut itself down . The projector cannot be switched on immediately...

User Manual
Page 24
... control. using the menu. Using the Remote Control Power 4:3 16:9-I 16:9-II Native DVD D-SUB S-VIDEO VIDEO Enter Press [Power] to turns on the projector's lamp, refer to the "Powering On/Off the Projector" section on -screen display menus for projector. Scale to 854x480, then center 800x480 image to increase/decrease...
... control. using the menu. Using the Remote Control Power 4:3 16:9-I 16:9-II Native DVD D-SUB S-VIDEO VIDEO Enter Press [Power] to turns on the projector's lamp, refer to the "Powering On/Off the Projector" section on -screen display menus for projector. Scale to 854x480, then center 800x480 image to increase/decrease...

User Manual
Page 26
... Temp LED / Volume +/Source Resync Enter Press [Stand By] to turns on the projector's lamp, refer to the input source. Indicate the projector's lamp status. Automatically synchronizes the projector to the "Powering On/Off the Projector" section on -screen display menus for more details. Confirm your selection. ...
... Temp LED / Volume +/Source Resync Enter Press [Stand By] to turns on the projector's lamp, refer to the input source. Indicate the projector's lamp status. Automatically synchronizes the projector to the "Powering On/Off the Projector" section on -screen display menus for more details. Confirm your selection. ...
User Manual
Page 39
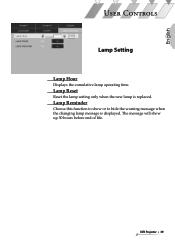
English USER CONTROLS Lamp Setting Lamp Hour Displays the cumulative lamp operating time. DVD Projector * 39 The message will show or to show up 30 hours before end of life. Lamp Reset Reset the lamp setting only when the new lamp is displayed. Lamp Reminder Choose this function to hide the warning message when the changing lamp message is replaced.
English USER CONTROLS Lamp Setting Lamp Hour Displays the cumulative lamp operating time. DVD Projector * 39 The message will show or to show up 30 hours before end of life. Lamp Reset Reset the lamp setting only when the new lamp is displayed. Lamp Reminder Choose this function to hide the warning message when the changing lamp message is replaced.

User Manual
Page 49
... display you are not bent or broken. If a problem persists, please contact your display resolution setting is lower than or equal to the "Replacing the lamp" section. No image appears on the control panel. Ensure that connector pins are using a PC: For Windows 95, 98, 2000, XP: 1. Please refer ... Resync function can not be used when the DVD player is pressed. Check the [Power] or [Stand By] button is operational. Ensure that the projection lamp has been securely installed. If using . From the "My Computer" icon, open the "Control Panel" folder, and double click the "Display" icon. 2....
... display you are not bent or broken. If a problem persists, please contact your display resolution setting is lower than or equal to the "Replacing the lamp" section. No image appears on the control panel. Ensure that connector pins are using a PC: For Windows 95, 98, 2000, XP: 1. Please refer ... Resync function can not be used when the DVD player is pressed. Check the [Power] or [Stand By] button is operational. Ensure that the projection lamp has been securely installed. If using . From the "My Computer" icon, open the "Control Panel" folder, and double click the "Display" icon. 2....
User Manual
Page 51
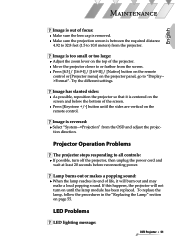
... 4.92 to 32.8 feet (1.5 to all controls: If possible, turn on the remote control. Press [Keystone +/-] button until the sides are vertical on until the lamp module has been replaced. If this happens, the projector will burn out and may make a loud popping sound. Press [4:3] / [16:9-I] / [16:9-II] / [... off the projector, then unplug the power cord and wait at least 20 seconds before reconnecting power. To replace the lamp, follow the procedures in the "Replacing the Lamp" section on page 55. MAINTENANCE English Image is out of focus: Make sure the lens cap is too small or...
... 4.92 to 32.8 feet (1.5 to all controls: If possible, turn on the remote control. Press [Keystone +/-] button until the sides are vertical on until the lamp module has been replaced. If this happens, the projector will burn out and may make a loud popping sound. Press [4:3] / [16:9-I] / [16:9-II] / [... off the projector, then unplug the power cord and wait at least 20 seconds before reconnecting power. To replace the lamp, follow the procedures in the "Replacing the Lamp" section on page 55. MAINTENANCE English Image is out of focus: Make sure the lens cap is too small or...
User Manual
Page 52
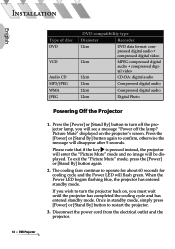
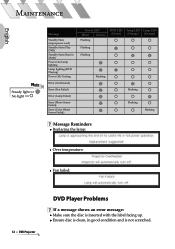
...) Error (Photo Senser Failed) Error (Color Wheel Senser Failed) Power LED (Blue) (Green) Flashing DVD LED Temp LED Lamp LED (Green) (Orange) (Orange) Flashing Flashing Flashing Flashing Flashing Flashing Message Reminders Replacing the lamp: Over temperature: Fan failed: 52 * DVD Projector DVD Player Problems If a message shows an error message: Make sure...
...) Error (Photo Senser Failed) Error (Color Wheel Senser Failed) Power LED (Blue) (Green) Flashing DVD LED Temp LED Lamp LED (Green) (Orange) (Orange) Flashing Flashing Flashing Flashing Flashing Flashing Message Reminders Replacing the lamp: Over temperature: Fan failed: 52 * DVD Projector DVD Player Problems If a message shows an error message: Make sure...

User Manual
Page 55
...61580; 5. DVD Projector * 55 When you will receive a warning message. Allow it to cool down at least 30 minutes before changing lamp! 1 3 2 4 Warning: To reduce the risk of use, you see this message, please contact your local reseller or service center to the... button. 2. Remove the cover. 6. Pull out the lamp module. To replace the lamp module, reverse the above mentioned steps. Warning: Lamp compartment is nearing the end of personal injury, avoid dropping the lamp module or touching the lamp bulb. Allow the projector to remove the screw from the...
...61580; 5. DVD Projector * 55 When you will receive a warning message. Allow it to cool down at least 30 minutes before changing lamp! 1 3 2 4 Warning: To reduce the risk of use, you see this message, please contact your local reseller or service center to the... button. 2. Remove the cover. 6. Pull out the lamp module. To replace the lamp module, reverse the above mentioned steps. Warning: Lamp compartment is nearing the end of personal injury, avoid dropping the lamp module or touching the lamp bulb. Allow the projector to remove the screw from the...


