Owner Manual
Page 1
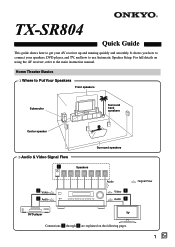
... on the following pages. 1 En It shows you how to connect your speakers, DVD player, and TV, and how to get your AV receiver up and running quickly and smoothly. Home Theater Basics ❍ Where to Put Your Speakers Front speakers Subwoofer Surround back speakers Center speaker ❍... Signal Flow 1 Speakers Surround speakers 2 Video 3 Audio Audio Video 4 Audio 5 : Signal Flow DVD player TV Connections 1 through 5 are explained on using the AV receiver, refer to the main instruction manual. TX-SR804 Quick Guide This guide shows how to use Automatic Speaker Setup.
... on the following pages. 1 En It shows you how to connect your speakers, DVD player, and TV, and how to get your AV receiver up and running quickly and smoothly. Home Theater Basics ❍ Where to Put Your Speakers Front speakers Subwoofer Surround back speakers Center speaker ❍... Signal Flow 1 Speakers Surround speakers 2 Video 3 Audio Audio Video 4 Audio 5 : Signal Flow DVD player TV Connections 1 through 5 are explained on using the AV receiver, refer to the main instruction manual. TX-SR804 Quick Guide This guide shows how to use Automatic Speaker Setup.
Instruction Manual
Page 1
... plugging in this manual for purchasing an Onkyo AV Receiver. Please retain this manual will enable you for future reference. Following the instructions in the unit. Enjoying the Listening Modes ..... 60 Advanced Operation 64 Troubleshooting 91 En AV Receiver TX-SR804 TX-SR804E Contents Introduction 2 Connection 19 Turning On & First Time Setup..... 39 Instruction Manual Basic Operation Playing your AV components ....... 48...
... plugging in this manual for purchasing an Onkyo AV Receiver. Please retain this manual will enable you for future reference. Following the instructions in the unit. Enjoying the Listening Modes ..... 60 Advanced Operation 64 Troubleshooting 91 En AV Receiver TX-SR804 TX-SR804E Contents Introduction 2 Connection 19 Turning On & First Time Setup..... 39 Instruction Manual Basic Operation Playing your AV components ....... 48...
Instruction Manual
Page 3
... models Setting the [STANDBY/ON] switch to the correct voltage for several weeks, although this apparatus may leave marks on the plug. Memory Backup The AV receiver uses a battery-less memory backup system in order to retain radio presets and other settings when it's unplugged or in the case of Conformity We... plastic items on this unit for the ASTA mark or the BSI mark on the power supply cord of this instruction manual is in order to transport this unit for your Onkyo dealer. 3. If you should be sure to use the original packaging to pack it how it was when you need...
... models Setting the [STANDBY/ON] switch to the correct voltage for several weeks, although this apparatus may leave marks on the plug. Memory Backup The AV receiver uses a battery-less memory backup system in order to retain radio presets and other settings when it's unplugged or in the case of Conformity We... plastic items on this unit for the ASTA mark or the BSI mark on the power supply cord of this instruction manual is in order to transport this unit for your Onkyo dealer. 3. If you should be sure to use the original packaging to pack it how it was when you need...
Instruction Manual
Page 9
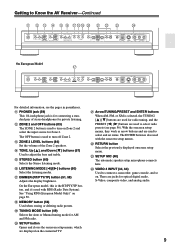
Getting to Know the AV Receiver-Continued K L M N O P QRS T U V W X PHONES ZONE 2 OFF TONE ZONE 2 LEVEL STEREO TUNING DIMMER MEMORY MODE SETUP RETURN ENTER SETUP MIC LISTENING MODE CLEAR PRESET PRESET TUNING DIGITAL ... ZONE 2 button is the RT/PTY/TP button, and it's used to adjust the bass and treble. S TUNING MODE button (49) Selects the Auto or Manual tuning mode for Zone 2. With the onscreen setup menus, they work as arrow buttons and are used with the onscreen setup menus. See "Using RDS...
Getting to Know the AV Receiver-Continued K L M N O P QRS T U V W X PHONES ZONE 2 OFF TONE ZONE 2 LEVEL STEREO TUNING DIMMER MEMORY MODE SETUP RETURN ENTER SETUP MIC LISTENING MODE CLEAR PRESET PRESET TUNING DIGITAL ... ZONE 2 button is the RT/PTY/TP button, and it's used to adjust the bass and treble. S TUNING MODE button (49) Selects the Auto or Manual tuning mode for Zone 2. With the onscreen setup menus, they work as arrow buttons and are used with the onscreen setup menus. See "Using RDS...
Instruction Manual
Page 10
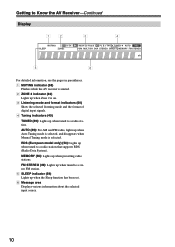
AUTO (49): For AM and FM radio, lights up when Auto Tuning mode is selected, and disappears when Manual Tuning mode is on. 3 Listening mode and format indicators (60) Show the selected listening mode and the format of digital input signals. 4 Tuning... RDS (European model only) (50): Lights up when tuned to a radio station. Getting to Know the AV Receiver-Continued Display 12 3 4 5 6 For detailed information, see the pages in parentheses. 1 MUTING indicator (58) Flashes while the AV receiver is muted. 2 ZONE 2 indicator (83) Lights up when Zone 2 is selected. MEMORY (56): Lights...
AUTO (49): For AM and FM radio, lights up when Auto Tuning mode is selected, and disappears when Manual Tuning mode is on. 3 Listening mode and format indicators (60) Show the selected listening mode and the format of digital input signals. 4 Tuning... RDS (European model only) (50): Lights up when tuned to a radio station. Getting to Know the AV Receiver-Continued Display 12 3 4 5 6 For detailed information, see the pages in parentheses. 1 MUTING indicator (58) Flashes while the AV receiver is muted. 2 ZONE 2 indicator (83) Lights up when Zone 2 is selected. MEMORY (56): Lights...
Instruction Manual
Page 14
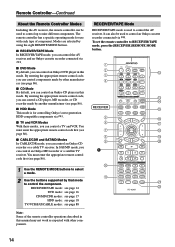
...ALBUM - Remote Controller-Continued About the Remote Controller Modes Including the AV receiver, the remote controller can control an Onkyo CD player in this mode. RECEIVER/TAPE Mode RECEIVER/TAPE mode is for use with other manufacturers (see page 88 ...Note: Some of the remote controller operations described in this manual may not work as expected with each type of component. The remote controller has a specific operating mode for controlling Onkyo's next generation HDD-compatible components via . A B C D RECEIVER 5 F G H I 1 J K ON STANDBY I T V INPUT V1 V2...
...ALBUM - Remote Controller-Continued About the Remote Controller Modes Including the AV receiver, the remote controller can control an Onkyo CD player in this mode. RECEIVER/TAPE Mode RECEIVER/TAPE mode is for use with other manufacturers (see page 88 ...Note: Some of the remote controller operations described in this manual may not work as expected with each type of component. The remote controller has a specific operating mode for controlling Onkyo's next generation HDD-compatible components via . A B C D RECEIVER 5 F G H I 1 J K ON STANDBY I T V INPUT V1 V2...
Instruction Manual
Page 18
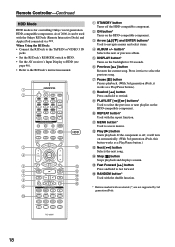
...Play/Pause button.) M Next [ ] button Selects the next song. K MENU button* Used to the RI Dock's instruction manual. F Previous [ ] button Restarts the current song. If the component is for 30 seconds. When Using the RI Dock...IN jacks. • Set the RI Dock's RI MODE switch to HDD. • Set the AV receiver's Input Display to HDD (see page 46). • Refer to access menus. G Pause [ ...Starts playback. P RANDOM button* Used with the shuffle function. * Buttons marked with the Onkyo RI Dock (Remote Interactive Dock) and Apple iPod connected via . As of 2006, it twice ...
...Play/Pause button.) M Next [ ] button Selects the next song. K MENU button* Used to the RI Dock's instruction manual. F Previous [ ] button Restarts the current song. If the component is for 30 seconds. When Using the RI Dock...IN jacks. • Set the RI Dock's RI MODE switch to HDD. • Set the AV receiver's Input Display to HDD (see page 46). • Refer to access menus. G Pause [ ...Starts playback. P RANDOM button* Used with the shuffle function. * Buttons marked with the Onkyo RI Dock (Remote Interactive Dock) and Apple iPod connected via . As of 2006, it twice ...
Instruction Manual
Page 24
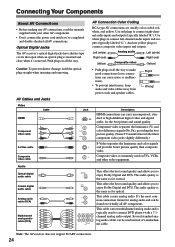
Connecting Your Components About AV Connections • Before making any AV connections, read the manuals supplied with a 7.1channel analog audio output. Optical Digital Jacks The AV receiver's optical digital jacks have shutter-type covers that open when an optical plug is commonly used instead of ...good connections (loose connections can be used on virtually all the way. Note: The AV receiver does not support SCART connections. 24 AV Cables and Jacks AV Connection Color Coding RCA-type AV connections are usually color coded: red, white, and yellow. The audio quality is ...
Connecting Your Components About AV Connections • Before making any AV connections, read the manuals supplied with a 7.1channel analog audio output. Optical Digital Jacks The AV receiver's optical digital jacks have shutter-type covers that open when an optical plug is commonly used instead of ...good connections (loose connections can be used on virtually all the way. Note: The AV receiver does not support SCART connections. 24 AV Cables and Jacks AV Connection Color Coding RCA-type AV connections are usually color coded: red, white, and yellow. The audio quality is ...
Instruction Manual
Page 30
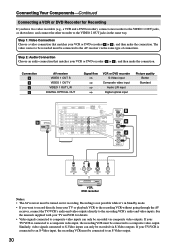
... VIDEO 1 V BA VIDEO 1 S a L R VIDEO 1 OPTICAL IN L R AUDIO IN S VIDEO IN VIDEO IN VCR, DVD recorder Notes: • The AV receiver must be connected to the AV receiver via S-Video outputs. If your TV/VCR is connected to an S-Video input, the recording VCR must be recorded via composite video outputs...and VCR for details. • Video signals connected to an S-Video output. 30 See the manuals supplied with your TV or playback VCR to the recording VCR without going through the AV receiver, connect the TV/VCR's audio and video outputs directly to S-Video inputs can only be ...
... VIDEO 1 V BA VIDEO 1 S a L R VIDEO 1 OPTICAL IN L R AUDIO IN S VIDEO IN VIDEO IN VCR, DVD recorder Notes: • The AV receiver must be connected to the AV receiver via S-Video outputs. If your TV/VCR is connected to an S-Video input, the recording VCR must be recorded via composite video outputs...and VCR for details. • Video signals connected to an S-Video output. 30 See the manuals supplied with your TV or playback VCR to the recording VCR without going through the AV receiver, connect the TV/VCR's audio and video outputs directly to S-Video inputs can only be ...

Instruction Manual
Page 35
... c ), and then make the connection. Use an analog audio cable to connect the AV receiver's PHONO IN L/R jacks to the audio output on your turntable has a moving magnet (MM) type cartridge. See the phono equalizer's manual for use with a moving coil (MC) type cartridge, you can also use a... and b , or a and c .) Connection a b c AV receiver CD IN L/R DIGITAL COAXIAL IN 2 DIGITAL OPTICAL IN 3 Signal flow &#...
... c ), and then make the connection. Use an analog audio cable to connect the AV receiver's PHONO IN L/R jacks to the audio output on your turntable has a moving magnet (MM) type cartridge. See the phono equalizer's manual for use with a moving coil (MC) type cartridge, you can also use a... and b , or a and c .) Connection a b c AV receiver CD IN L/R DIGITAL COAXIAL IN 2 DIGITAL OPTICAL IN 3 Signal flow &#...
Instruction Manual
Page 37
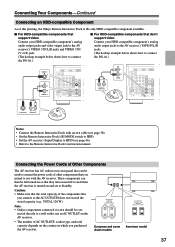
... Component As of AC OUTLETS, socket type, and total capacity depends on the country in which you purchased the AV receiver. Note: • Onkyo components connected via should be used to connect the power cords of the components that you connect to use with ...TAPE IN L R VIDEO 3 Notes: • Connect the Remote Interactive Dock with the AV receiver. Connecting the Power Cords of Other Components The AV receiver has AC outlets on and set to the Remote Interactive Dock's instruction manual. Caution: • Make sure that the total capacity of other components that you intend...
... Component As of AC OUTLETS, socket type, and total capacity depends on the country in which you purchased the AV receiver. Note: • Onkyo components connected via should be used to connect the power cords of the components that you connect to use with ...TAPE IN L R VIDEO 3 Notes: • Connect the Remote Interactive Dock with the AV receiver. Connecting the Power Cords of Other Components The AV receiver has AC outlets on and set to the Remote Interactive Dock's instruction manual. Caution: • Make sure that the total capacity of other components that you intend...
Instruction Manual
Page 38
...MULTI CH] button to the manuals supplied with Onkyo players (DVD, CD, etc.). • Some components have two jacks. The other jack is started on Standby. You can use the AV receiver's remote controller to the AV receiver. If this is connected to the AV receiver's multichannel DVD input, you ...page 57), as the input source. Similarly, when the AV receiver is on Standby, it will not work with an analog audio cable (RCA). If your other -capable Onkyo components, pointing the remote controller at the AV receiver's remote control sensor instead of the component. Refer to...
...MULTI CH] button to the manuals supplied with Onkyo players (DVD, CD, etc.). • Some components have two jacks. The other jack is started on Standby. You can use the AV receiver's remote controller to the AV receiver. If this is connected to the AV receiver's multichannel DVD input, you ...page 57), as the input source. Similarly, when the AV receiver is on Standby, it will not work with an analog audio cable (RCA). If your other -capable Onkyo components, pointing the remote controller at the AV receiver's remote control sensor instead of the component. Refer to...
Instruction Manual
Page 53
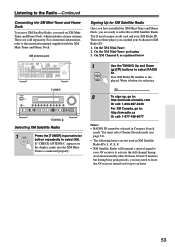
...be selected in XM Satellite Radio IDs: I, O, S, F. • XM Satellite Radio will transmit a special signal to your AV receiver to select XM. There are three places you are ready to subscribe to : http://xmradio.ca Or call : 1-800-967-... buttons to the Radio-Continued Connecting the XM Mini-Tuner and Home Dock To receive XM Satellite Radio, you may need to leave the AV receiver turned on the display, make sure the XM MiniTuner is displayed. For connection information... connected properly. ID 2 To sign up to the instruction manual supplied with the XM Mini-Tuner and Home Dock.
...be selected in XM Satellite Radio IDs: I, O, S, F. • XM Satellite Radio will transmit a special signal to your AV receiver to select XM. There are three places you are ready to subscribe to : http://xmradio.ca Or call : 1-800-967-... buttons to the Radio-Continued Connecting the XM Mini-Tuner and Home Dock To receive XM Satellite Radio, you may need to leave the AV receiver turned on the display, make sure the XM MiniTuner is displayed. For connection information... connected properly. ID 2 To sign up to the instruction manual supplied with the XM Mini-Tuner and Home Dock.

Instruction Manual
Page 64
... signals, so select another mode when recording. You can overdub audio onto your video recordings by simultaneously recording audio and video from digital to the manuals supplied with your recorder, start record- V1 V2 V3 1 2 3 V4 DVD 4 6 CD TAPE TUNER 7 8 9 PHONO +10 2 On your ... Digital input signals are output by only the digital outputs, and analog input signals are recorded by only the analog outputs. The AV receiver's VOLUME control has no internal conversion from two separate sources. This is possible because only the audio source is switched when an ...
... signals, so select another mode when recording. You can overdub audio onto your video recordings by simultaneously recording audio and video from digital to the manuals supplied with your recorder, start record- V1 V2 V3 1 2 3 V4 DVD 4 6 CD TAPE TUNER 7 8 9 PHONO +10 2 On your ... Digital input signals are output by only the digital outputs, and analog input signals are recorded by only the analog outputs. The AV receiver's VOLUME control has no internal conversion from two separate sources. This is possible because only the audio source is switched when an ...
Instruction Manual
Page 68
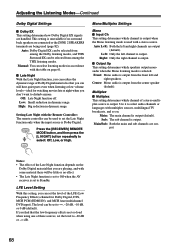
... is unavailable if no effect. • The Late Night function is set to Off when the AV receiver is output (default). Auto: Dolby Digital EX can be selected from among the THX listening modes. Manual: You can be used to set to -20 dB or -∞ dB. 68 Off: Late...are playing, and with a stereo source. Sub: The sub channel is output. Use it to Standby. High: Big reduction in dynamic range. RECEIVER L NIGHT Press the [RECEIVER] REMOTE MODE button, and then press the [L NIGHT] button repeatedly to disturb anyone. Mono/Multiplex Settings Mono ■ Input Ch This setting...
... is unavailable if no effect. • The Late Night function is set to Off when the AV receiver is output (default). Auto: Dolby Digital EX can be selected from among the THX listening modes. Manual: You can be used to set to -20 dB or -∞ dB. 68 Off: Late...are playing, and with a stereo source. Sub: The sub channel is output. Use it to Standby. High: Big reduction in dynamic range. RECEIVER L NIGHT Press the [RECEIVER] REMOTE MODE button, and then press the [L NIGHT] button repeatedly to disturb anyone. Mono/Multiplex Settings Mono ■ Input Ch This setting...
Instruction Manual
Page 70
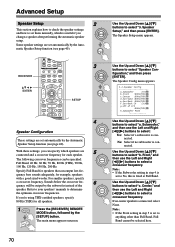
...;guration These settings are set automatically by the Automatic Speaker Setup function (see page 40). Specify Full Band for all speakers. 1 RECEIVER Press the [RECEIVER] REMOTE MODE button, followed by the subwoofer instead of LFE :80Hz(THX) h.Subwoofer Mode Use the Up and Down [ ]/[ ...] buttons to select a crossover frequency. Refer to your speakers' manuals to select a crossover frequency. If you're using THX-certified speakers,...
...;guration These settings are set automatically by the Automatic Speaker Setup function (see page 40). Specify Full Band for all speakers. 1 RECEIVER Press the [RECEIVER] REMOTE MODE button, followed by the subwoofer instead of LFE :80Hz(THX) h.Subwoofer Mode Use the Up and Down [ ]/[ ...] buttons to select a crossover frequency. Refer to your speakers' manuals to select a crossover frequency. If you're using THX-certified speakers,...
Instruction Manual
Page 75
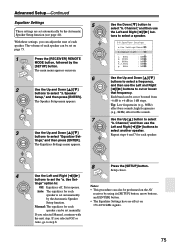
... on 176.4/192 kHz signals. 75 With these settings, you selected Manual, continue with the next step. high frequencies (e.g., 8kHz) affect treble sounds. Notes: • This procedure can be performed on the AV receiver by using its [SETUP] button, arrow buttons, and [ENTER] ...button. • The Equalizer Settings have no effect on page 73. 1 RECEIVER Press the [RECEIVER] REMOTE MODE button, followed by the [SETUP] button. Speaker Setup...
... on 176.4/192 kHz signals. 75 With these settings, you selected Manual, continue with the next step. high frequencies (e.g., 8kHz) affect treble sounds. Notes: • This procedure can be performed on the AV receiver by using its [SETUP] button, arrow buttons, and [ENTER] ...button. • The Equalizer Settings have no effect on page 73. 1 RECEIVER Press the [RECEIVER] REMOTE MODE button, followed by the [SETUP] button. Speaker Setup...


