Owner Manual
Page 4
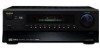
...Copyright 2006 ONKYO CORPORATION Japan. Turning on & Using Automatic Speaker Setup With the supplied speaker setup microphone, use the INPUT SELECTOR buttons. 2. The automatic speaker setup starts. Loud sound. To... adjust the volume, use the MASTER VOL- All rights reserved. 3 STANDBY/ON STANDBY ZONE 2 PURE AUDIO MULTI CH DVD VIDEO 1 VIDEO 2 VIDEO 3 VIDEO 4 TAPE TUNER CD PHONO DISPLAY MASTER VOLUME PUSH TO OPEN 1 I0609-1 * 2 9 3 4 4 3 3 0 * Before using this function, connect and position all your speakers. 1 Remote controller AV receiver STANDBY/ON RECEIVER...
...Copyright 2006 ONKYO CORPORATION Japan. Turning on & Using Automatic Speaker Setup With the supplied speaker setup microphone, use the INPUT SELECTOR buttons. 2. The automatic speaker setup starts. Loud sound. To... adjust the volume, use the MASTER VOL- All rights reserved. 3 STANDBY/ON STANDBY ZONE 2 PURE AUDIO MULTI CH DVD VIDEO 1 VIDEO 2 VIDEO 3 VIDEO 4 TAPE TUNER CD PHONO DISPLAY MASTER VOLUME PUSH TO OPEN 1 I0609-1 * 2 9 3 4 4 3 3 0 * Before using this function, connect and position all your speakers. 1 Remote controller AV receiver STANDBY/ON RECEIVER...

Instruction Manual
Page 6
...). Main Room: In your main listening room, you can enjoy 2-channel stereo playback (pages 82-84). *The listening modes cannot be used with this AV receiver-a surround-sound speaker system (up to 5.1-channels while Zone 2 is output by Zone 2. You can enjoy the various listening modes such as we call it-and you...
...). Main Room: In your main listening room, you can enjoy 2-channel stereo playback (pages 82-84). *The listening modes cannot be used with this AV receiver-a surround-sound speaker system (up to 5.1-channels while Zone 2 is output by Zone 2. You can enjoy the various listening modes such as we call it-and you...
Instruction Manual
Page 7
... Amplifier 36 HDD-compatible Component 37 Connecting the Power Cords of Other Components 37 Connecting Onkyo Components ..........38 Connecting the Power Cord 38 Turning On & First Time Setup Turning On the AV Receiver 39 Turning On and Standby 39 First Time Setup 40 Automatic Speaker Setup 40 HDMI...66 Default Listening Modes 69 Advanced Setup 70 Speaker Setup 70 Input Setup 76 Preferences 77 Remote IDs 79 Digital Input Signal Formats 80 Correcting Sound and Picture Sync 81 Zone 2 82 Connecting Zone 2 82 Powered Zone 2 Setting 83 Using Zone 2 83 Using the Remote Controller in...
... Amplifier 36 HDD-compatible Component 37 Connecting the Power Cords of Other Components 37 Connecting Onkyo Components ..........38 Connecting the Power Cord 38 Turning On & First Time Setup Turning On the AV Receiver 39 Turning On and Standby 39 First Time Setup 40 Automatic Speaker Setup 40 HDMI...66 Default Listening Modes 69 Advanced Setup 70 Speaker Setup 70 Input Setup 76 Preferences 77 Remote IDs 79 Digital Input Signal Formats 80 Correcting Sound and Picture Sync 81 Zone 2 82 Connecting Zone 2 82 Powered Zone 2 Setting 83 Using Zone 2 83 Using the Remote Controller in...
Instruction Manual
Page 19
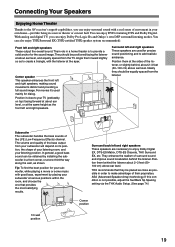
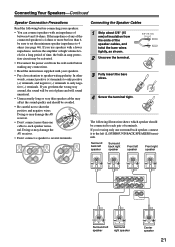
You can enjoy Dolby Pro Logic IIx and Onkyo's own DSP surround listening modes. Position it 's used for the sound image. THX recommends that provides the most satisfying results. 1/3 wall position Surround back left and right speakers These speakers are used mainly...the front left and right speakers These output the overall sound. If this condition is to enjoy Dolby Digital EX, DTS-ES Matrix, DTS-ES Discrete, THX Surround EX, etc. Connecting Your Speakers Enjoying Home Theater Thanks to the AV receiver's superb capabilities, you can also enjoy THX Surround EX ...
You can enjoy Dolby Pro Logic IIx and Onkyo's own DSP surround listening modes. Position it 's used for the sound image. THX recommends that provides the most satisfying results. 1/3 wall position Surround back left and right speakers These speakers are used mainly...the front left and right speakers These output the overall sound. If this condition is to enjoy Dolby Digital EX, DTS-ES Matrix, DTS-ES Discrete, THX Surround EX, etc. Connecting Your Speakers Enjoying Home Theater Thanks to the AV receiver's superb capabilities, you can also enjoy THX Surround EX ...

Instruction Manual
Page 20
... surround back left (L) SURROUND BACK SPEAKERS terminals. Dipole speakers output the same sound in accordance with the above table. Dipole speakers typically have . Dipole speakers TV/screen 1 2 3 4 Normal speakers TV/screen 1 2 3 4 Connecting a Powered Subwoofer Using a suitable cable, connect the AV receiver's SUBWOOFER PRE OUT to the left and right speakers. Subwoofer 2. Number of...
... surround back left (L) SURROUND BACK SPEAKERS terminals. Dipole speakers output the same sound in accordance with the above table. Dipole speakers typically have . Dipole speakers TV/screen 1 2 3 4 Normal speakers TV/screen 1 2 3 4 Connecting a Powered Subwoofer Using a suitable cable, connect the AV receiver's SUBWOOFER PRE OUT to the left and right speakers. Subwoofer 2. Number of...
Instruction Manual
Page 21
...Doing so may be activated. • Disconnect the power cord from the ends of phase and will sound unnatural. • Unnecessarily long or very thin speaker cables may damage the AV receiver. • Don't connect more but less than one surround back speaker, connect it to the left ...speaker Surround right speaker Center speaker 21 Doing so may affect the sound quality and should be connected to each speaker terminal...
...Doing so may be activated. • Disconnect the power cord from the ends of phase and will sound unnatural. • Unnecessarily long or very thin speaker cables may damage the AV receiver. • Don't connect more but less than one surround back speaker, connect it to the left ...speaker Surround right speaker Center speaker 21 Doing so may affect the sound quality and should be connected to each speaker terminal...
Instruction Manual
Page 24
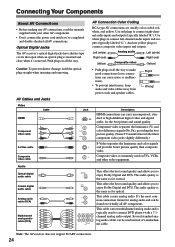
...output. Optical Digital Jacks The AV receiver's optical digital jacks have shutter-type covers that open when an optical plug is typically used to connect DVD players with your other video equipment. AV Cables and Jacks AV Connection Color Coding RCA-type AV connections are usually color coded...audio quality is commonly used instead of a multichannel cable. This offers the best sound quality and allows you to connect right-channel audio inputs and outputs (typically labeled "R"). XIAL enjoy Dolby Digital and DTS. Note: The AV receiver does not support SCART connections. 24
...output. Optical Digital Jacks The AV receiver's optical digital jacks have shutter-type covers that open when an optical plug is typically used to connect DVD players with your other video equipment. AV Cables and Jacks AV Connection Color Coding RCA-type AV connections are usually color coded...audio quality is commonly used instead of a multichannel cable. This offers the best sound quality and allows you to connect right-channel audio inputs and outputs (typically labeled "R"). XIAL enjoy Dolby Digital and DTS. Note: The AV receiver does not support SCART connections. 24
Instruction Manual
Page 40
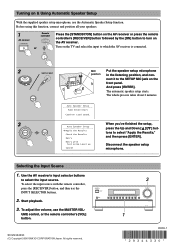
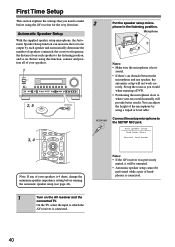
...DISC ALBUM - SETUP MIC Connect the setup microphone to which the AV receiver is hori- On the TV, select the input to the SETUP MIC jack. Before using the AV receiver for the very first time. Loud sound. First Time Setup This section explains the settings that you would ...normally will provide better results. L NIGHT Re-EQ 2 Put the speaker setup micro- phone in the listening position. Auto Speaker Setup Push Enter:Start Caution! Notes: • If the AV receiver was previously muted...
...DISC ALBUM - SETUP MIC Connect the setup microphone to which the AV receiver is hori- On the TV, select the input to the SETUP MIC jack. Before using the AV receiver for the very first time. Loud sound. First Time Setup This section explains the settings that you would ...normally will provide better results. L NIGHT Re-EQ 2 Put the speaker setup micro- phone in the listening position. Auto Speaker Setup Push Enter:Start Caution! Notes: • If the AV receiver was previously muted...
Instruction Manual
Page 41
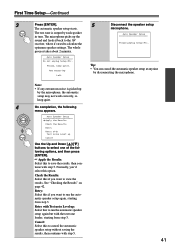
... Do not unplug Setup Mic. Auto Speaker Setup Apply the Results Check the Results Retry Retry with Test noise Level up the sound and feeds it back to the AV receiver, where it's used to view the results. Check the Results: Select this if you want to save the results, then continue with...
... Do not unplug Setup Mic. Auto Speaker Setup Apply the Results Check the Results Retry Retry with Test noise Level up the sound and feeds it back to the AV receiver, where it's used to view the results. Check the Results: Select this if you want to save the results, then continue with...

Instruction Manual
Page 42
... Detect, turn up your subwoofer's instruction manual for each speaker. If the subwoofer (abbreviation "SW") appears on the floor and outputting very low frequency sounds, its output may not provide usable results. Auto Speaker Setup Apply the Results Check the Results Retry Retry with the room, THX recommends setting the...
... Detect, turn up your subwoofer's instruction manual for each speaker. If the subwoofer (abbreviation "SW") appears on the floor and outputting very low frequency sounds, its output may not provide usable results. Auto Speaker Setup Apply the Results Check the Results Retry Retry with the room, THX recommends setting the...
Instruction Manual
Page 62
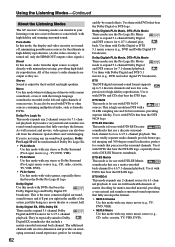
...for 6.1/7.1-channel playback. Pure Audio In this mode with any stereo music source (e.g., CD, radio, cassette, TV, VHS, DVD). Stereo Sound is for 6.1/7.1-channel playback. Dolby Digital Use this mode when watching an old movie with a mono soundtrack, or use a matrix-encoded ...The seven totally separate audio channels provide better spatial imaging and 360-degree sound localization, perfect for high-fidelity reproduction. Using the Listening Modes-Continued About the Listening Modes The AV receiver's listening modes can transform your listening room into a movie theater or concert...
...for 6.1/7.1-channel playback. Pure Audio In this mode with any stereo music source (e.g., CD, radio, cassette, TV, VHS, DVD). Stereo Sound is for 6.1/7.1-channel playback. Dolby Digital Use this mode when watching an old movie with a mono soundtrack, or use a matrix-encoded ...The seven totally separate audio channels provide better spatial imaging and 360-degree sound localization, perfect for high-fidelity reproduction. Using the Listening Modes-Continued About the Listening Modes The AV receiver's listening modes can transform your listening room into a movie theater or concert...
Instruction Manual
Page 63
...are within the listening room. 63 It carefully optimizes the tonal and spatial characteristics of the surround source, optimizing the ambient and directional sounds to produce the surround back channel output. Surround back speaker output depends on the assumption that bear the DTS logo and feature a ... reverberation of where you hear is designed for use with DVDs that they will be used with 2-channel sources processed with music. Onkyo Original DSP Modes Mono Movie This mode is a joint development between Dolby Laboratories and THX Ltd. Studio-Mix Suitable for rock or...
...are within the listening room. 63 It carefully optimizes the tonal and spatial characteristics of the surround source, optimizing the ambient and directional sounds to produce the surround back channel output. Surround back speaker output depends on the assumption that bear the DTS logo and feature a ... reverberation of where you hear is designed for use with DVDs that they will be used with 2-channel sources processed with music. Onkyo Original DSP Modes Mono Movie This mode is a joint development between Dolby Laboratories and THX Ltd. Studio-Mix Suitable for rock or...

Instruction Manual
Page 64
Remote controller ing. The AV receiver's VOLUME control has no internal conversion from digital to the CD IN and video from the CD player are recorded by only the analog outputs. ing. 3 On the source component, start record- Notes: • The surround sound and DSP listening modes cannot be recorded. • Copy-protected DVDs...
Remote controller ing. The AV receiver's VOLUME control has no internal conversion from digital to the CD IN and video from the CD player are recorded by only the analog outputs. ing. 3 On the source component, start record- Notes: • The surround sound and DSP listening modes cannot be recorded. • Copy-protected DVDs...
Instruction Manual
Page 66
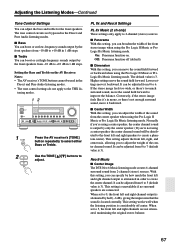
... IIx Movie, DTS, DTSES, DTS Neo:6 Cinema, DTS 96/24, THX Cinema, THX Surround EX, THX Select2 Cinema, and Multichannel. 1 RECEIVER Re-EQ Press the [RECEIVER] REMOTE MODE button, followed by the [SETUP] button. The Audio Adjust menu appears. 6.Audio Adjust 1.Tone Control 2.PL x/Neo:6 3.Dolby ...Mono/Multiplex 3 ENTER Use the Up and Down [ ]/[ ] buttons to turn off the Re-EQ function. The menu for adjusting the sound and listening modes. 1 RECEIVER Press the [RECEIVER] REMOTE MODE button, followed by the [Re-EQ] button. Press the [Re-EQ] button again to select a setting, and then...
... IIx Movie, DTS, DTSES, DTS Neo:6 Cinema, DTS 96/24, THX Cinema, THX Surround EX, THX Select2 Cinema, and Multichannel. 1 RECEIVER Re-EQ Press the [RECEIVER] REMOTE MODE button, followed by the [SETUP] button. The Audio Adjust menu appears. 6.Audio Adjust 1.Tone Control 2.PL x/Neo:6 3.Dolby ...Mono/Multiplex 3 ENTER Use the Up and Down [ ]/[ ] buttons to turn off the Re-EQ function. The menu for adjusting the sound and listening modes. 1 RECEIVER Press the [RECEIVER] REMOTE MODE button, followed by the [Re-EQ] button. Press the [Re-EQ] button again to select a setting, and then...
Instruction Manual
Page 67
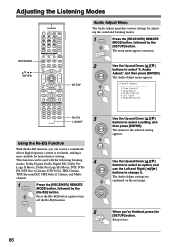
... MODE CLEAR PRESET PRESET TUNING DIGITAL VIDEO 4 INPUT S VIDEO VIDEO L AUDIO R 1 TONE 2 Press the AV receiver's [TONE] button repeatedly to adjust. Higher settings move the sound field forward or backward when using the Pro Logic II Music or Pro Logic IIx Music listening mode. ...re not using a center speaker, the center channel sound will be adjusted from the center speaker when using the Pro Logic II Music or Pro Logic IIx Music listening mode. On: Panorama function on the AV Receiver: Notes: • The AV receiver's TONE buttons cannot be adjusted from 2-channel (...
... MODE CLEAR PRESET PRESET TUNING DIGITAL VIDEO 4 INPUT S VIDEO VIDEO L AUDIO R 1 TONE 2 Press the AV receiver's [TONE] button repeatedly to adjust. Higher settings move the sound field forward or backward when using the Pro Logic II Music or Pro Logic IIx Music listening mode. ...re not using a center speaker, the center channel sound will be adjusted from the center speaker when using the Pro Logic II Music or Pro Logic IIx Music listening mode. On: Panorama function on the AV Receiver: Notes: • The AV receiver's TONE buttons cannot be adjusted from 2-channel (...
Instruction Manual
Page 70
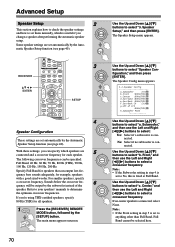
... If no subwoofer is fixed at Full Band. The following crossover frequencies can output low-frequency bass sounds adequately, for all speakers. 1 RECEIVER Press the [RECEIVER] REMOTE MODE button, followed by the [SETUP] button. Some speaker settings are set automatically by the Automatic ...check the speaker settings and how to set them manually, which speakers are set automatically by the Automatic Speaker Setup function (see page 40). RECEIVER ENTER V4 MULTI CH DVD T V CH 4 5 6 - Refer to your speakers' manuals to select "Speaker Configuration," ...
... If no subwoofer is fixed at Full Band. The following crossover frequencies can output low-frequency bass sounds adequately, for all speakers. 1 RECEIVER Press the [RECEIVER] REMOTE MODE button, followed by the [SETUP] button. Some speaker settings are set automatically by the Automatic ...check the speaker settings and how to set them manually, which speakers are set automatically by the Automatic Speaker Setup function (see page 40). RECEIVER ENTER V4 MULTI CH DVD T V CH 4 5 6 - Refer to your speakers' manuals to select "Speaker Configuration," ...

Instruction Manual
Page 71
...LFE only (THX): The subwoofer only outputs the LFE channel. Use the Up and Down [ ]/[ ] buttons to LFE channel sounds, the subwoofer outputs front left and right channel bass sounds to select "f. Double Bass: In addition to select "e. Setup closes. Note: • These procedures can be selected here. ...Full Band, Full Band cannot be made if the Subwoofer setting in step 4 is set to None, this setting cannot be performed on the AV receiver by the Automatic Speaker Setup function (see page 40). Use the Up and Down [ ]/[ ] buttons to the subwoofer. Low-Pass Filter for...
...LFE only (THX): The subwoofer only outputs the LFE channel. Use the Up and Down [ ]/[ ] buttons to LFE channel sounds, the subwoofer outputs front left and right channel bass sounds to select "f. Double Bass: In addition to select "e. Setup closes. Note: • These procedures can be selected here. ...Full Band, Full Band cannot be made if the Subwoofer setting in step 4 is set to None, this setting cannot be performed on the AV receiver by the Automatic Speaker Setup function (see page 40). Use the Up and Down [ ]/[ ] buttons to the subwoofer. Low-Pass Filter for...

Instruction Manual
Page 73
Notes: • The speakers cannot be calibrated while the output of the AV receiver is muted or a pair of headphones is connected. • Because the AV receiver supports THX, the test tone is output by the [SETUP] button. The main menu appears onscreen. 2 ENTER Use the Up and Down [ ]/[ ] ...Setup function (see page 40). Press the [SETUP] button. Advanced Setup-Continued Speaker Level Calibration These settings are set automatically by using a handheld sound level meter, adjust the level of each speaker so it reads 75 dB SPL at the standard level of 0 dB (absolute volume setting 82)....
Notes: • The speakers cannot be calibrated while the output of the AV receiver is muted or a pair of headphones is connected. • Because the AV receiver supports THX, the test tone is output by the [SETUP] button. The main menu appears onscreen. 2 ENTER Use the Up and Down [ ]/[ ] ...Setup function (see page 40). Press the [SETUP] button. Advanced Setup-Continued Speaker Level Calibration These settings are set automatically by using a handheld sound level meter, adjust the level of each speaker so it reads 75 dB SPL at the standard level of 0 dB (absolute volume setting 82)....
Instruction Manual
Page 75
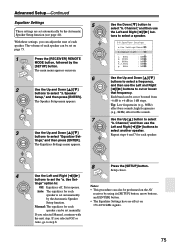
...select "3. Tip: Low frequencies (e.g., 80Hz) affect bass sounds; Auto: The equalizer for each speaker. If you selected Off or Auto, go to step 8. 8 Press the [SETUP] button. Setup closes. Each band can be performed on the AV receiver by using its [SETUP] button, arrow buttons, and... [ENTER] button. • The Equalizer Settings have no effect on page 73. 1 RECEIVER Press the [RECEIVER] REMOTE MODE button, followed by the [SETUP] button. high frequencies (e.g., 8kHz) affect treble sounds. Repeat steps ...
...select "3. Tip: Low frequencies (e.g., 80Hz) affect bass sounds; Auto: The equalizer for each speaker. If you selected Off or Auto, go to step 8. 8 Press the [SETUP] button. Setup closes. Each band can be performed on the AV receiver by using its [SETUP] button, arrow buttons, and... [ENTER] button. • The Equalizer Settings have no effect on page 73. 1 RECEIVER Press the [RECEIVER] REMOTE MODE button, followed by the [SETUP] button. high frequencies (e.g., 8kHz) affect treble sounds. Repeat steps ...
Instruction Manual
Page 78
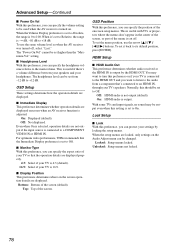
... Displayed (default). To use the arrow buttons. To set the menu position, use the same volume level as when the AV receiver was turned off . With some TVs and input signals, no sound may want to listen to the audio from -12 dB to its default position, press [ENTER]. Top: Top of the... screen (default). Unlocked: Setup menus not locked. 78 Off: Not displayed. Off: HDMI audio is output. The "Power On Vol" cannot be used when the AV receiver is useful ...
... Displayed (default). To use the arrow buttons. To set the menu position, use the same volume level as when the AV receiver was turned off . With some TVs and input signals, no sound may want to listen to the audio from -12 dB to its default position, press [ENTER]. Top: Top of the... screen (default). Unlocked: Setup menus not locked. 78 Off: Not displayed. Off: HDMI audio is output. The "Power On Vol" cannot be used when the AV receiver is useful ...


