
Owner Manual
Page 3
...➔ See page 4. 3 IN1 XIAL COAXIAL OUT DVD player 3 VIDEO OUT DVD IN V 2 FRONT L R DVD Connection 2 3 3 AV receiver DVD IN V DVD IN FRONT DIGITAL COAXIAL IN 1 Signal flow DVD player Composite video output Analog audio L/R output Digital coaxial output Note: ... connection 3 offers Dolby & DTS listening modes, the analog connection 3 allows you to listen in Zone 2. 4+5 Basic TV Hookup 5 L R AUDIO OUT IN L R VIDEO 3 TV VIDEO IN MONITOR OUT V 4 Connection 4 5 AV receiver MONITOR OUT V VIDEO 3 IN L/R Signal flow TV Composite video input Analog audio L/R ...
...➔ See page 4. 3 IN1 XIAL COAXIAL OUT DVD player 3 VIDEO OUT DVD IN V 2 FRONT L R DVD Connection 2 3 3 AV receiver DVD IN V DVD IN FRONT DIGITAL COAXIAL IN 1 Signal flow DVD player Composite video output Analog audio L/R output Digital coaxial output Note: ... connection 3 offers Dolby & DTS listening modes, the analog connection 3 allows you to listen in Zone 2. 4+5 Basic TV Hookup 5 L R AUDIO OUT IN L R VIDEO 3 TV VIDEO IN MONITOR OUT V 4 Connection 4 5 AV receiver MONITOR OUT V VIDEO 3 IN L/R Signal flow TV Composite video input Analog audio L/R ...
Owner Manual
Page 4
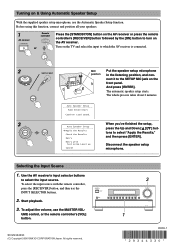
.... All rights reserved. 3 STANDBY/ON STANDBY ZONE 2 PURE AUDIO MULTI CH DVD VIDEO 1 VIDEO 2 VIDEO 3 VIDEO 4 TAPE TUNER CD PHONO DISPLAY MASTER VOLUME PUSH TO OPEN 1 I0609-1 * 2 9 3 4 4 3 3 0 * SN 29344330 (C) Copyright 2006 ONKYO CORPORATION Japan. Selecting the Input Source 1. Turning on the AV receiver or press the remote controller's [RECEIVER] button followed by the [ON] button...
.... All rights reserved. 3 STANDBY/ON STANDBY ZONE 2 PURE AUDIO MULTI CH DVD VIDEO 1 VIDEO 2 VIDEO 3 VIDEO 4 TAPE TUNER CD PHONO DISPLAY MASTER VOLUME PUSH TO OPEN 1 I0609-1 * 2 9 3 4 4 3 3 0 * SN 29344330 (C) Copyright 2006 ONKYO CORPORATION Japan. Selecting the Input Source 1. Turning on the AV receiver or press the remote controller's [RECEIVER] button followed by the [ON] button...
Instruction Manual
Page 4
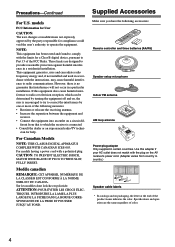
...Right Center Center Surround Back Left Surround Back Left Zone 2 Left Zone 2 Left Surround Back Right Surround Back Right Zone 2 Right Zone 2 Right Front Left Front Left SP-B / Zone 2 Left SP-B / Zone 2 Left Front Right Front Right SP-B / Zone 2 Right SP-B / Zone 2 Right Surround Left Surround Left Surround Right ... À LA NORME NMB-003 DU CANADA. NOTE: This equipment has been tested and found to comply with the plug on the AV receiver's power cord. (Adapter varies from that interference will not occur in accordance with a polarized plug: CAUTION: TO PREVENT ELECTRIC SHOCK, ...
...Right Center Center Surround Back Left Surround Back Left Zone 2 Left Zone 2 Left Surround Back Right Surround Back Right Zone 2 Right Zone 2 Right Front Left Front Left SP-B / Zone 2 Left SP-B / Zone 2 Left Front Right Front Right SP-B / Zone 2 Right SP-B / Zone 2 Right Surround Left Surround Left Surround Right ... À LA NORME NMB-003 DU CANADA. NOTE: This equipment has been tested and found to comply with the plug on the AV receiver's power cord. (Adapter varies from that interference will not occur in accordance with a polarized plug: CAUTION: TO PREVENT ELECTRIC SHOCK, ...

Instruction Manual
Page 5
... series of this copyright protection technology must be registered in the U.S. THX Select2 receivers also feature proprietary THX technologies (e.g., THX Mode) which is your guarantee that is... Powerful and highly accurate 32-bit DSP processing. • Re-EQ*4 Function Audio/Video • Powered Zone 2 and 12V trigger • 2 HDMI*6 inputs, 1 output (Version 1.1) • HDMI with permission....;er performance, and pre-amplifier performance and operation for home and other AV components • Remote controller Learning function • Remote controller Macro function *1 THX...
... series of this copyright protection technology must be registered in the U.S. THX Select2 receivers also feature proprietary THX technologies (e.g., THX Mode) which is your guarantee that is... Powerful and highly accurate 32-bit DSP processing. • Re-EQ*4 Function Audio/Video • Powered Zone 2 and 12V trigger • 2 HDMI*6 inputs, 1 output (Version 1.1) • HDMI with permission....;er performance, and pre-amplifier performance and operation for home and other AV components • Remote controller Learning function • Remote controller Macro function *1 THX...

Instruction Manual
Page 6
..., and THX (pages 60-63). *If the Powered Zone 2 setting is set to Act, nothing is on (see pages 20-21). You can enjoy 2-channel stereo playback (pages 82-84). *The listening modes cannot be used with this AV receiver-a surround-sound speaker system (up to 7.1-channel playback (see... page 83). Main Room: In your main listening room, you can enjoy a different audio source in your main listening room and a stereo speaker system in each room. Subwoofer Center speaker Zone 2: Sub Room ...
..., and THX (pages 60-63). *If the Powered Zone 2 setting is set to Act, nothing is on (see pages 20-21). You can enjoy 2-channel stereo playback (pages 82-84). *The listening modes cannot be used with this AV receiver-a surround-sound speaker system (up to 7.1-channel playback (see... page 83). Main Room: In your main listening room, you can enjoy a different audio source in your main listening room and a stereo speaker system in each room. Subwoofer Center speaker Zone 2: Sub Room ...
Instruction Manual
Page 7
... 36 HDD-compatible Component 37 Connecting the Power Cords of Other Components 37 Connecting Onkyo Components ..........38 Connecting the Power Cord 38 Turning On & First Time Setup Turning On the AV Receiver 39 Turning On and Standby 39 First Time Setup 40 Automatic Speaker Setup 40... 77 Remote IDs 79 Digital Input Signal Formats 80 Correcting Sound and Picture Sync 81 Zone 2 82 Connecting Zone 2 82 Powered Zone 2 Setting 83 Using Zone 2 83 Using the Remote Controller in Zone 2 and Multiroom Control Kits 85 Controlling Other Components 86 Entering Remote Control Codes 86 ...
... 36 HDD-compatible Component 37 Connecting the Power Cords of Other Components 37 Connecting Onkyo Components ..........38 Connecting the Power Cord 38 Turning On & First Time Setup Turning On the AV Receiver 39 Turning On and Standby 39 First Time Setup 40 Automatic Speaker Setup 40... 77 Remote IDs 79 Digital Input Signal Formats 80 Correcting Sound and Picture Sync 81 Zone 2 82 Connecting Zone 2 82 Powered Zone 2 Setting 83 Using Zone 2 83 Using the Remote Controller in Zone 2 and Multiroom Control Kits 85 Controlling Other Components 86 Entering Remote Control Codes 86 ...

Instruction Manual
Page 8
...) Lights up when Zone 2 is selected. Pressing this switch. When set to OFF, the AV receiver is the main power switch. They are not shown here for clarity. A STANDBY/ON button (39) Sets the AV receiver to -∞ dB, -81 dB, -80 dB through +18 dB (relative display). I ... signals from the remote controller. See "Volume Setup" on page 10. When set to ON, it . Getting to Know the AV Receiver Front Panel 1 23 4 5 6 7 STANDBY/ON POWER STANDBY ZONE 2 ON OFF PURE AUDIO MULTI CH DVD VIDEO 1 VIDEO 2 VIDEO 3 VIDEO 4 TAPE TUNER CD PHONO DISPLAY MASTER VOLUME PUSH...
...) Lights up when Zone 2 is selected. Pressing this switch. When set to OFF, the AV receiver is the main power switch. They are not shown here for clarity. A STANDBY/ON button (39) Sets the AV receiver to -∞ dB, -81 dB, -80 dB through +18 dB (relative display). I ... signals from the remote controller. See "Volume Setup" on page 10. When set to ON, it . Getting to Know the AV Receiver Front Panel 1 23 4 5 6 7 STANDBY/ON POWER STANDBY ZONE 2 ON OFF PURE AUDIO MULTI CH DVD VIDEO 1 VIDEO 2 VIDEO 3 VIDEO 4 TAPE TUNER CD PHONO DISPLAY MASTER VOLUME PUSH...
Instruction Manual
Page 9
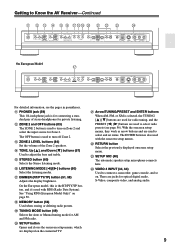
... [ ]/[ ] buttons (60) Select the listening modes. X VIDEO 4 INPUT (34, 64) Used to Know the AV Receiver-Continued K L M N O P QRS T U V W X PHONES ZONE 2 OFF TONE ZONE 2 LEVEL STEREO TUNING DIMMER MEMORY MODE SETUP RETURN ENTER SETUP MIC LISTENING MODE CLEAR PRESET PRESET TUNING DIGITAL VIDEO 4 INPUT ...S VIDEO VIDEO L AUDIO R On European Model Q PHONES ZONE 2 OFF TONE ZONE 2 LEVEL STEREO TUNING RT / PTY/ TP MEMORY MODE SETUP RETURN ENTER LISTENING MODE RDS CLEAR PRESET PRESET TUNING ...
... [ ]/[ ] buttons (60) Select the listening modes. X VIDEO 4 INPUT (34, 64) Used to Know the AV Receiver-Continued K L M N O P QRS T U V W X PHONES ZONE 2 OFF TONE ZONE 2 LEVEL STEREO TUNING DIMMER MEMORY MODE SETUP RETURN ENTER SETUP MIC LISTENING MODE CLEAR PRESET PRESET TUNING DIGITAL VIDEO 4 INPUT ...S VIDEO VIDEO L AUDIO R On European Model Q PHONES ZONE 2 OFF TONE ZONE 2 LEVEL STEREO TUNING RT / PTY/ TP MEMORY MODE SETUP RETURN ENTER LISTENING MODE RDS CLEAR PRESET PRESET TUNING ...
Instruction Manual
Page 10
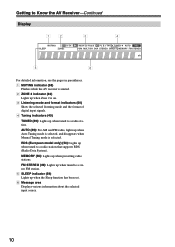
... up when tuned to a radio station that supports RDS (Radio Data System). Getting to Know the AV Receiver-Continued Display 12 3 4 5 6 For detailed information, see the pages in parentheses. 1 MUTING indicator (58) Flashes while the AV receiver is muted. 2 ZONE 2 indicator (83) Lights up when Zone 2 is selected. MEMORY (56): Lights up when presetting radio stations.
... up when tuned to a radio station that supports RDS (Radio Data System). Getting to Know the AV Receiver-Continued Display 12 3 4 5 6 For detailed information, see the pages in parentheses. 1 MUTING indicator (58) Flashes while the AV receiver is muted. 2 ZONE 2 indicator (83) Lights up when Zone 2 is selected. MEMORY (56): Lights up when presetting radio stations.
Instruction Manual
Page 11
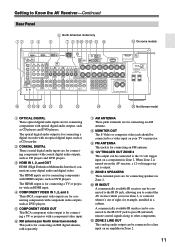
... to the 12-volt trigger input on a component in Zone 2. 11 M ZONE 2 LINE OUT This analog audio output can be connected to the IR OUT jack to pass IR (infrared) remote control signals along to other components. F XM antenna (on the AV receiver, a 12-volt trigger signal is for connecting a digital... North American model) This jack is for connecting an AM antenna. J 12V TRIGGER OUT ZONE 2 This output can be connected to the IR IN jack, allowing you to control the AV receiver while you're in Zone 2, or control it when it's out of sight, for connecting components with an HDMI ...
... to the 12-volt trigger input on a component in Zone 2. 11 M ZONE 2 LINE OUT This analog audio output can be connected to the IR OUT jack to pass IR (infrared) remote control signals along to other components. F XM antenna (on the AV receiver, a 12-volt trigger signal is for connecting a digital... North American model) This jack is for connecting an AM antenna. J 12V TRIGGER OUT ZONE 2 This output can be connected to the IR IN jack, allowing you to control the AV receiver while you're in Zone 2, or control it when it's out of sight, for connecting components with an HDMI ...
Instruction Manual
Page 15
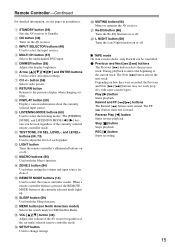
... model) Selects the search mode for Zone 2. I DISPLAY button (59) Displays various information about the currently selected input source. S SETUP button Used to the previous display when changing settings. Stop [ ] button Stops playback. H RETURN button Returns to change settings. T MUTING button (58) Mutes or unmutes the AV receiver. Play [ ] button Starts playback. E DIMMER...
... model) Selects the search mode for Zone 2. I DISPLAY button (59) Displays various information about the currently selected input source. S SETUP button Used to the previous display when changing settings. Stop [ ] button Stops playback. H RETURN button Returns to change settings. T MUTING button (58) Mutes or unmutes the AV receiver. Play [ ] button Starts playback. E DIMMER...

Instruction Manual
Page 20
...back right Color White Red Green Blue Gray Brown Tan The supplied speaker labels are all black.) Speaker terminal Front left, Zone 2 left Front right, Zone 2 right Center Surround left Surround right Surround back left (L) SURROUND BACK SPEAKERS terminals. Surround back left speaker 3. Number of...'s input. Dipole speakers TV/screen 1 2 3 4 Normal speakers TV/screen 1 2 3 4 Connecting a Powered Subwoofer Using a suitable cable, connect the AV receiver's SUBWOOFER PRE OUT to the input on the number of each label to the corresponding speaker terminal. 5 65 6 7 8 1.
...back right Color White Red Green Blue Gray Brown Tan The supplied speaker labels are all black.) Speaker terminal Front left, Zone 2 left Front right, Zone 2 right Center Surround left Surround right Surround back left (L) SURROUND BACK SPEAKERS terminals. Surround back left speaker 3. Number of...'s input. Dipole speakers TV/screen 1 2 3 4 Normal speakers TV/screen 1 2 3 4 Connecting a Powered Subwoofer Using a suitable cable, connect the AV receiver's SUBWOOFER PRE OUT to the input on the number of each label to the corresponding speaker terminal. 5 65 6 7 8 1.
Instruction Manual
Page 26
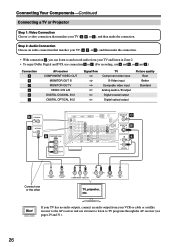
... no audio outputs, connect an audio output from your TV and listen in Zone 2. • To enjoy Dolby Digital and DTS, use connection b or c . (For recording, use its tuner to listen to the AV receiver and use a and b , or a and c .) Connection A B C a b c AV receiver COMPONENT VIDEO OUT MONITOR OUT S MONITOR OUT V VIDEO 3 IN L/R DIGITAL COAXIAL IN...your TV ( A , B , or C ), and then make the connection. • With connection a , you can listen to and record audio from your VCR or cable or satellite receiver to TV programs through the AV receiver (see pages 29 and 31). 26 Hint!
... no audio outputs, connect an audio output from your TV and listen in Zone 2. • To enjoy Dolby Digital and DTS, use connection b or c . (For recording, use its tuner to listen to the AV receiver and use a and b , or a and c .) Connection A B C a b c AV receiver COMPONENT VIDEO OUT MONITOR OUT S MONITOR OUT V VIDEO 3 IN L/R DIGITAL COAXIAL IN...your TV ( A , B , or C ), and then make the connection. • With connection a , you can listen to and record audio from your VCR or cable or satellite receiver to TV programs through the AV receiver (see pages 29 and 31). 26 Hint!
Instruction Manual
Page 27
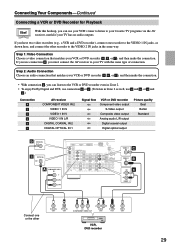
... audio from a DVD and listen in Zone 2. • To enjoy Dolby Digital and DTS, use connection b or c . (For recording, use the main left and right outputs, be sure to your DVD player ( A , B , or C ), and then make the connection. Connection A B C a b c AV receiver COMPONENT VIDEO IN 1 DVD IN S...video connection that matches your DVD player ( a , b , or c ), and then make the connection. • With connection a , you must connect the AV receiver to use a and b , or a and c .) • If your DVD player has main left and right outputs and multichannel left and right outputs for connection a ...
... audio from a DVD and listen in Zone 2. • To enjoy Dolby Digital and DTS, use connection b or c . (For recording, use the main left and right outputs, be sure to your DVD player ( A , B , or C ), and then make the connection. Connection A B C a b c AV receiver COMPONENT VIDEO IN 1 DVD IN S...video connection that matches your DVD player ( a , b , or c ), and then make the connection. • With connection a , you must connect the AV receiver to use a and b , or a and c .) • If your DVD player has main left and right outputs and multichannel left and right outputs for connection a ...
Instruction Manual
Page 29
... can listen to the VCR or DVD recorder even in Zone 2. • To enjoy Dolby Digital and DTS, use connection b or c . (To listen in Zone 2 as well, use your VCR's tuner to listen to your favorite TV programs via the AV receiver, useful if your VCR or DVD recorder ( A ..., B , or C ), and then make the connection. • With connection a , you can use a and b , or a and c .) Connection A B C a b c AV receiver COMPONENT VIDEO IN 2 ...
... can listen to the VCR or DVD recorder even in Zone 2. • To enjoy Dolby Digital and DTS, use connection b or c . (To listen in Zone 2 as well, use your VCR's tuner to listen to your favorite TV programs via the AV receiver, useful if your VCR or DVD recorder ( A ..., B , or C ), and then make the connection. • With connection a , you can use a and b , or a and c .) Connection A B C a b c AV receiver COMPONENT VIDEO IN 2 ...
Instruction Manual
Page 31
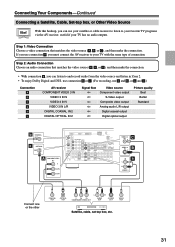
... listen to and record audio from the video source and listen in Zone 2. • To enjoy Dolby Digital and DTS, use connection b or c . (For recording, use connection A , you can use your satellite or cable receiver to listen to your TV has no audio outputs. Step 2: Audio... video source ( A , B , or C ), and then make the connection. • With connection a , you must connect the AV receiver to your favorite TV programs via the AV receiver, useful if your TV with the same type of connection. Connecting Your Components-Continued Connecting a Satellite, Cable, Set-top box, or Other...
... listen to and record audio from the video source and listen in Zone 2. • To enjoy Dolby Digital and DTS, use connection b or c . (For recording, use connection A , you can use your satellite or cable receiver to listen to your TV has no audio outputs. Step 2: Audio... video source ( A , B , or C ), and then make the connection. • With connection a , you must connect the AV receiver to your favorite TV programs via the AV receiver, useful if your TV with the same type of connection. Connecting Your Components-Continued Connecting a Satellite, Cable, Set-top box, or Other...

Instruction Manual
Page 35
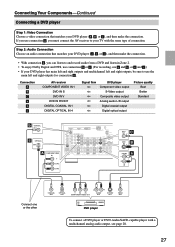
...cartridge. Connecting Your Components-Continued Connecting a CD Player Step 1: Choose a connection that to the AV receiver's PHONO IN L/R jacks. • You can listen to and record audio from the CD player and listen in Zone 2. • To connect the CD player digitally, use connection b or c . (For... recording, use a and b , or a and c .) Connection a b c AV receiver CD IN L/R DIGITAL COAXIAL IN 2 DIGITAL OPTICAL IN 3 Signal flow ...
...cartridge. Connecting Your Components-Continued Connecting a CD Player Step 1: Choose a connection that to the AV receiver's PHONO IN L/R jacks. • You can listen to and record audio from the CD player and listen in Zone 2. • To connect the CD player digitally, use connection b or c . (For... recording, use a and b , or a and c .) Connection a b c AV receiver CD IN L/R DIGITAL COAXIAL IN 2 DIGITAL OPTICAL IN 3 Signal flow ...

Instruction Manual
Page 36
... MiniDisc, or DAT Recorder Step 1: Choose a connection that matches the recorder ( a , b , c , or d ), and then make the connection. Connection a b c d AV receiver TAPE IN L/R TAPE OUT L/R DIGITAL COAXIAL IN 2 DIGITAL IN OPTICAL IN 4 DIGITAL OPTICAL OUT Signal flow Cassette, CDR, MD, or DAT recorder Analog audio...er If you can play and record and listen in Zone 2. • To connect the recorder digitally for playback, use connections a and b , or a and c . • To connect the recorder digitally for recording, use the AV receiver as a preamp, connect it to the power ampli&#...
... MiniDisc, or DAT Recorder Step 1: Choose a connection that matches the recorder ( a , b , c , or d ), and then make the connection. Connection a b c d AV receiver TAPE IN L/R TAPE OUT L/R DIGITAL COAXIAL IN 2 DIGITAL IN OPTICAL IN 4 DIGITAL OPTICAL OUT Signal flow Cassette, CDR, MD, or DAT recorder Analog audio...er If you can play and record and listen in Zone 2. • To connect the recorder digitally for playback, use connections a and b , or a and c . • To connect the recorder digitally for recording, use the AV receiver as a preamp, connect it to the power ampli&#...
Instruction Manual
Page 39
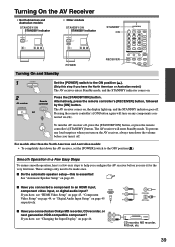
... mode. If you connected an Onkyo MD recorder, CD recorder, or OUT IN next generation HDD-compatible component? These settings only need to the ON position ( ). (Skip this is essential! Press the [STANDBY/ON] button. Turning On the AV Receiver • North American and Australian... models STANDBY/ON STANDBY indicator • Other models STANDBY/ON STANDBY indicator STANDBY/ON STANDBY ZONE 2 PURE AUDIO MULTI CH DVD VIDEO 1 STANDBY/ON POWER STANDBY ZONE 2 ON OFF PURE AUDIO MULTI CH DVD ...
... mode. If you connected an Onkyo MD recorder, CD recorder, or OUT IN next generation HDD-compatible component? These settings only need to the ON position ( ). (Skip this is essential! Press the [STANDBY/ON] button. Turning On the AV Receiver • North American and Australian... models STANDBY/ON STANDBY indicator • Other models STANDBY/ON STANDBY indicator STANDBY/ON STANDBY ZONE 2 PURE AUDIO MULTI CH DVD VIDEO 1 STANDBY/ON POWER STANDBY ZONE 2 ON OFF PURE AUDIO MULTI CH DVD ...
Instruction Manual
Page 40
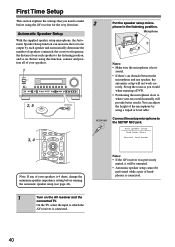
...position all of speakers connected, the crossover frequency, the distance from each speaker to the listening position, and so on the AV receiver and the connected TV. Auto Speaker Setup Push Enter:Start Caution! First Time Setup This section explains the settings that you... OFF PURE AUDIO MULTI CH DVD VIDEO 1 VIDEO 2 VIDEO 3 VIDEO 4 TAPE TUNER CD PHONO DISPLAY MASTER VOLUME PHONES ZONE 2 OFF TONE ZONE 2 LEVEL STEREO TUNING DIMMER MEMORY MODE SETUP RETURN ENTER SETUP MIC LISTENING MODE CLEAR PRESET PRESET TUNING DIGITAL VIDEO 4 INPUT S VIDEO VIDEO L AUDIO ...
...position all of speakers connected, the crossover frequency, the distance from each speaker to the listening position, and so on the AV receiver and the connected TV. Auto Speaker Setup Push Enter:Start Caution! First Time Setup This section explains the settings that you... OFF PURE AUDIO MULTI CH DVD VIDEO 1 VIDEO 2 VIDEO 3 VIDEO 4 TAPE TUNER CD PHONO DISPLAY MASTER VOLUME PHONES ZONE 2 OFF TONE ZONE 2 LEVEL STEREO TUNING DIMMER MEMORY MODE SETUP RETURN ENTER SETUP MIC LISTENING MODE CLEAR PRESET PRESET TUNING DIGITAL VIDEO 4 INPUT S VIDEO VIDEO L AUDIO ...


