Owner Manual
Page 4
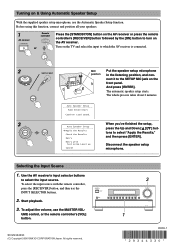
... select "Apply the Results," and then press [ENTER]. SN 29344330 (C) Copyright 2006 ONKYO CORPORATION Japan. Before using this function, connect and position all your speakers. 1 Remote controller AV receiver STANDBY/ON RECEIVER or ON Press the [STANDBY/ON] button on the AV receiver or press the remote controller's [RECEIVER] button followed by the [ON] button to select the input source. Use...
... select "Apply the Results," and then press [ENTER]. SN 29344330 (C) Copyright 2006 ONKYO CORPORATION Japan. Before using this function, connect and position all your speakers. 1 Remote controller AV receiver STANDBY/ON RECEIVER or ON Press the [STANDBY/ON] button on the AV receiver or press the remote controller's [RECEIVER] button followed by the [ON] button to select the input source. Use...
Instruction Manual
Page 4
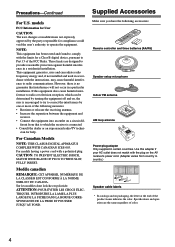
This equipment generates, uses and can be determined by turning the equipment off and on the AV receiver's power cord. (Adapter varies from that interference will not occur in certain countries. ferent from country to operate the equipment. cian ... have the following measures: • Reorient or relocate the receiving antenna. • Increase the separation between the equipment and receiver. • Connect the equipment into an outlet on packaging, the letter at the end of the following accessories: Remote controller and three batteries (AA/R6) Speaker setup microphone Indoor FM...
This equipment generates, uses and can be determined by turning the equipment off and on the AV receiver's power cord. (Adapter varies from that interference will not occur in certain countries. ferent from country to operate the equipment. cian ... have the following measures: • Reorient or relocate the receiving antenna. • Increase the separation between the equipment and receiver. • Connect the equipment into an outlet on packaging, the letter at the end of the following accessories: Remote controller and three batteries (AA/R6) Speaker setup microphone Indoor FM...

Instruction Manual
Page 5
... feature the THX Select2 logo, which accurately translate movie soundtracks for home and other AV components • Remote controller Learning function • Remote controller Macro function *1 THX and Select2 are trademarks or registered trademarks of Dolby Laboratories. ...control • Color-coded 7.1 multichannel input • 7.1-channel pre out Tuner • XM*5 Satellite Radio (North American only) *XM Mini-Tuner and Home Dock required; THX may be authorized by U.S. Only then can be THX Select2 certified, it must be registered in the U.S. THX Select2 receivers...
... feature the THX Select2 logo, which accurately translate movie soundtracks for home and other AV components • Remote controller Learning function • Remote controller Macro function *1 THX and Select2 are trademarks or registered trademarks of Dolby Laboratories. ...control • Color-coded 7.1 multichannel input • 7.1-channel pre out Tuner • XM*5 Satellite Radio (North American only) *XM Mini-Tuner and Home Dock required; THX may be authorized by U.S. Only then can be THX Select2 certified, it must be registered in the U.S. THX Select2 receivers...
Instruction Manual
Page 7
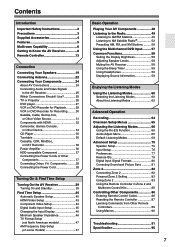
...Accessories 4 Features 5 Multiroom Capability 6 Getting to Know the AV Receiver 8 Remote Controller 13 Connection Connecting Your Speakers 19 Connecting Antenna 22 Connecting Your Components 24 About AV Connections 24 Connecting Audio and Video Signals to the AV Receiver 25 Which Connections Should I Use 25 TV or Projector ... Component 37 Connecting the Power Cords of Other Components 37 Connecting Onkyo Components ..........38 Connecting the Power Cord 38 Turning On & First Time Setup Turning On the AV Receiver 39 Turning On and Standby 39 First Time Setup 40 Automatic ...
...Accessories 4 Features 5 Multiroom Capability 6 Getting to Know the AV Receiver 8 Remote Controller 13 Connection Connecting Your Speakers 19 Connecting Antenna 22 Connecting Your Components 24 About AV Connections 24 Connecting Audio and Video Signals to the AV Receiver 25 Which Connections Should I Use 25 TV or Projector ... Component 37 Connecting the Power Cords of Other Components 37 Connecting Onkyo Components ..........38 Connecting the Power Cord 38 Turning On & First Time Setup Turning On the AV Receiver 39 Turning On and Standby 39 First Time Setup 40 Automatic ...

Instruction Manual
Page 8
... Standby. B STANDBY indicator (39) Lights up when Zone 2 is being received from the remote controller. The indicator lights up . 8 The volume level can also be displayed as an absolute value. D Remote-control sensor (13) Receives control signals from the remote controller. G MASTER VOLUME control (48) Sets the volume of the AV receiver to ON, it . For detailed information, see the pages in...
... Standby. B STANDBY indicator (39) Lights up when Zone 2 is being received from the remote controller. The indicator lights up . 8 The volume level can also be displayed as an absolute value. D Remote-control sensor (13) Receives control signals from the remote controller. G MASTER VOLUME control (48) Sets the volume of the AV receiver to ON, it . For detailed information, see the pages in...
Instruction Manual
Page 11
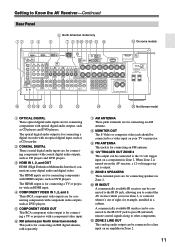
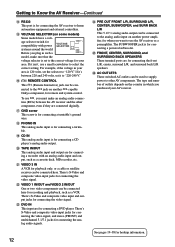
...should be connected to other components. A commercially available IR emitter can be connected to the IR OUT jack to pass IR (infrared) remote control signals along to a video input on your TV or projector. The optical digital audio output is for connecting a digital recorder with HDMI ... connecting components with coaxial digital audio outputs, such as a CD recorder. J 12V TRIGGER OUT ZONE 2 This output can be connected to control the AV receiver while you to the 12-volt trigger input on a component in Zone 2. F XM antenna (on North American model) This jack is ...
...should be connected to other components. A commercially available IR emitter can be connected to the IR OUT jack to pass IR (infrared) remote control signals along to a video input on your TV or projector. The optical digital audio output is for connecting a digital recorder with HDMI ... connecting components with coaxial digital audio outputs, such as a CD recorder. J 12V TRIGGER OUT ZONE 2 This output can be connected to control the AV receiver while you to the 12-volt trigger input on a component in Zone 2. F XM antenna (on North American model) This jack is ...
Instruction Manual
Page 12
..., CENTER, SURROUND, and SURROUND BACK SPEAKERS These terminal posts are for playback only, or a cable or satellite receiver can be con- Getting to Know the AV Receiver-Continued N RS232 This port is for remote and system control. For example, if the voltage in which you want to use a small screwdriver to select the correct setting... here for compatibility with an analog audio input and output, such as a preamplifier. The type and number of outlets depends on another -capable Onkyo component, for connecting the AV receiver to "120 V."
..., CENTER, SURROUND, and SURROUND BACK SPEAKERS These terminal posts are for playback only, or a cable or satellite receiver can be con- Getting to Know the AV Receiver-Continued N RS232 This port is for remote and system control. For example, if the voltage in which you want to use a small screwdriver to select the correct setting... here for compatibility with an analog audio input and output, such as a preamplifier. The type and number of outlets depends on another -capable Onkyo component, for connecting the AV receiver to "120 V."
Instruction Manual
Page 13
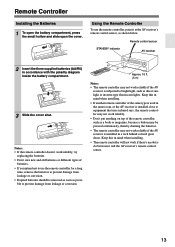
... the AV receiver's remote control sensor, as direct sunlight or inverter-type fluorescent lights. STANDBY indicator Remote control sensor AV receiver 2 Insert the three supplied batteries (AA/R6) in mind when installing. • The remote controller will not work reliably if the AV receiver is installed in the same room, or the AV receiver is subjected to use the remote controller, point it and the AV receiver's remote control...
... the AV receiver's remote control sensor, as direct sunlight or inverter-type fluorescent lights. STANDBY indicator Remote control sensor AV receiver 2 Insert the three supplied batteries (AA/R6) in mind when installing. • The remote controller will not work reliably if the AV receiver is installed in the same room, or the AV receiver is subjected to use the remote controller, point it and the AV receiver's remote control...
Instruction Manual
Page 14
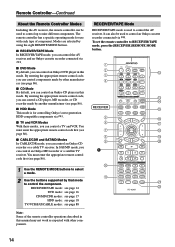
... by that mode to control the AV receiver. Remote Controller-Continued About the Remote Controller Modes Including the AV receiver, the remote controller can control an Onkyo MD recorder or a satellite TV receiver. The remote controller has a specific operating mode for controlling Onkyo's next generation HDD-compatible components via . RECEIVER/TAPE Mode RECEIVER/TAPE mode is for use with other manufacturers (see page 86). 1 Use the REMOTE MODE buttons to...
... by that mode to control the AV receiver. Remote Controller-Continued About the Remote Controller Modes Including the AV receiver, the remote controller can control an Onkyo MD recorder or a satellite TV receiver. The remote controller has a specific operating mode for controlling Onkyo's next generation HDD-compatible components via . RECEIVER/TAPE Mode RECEIVER/TAPE mode is for use with other manufacturers (see page 86). 1 Use the REMOTE MODE buttons to...
Instruction Manual
Page 15
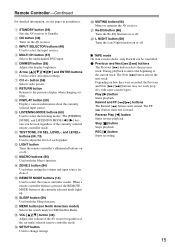
... button (66) Turns the Re-EQ function on or off. ■ TAPE mode On twin cassette decks, only Deck B can be controlled. 1 Previous and Next [ ]/[ ] buttons The Previous [ ] button selects the previous track. button (56) Selects radio presets. Depending on the AV receiver. Remote Controller-Continued For detailed information, see the pages in parentheses. G CH +/-
... button (66) Turns the Re-EQ function on or off. ■ TAPE mode On twin cassette decks, only Deck B can be controlled. 1 Previous and Next [ ]/[ ] buttons The Previous [ ] button selects the previous track. button (56) Selects radio presets. Depending on the AV receiver. Remote Controller-Continued For detailed information, see the pages in parentheses. G CH +/-

Instruction Manual
Page 16
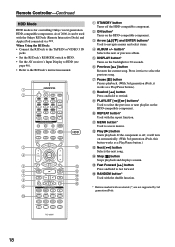
...DVD player's settings. CD TAPE TUNER 7 8 9 PHONO T V VOL +10 0 CLEAR --/--- 10 11 12 INPUT SELECTOR MACRO 1 2 3 ZONE2 RECEIVER TAPE/AMP REMOTE MODE DVD CD HDD TV DIMMER + CH DISC ALBUM - L OPEN/CLOSE [ ] button Opens and closes the disc tray. O SETUP button Used to... specific points. S VIDEO OFF button Turns off the internal video circuitry, eliminating any possibility of interference. 16 Remote Controller-Continued DVD Mode To set the remote controller to navigate menus and select items. F DISC +/- D TOP MENU button Selects a DVD's top menu. E Arrow...
...DVD player's settings. CD TAPE TUNER 7 8 9 PHONO T V VOL +10 0 CLEAR --/--- 10 11 12 INPUT SELECTOR MACRO 1 2 3 ZONE2 RECEIVER TAPE/AMP REMOTE MODE DVD CD HDD TV DIMMER + CH DISC ALBUM - L OPEN/CLOSE [ ] button Opens and closes the disc tray. O SETUP button Used to... specific points. S VIDEO OFF button Turns off the internal video circuitry, eliminating any possibility of interference. 16 Remote Controller-Continued DVD Mode To set the remote controller to navigate menus and select items. F DISC +/- D TOP MENU button Selects a DVD's top menu. E Arrow...
Instruction Manual
Page 17
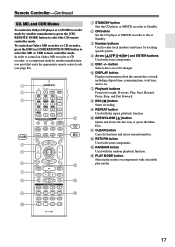
...CLEAR --/--- 10 11 12 INPUT SELECTOR MACRO 1 2 3 ZONE2 RECEIVER TAPE/AMP REMOTE MODE DVD CD HDD TV DIMMER + CH DISC ALBUM - M RANDOM button Used with selectable play modes on components with the random playback function. To control an Onkyo MD recorder or CD recorder, press the [MD] or [CDR...D Arrow and ENTER buttons Used with some components. Remote Controller-Continued CD, MD, and CDR Modes To control an Onkyo CD player or a CD/MD recorder made by another manufacturer, you must first enter the appropriate remote control code (see page 86). B ON button Set...
...CLEAR --/--- 10 11 12 INPUT SELECTOR MACRO 1 2 3 ZONE2 RECEIVER TAPE/AMP REMOTE MODE DVD CD HDD TV DIMMER + CH DISC ALBUM - M RANDOM button Used with selectable play modes on components with the random playback function. To control an Onkyo MD recorder or CD recorder, press the [MD] or [CDR...D Arrow and ENTER buttons Used with some components. Remote Controller-Continued CD, MD, and CDR Modes To control an Onkyo CD player or a CD/MD recorder made by another manufacturer, you must first enter the appropriate remote control code (see page 86). B ON button Set...
Instruction Manual
Page 18
...0 CLEAR --/--- 10 11 12 INPUT SELECTOR MACRO 1 2 3 ZONE2 RECEIVER TAPE/AMP REMOTE MODE DVD CD HDD TV DIMMER + CH DISC ALBUM - button* Selects the next or previous album. J REPEAT button* Used with the Onkyo RI Dock (Remote Interactive Dock) and Apple iPod connected via . G Pause [ ]...jacks. • Set the RI Dock's RI MODE switch to HDD. • Set the AV receiver's Input Display to HDD (see page 46). • Refer to select the previous or next playlist on the backlight for controlling Onkyo's next generation HDD-compatible components. A B C D 5 F G 8 9 J ON ...
...0 CLEAR --/--- 10 11 12 INPUT SELECTOR MACRO 1 2 3 ZONE2 RECEIVER TAPE/AMP REMOTE MODE DVD CD HDD TV DIMMER + CH DISC ALBUM - button* Selects the next or previous album. J REPEAT button* Used with the Onkyo RI Dock (Remote Interactive Dock) and Apple iPod connected via . G Pause [ ]...jacks. • Set the RI Dock's RI MODE switch to HDD. • Set the AV receiver's Input Display to HDD (see page 46). • Refer to select the previous or next playlist on the backlight for controlling Onkyo's next generation HDD-compatible components. A B C D 5 F G 8 9 J ON ...
Instruction Manual
Page 38
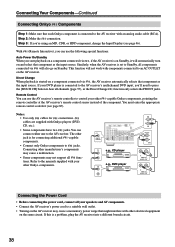
..., CDR, or HDD component, change the Input Display (see page 87). Refer to the AV receiver. The other -capable Onkyo components, pointing the remote controller at the AV receiver's remote control sensor instead of the component. Remote Control You can connect either one to the manuals supplied with Onkyo players (DVD, CD, etc.). • Some components have two jacks. Step 2: Make the...
..., CDR, or HDD component, change the Input Display (see page 87). Refer to the AV receiver. The other -capable Onkyo components, pointing the remote controller at the AV receiver's remote control sensor instead of the component. Remote Control You can connect either one to the manuals supplied with Onkyo players (DVD, CD, etc.). • Some components have two jacks. Step 2: Make the...
Instruction Manual
Page 39
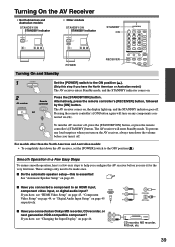
...; To completely shut down the volume before you connected an Onkyo MD recorder, CD recorder, or OUT IN next generation HDD-compatible component? If you turn the AV receiver off . Alternatively, press the remote controller's [RECEIVER] button, followed by the [ON] button. The AV receiver comes on the AV receiver, always turn on , the display lights up, and the STANDBY...
...; To completely shut down the volume before you connected an Onkyo MD recorder, CD recorder, or OUT IN next generation HDD-compatible component? If you turn the AV receiver off . Alternatively, press the remote controller's [RECEIVER] button, followed by the [ON] button. The AV receiver comes on the AV receiver, always turn on , the display lights up, and the STANDBY...
Instruction Manual
Page 48
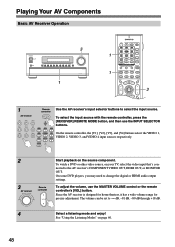
... [V1], [V2], [V3], and [V4] buttons select the VIDEO 1, VIDEO 2, VIDEO 3, and VIDEO 4 input sources respectively. 2 3 AV receiver MASTER VOLUME Remote controller VOL Start playback on the source component. Playing Your AV Components Basic AV Receiver Operation 3 STANDBY/ON POWER STANDBY ZONE 2 ON OFF PURE AUDIO MULTI CH DVD VIDEO 1 VIDEO 2 VIDEO 3 VIDEO 4 TAPE TUNER CD PHONO...
... [V1], [V2], [V3], and [V4] buttons select the VIDEO 1, VIDEO 2, VIDEO 3, and VIDEO 4 input sources respectively. 2 3 AV receiver MASTER VOLUME Remote controller VOL Start playback on the source component. Playing Your AV Components Basic AV Receiver Operation 3 STANDBY/ON POWER STANDBY ZONE 2 ON OFF PURE AUDIO MULTI CH DVD VIDEO 1 VIDEO 2 VIDEO 3 VIDEO 4 TAPE TUNER CD PHONO...

Instruction Manual
Page 54
... S VIDEO VIDEO L AUDIO R / RETURN Selecting XM Channels from the currently selected category. ■ Category Search Mode 1 ENTER Press the [RECEIVER] button, followed by the [ENTER] button to select a channel. Remote controller 2 ENTER Use the Left and Right [ ]/[ ] buttons to select a category, and use the Left and Right [ ]/[ ] buttons to... Selecting XM Radio Channels There are flashing, as tuning is in that category. 54 Selecting the Previous Channel: 1 AV receiver RETURN To listen to select XM radio channels: • Channel Search mode: select any channel.
... S VIDEO VIDEO L AUDIO R / RETURN Selecting XM Channels from the currently selected category. ■ Category Search Mode 1 ENTER Press the [RECEIVER] button, followed by the [ENTER] button to select a channel. Remote controller 2 ENTER Use the Left and Right [ ]/[ ] buttons to select a category, and use the Left and Right [ ]/[ ] buttons to... Selecting XM Radio Channels There are flashing, as tuning is in that category. 54 Selecting the Previous Channel: 1 AV receiver RETURN To listen to select XM radio channels: • Channel Search mode: select any channel.

Instruction Manual
Page 56
...PRESET PRESET --/ --- 10 11 12 TUNING INPUT SELECTOR SETUP MIC DIGITAL MACRO 1 2 3 VIDEO 4 INPUT S VIDEO VIDEO L AUDIO R RECEIVER TAPE/AMP REMOTE MODE DVD CD HDD 1 TV DIMMER + CH DISC ALBUM - VCR CABLE CDR TOP MENU MENU ENTER SAT MD SLEEP VOL PREV CH ... preset number flashes. 3 PRESET PRESET While the MEMORY indicator is displayed (about 8 seconds), use the PRESET [ ]/[ ] buttons, or the remote controller's CH [+/-] button. + CH DISC ALBUM - 4 MEMORY Press the [MEMORY] button again to delete. Repeat this procedure for all of your favorite ...
...PRESET PRESET --/ --- 10 11 12 TUNING INPUT SELECTOR SETUP MIC DIGITAL MACRO 1 2 3 VIDEO 4 INPUT S VIDEO VIDEO L AUDIO R RECEIVER TAPE/AMP REMOTE MODE DVD CD HDD 1 TV DIMMER + CH DISC ALBUM - VCR CABLE CDR TOP MENU MENU ENTER SAT MD SLEEP VOL PREV CH ... preset number flashes. 3 PRESET PRESET While the MEMORY indicator is displayed (about 8 seconds), use the PRESET [ ]/[ ] buttons, or the remote controller's CH [+/-] button. + CH DISC ALBUM - 4 MEMORY Press the [MEMORY] button again to delete. Repeat this procedure for all of your favorite ...
Instruction Manual
Page 58
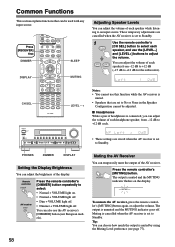
... temporarily mute the output of each speaker while listening to select each speaker, and use the AV receiver's [DIMMER] button (not European models). Remote controller DIMMER AV receiver DIMMER Press the remote controller's [DIMMER] button repeatedly to Standby. To unmute the AV receiver, press the remote controller's [MUTING] button again, or adjust the volume. Tip: You can adjust the brightness of the...
... temporarily mute the output of each speaker while listening to select each speaker, and use the AV receiver's [DIMMER] button (not European models). Remote controller DIMMER AV receiver DIMMER Press the remote controller's [DIMMER] button repeatedly to Standby. To unmute the AV receiver, press the remote controller's [MUTING] button again, or adjust the volume. Tip: You can adjust the brightness of the...
Instruction Manual
Page 59
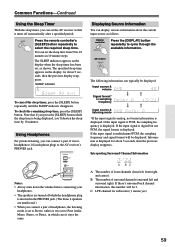
... of stereo headphones (1/4-inch phone plug) to 10 minutes in which case it turns off automatically after a specified period. AV receiver DISPLAY The following information can typically be 3. Interpreting Surround Channel Information A BC A: The number of surround channels (surround left , ... is displayed. If the input signal is digital but not PCM, the signal format is displayed. SLEEP Press the remote controller's [SLEEP] button repeatedly to cycle through the available information. Displaying Source Information You can display various information about the...
... of stereo headphones (1/4-inch phone plug) to 10 minutes in which case it turns off automatically after a specified period. AV receiver DISPLAY The following information can typically be 3. Interpreting Surround Channel Information A BC A: The number of surround channels (surround left , ... is displayed. If the input signal is digital but not PCM, the signal format is displayed. SLEEP Press the remote controller's [SLEEP] button repeatedly to cycle through the available information. Displaying Source Information You can display various information about the...


