Owner Manual
Page 6
...or registered trademarks of SIRIUS Satellite Radio Inc. THX Select2 Plus receivers also feature proprietary THX technologies (e.g., THX Mode) which is your guarantee that is a registered trademark of Onkyo Corporation. THX may be registered in the contiguous United States (... Mode • 192 kHz/24-bit D/A Converters • Powerful and Highly Accurate 32-bit DSP Processing x 2 Connections • 4 HDMI*4 Inputs and 1 Output (ver. 1.3a) • Onkyo for System Control • 6 Digital Inputs (3 Optical / 3 Coaxial) • 5 S-Video Inputs / 2 Outputs • Component ...
...or registered trademarks of SIRIUS Satellite Radio Inc. THX Select2 Plus receivers also feature proprietary THX technologies (e.g., THX Mode) which is your guarantee that is a registered trademark of Onkyo Corporation. THX may be registered in the contiguous United States (... Mode • 192 kHz/24-bit D/A Converters • Powerful and Highly Accurate 32-bit DSP Processing x 2 Connections • 4 HDMI*4 Inputs and 1 Output (ver. 1.3a) • Onkyo for System Control • 6 Digital Inputs (3 Optical / 3 Coaxial) • 5 S-Video Inputs / 2 Outputs • Component ...
Owner Manual
Page 7
...Controller 14 Controlling the AV Receiver/AV Amplifier 15 About Home Theater 16 Enjoying Home Theater 16 Connections Connecting the AV Receiver/AV Amplifier 17 Connecting Your Speakers 17 Bi-amping the Front Speakers 19 Connecting Antenna (TX-SR706 only 20 About AV Connections 22 Connecting ...HDMI 33 Connecting a CD Player or Turntable 35 Connecting a Cassette, CDR, MiniDisc, or DAT Recorder 36 Connecting a Power Amplifier 37 Connecting a Tuner (TX-SA706 only 37 Connecting an RI Dock 38 Connecting Onkyo V Components 39 Connecting the Power Cord 39 Turning On the AV Receiver/AV...
...Controller 14 Controlling the AV Receiver/AV Amplifier 15 About Home Theater 16 Enjoying Home Theater 16 Connections Connecting the AV Receiver/AV Amplifier 17 Connecting Your Speakers 17 Bi-amping the Front Speakers 19 Connecting Antenna (TX-SR706 only 20 About AV Connections 22 Connecting ...HDMI 33 Connecting a CD Player or Turntable 35 Connecting a Cassette, CDR, MiniDisc, or DAT Recorder 36 Connecting a Power Amplifier 37 Connecting a Tuner (TX-SA706 only 37 Connecting an RI Dock 38 Connecting Onkyo V Components 39 Connecting the Power Cord 39 Turning On the AV Receiver/AV...

Owner Manual
Page 10
... of audio input that supports RDS (Radio Data System). K Volume level (54) Displays the volume level. E Tuning indicators (TX-SR706 only) (57) RDS (not North American model) (59): Lights up when tuned to a stereo FM station. TUNED (57... Lights up when the Sleep function has been set to a radio station that 's selected as the audio source: HDMI, ANALOG, or DIGITAL. Front & Rear Panels-Continued Display 12 3 45 67 For detailed information, see the pages...area Displays various information. L MUTING indicator (56) Flashes while the AV receiver/AV amplifier is set in parentheses.
... of audio input that supports RDS (Radio Data System). K Volume level (54) Displays the volume level. E Tuning indicators (TX-SR706 only) (57) RDS (not North American model) (59): Lights up when tuned to a stereo FM station. TUNED (57... Lights up when the Sleep function has been set to a radio station that 's selected as the audio source: HDMI, ANALOG, or DIGITAL. Front & Rear Panels-Continued Display 12 3 45 67 For detailed information, see the pages...area Displays various information. L MUTING indicator (56) Flashes while the AV receiver/AV amplifier is set in parentheses.
Owner Manual
Page 12
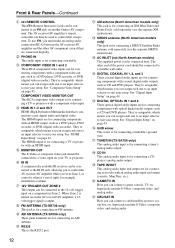
...a DVD player, DVD recorder, or DVR (digital video recorder). J AM ANTENNA (TX-SR706 only) These push terminals are connected digitally. The other AV component, even if they are for connecting components with an HDMI input. Q GND screw This screw is for example, installed in Zone 2. Input ... jack can be connected to an V jack on page 43. See "Component Video Setup" on another Onkyo AV component. The HDMI inputs are for connecting a turntable. See "HDMI Input Setup" on the AV receiver/AV amplifier, a 12volt trigger signal is turned on on page 42. When Zone 2 is output. S CD...
...a DVD player, DVD recorder, or DVR (digital video recorder). J AM ANTENNA (TX-SR706 only) These push terminals are connected digitally. The other AV component, even if they are for connecting components with an HDMI input. Q GND screw This screw is for example, installed in Zone 2. Input ... jack can be connected to an V jack on page 43. See "Component Video Setup" on another Onkyo AV component. The HDMI inputs are for connecting a turntable. See "HDMI Input Setup" on the AV receiver/AV amplifier, a 12volt trigger signal is turned on on page 42. When Zone 2 is output. S CD...
Owner Manual
Page 14
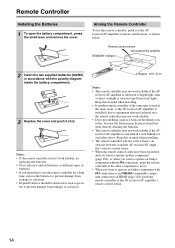
...from leakage or corrosion. nent connected via HDMI (page 104), point the remote controller at the AV receiver/AV amplifier's remote control sensor, as direct sunlight or inverter-type fluorescent lights. Remote control sensor AV receiver/AV amplifier STANDBY indicator 2 Insert the two ...The remote controller will not work reliably if the AV receiver/AV amplifier is subjected to operate an Onkyo component with the polarity diagram inside the battery compartment. 3 Replace the cover and push it at the AV receiver/AV amplifier's remote control sensor. 14 ently, thereby...
...from leakage or corrosion. nent connected via HDMI (page 104), point the remote controller at the AV receiver/AV amplifier's remote control sensor, as direct sunlight or inverter-type fluorescent lights. Remote control sensor AV receiver/AV amplifier STANDBY indicator 2 Insert the two ...The remote controller will not work reliably if the AV receiver/AV amplifier is subjected to operate an Onkyo component with the polarity diagram inside the battery compartment. 3 Replace the cover and push it at the AV receiver/AV amplifier's remote control sensor. 14 ently, thereby...
Owner Manual
Page 22
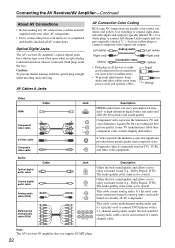
... connect DVD players with your other video equipment. Use white plugs to connect composite video inputs and outputs. HDMI dard- Composite video is the same as for optical. It's the most com- Note: The AV receiver/AV amplifier does not support SCART plugs. 22 This cable carries analog audio. or high-definition digital video...
... connect DVD players with your other video equipment. Use white plugs to connect composite video inputs and outputs. HDMI dard- Composite video is the same as for optical. It's the most com- Note: The AV receiver/AV amplifier does not support SCART plugs. 22 This cable carries analog audio. or high-definition digital video...
Owner Manual
Page 23
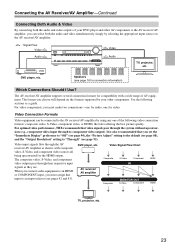
...of the following sections as a guide. MONITOR OUT Composite S-Video Component HDMI TV, projector, etc. 23 For optimal video performance, THX recommends that AV receiver/ AV amplifier input to the AV receiver/AV amplifier, you must assign that video signals pass through the system without upconversion...simultaneously simply by selecting the appropriate input source on the formats supported by using any one for the HDMI output. The AV receiver/AV amplifier supports several connection formats for compatibility with composite Video Signal Flow Chart video, S-Video, and ...
...of the following sections as a guide. MONITOR OUT Composite S-Video Component HDMI TV, projector, etc. 23 For optimal video performance, THX recommends that AV receiver/ AV amplifier input to the AV receiver/AV amplifier, you must assign that video signals pass through the system without upconversion...simultaneously simply by selecting the appropriate input source on the formats supported by using any one for the HDMI output. The AV receiver/AV amplifier supports several connection formats for compatibility with composite Video Signal Flow Chart video, S-Video, and ...
Owner Manual
Page 24
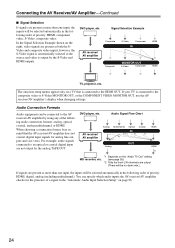
...is output by the analog TAPE OUT. AV receiver/ AV amplifier Analog Multichannel Optical IN Coaxial Analog OUT HDMI HDMI MD recorder, etc. *1 Depends on page 96. 24 In the Signal Selection Example shown on a TV that the AV receiver/AV amplifier does not convert digital input signals for... the presence of a signal in the following order of priority: HDMI, digital, analog (including multichannel). Audio Connection Formats Audio equipment can specify which audio inputs the AV receiver/AV amplifier checks for analog line outputs and vice versa. For example, audio ...
...is output by the analog TAPE OUT. AV receiver/ AV amplifier Analog Multichannel Optical IN Coaxial Analog OUT HDMI HDMI MD recorder, etc. *1 Depends on page 96. 24 In the Signal Selection Example shown on a TV that the AV receiver/AV amplifier does not convert digital input signals for... the presence of a signal in the following order of priority: HDMI, digital, analog (including multichannel). Audio Connection Formats Audio equipment can specify which audio inputs the AV receiver/AV amplifier checks for analog line outputs and vice versa. For example, audio ...
Owner Manual
Page 25
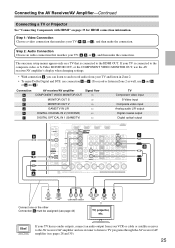
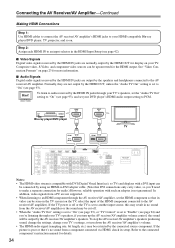
The onscreen setup menus appear only on page 33 for HDMI connection information. Hint! Connecting the AV Receiver/AV Amplifier-Continued Connecting a TV or Projector See "Connecting Components with HDMI" on a TV that matches your TV ( a , b , or c ), and then make the connection. Step 2: Audio ...can listen to and record audio from your VCR or cable or satellite receiver to TV programs through the AV receiver/AV amplifier (see page 44) TV, projector, etc. If your TV is connected to the HDMI OUT. Step 1: Video Connection Choose a video connection that matches your ...
The onscreen setup menus appear only on page 33 for HDMI connection information. Hint! Connecting the AV Receiver/AV Amplifier-Continued Connecting a TV or Projector See "Connecting Components with HDMI" on a TV that matches your TV ( a , b , or c ), and then make the connection. Step 2: Audio ...can listen to and record audio from your VCR or cable or satellite receiver to TV programs through the AV receiver/AV amplifier (see page 44) TV, projector, etc. If your TV is connected to the HDMI OUT. Step 1: Video Connection Choose a video connection that matches your ...
Owner Manual
Page 26
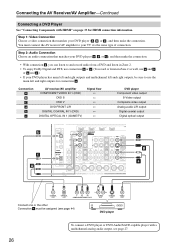
... OPTICAL OUT Y PB PR COMPONENT VIDEO OUT L R AUDIO OUT S VIDEO OUT VIDEO OUT Connect one or the other Connection c must connect the AV receiver/AV amplifier to and record audio from a DVD and listen in Zone 2. • To enjoy Dolby Digital and DTS, use connection b or c ...and c .) • If your DVD player has main left and right outputs and multichannel left and right outputs for HDMI connection information. Connecting the AV Receiver/AV Amplifier-Continued Connecting a DVD Player See "Connecting Components with a multichannel analog audio output, see page 44) DVD player ...
... OPTICAL OUT Y PB PR COMPONENT VIDEO OUT L R AUDIO OUT S VIDEO OUT VIDEO OUT Connect one or the other Connection c must connect the AV receiver/AV amplifier to and record audio from a DVD and listen in Zone 2. • To enjoy Dolby Digital and DTS, use connection b or c ...and c .) • If your DVD player has main left and right outputs and multichannel left and right outputs for HDMI connection information. Connecting the AV Receiver/AV Amplifier-Continued Connecting a DVD Player See "Connecting Components with a multichannel analog audio output, see page 44) DVD player ...
Owner Manual
Page 27
...output from HDMI OUT or analog audio output, only the front L/R channels will be output. If your DVD player supports multichannel audio formats such as DVD-Audio or SACD, and it has a multichannel analog audio output, you can connect it to the AV receiver/AV amplifier's ...multichannel DVD input. Use a multichannel analog audio cable, or several normal audio cables, to connect the AV receiver/AV amplifier's DVD FRONT L/R, CENTER, SURR L/R, SURR BACK L/R, and SUBWOOFER jacks to the...
...output from HDMI OUT or analog audio output, only the front L/R channels will be output. If your DVD player supports multichannel audio formats such as DVD-Audio or SACD, and it has a multichannel analog audio output, you can connect it to the AV receiver/AV amplifier's ...multichannel DVD input. Use a multichannel analog audio cable, or several normal audio cables, to connect the AV receiver/AV amplifier's DVD FRONT L/R, CENTER, SURR L/R, SURR BACK L/R, and SUBWOOFER jacks to the...
Owner Manual
Page 33
...NEC, and Silicon Image, this open industry group's objective is to the AV receiver/AV amplifier via HDMI must also support HDMI output of the above audio formats. About Copyright Protection The AV receiver/AV amplifier supports HDCP (High-bandwidth Digital Content Protection)*2, a copy-protection system ...Digital Visual Interface): The digital display interface standard set -top boxes, and other video components. Connecting the AV Receiver/AV Amplifier-Continued Connecting Components with HDMI About HDMI Designed to 7.1 ch, 32-192 kHz, 16/20/24 bit) • Bitstream (DSD, Dolby Digital...
...NEC, and Silicon Image, this open industry group's objective is to the AV receiver/AV amplifier via HDMI must also support HDMI output of the above audio formats. About Copyright Protection The AV receiver/AV amplifier supports HDCP (High-bandwidth Digital Content Protection)*2, a copy-protection system ...Digital Visual Interface): The digital display interface standard set -top boxes, and other video components. Connecting the AV Receiver/AV Amplifier-Continued Connecting Components with HDMI About HDMI Designed to 7.1 ch, 32-192 kHz, 16/20/24 bit) • Bitstream (DSD, Dolby Digital...
Owner Manual
Page 34
... the AV Receiver/AV Amplifier-Continued Making HDMI Connections Step 1: Use HDMI cables to connect the AV receiver/AV amplifier's HDMI jacks to your TV's speakers, if you turn down the AV receiver/AV amplifier's volume. • The HDMI audio signal (sampling rate, bit length, etc.) may be upconverted for details. 34 Hint! To listen to audio received by the HDMI IN jacks through the AV receiver/AV...
... the AV Receiver/AV Amplifier-Continued Making HDMI Connections Step 1: Use HDMI cables to connect the AV receiver/AV amplifier's HDMI jacks to your TV's speakers, if you turn down the AV receiver/AV amplifier's volume. • The HDMI audio signal (sampling rate, bit length, etc.) may be upconverted for details. 34 Hint! To listen to audio received by the HDMI IN jacks through the AV receiver/AV...
Owner Manual
Page 40
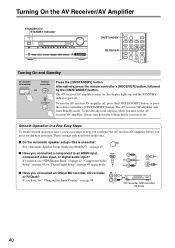
... operation, here's a few easy steps to help you configure the AV receiver/AV amplifier before you turn down the volume before you connected an Onkyo MD recorder, CD recorder, or RI Dock? To turn on page 48. These settings only need to an HDMI input, HDMI component video input, or digital audio input? Alternatively, press the...
... operation, here's a few easy steps to help you configure the AV receiver/AV amplifier before you turn down the volume before you connected an Onkyo MD recorder, CD recorder, or RI Dock? To turn on page 48. These settings only need to an HDMI input, HDMI component video input, or digital audio input? Alternatively, press the...

Owner Manual
Page 41
.... The setting item appears on a TV that is selected, the selected items will appear in the Onscreen Setup Menus is connected to the HDMI OUT. Lock Setup Display 2 Use the Up and Down [R]/[X] but - menu. The onscreen setup menus appear only on the display. Listening...lowed by the [SETUP] button. 2 2 The submenu item appears on the display. 1 Using the Onscreen Setup Menus Carry out the settings for the AV receiver/AV amplifier by the [SETUP] button. Hardware Setup 8. Input Assign 2. Onscreen Setup Menus and Display As each item in the Display. Press the [SETUP...
.... The setting item appears on a TV that is selected, the selected items will appear in the Onscreen Setup Menus is connected to the HDMI OUT. Lock Setup Display 2 Use the Up and Down [R]/[X] but - menu. The onscreen setup menus appear only on the display. Listening...lowed by the [SETUP] button. 2 2 The submenu item appears on the display. 1 Using the Onscreen Setup Menus Carry out the settings for the AV receiver/AV amplifier by the [SETUP] button. Hardware Setup 8. Input Assign 2. Onscreen Setup Menus and Display As each item in the Display. Press the [SETUP...
Owner Manual
Page 42
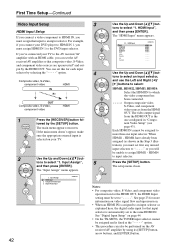
...• This procedure can set first any unused input selectors to or you will be performed on the AV receiver/AV amplifier by the HDMI OUT. Each HDMI IN cannot be set to the same HDMI IN. HDMI4 to the DVD input selector. Notes: • For composite video, S-Video, and component... video upconversion for more than one configured in the Step 3 illus- The "HDMI Input" menu appears. 1-1. The setup menu closes. See "Digital Input Setup" on page 44. • On the TX-SR706, the TUNER input selector cannot be assigned and is assigned to an input selector as...
...• This procedure can set first any unused input selectors to or you will be performed on the AV receiver/AV amplifier by the HDMI OUT. Each HDMI IN cannot be set to the same HDMI IN. HDMI4 to the DVD input selector. Notes: • For composite video, S-Video, and component... video upconversion for more than one configured in the Step 3 illus- The "HDMI Input" menu appears. 1-1. The setup menu closes. See "Digital Input Setup" on page 44. • On the TX-SR706, the TUNER input selector cannot be assigned and is assigned to an input selector as...

Owner Manual
Page 43
For example, if you connect your TV. 2 Use the Up and Down [R]/[X] but - Input Assign 1. HDMI Input 2. First Time Setup-Continued Component Video Setup If you connect to a COMPONENT VIDEO IN, you should assign it to an input selector....AUX TAPE TUNER (TX-SA706 only) CD PHONO Default assignment IN1 ----IN2 1 Press the [RECEIVER] button fol- lowed by using the HDMI OUT, rather than the COMPONENT VIDEO MONITOR OUT, for the out- If the main menu doesn't appear, make sure the appropriate external input is selected on the AV receiver/AV amplifier by the...
For example, if you connect your TV. 2 Use the Up and Down [R]/[X] but - Input Assign 1. HDMI Input 2. First Time Setup-Continued Component Video Setup If you connect to a COMPONENT VIDEO IN, you should assign it to an input selector....AUX TAPE TUNER (TX-SA706 only) CD PHONO Default assignment IN1 ----IN2 1 Press the [RECEIVER] button fol- lowed by using the HDMI OUT, rather than the COMPONENT VIDEO MONITOR OUT, for the out- If the main menu doesn't appear, make sure the appropriate external input is selected on the AV receiver/AV amplifier by the...
Owner Manual
Page 44
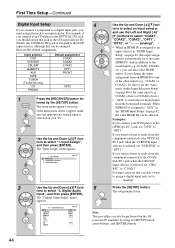
... press [ENTER]. If you want to listen to audio from the front panel terminals. Note: This procedure can also be performed on the AV receiver/AV amplifier by the [SETUP] button. IAL IN 1 jack when the CBL/SAT input selector is assigned to an input selector. First Time Setup...AUX" in the "HDMI Input Setup" on page 42, the same HDMI IN can be selected. Input selector DVD VCR/DVR CBL/SAT GAME/TV AUX TAPE TUNER (TX-SA706 only) CD PHONO Default assignment COAX1 COAX2 COAX3 OPT1 FRONT ----- ----- OPT2 ----- 1 Press the [RECEIVER] button fol- When HDMI IN is selected, ...
... press [ENTER]. If you want to listen to audio from the front panel terminals. Note: This procedure can also be performed on the AV receiver/AV amplifier by the [SETUP] button. IAL IN 1 jack when the CBL/SAT input selector is assigned to an input selector. First Time Setup...AUX" in the "HDMI Input Setup" on page 42, the same HDMI IN can be selected. Input selector DVD VCR/DVR CBL/SAT GAME/TV AUX TAPE TUNER (TX-SA706 only) CD PHONO Default assignment COAX1 COAX2 COAX3 OPT1 FRONT ----- ----- OPT2 ----- 1 Press the [RECEIVER] button fol- When HDMI IN is selected, ...

Owner Manual
Page 47
...button, arrow buttons, and [ENTER] button. 2 Use the Up and Down [R]/[X] but - Note that when this setting is selected on the AV receiver/AV amplifier by the [SETUP] button. If the main menu doesn't appear, make sure the appropriate external input is changed, all radio presets are...area. The setup menu closes. Tuner 4. The "Hardware Setup" menu appears. 7. tons to select "7. Hardware Setup", and then press [ENTER]. Zone2 3. HDMI 3 Use the Up and Down [R]/[X] but - Tuner", and then press [ENTER]. Note: This procedure can also be performed on your TV. 5 Press ...
...button, arrow buttons, and [ENTER] button. 2 Use the Up and Down [R]/[X] but - Note that when this setting is selected on the AV receiver/AV amplifier by the [SETUP] button. If the main menu doesn't appear, make sure the appropriate external input is changed, all radio presets are...area. The setup menu closes. Tuner 4. The "Hardware Setup" menu appears. 7. tons to select "7. Hardware Setup", and then press [ENTER]. Zone2 3. HDMI 3 Use the Up and Down [R]/[X] but - Tuner", and then press [ENTER]. Note: This procedure can also be performed on your TV. 5 Press ...
Owner Manual
Page 49
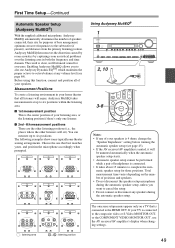
...use Audyssey Dynamic EQTM, which maintains the proper octave-to-octave balance at up to the HDMI OUT. If your speakers is connected. • It takes about 15 minutes to also use the AV receiver/AV amplifier's display when changing settings. 49 Choose the one listener. ■ 2nd−6th... can measure up to cancel the setup. • Do not connect or disconnect any volume level (see page 45). • If the AV receiver/AV amplifier is muted, it will be unmuted automatically when the automatic speaker setup starts. • Automatic speaker setup cannot be performed while a pair...
...use Audyssey Dynamic EQTM, which maintains the proper octave-to-octave balance at up to the HDMI OUT. If your speakers is connected. • It takes about 15 minutes to also use the AV receiver/AV amplifier's display when changing settings. 49 Choose the one listener. ■ 2nd−6th... can measure up to cancel the setup. • Do not connect or disconnect any volume level (see page 45). • If the AV receiver/AV amplifier is muted, it will be unmuted automatically when the automatic speaker setup starts. • Automatic speaker setup cannot be performed while a pair...


