Owner Manual
Page 1
Please read this manual thoroughly before making connections and plugging in this manual for purchasing the Onkyo AV Receiver. Please retain this manual will enable you for future reference. Following the instructions in the unit. Remote controller 63 Appendix 76 Contents AV Receiver TX-SR700/700E TX-SR600/600E Instruction Manual Before using 2 Facilities and connections 8 Setup and operation 36 Thank you to obtain optimum performance and listening enjoyment from your new AV Receiver.
Please read this manual thoroughly before making connections and plugging in this manual for purchasing the Onkyo AV Receiver. Please retain this manual will enable you for future reference. Following the instructions in the unit. Remote controller 63 Appendix 76 Contents AV Receiver TX-SR700/700E TX-SR600/600E Instruction Manual Before using 2 Facilities and connections 8 Setup and operation 36 Thank you to obtain optimum performance and listening enjoyment from your new AV Receiver.
Owner Manual
Page 4
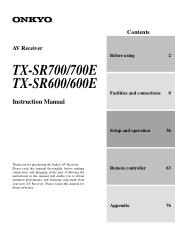
... voltage selector (Worldwide models only 7 Installing the remote controller batteries 7 Using the remote controller 7 Facilities and connections Front panel facilities 8 Front panel 8 Front panel display 11 Remote controller 12 Connections 14 Connections (TX-SR700/700E 16 Connecting your audio components 16 Connecting your...Operating components not reached by the remote controller signals (IR IN) (TX-SR700/ 700E only 22 If the remote controller signal does not reach the TXSR700/700E remote sensor 22 Connecting the remote zone (Zone 2) speakers (TX-SR700/700E only 23 When using the...
... voltage selector (Worldwide models only 7 Installing the remote controller batteries 7 Using the remote controller 7 Facilities and connections Front panel facilities 8 Front panel 8 Front panel display 11 Remote controller 12 Connections 14 Connections (TX-SR700/700E 16 Connecting your audio components 16 Connecting your...Operating components not reached by the remote controller signals (IR IN) (TX-SR700/ 700E only 22 If the remote controller signal does not reach the TXSR700/700E remote sensor 22 Connecting the remote zone (Zone 2) speakers (TX-SR700/700E only 23 When using the...
Owner Manual
Page 5
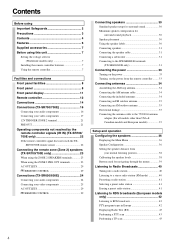
... 82110 GERMERING, GERMANY declare in own responsibility, that the ONKYO product described in this instruction manual is in the remote zone (TX-SR700/700E only 60 Using the buttons on the TX-SR700/700E 60 Using the remote controller 60 Adjusting the volume for the remote zone 60 Recording a source (TX-SR700/700E 61 To record the input source signal you...
... 82110 GERMERING, GERMANY declare in own responsibility, that the ONKYO product described in this instruction manual is in the remote zone (TX-SR700/700E only 60 Using the buttons on the TX-SR700/700E 60 Using the remote controller 60 Adjusting the volume for the remote zone 60 Recording a source (TX-SR700/700E 61 To record the input source signal you...
Owner Manual
Page 7
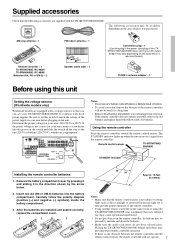
... corrosion, remove the batteries if the remote controller will not operate. 7 Placing the TX-SR700/700E/600/600E behind such doors may prevent proper remote controller operation. • If there is any obstacle between the remote controller and the remote control sensor, the remote controller will not be used for your area...220-230 V Notes: • Do not mix new batteries with two new AA batteries. AM loop antenna × 1 RC-482M Remote controller × 1 TX-SR700/700E: RC-482M TX-SR600/600E: RC-480M Batteries (AA, R6 or UM-3) × 2 Front Left Front Left SP-B / Zone 2 Left SP-B...
... corrosion, remove the batteries if the remote controller will not operate. 7 Placing the TX-SR700/700E/600/600E behind such doors may prevent proper remote controller operation. • If there is any obstacle between the remote controller and the remote control sensor, the remote controller will not be used for your area...220-230 V Notes: • Do not mix new batteries with two new AA batteries. AM loop antenna × 1 RC-482M Remote controller × 1 TX-SR700/700E: RC-482M TX-SR600/600E: RC-480M Batteries (AA, R6 or UM-3) × 2 Front Left Front Left SP-B / Zone 2 Left SP-B...
Owner Manual
Page 9
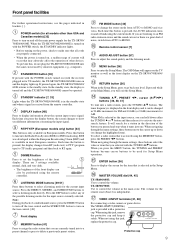
...off and the TX-SR700/700E/600/600E cannot be changed in stereo and the sound cuts out or there is selected as the front display on European models. Note: During playback of the front display can hold down (or change the stereo mode from the remote controller. Each time this... from AUTO to be performed using the remote controller. ENTER button [36] Press to make sure that is turned on and off the main power supply for all cords are currently tuned into a radio station, press the TUNING / buttons. POWER switch (for the TX-SR700/ 700E/600/600E. STANDBY/ON button ...
...off and the TX-SR700/700E/600/600E cannot be changed in stereo and the sound cuts out or there is selected as the front display on European models. Note: During playback of the front display can hold down (or change the stereo mode from the remote controller. Each time this... from AUTO to be performed using the remote controller. ENTER button [36] Press to make sure that is turned on and off the main power supply for all cords are currently tuned into a radio station, press the TUNING / buttons. POWER switch (for the TX-SR700/ 700E/600/600E. STANDBY/ON button ...
Owner Manual
Page 12
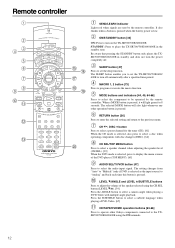
...to select the component to turn on the TX-SR700/700E/600/600E. Remote controller 12 SEND/LEARN indicator Lights red when signals are sent by the remote controller. MACRO 1, 2 button [73] Press to set the TX-SR700/700E/600/ 600E to be operated by the remote controller. Press the SUBTITLE button to select a ... , DISC button Press to select a preset channel for 8 seconds. When a MODE button is pressed, it will also light whenever any other Onkyo components connected to the TXSR700/700E/600/600E using the CH SEL button (LEVEL / ). [39] Press the ANGLE button to display the menu...
...to select the component to turn on the TX-SR700/700E/600/600E. Remote controller 12 SEND/LEARN indicator Lights red when signals are sent by the remote controller. MACRO 1, 2 button [73] Press to set the TX-SR700/700E/600/ 600E to be operated by the remote controller. Press the SUBTITLE button to select a ... , DISC button Press to select a preset channel for 8 seconds. When a MODE button is pressed, it will also light whenever any other Onkyo components connected to the TXSR700/700E/600/600E using the CH SEL button (LEVEL / ). [39] Press the ANGLE button to display the menu...
Owner Manual
Page 13
...of the remote controller. TEST/MENU button This button is selected, press to find the specific section on a DVD where you can select a listening mode. [51] Note: During playback of the TXSR700/700E/600/600E. ZONE 2/SEARCH/ENTER button When the DVD mode is used with the TX-SR700/700E. ...Same as the input selector buttons on the remote zone (ZONE 2) (not used to adjust the volume. There are three settings available: normal, dark, and very dark...
...of the remote controller. TEST/MENU button This button is selected, press to find the specific section on a DVD where you can select a listening mode. [51] Note: During playback of the TXSR700/700E/600/600E. ZONE 2/SEARCH/ENTER button When the DVD mode is used with the TX-SR700/700E. ...Same as the input selector buttons on the remote zone (ZONE 2) (not used to adjust the volume. There are three settings available: normal, dark, and very dark...
Owner Manual
Page 15
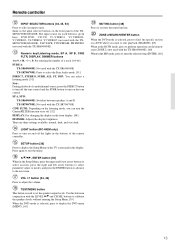
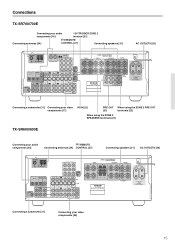
...PRE OUT [21] terminals [23] When using the ZONE 2 SPEAKERS terminals [23] TX-SR600/600E Connecting your audio components [16] 12V TRIGGER ZONE 2 terminal [21] Connecting antennas [34] REMOTE CONTROL [27] Connecting speakers [31] AC OUTLETS [26] ANTENNA FM AM 75 GND R...R FRONT SURROUND CENTER L ZONE 2 L SURROUND BACK SPEAKER PRE OUT R R AV RECEIVER MODEL NO. Connections TX-SR700/700E Connecting your audio components [24] REMOTE Connecting antennas [34] CONTROL [27] Connecting speakers [31] AC OUTLETS [26] ANTENNA FM AM 75 DIGITAL INPUT OPTICAL 2 1 DIGITAL ...
...PRE OUT [21] terminals [23] When using the ZONE 2 SPEAKERS terminals [23] TX-SR600/600E Connecting your audio components [16] 12V TRIGGER ZONE 2 terminal [21] Connecting antennas [34] REMOTE CONTROL [27] Connecting speakers [31] AC OUTLETS [26] ANTENNA FM AM 75 GND R...R FRONT SURROUND CENTER L ZONE 2 L SURROUND BACK SPEAKER PRE OUT R R AV RECEIVER MODEL NO. Connections TX-SR700/700E Connecting your audio components [24] REMOTE Connecting antennas [34] CONTROL [27] Connecting speakers [31] AC OUTLETS [26] ANTENNA FM AM 75 DIGITAL INPUT OPTICAL 2 1 DIGITAL ...
Owner Manual
Page 17
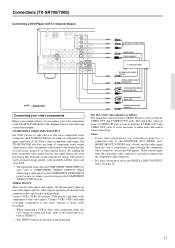
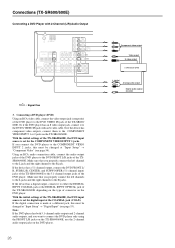
...connecting a VCR or other video component, make both video and S video connections. Notes: • If your television to the TX-SR700/700E. Connections (TX-SR700/700E) Connecting a DVD Player with incredibly lifelike colors and crisp detail. • The signal that comes in from COMPONENT VIDEO ... VIDEO INPUT 2 INPUT 1 OUTPUT Y PB DIGITAL INPUT OPTICAL 2 1 DIGITAL VIDEO 3 OUTPUT COAXIAL IN OPTICAL VIDEO 2 OUT IN VIDEO 1 OUT IN REMOTE CONTROL PR DVD IN MONITOR OUT V ZONE 2 12 V TRIGGE OUT SUBWOOFER PRE OUT IN L R CD COAXIAL DIGITAL INPUT OUT IN IN OUT IN TAPE...
...connecting a VCR or other video component, make both video and S video connections. Notes: • If your television to the TX-SR700/700E. Connections (TX-SR700/700E) Connecting a DVD Player with incredibly lifelike colors and crisp detail. • The signal that comes in from COMPONENT VIDEO ... VIDEO INPUT 2 INPUT 1 OUTPUT Y PB DIGITAL INPUT OPTICAL 2 1 DIGITAL VIDEO 3 OUTPUT COAXIAL IN OPTICAL VIDEO 2 OUT IN VIDEO 1 OUT IN REMOTE CONTROL PR DVD IN MONITOR OUT V ZONE 2 12 V TRIGGE OUT SUBWOOFER PRE OUT IN L R CD COAXIAL DIGITAL INPUT OUT IN IN OUT IN TAPE...
Owner Manual
Page 22
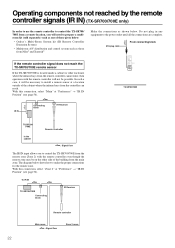
...; Onkyo's Multi-Room System kit (IR Remote Controller Extension System) • Multiroom A/V distribution and control system such as shown below shows how to make the proper connections for the remote zone. Mini plug cable From connecting block REMOTE CONTROL ZONE 2 12 V TRIGGER OUT IR IN TX-SR700/700E IR IN Connecting block IR Receiver TX-SR700 /700E In the cabinet Remote Controller : Signal...
...; Onkyo's Multi-Room System kit (IR Remote Controller Extension System) • Multiroom A/V distribution and control system such as shown below shows how to make the proper connections for the remote zone. Mini plug cable From connecting block REMOTE CONTROL ZONE 2 12 V TRIGGER OUT IR IN TX-SR700/700E IR IN Connecting block IR Receiver TX-SR700 /700E In the cabinet Remote Controller : Signal...

Owner Manual
Page 23
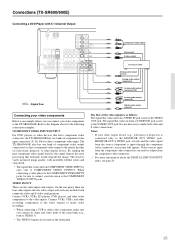
The diagram below shows how to control the TX-SR700/700E from the remote zone (Zone 2) with the remote controller even though the remote zone is physically separated. Main Room Remote Zone (Zone 2) Zone 2 Left speaker Zone 2 Right speaker When using the ZONE 2 PRE OUT terminals If you are using a 5.1-channel speaker system in the main ...
The diagram below shows how to control the TX-SR700/700E from the remote zone (Zone 2) with the remote controller even though the remote zone is physically separated. Main Room Remote Zone (Zone 2) Zone 2 Left speaker Zone 2 Right speaker When using the ZONE 2 PRE OUT terminals If you are using a 5.1-channel speaker system in the main ...
Owner Manual
Page 25
... sources input from the component video connectors can connect your video output device (e.g., television or projector) is connected only to the TX-SR600/600E. Connect VCRs, VTRs, and other recording components to the video outputs to make both to COMPONENT VIDEO OUTPUT. The... INPUT OPTICAL 2 1 DIGITAL DIGITAL OUTPUT INPUT OPTICAL COAXIAL COMPONENT VIDEO INPUT 2 INPUT 1 OUTPUT Y VIDEO 3 VIDEO 2 VIDEO 1 IN IN OUT IN PB REMOTE CONTROL PR DVD MONITOR IN OUT VIDEO CD IN L SUBWOOFER PRE OUT R TAPE OUT IN S VIDEO IN IN OUT IN FRONT SURR CENTER L L R VIDEO...
... sources input from the component video connectors can connect your video output device (e.g., television or projector) is connected only to the TX-SR600/600E. Connect VCRs, VTRs, and other recording components to the video outputs to make both to COMPONENT VIDEO OUTPUT. The... INPUT OPTICAL 2 1 DIGITAL DIGITAL OUTPUT INPUT OPTICAL COAXIAL COMPONENT VIDEO INPUT 2 INPUT 1 OUTPUT Y VIDEO 3 VIDEO 2 VIDEO 1 IN IN OUT IN PB REMOTE CONTROL PR DVD MONITOR IN OUT VIDEO CD IN L SUBWOOFER PRE OUT R TAPE OUT IN S VIDEO IN IN OUT IN FRONT SURR CENTER L L R VIDEO...
Owner Manual
Page 26
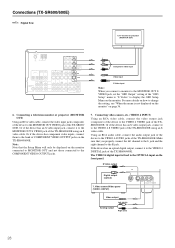
... INPUT OPTICAL 2 1 DIGITAL DIGITAL OUTPUT INPUT OPTICAL COAXIAL COMPONENT VIDEO INPUT 2 INPUT 1 OUTPUT Y VIDEO 3 VIDEO 2 VIDEO 1 IN IN OUT IN PB REMOTE CONTROL PR DVD MONITOR IN OUT VIDEO CD IN L SUBWOOFER PRE OUT R TAPE OUT IN S VIDEO IN IN OUT IN FRONT SURR CENTER L L R VIDEO ...R jacks. If the device has a 5.1-channel output, connect the DVD FRONT L/ R, SURR L/R, CENTER, and SUBWOOFER (5.1-channel input) jacks of the TX-SR600/600E to the COMPONENT VIDEO INPUT 2 jacks, this must be changed at "Input Setup" → "Digital Input" (see page 54). Make ...
... INPUT OPTICAL 2 1 DIGITAL DIGITAL OUTPUT INPUT OPTICAL COAXIAL COMPONENT VIDEO INPUT 2 INPUT 1 OUTPUT Y VIDEO 3 VIDEO 2 VIDEO 1 IN IN OUT IN PB REMOTE CONTROL PR DVD MONITOR IN OUT VIDEO CD IN L SUBWOOFER PRE OUT R TAPE OUT IN S VIDEO IN IN OUT IN FRONT SURR CENTER L L R VIDEO ...R jacks. If the device has a 5.1-channel output, connect the DVD FRONT L/ R, SURR L/R, CENTER, and SUBWOOFER (5.1-channel input) jacks of the TX-SR600/600E to the COMPONENT VIDEO INPUT 2 jacks, this must be changed at "Input Setup" → "Digital Input" (see page 54). Make ...
Owner Manual
Page 28
...TX-SR600/600E. The VIDEO 4 digital input is not displayed on the monitor" on page 36. 6. TV monitor or projector (MONITOR OUT) ANTENNA FM AM 75 DIGITAL INPUT OPTICAL 2 1 DIGITAL DIGITAL OUTPUT INPUT OPTICAL COAXIAL COMPONENT VIDEO INPUT 2 INPUT 1 OUTPUT Y VIDEO 3 VIDEO 2 VIDEO 1 IN IN OUT IN PB REMOTE CONTROL... jack of the TXSR600/600E. If the device has an optical digital output, connect it to the VIDEO 4 VIDEO jack of the TX-SR600/600E. Video camera/Video game (VIDEO 4 INPUT) Video output Left (white) Analog output Right (red) 28 Connecting video camera...
...TX-SR600/600E. The VIDEO 4 digital input is not displayed on the monitor" on page 36. 6. TV monitor or projector (MONITOR OUT) ANTENNA FM AM 75 DIGITAL INPUT OPTICAL 2 1 DIGITAL DIGITAL OUTPUT INPUT OPTICAL COAXIAL COMPONENT VIDEO INPUT 2 INPUT 1 OUTPUT Y VIDEO 3 VIDEO 2 VIDEO 1 IN IN OUT IN PB REMOTE CONTROL... jack of the TXSR600/600E. If the device has an optical digital output, connect it to the VIDEO 4 VIDEO jack of the TX-SR600/600E. Video camera/Video game (VIDEO 4 INPUT) Video output Left (white) Analog output Right (red) 28 Connecting video camera...
Owner Manual
Page 29
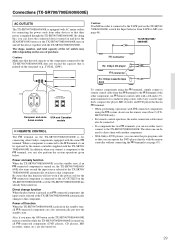
... the AC outlets may differ depending on . AC 230-240V 50 Hz SWITCHED TOTAL 100W MAX. TX-SR700/700E/ 600/600E REMOTE CONTROL connector Ex: Onkyo CD player connector Ex: Onkyo cassette tape deck To connect components using the system, do not use either one can be operated... by the remote controller supplied with the remote controller without connecting the terminals (see page 46). Connections (TX-SR700/700E/600/600E) AC OUTLETS The TX-SR700/700E/600/600E is equipped with AC mains outlets for connecting other Onkyo components equipped with the same terminal. ...
... the AC outlets may differ depending on . AC 230-240V 50 Hz SWITCHED TOTAL 100W MAX. TX-SR700/700E/ 600/600E REMOTE CONTROL connector Ex: Onkyo CD player connector Ex: Onkyo cassette tape deck To connect components using the system, do not use either one can be operated... by the remote controller supplied with the remote controller without connecting the terminals (see page 46). Connections (TX-SR700/700E/600/600E) AC OUTLETS The TX-SR700/700E/600/600E is equipped with AC mains outlets for connecting other Onkyo components equipped with the same terminal. ...

Owner Manual
Page 32
... 1 DIGITAL VIDEO 3 OUTPUT COAXIAL IN OPTICAL VIDEO 2 OUT IN VIDEO 1 OUT IN DVD IN REMOTE PR CONTROL MONITOR OUT V R ZONE 2 12 V TRIGGER OUT SUBWOOFER PRE OUT IN L R CD COAXIAL...TX-SR700/700E Front right speaker Center speaker Front left B speaker B speaker 32 Subwoofer Surround right speaker Surround back speaker Surround left speaker TX-SR600/600E Front right A speaker Center speaker Front left A speaker ANTENNA FM AM 75 DIGITAL INPUT OPTICAL 2 1 DIGITAL DIGITAL OUTPUT INPUT OPTICAL COAXIAL COMPONENT VIDEO INPUT 2 INPUT 1 OUTPUT Y L PB REMOTE CONTROL...
... 1 DIGITAL VIDEO 3 OUTPUT COAXIAL IN OPTICAL VIDEO 2 OUT IN VIDEO 1 OUT IN DVD IN REMOTE PR CONTROL MONITOR OUT V R ZONE 2 12 V TRIGGER OUT SUBWOOFER PRE OUT IN L R CD COAXIAL...TX-SR700/700E Front right speaker Center speaker Front left B speaker B speaker 32 Subwoofer Surround right speaker Surround back speaker Surround left speaker TX-SR600/600E Front right A speaker Center speaker Front left A speaker ANTENNA FM AM 75 DIGITAL INPUT OPTICAL 2 1 DIGITAL DIGITAL OUTPUT INPUT OPTICAL COAXIAL COMPONENT VIDEO INPUT 2 INPUT 1 OUTPUT Y L PB REMOTE CONTROL...
Owner Manual
Page 33
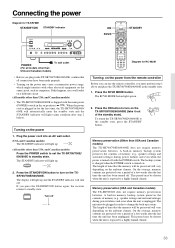
...Canadian models) The TX-SR700/700E/600/600E does not require memory preservation batteries. A built-in memory backup system preserves the contents of a few weeks after the last time the unit has been turned off Diagram for RC-482M Turning on the power from the remote controller Before you can ... first time, the TX-SR700/700E/600/ 600E will automatically enter the standby state and the STANDBY indicator will vary depending on the ambient climate. Press the RCVR MODE button. Press the ON button to a highly humid climate. 33 If this happens, use the remote controller, you must be...
...Canadian models) The TX-SR700/700E/600/600E does not require memory preservation batteries. A built-in memory backup system preserves the contents of a few weeks after the last time the unit has been turned off Diagram for RC-482M Turning on the power from the remote controller Before you can ... first time, the TX-SR700/700E/600/ 600E will automatically enter the standby state and the STANDBY indicator will vary depending on the ambient climate. Press the RCVR MODE button. Press the ON button to a highly humid climate. 33 If this happens, use the remote controller, you must be...
Owner Manual
Page 36
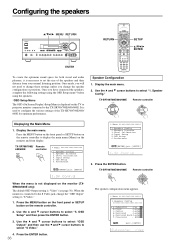
...*oiio*nsbn*ftrf*iaai*gntg*ci*eo*n****** 456...abcIOP...nSrSFCpDeureufbontSewnteroteSteoreunftpceuerp :Yes :Large :Large d.Surround :Large e.Surround Back:Large f.Crossover : 80Hz Quit:|SETUP| Speaker Config." TX-SR700/700E/ Remote 600/600E controller * Menu 1.Speaker Config 2.Speaker Distance 3.Level Calibration 4.Input Setup 5.OSD Setup 6.Preference |ENTER|Quit:|SETUP| * Menu 1.Speaker Config 2.Speaker Distance 3.Level Calibration 4.Input...
...*oiio*nsbn*ftrf*iaai*gntg*ci*eo*n****** 456...abcIOP...nSrSFCpDeureufbontSewnteroteSteoreunftpceuerp :Yes :Large :Large d.Surround :Large e.Surround Back:Large f.Crossover : 80Hz Quit:|SETUP| Speaker Config." TX-SR700/700E/ Remote 600/600E controller * Menu 1.Speaker Config 2.Speaker Distance 3.Level Calibration 4.Input Setup 5.OSD Setup 6.Preference |ENTER|Quit:|SETUP| * Menu 1.Speaker Config 2.Speaker Distance 3.Level Calibration 4.Input...
Owner Manual
Page 37
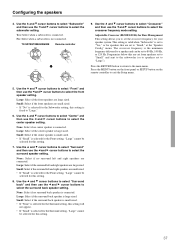
Yes: Select when a subwoofer is large sized. TX-SR700/700E/600/600E Remote controller 9. The crossover frequency is selected for the Front setting, "Large" cannot be set to "Small," at the "Speaker Config" menu. Frequencies below this setting. 7. Large: ... Surround setting, "Large" cannot be selected for speakers that are large sized. Press the MENU button on the front panel or SETUP button on the remote controller to the main menu. Use the and cursor buttons to select "Center" and then use the and cursor buttons to select the subwoofer setting. Use...
Yes: Select when a subwoofer is large sized. TX-SR700/700E/600/600E Remote controller 9. The crossover frequency is selected for the Front setting, "Large" cannot be set to "Small," at the "Speaker Config" menu. Frequencies below this setting. 7. Large: ... Surround setting, "Large" cannot be selected for speakers that are large sized. Press the MENU button on the front panel or SETUP button on the remote controller to the main menu. Use the and cursor buttons to select "Center" and then use the and cursor buttons to select the subwoofer setting. Use...
Owner Manual
Page 38
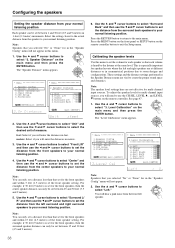
... to set the distance from the front speakers to select "Unit" and then use the CH SEL, LEVEL , and LEVEL buttons on the remote controller button to your normal listening position. Use the and cursor buttons to select "Left." Use the and cursor buttons to select "3. Note: The...dynamics. Use the and cursor buttons to your normal listening position. 4. Press the MENU button on the front panel or SETUP button on the remote controller. Calibrating the speaker levels Use this menu. 1. Level Calibration" on the main menu and then press the ENTER button. feet: Select if ...
... to set the distance from the front speakers to select "Unit" and then use the CH SEL, LEVEL , and LEVEL buttons on the remote controller button to your normal listening position. Use the and cursor buttons to select "Left." Use the and cursor buttons to select "3. Note: The...dynamics. Use the and cursor buttons to your normal listening position. 4. Press the MENU button on the front panel or SETUP button on the remote controller. Calibrating the speaker levels Use this menu. 1. Level Calibration" on the main menu and then press the ENTER button. feet: Select if ...


